IDEA把css/js压缩成一行min文件,idea实现右键压缩css和js文件

前言

发布时有些css和js文件较长多行,导致加载的时候略慢,所以想把指定的css或js压缩

实现

整合 yuicompressor-2.4.8.jar
下载地址1:https://github.com/yui/yuicompressor/releases
下载地址2:https://github.com/yui/yuicompressor/releases/download/v2.4.8/yuicompressor-2.4.8.jar
下载后将文件存储到本地某个路径下,下面等会使用

打开IDEA

打开Settings窗口(左上角File ->Settings)
然后如图所示操作Tools->External Tools,点击加号添加
在这里插入图片描述
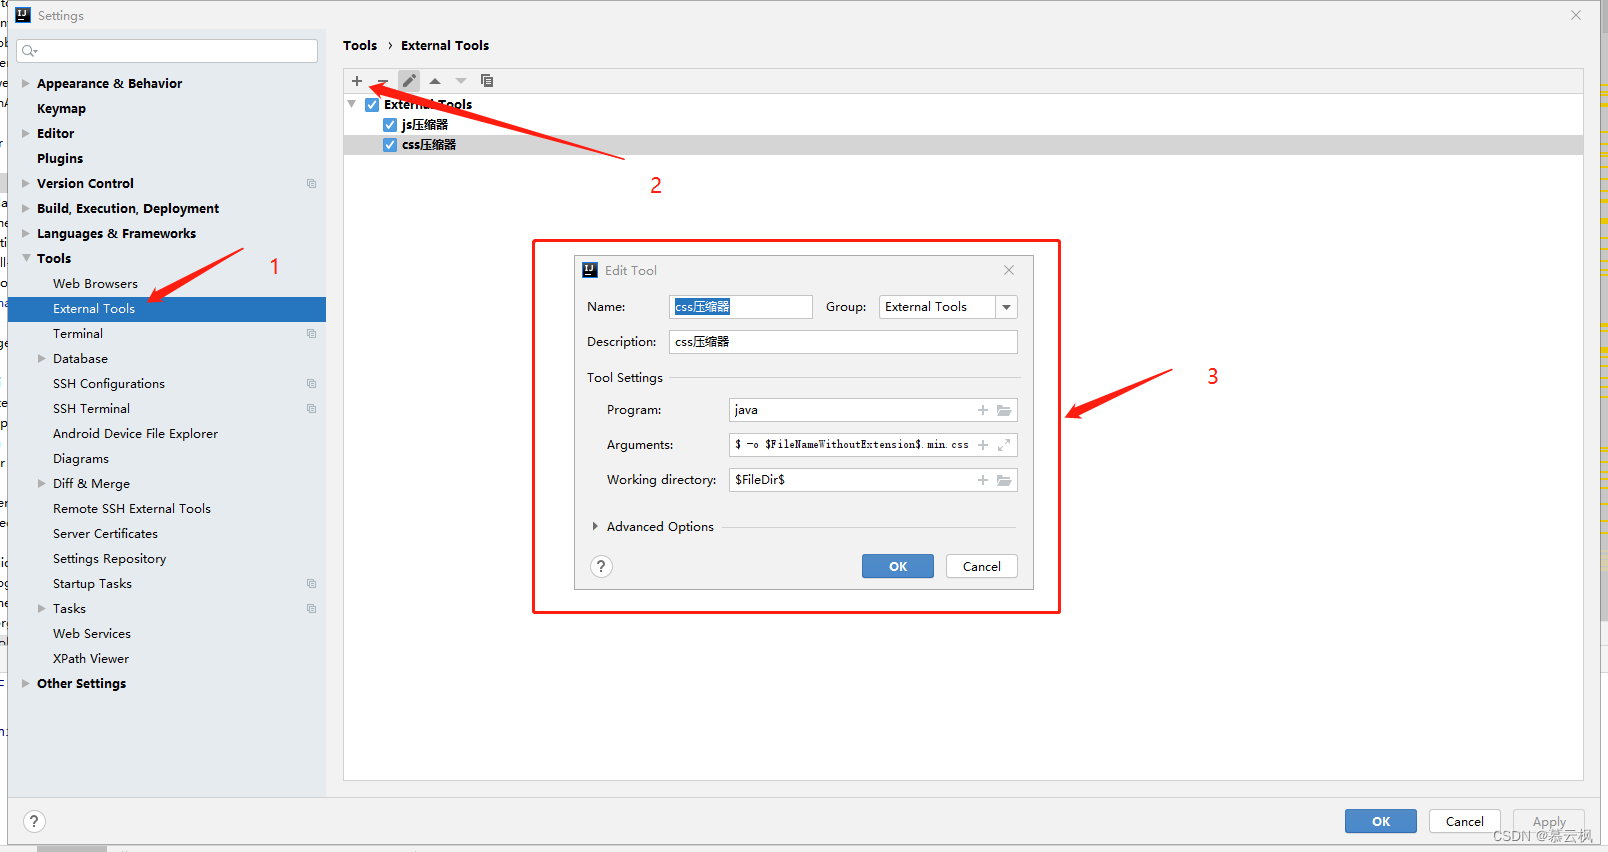
前面的name和Description自定义

Program

java

Arguments
css 的用这个

-jar F:\Development-Tools\yuicompressor-2.4.8.jar --type css --charset utf-8 $FilePath$ -o $FileNameWithoutExtension$.min.css

js 的用这个

-jar F:\Development-Tools\yuicompressor-2.4.8.jar --type js --charset utf-8 $FilePath$ -o $FileNameWithoutExtension$.min.js

F:\Development-Tools\yuicompressor-2.4.8.jar 这个路径就是你下载的那个jar本地路径
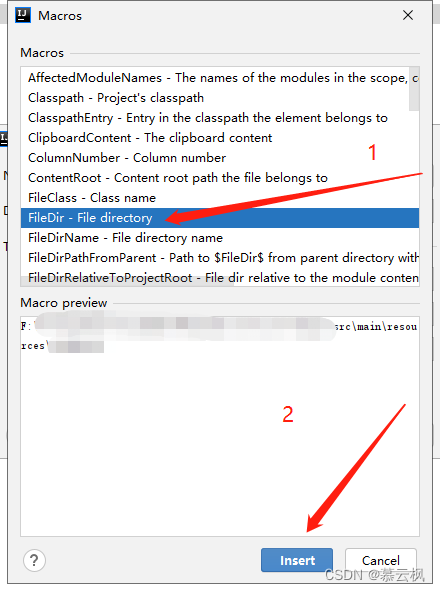
Working directory
点击框架中右边 + 加号
在这里插入图片描述
再点击OK,然后重启IDEA
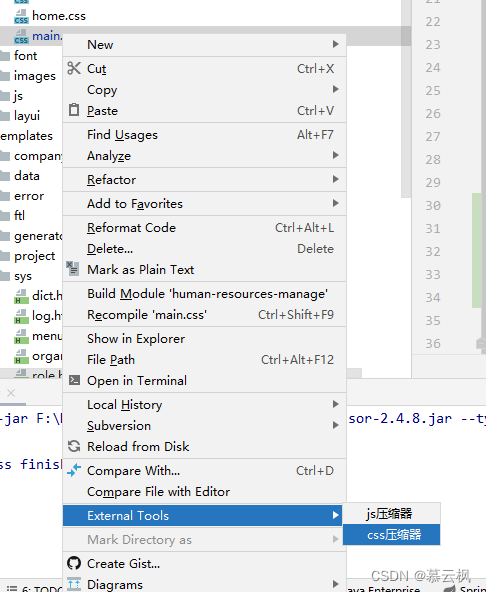
重启后,选择css或js文件右键,如下操作

在这里插入图片描述
生成后
在这里插入图片描述
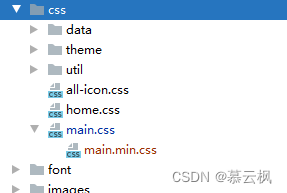
双击min文件打开就可以看到效果了,生成后的min文件与原文件同级路径
在这里插入图片描述
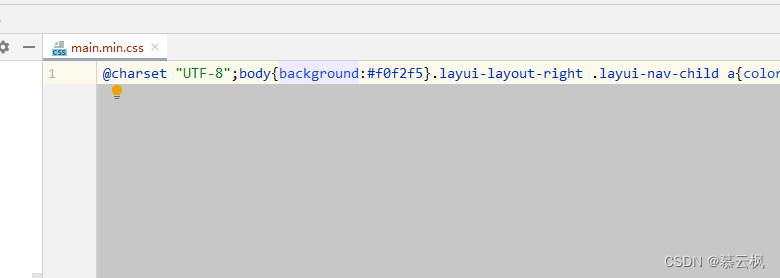
注:压缩后的min文件里面原来有的注释是会清除的,所以原文件建议备份

  • 1
    点赞
  • 10
    收藏
    觉得还不错? 一键收藏
  • 0
    评论
很抱歉,我无法在这里提供完整的代码和配置,因为这需要较多的篇幅和时间来完成。但是,我可以提供一些参考和指导来帮助你完成这个项目。 首先,你需要创建一个MySQL数据库,包含一个名为"book"的表,该表包含id、name、author、price和description等字段。可以使用以下SQL语句来创建该表: ``` CREATE TABLE book ( id int(11) NOT NULL AUTO_INCREMENT, name varchar(50) DEFAULT NULL, author varchar(50) DEFAULT NULL, price double(10,2) DEFAULT NULL, description varchar(200) DEFAULT NULL, PRIMARY KEY (id) ) ENGINE=InnoDB DEFAULT CHARSET=utf8mb4; ``` 然后,你需要在Spring中配置Mybatis,以便从Java代码中访问该数据库。可以在applicationContext.xml文件中添加以下配置: ``` <!-- 配置Mybatis --> <bean id="sqlSessionFactory" class="org.mybatis.spring.SqlSessionFactoryBean"> <property name="dataSource" ref="dataSource"/> <property name="configLocation" value="classpath:mybatis-config.xml"/> </bean> <bean class="org.mybatis.spring.mapper.MapperScannerConfigurer"> <property name="basePackage" value="com.example.mapper"/> </bean> <!-- 配置数据源 --> <bean id="dataSource" class="org.apache.commons.dbcp.BasicDataSource"> <property name="driverClassName" value="com.mysql.cj.jdbc.Driver"/> <property name="url" value="jdbc:mysql://localhost:3306/book?useUnicode=true&characterEncoding=utf-8&useSSL=false&serverTimezone=Asia/Shanghai"/> <property name="username" value="root"/> <property name="password" value="123456"/> </bean> ``` 其中,mybatis-config.xml文件包含了Mybatis的其他配置,可以在该文件中添加以下内容: ``` <?xml version="1.0" encoding="UTF-8"?> <!DOCTYPE configuration PUBLIC "-//mybatis.org//DTD Config 3.0//EN" "http://mybatis.org/dtd/mybatis-3-config.dtd"> <configuration> <settings> <setting name="cacheEnabled" value="true"/> <setting name="lazyLoadingEnabled" value="true"/> </settings> <typeAliases> <package name="com.example.entity"/> </typeAliases> <mappers> <mapper class="com.example.mapper.BookMapper"/> </mappers> </configuration> ``` 在该项目中,你需要创建一个Book实体类来表示图书信息,可以使用以下代码: ``` public class Book { private Integer id; private String name; private String author; private Double price; private String description; // 省略getter和setter方法 } ``` 为了将该实体类映射到数据库中,你需要创建一个BookMapper接口和一个BookMapper.xml文件。可以使用以下代码: ``` public interface BookMapper { List<Book> findAll(); void insert(Book book); void update(Book book); void delete(Integer id); Book findById(Integer id); } ``` ``` <?xml version="1.0" encoding="UTF-8"?> <!DOCTYPE mapper PUBLIC "-//mybatis.org//DTD Mapper 3.0//EN" "http://mybatis.org/dtd/mybatis-3-mapper.dtd"> <mapper namespace="com.example.mapper.BookMapper"> <resultMap type="com.example.entity.Book" id="book"> <id column="id" property="id"/> <result column="name" property="name"/> <result column="author" property="author"/> <result column="price" property="price"/> <result column="description" property="description"/> </resultMap> <select id="findAll" resultMap="book"> select * from book </select> <insert id="insert"> insert into book(name, author, price, description) values(#{name}, #{author}, #{price}, #{description}) </insert> <update id="update"> update book set name=#{name}, author=#{author}, price=#{price}, description=#{description} where id=#{id} </update> <delete id="delete"> delete from book where id=#{id} </delete> <select id="findById" resultMap="book"> select * from book where id=#{id} </select> </mapper> ``` 最后,你需要创建一个BookController类来处理Web请求,并使用Thymeleaf模板引擎来渲染页面。可以使用以下代码: ``` @Controller public class BookController { @Autowired private BookMapper bookMapper; @GetMapping("/") public String index(Model model) { List<Book> books = bookMapper.findAll(); model.addAttribute("books", books); return "index"; } @GetMapping("/add") public String add() { return "add"; } @PostMapping("/save") public String save(Book book) { bookMapper.insert(book); return "redirect:/"; } @GetMapping("/edit/{id}") public String edit(@PathVariable Integer id, Model model) { Book book = bookMapper.findById(id); model.addAttribute("book", book); return "edit"; } @PostMapping("/update") public String update(Book book) { bookMapper.update(book); return "redirect:/"; } @GetMapping("/delete/{id}") public String delete(@PathVariable Integer id) { bookMapper.delete(id); return "redirect:/"; } } ``` 在resources/templates目录下,你需要创建以下Thymeleaf模板文件: index.html: ``` <!DOCTYPE html> <html xmlns:th="http://www.thymeleaf.org"> <head> <meta charset="UTF-8"> <title>图书管理系统</title> <link rel="stylesheet" href="https://cdn.bootcdn.net/ajax/libs/twitter-bootstrap/4.6.0/css/bootstrap.min.css"> </head> <body> <div class="container-fluid"> <div class="row"> <div class="col-md-12"> <h2>图书列表</h2> <hr> <div class="text-right"> <a href="/add" class="btn btn-primary">添加图书</a> </div> <table class="table table-bordered table-striped"> <thead> <tr> <th>编号</th> <th>书名</th> <th>作者</th> <th>价格</th> <th>描述</th> <th>操作</th> </tr> </thead> <tbody> <tr th:each="book : ${books}"> <td th:text="${book.id}"></td> <td th:text="${book.name}"></td> <td th:text="${book.author}"></td> <td th:text="${book.price}"></td> <td th:text="${book.description}"></td> <td> <a th:href="@{/edit/{id}(id=${book.id})}" class="btn btn-info btn-sm">编辑</a> <a th:href="@{/delete/{id}(id=${book.id})}" class="btn btn-danger btn-sm" onclick="return confirm('确定要删除吗?')">删除</a> </td> </tr> </tbody> </table> </div> </div> </div> </body> </html> ``` add.html: ``` <!DOCTYPE html> <html xmlns:th="http://www.thymeleaf.org"> <head> <meta charset="UTF-8"> <title>添加图书</title> <link rel="stylesheet" href="https://cdn.bootcdn.net/ajax/libs/twitter-bootstrap/4.6.0/css/bootstrap.min.css"> </head> <body> <div class="container-fluid"> <div class="row"> <div class="col-md-12"> <h2>添加图书</h2> <hr> <form th:action="@{/save}" method="post"> <div class="form-group"> <label>书名:</label> <input type="text" name="name" class="form-control" required> </div> <div class="form-group"> <label>作者:</label> <input type="text" name="author" class="form-control" required> </div> <div class="form-group"> <label>价格:</label> <input type="number" name="price" class="form-control" step="0.01" required> </div> <div class="form-group"> <label>描述:</label> <textarea name="description" class="form-control" rows="3" required></textarea> </div> <div class="text-right"> <button type="submit" class="btn btn-primary">保存</button> <a href="/" class="btn btn-secondary">取消</a> </div> </form> </div> </div> </div> </body> </html> ``` edit.html: ``` <!DOCTYPE html> <html xmlns:th="http://www.thymeleaf.org"> <head> <meta charset="UTF-8"> <title>编辑图书</title> <link rel="stylesheet" href="https://cdn.bootcdn.net/ajax/libs/twitter-bootstrap/4.6.0/css/bootstrap.min.css"> </head> <body> <div class="container-fluid"> <div class="row"> <div class="col-md-12"> <h2>编辑图书</h2> <hr> <form th:action="@{/update}" method="post"> <input type="hidden" name="id" th:value="${book.id}"> <div class="form-group"> <label>书名:</label> <input type="text" name="name" class="form-control" th:value="${book.name}" required> </div> <div class="form-group"> <label>作者:</label> <input type="text" name="author" class="form-control" th:value="${book.author}" required> </div> <div class="form-group"> <label>价格:</label> <input type="number" name="price" class="form-control" step="0.01" th:value="${book.price}" required> </div> <div class="form-group"> <label>描述:</label> <textarea name="description" class="form-control" rows="3" th:text="${book.description}" required></textarea> </div> <div class="text-right"> <button type="submit" class="btn btn-primary">保存</button> <a href="/" class="btn btn-secondary">取消</a> </div> </form> </div> </div> </div> </body> </html> ``` 最后,你需要在pom.xml文件中添加以下依赖: ``` <dependencies> <dependency> <groupId>org.springframework.boot</groupId> <artifactId>spring-boot-starter-web</artifactId> </dependency> <dependency> <groupId>org.springframework.boot</groupId> <artifactId>spring-boot-starter-thymeleaf</artifactId> </dependency> <dependency> <groupId>org.mybatis.spring.boot</groupId> <artifactId>mybatis-spring-boot-starter</artifactId> <version>2.2.0</version> </dependency> <dependency> <groupId>mysql</groupId> <artifactId>mysql-connector-java</artifactId> <version>8.0.29</version> </dependency> <dependency> <groupId>commons-dbcp</groupId> <artifactId>commons-dbcp</artifactId> <version>1.4</version> </dependency> </dependencies> ``` 以上就是一个简单的图书管理系统的实现,希望能对你有所帮助。

“相关推荐”对你有帮助么?

  • 非常没帮助
  • 没帮助
  • 一般
  • 有帮助
  • 非常有帮助
提交
评论
添加红包

请填写红包祝福语或标题

红包个数最小为10个

红包金额最低5元

当前余额3.43前往充值 >
需支付:10.00
成就一亿技术人!
领取后你会自动成为博主和红包主的粉丝 规则
hope_wisdom
发出的红包
实付
使用余额支付
点击重新获取
扫码支付
钱包余额 0

抵扣说明:

1.余额是钱包充值的虚拟货币,按照1:1的比例进行支付金额的抵扣。
2.余额无法直接购买下载,可以购买VIP、付费专栏及课程。

余额充值