


uni-app 多端开发
- 一、命令创建uni-app 项目 [官网地址](https://zh.uniapp.dcloud.io/quickstart-cli.html)
- 二、在微信小程序后台找到 appId 填写 appId
- 三、运行项目
- 四、使用 uni-ui
- 五、持久化 pinia(vuex)
- 六、数据请求封装
- 七、获取组件的实例类型
- 八、上拉加载更多
- 九、TS 类型
- 十、页面滚动动画 animate 使用
- 十一、不同平台间条件渲染
- 十二、uni-app在 安卓 手机上预览
- 十三、uni-app打包 apk 安装包
- 十四、uni-app 在 ios 上运行和打包
- 十五、uni-app 在 ios 打包
- 十六、uni-app 跨端兼容(css)
- 十七、uni-app 跨端兼容(组件)
- 十八、uni-app(vue3语法)配置eslint + prettier
- 十九、uni-app(vue3语法)配置 husky
- 二十、uni-app 中的安全区域(flutter中的 Safarea)
- 二十一、TS中的 方法 定义需要的数据类型
- 二十二、TS 类型创建和引用
- 二十三、TS 在定义对象的时候注意事项
- 二十四、uni-app获取dom元素
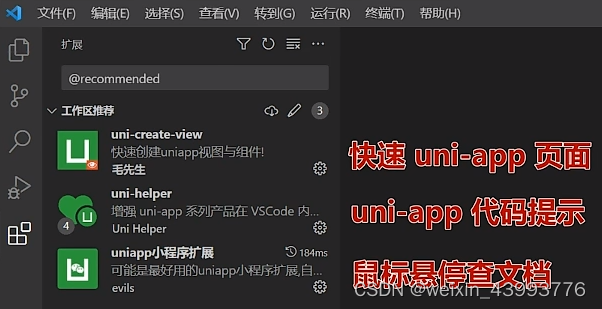
开场白: 要是在 vscode 书写代码, 需要添加 几个插件来支持 uni-app
到此 js 的 项目就可以了
但是 ts 的项目需要类型检查
下载两个 pnpm i -D @types/wechat-miniprogram @uni-helper/uni-app-types (这两个是用来检查 ts 的uni-app项目)
然后再tsconfig.json 配置文件中 types 数组追加
“types”: [“@dcloudio/types”, “@types/wechat-miniprogram”, “@uni-helper/uni-app-types”]
// tsconfig.json 此时的完整配置
{
  "extends": "@vue/tsconfig/tsconfig.json",
  "compilerOptions": {
    "sourceMap": true,
    "baseUrl": ".",
    "paths": {
      "@/*": ["./src/*"]
    },
    "lib": ["esnext", "dom"],
    "types": [
    	"@dcloudio/types",
    	"@types/wechat-miniprogram",   // 新加
    	"@uni-helper/uni-app-types"    // 新加
   	]
  },
  // 新加
  "vueCompilerOptions": {
    // "experimentalRuntimeMode": "runtime-uni-app"  // 已经弃用
    "nativeTags": ["block", "component", "template", "slot"]
  },
  "include": ["src/**/*.ts", "src/**/*.d.ts", "src/**/*.tsx", "src/**/*.vue"]
}
json 文件不能添加注释
解决
vscode 设置
搜索 Associations 关键字
将 pages.json 和 manifest.json 文件配置进去即可
一、命令创建uni-app 项目 官网地址
npx degit dcloudio/uni-preset-vue#vite-ts my-vue3-project
二、在微信小程序后台找到 appId 填写 appId
三、运行项目
运行命令: pnpm dev:mp-weixin,会生成dist 文件目录,导入到微信开发者工具查看
四、使用 uni-ui
官网地址:uni-app 官网 使用uni-ui
4-1、下载
npm i @dcloudio/uni-ui 或 yarn add @dcloudio/uni-ui
4-2、自动导入
// pages.json
{
	// 自动导包配置
	"easycom": {
		"autoscan": true,
		"custom": {
			// uni-ui 规则如下配置
			"^uni-(.*)": "@dcloudio/uni-ui/lib/uni-$1/uni-$1.vue"
		}
	},

	// 其他内容
	pages:[
		// ...
	]
}
4-3、ts项目下载类型校验 (uni-ui 组件库)
uni-helper/uni-ui-types
后面的所有的点击事件对象都可以用 UniHelper 提供的类型
<swiper @change="onChange">
	<swiper-item>...</swiper-item>
	<swiper-item>...</swiper-item>
</swiper>

// js
const onChange: UniHelper.SwiperOnChange = (event) => {
	//  UniHelper.SwiperOnChange  这样 event 里面的所有的类型都有了
}
4-3-1、下载
pnpm i -D uni-helper/uni-ui-types
4-3-2、配置
在 tsconfig.json 文件中 compilerOptions 配置上
"compilerOptions": {
   "allowJs": true,
    "sourceMap": true,
    "baseUrl": ".",
    "paths": {
        "@/*": ["./src/*"]
    },
    "lib": ["esnext", "dom"],
    "types": [
        "@dcloudio/types",
        "miniprogram-api-typings",
        "@uni-helper/uni-app-types",
        "@uni-helper/uni-ui-types"   // 配置的uni-ui类型,书写标签时,鼠标划上之后有代码提示
    ]
},
五、持久化 pinia(vuex)
pinia 的使用和 vue3 一样 pinia配置,只是持久化的时候需要改一下
// TODO: 持久化
{
     persist: {
         storage: {
             getItem(key) {
                 return uni.getStorageSync(key)
             },
             setItem(key, value) {
                 uni.setStorageSync(key, value)
             },
         },
     },
 },
vuex的持久化
在vue2中
yarn add vuex-persistedstate
在store/index.js文件中
import vuexPersistedstate from 'vuex-persistedstate'
modules: {},
plugins: [vuexPersistedstate({
		// 小程序开发中使用的方式

       // storage: { // 存储方式定义
       //     getItem: (key) => uni.getStorageSync(key), // 获取
       //     setItem: (key, value) => uni.setStorageSync(key, value), // 存储
       //     removeItem: (key) => uni.removeStorageSync(key) // 删除
       // }

		// 网页开发使用的方式
       key: 'custom',  // 修改 存在前端本地的 key
       storage: window.sessionStorage  // 修改存在 local 还是 session 里面
 })]
六、数据请求封装
utils包里面创建 http.ts 文件
// http.ts

import { useMemberStore } from '@/stores'  // store 取 token

const baseUrl = 'https://pcapi-xiaotuxian-front-devtest.itheima.net'

// 拦截器
const httpInterceptor = {
    // 拦截前触发
    invoke(options: UniApp.RequestOptions) {
        options.url = baseUrl + options.url
        options.timeout = 10000
        options.header = {
            ...options.header,
            'source-client': 'miniapp',
        }
        const memStore = useMemberStore()
        const token = memStore.profile?.token
        if (token) {
            options.header.Authorization = token
        }
    },
}
// 添加 request 请求拦截 和 文件上传拦截
uni.addInterceptor('request', httpInterceptor)
uni.addInterceptor('uploadFile', httpInterceptor)

// 封装响应
interface Data<T> {
    code: string
    message: string
    result: T
}
export const http = <T>(options: UniApp.RequestOptions) => {  // http 函数接受 泛型<T>,由调用 http 函数地方传进来
    return new Promise<Data<T>>((resolve, reject) => {  // Promise 响应数据进行泛型约束,Data 在上面定义好了,只有 result 类型会变化,所以从 http 函数调用者传进来
        uni.request({
            ...options,
            success(response) {
                if (response.statusCode >= 200 && response.statusCode < 300) {
                    resolve(response.data as Data<T>)
                } else {
                    uni.showToast({ icon: 'none', title: '请求错误' })
                    reject(response)
                }
            },
            fail(err) {
                uni.showToast({ icon: 'none', title: '服务器异常' })
                reject(err)
            },
        })
    })
}
在 api / index.ts 目录下
import { http } from '@/utils/http'

/**
 * 首页轮播图
 * @param distributionSite 区分首页还是分类页面
 * @returns promise
 */
export const getHomeBannerAPI = (data: Banner ) => {
    return http<BannerItem[]>({
        url: '/home/banner',
        method: 'GET',
        data
    })
}
在组件中正常使用就好了
七、获取组件的实例类型
<Son ref='sonComponent' />

const sonComponent = ref<InstanceType<typeof Son>>()  // typeof xxx 组件类型  InstanceType 获取的是实例类型

sonComponent.value.getMore  // 父组件拿到子组件的属性和方法
子组件需要暴露出来(vue3中)
defineExpose({
    getMore: getGuessData   // 前面定义的名字,让父组件拿到, 后面是子组件中的属性和方法
})
八、上拉加载更多
// 分页参数
const params = {
	currrentPage: 1,
	pageSize: 10
}
// 定义的数组
const tableDataList = ref([])
// 是否加载完数据
const isFinish = ref(false)
// 加载中状态
let isLoading = false
// 页面和加载更多方法
const getDataList = async (params) => {
	if(isLoading || isFinish.value) return   // 加载中或者数据没有加载完, 都不进行请求数据
	isLoading = true   // 请求数据制成 true
	const res = await API(params)
	tableDataList.value = [...tableDataList.value, res.result.list]   // 数据拼接
	isLoading = false   // 数据回来,加载中的状态制成 false

	// 判断要是当前的页码大于等于列表数据的总页码,停止加载(数据加载完了)
	if(params.currentPage >= res.result.pages) {
		isFinish.value = true  // 数据加载完了
		return uni.showToast({title: "数据加载完了", icon: "none"})
	}

	params.currentPage++  // 加载下一页的数据
}
九、TS 类型
1、检出一个类型中的某几个字段
type baseItem = {
	name: string
	age: number
	job: string
	address: string
}

// 这个类型有上面的 baseItem 类型的某几个类型, 同时又有新的类型
type userInfoItem = Pick<baseItem, "name" | "age" > & {
	sex: "男" | "女"
	like: string
}
2、将类型变成可选参数( partial )
type test1 = {
    name: string
    age: number
    sex: Date
}

type test2 = Partial<test1>

test2 类型就变成了可选字段了
3、将可选类型变成必选类型( Required )
type test1 = {
    name?: string
    age?: number
    sex?: Date
}

type test3 = Required<test1>
十、页面滚动动画 animate 使用
类似于这种效果
this.animate("需要动画的选择器", [{opacity: 1}, {opacity: 0}], 1000, {scrollSource: '', ....})
注: 在 vue3 模板语法中获取this(当前页面实例)
const pageList = getCurrentPages()
const currentPageInstance = pageList[pageList .length - 1]
currentPageInstance 就相当于 this
十一、不同平台间条件渲染
<!-- #ifdef APP-PLUS -->
   app 语法
<!-- #endif -->

<!-- #ifdef H5 -->
   h5 网页
<!-- #endif -->

<!-- #ifdef MP-WEIXIN -->
   微信小程序语法
<!-- #endif -->

<!-- #ifdef MP-WEIXIN || H5 -->
   微信小程序语法和 H5
<!-- #endif -->

// 以上 js  ts  html  css  json  scss 都支持
十二、uni-app在 安卓 手机上预览
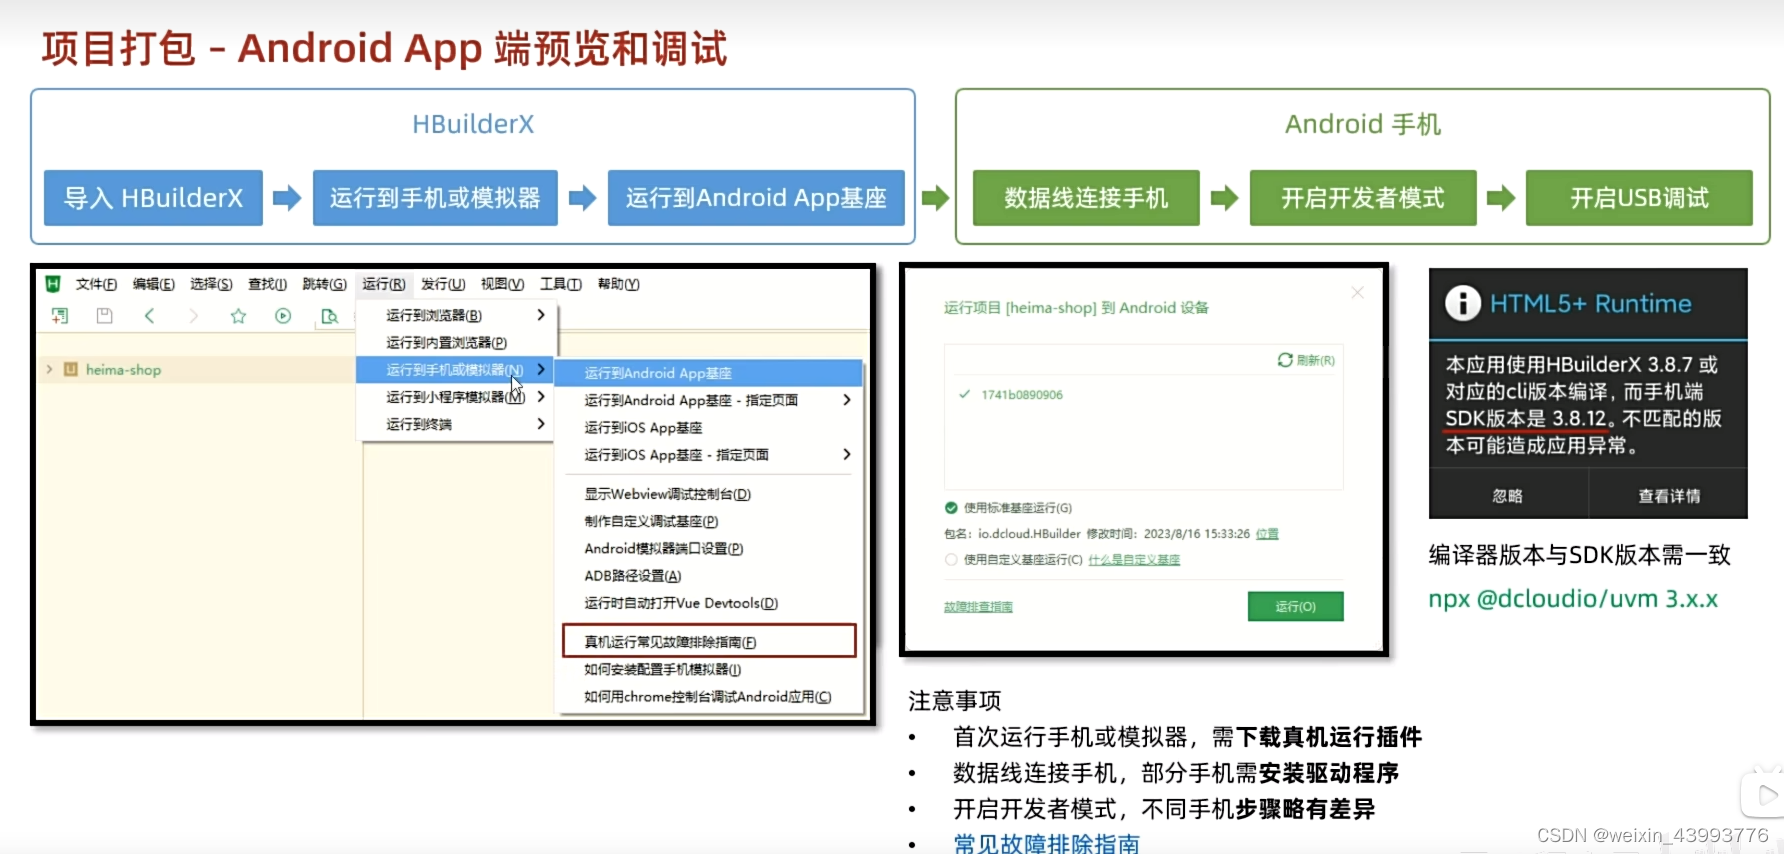
注: adb 问题需要找到 HBuildx 安装目录
D:\selfSoft\software\HBuilderX.3.3.13.20220314\HBuilderX\plugins\launcher-tools\tools\adbs 我的安装目录谁这样的
将文件夹(1.0.31)里面的三个文件复制到外面
还是报错 就将(1.0.36)文件夹里面的三个文件复制到外面
如果出现上图最右面的 HTML5+ Runtime 黑框 就是 package.json里面的依赖版本和 HBuildx 版本不一致导致的
查看 HBuildx官网 升级项目依赖就可以了 npx @dcloudio/uvm@latest 3.2.0
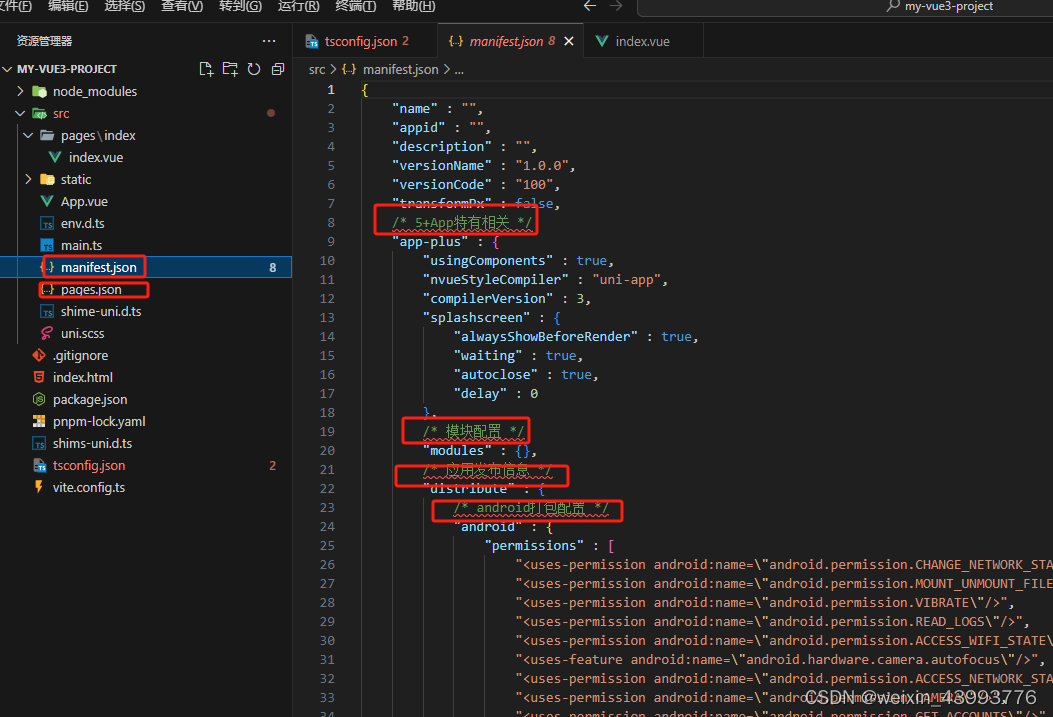
十三、uni-app打包 apk 安装包
配置manifest.json
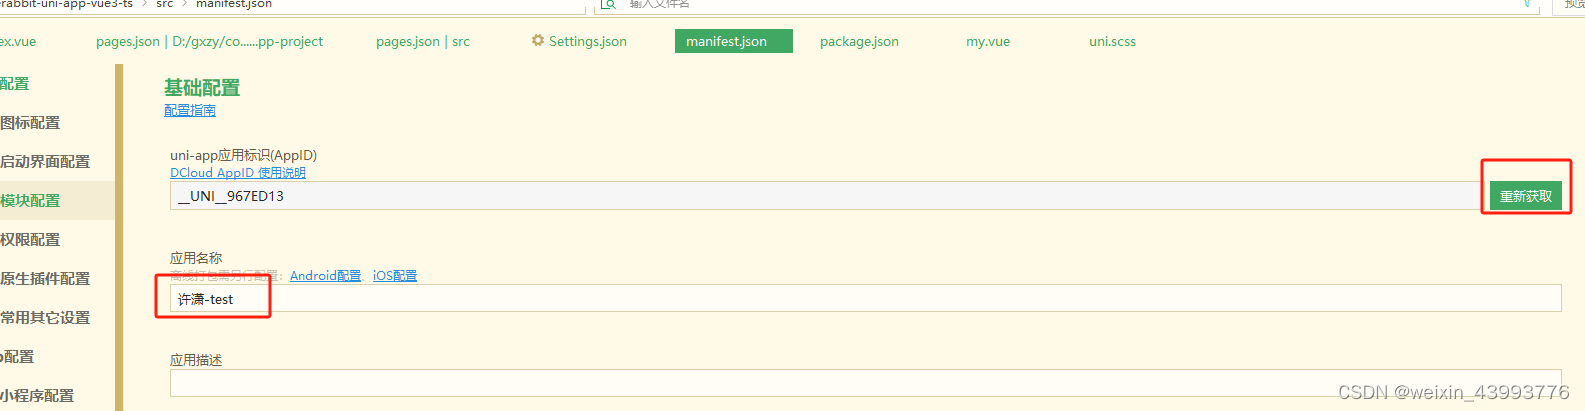

配置好 appid 和 app 的图标,应用名称之后开始下面的步骤
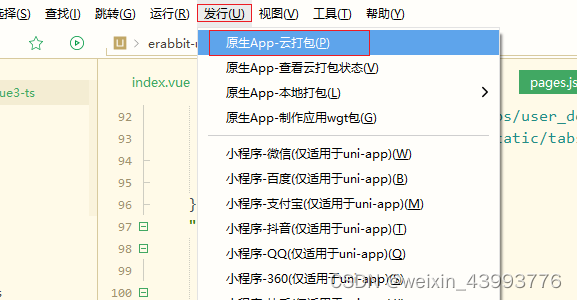
进入 HBuildx 发行 原生APP云打包
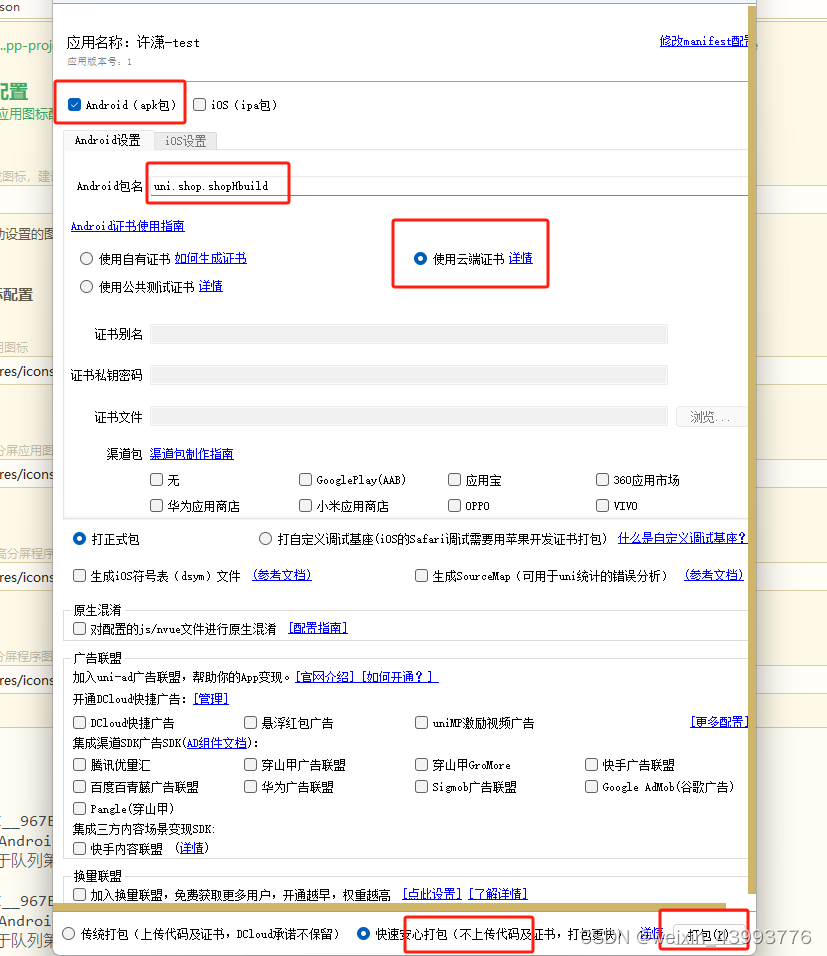
使用云端证书,点击后面的详情按钮会跳转到一个网页上面 (https://ask.dcloud.net.cn/article/35985#server)
点击DCloud 开发着中心 按钮
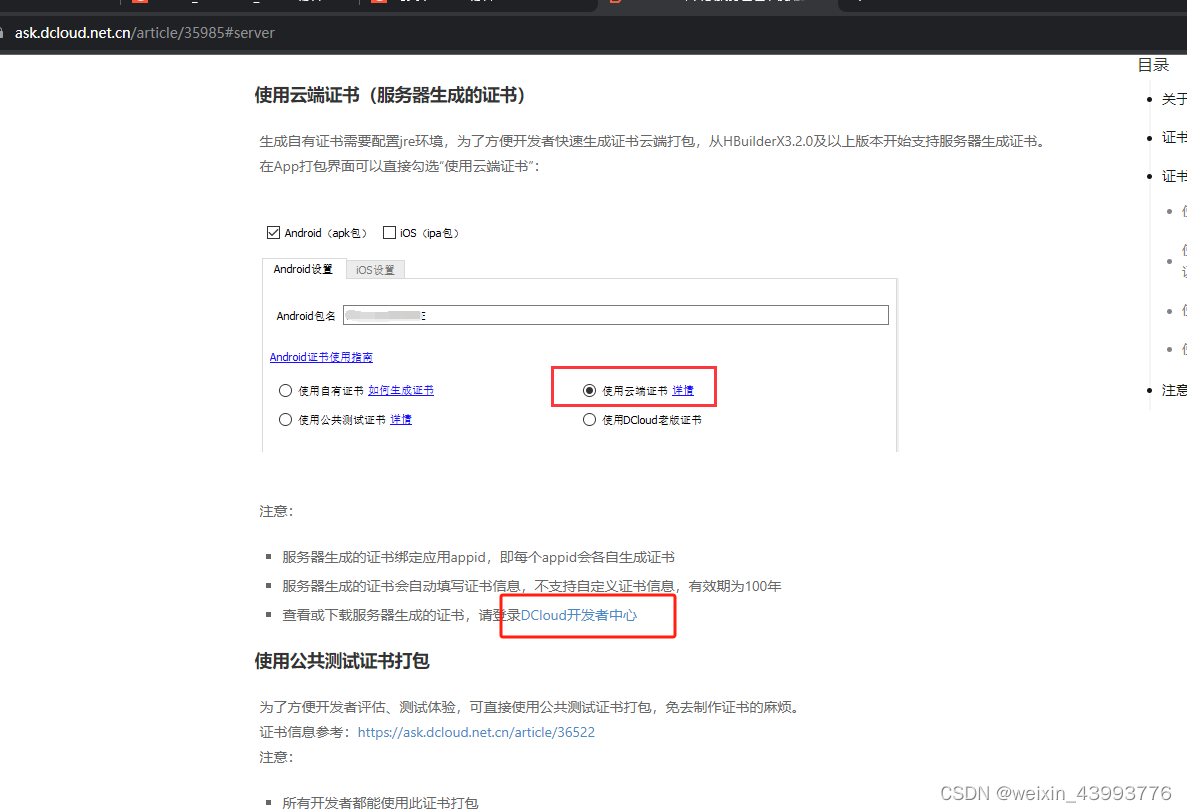
然后点击应用名称

点击安卓云端证书

点击生成证书等待就 可以了
证书生成之后就点击Hbuildx 上的打包按钮等待即可
十四、uni-app 在 ios 上运行和打包
在 mac 本上操作
首先安装 Xcode 软件,Xcode就是一个模拟器,可以模拟 iPhone 任何版本的手机

点击运行
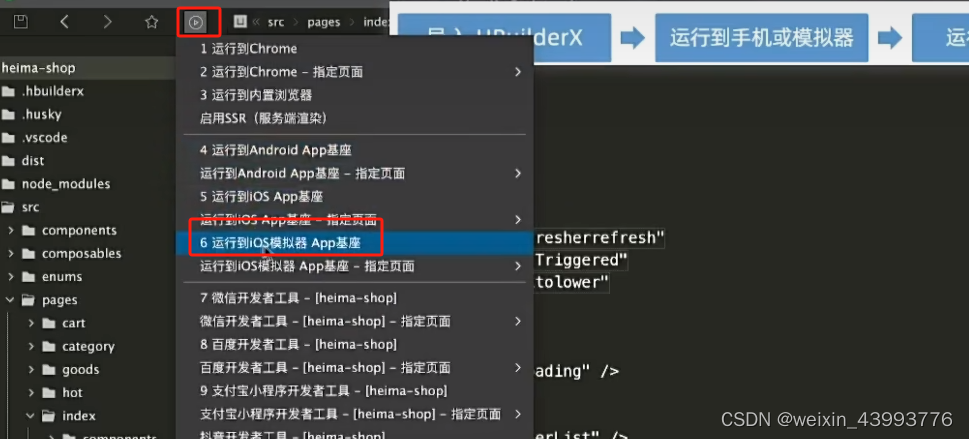
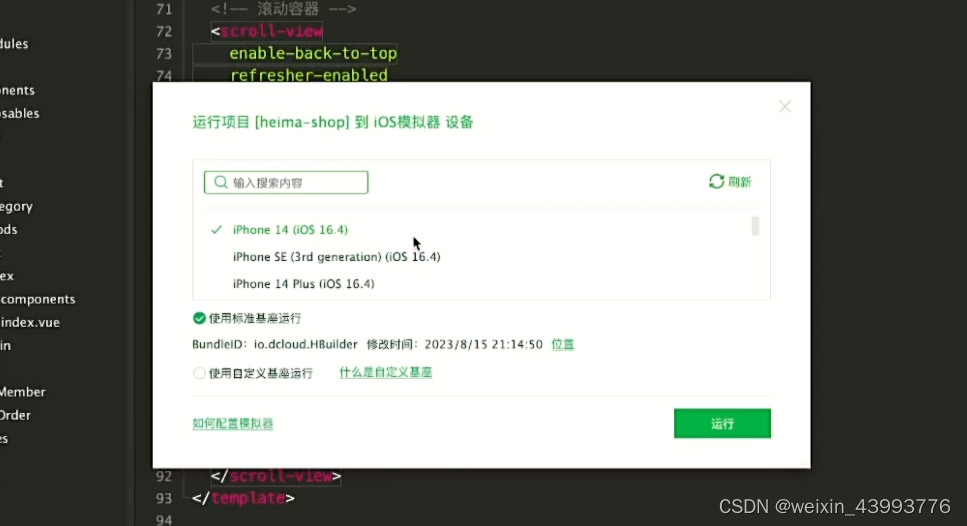
点击运行就可以在ios模拟器上运行项目了
十五、uni-app 在 ios 打包
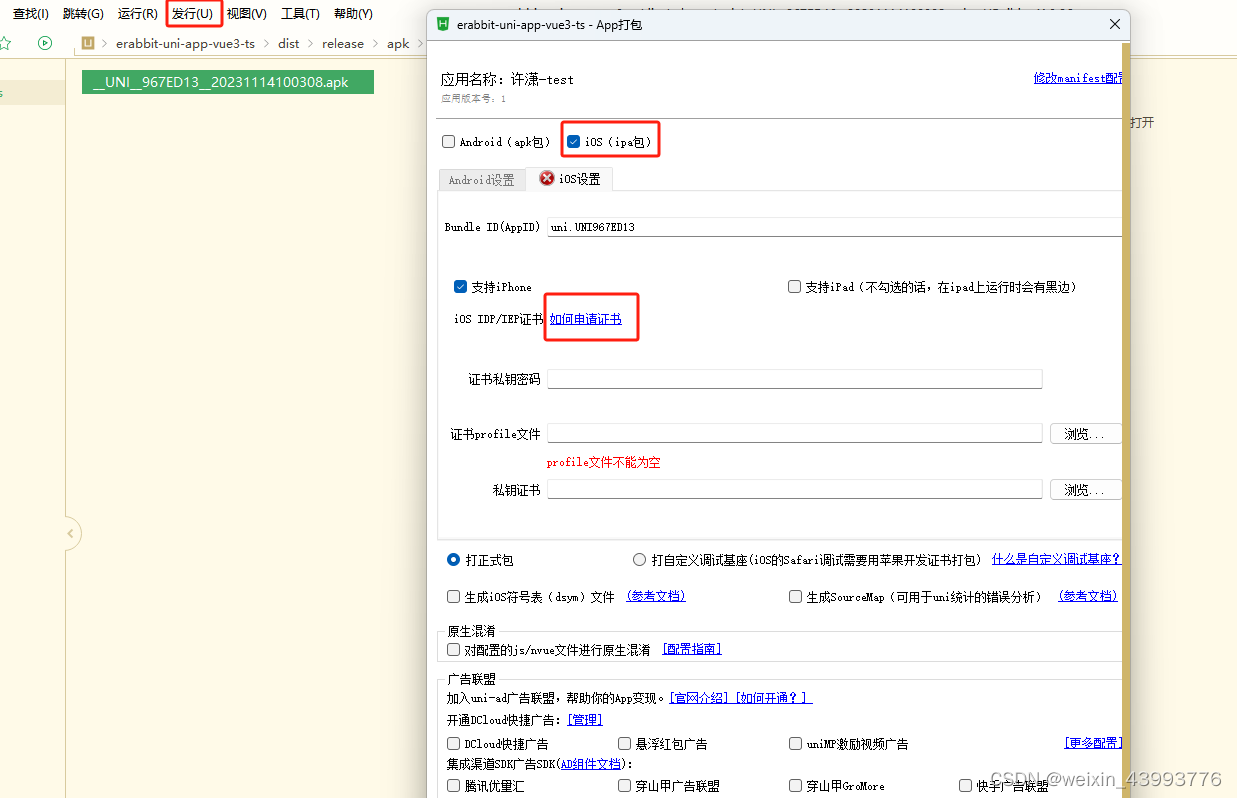
ios 打包 在申请证书的时候需要钱,其它的步骤和安卓一样
十六、uni-app 跨端兼容(css)
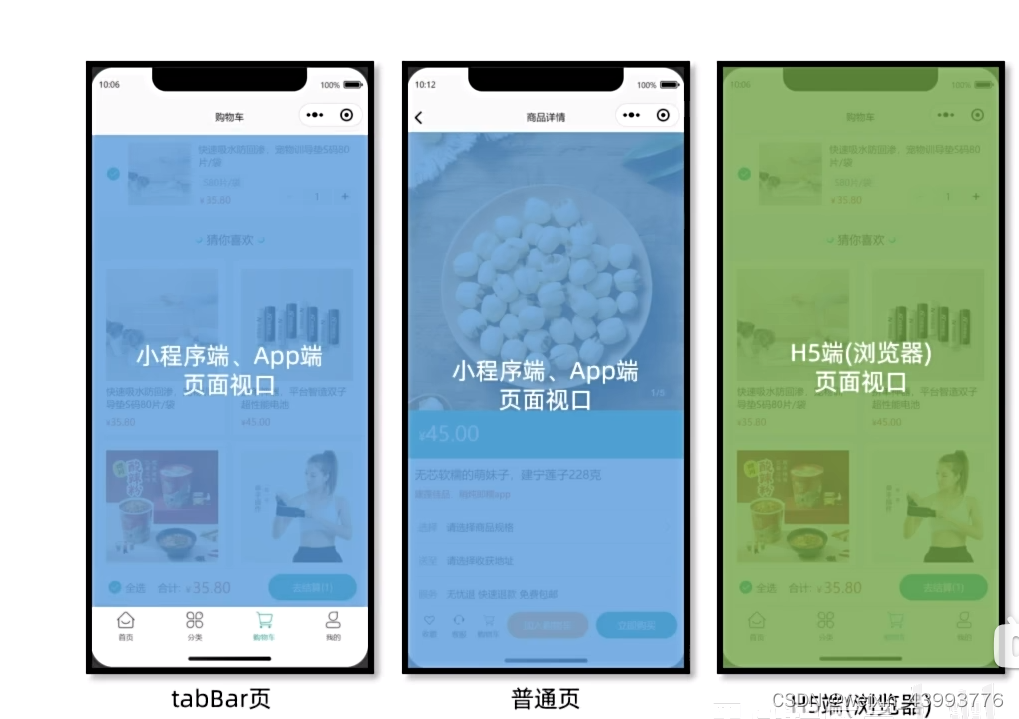
1、上图 APP 和 小程序 的可视窗口是有颜色的部分(去掉 tabbar 和 navigateBar),H5页面是整个手机的高度
所以在每个页面中尽量
page{
	height: 100%;
}
2、定位的时候需要注意:
直接写 bottom: 0; 在H5端不行的,
使用uni-app 提供的css 内置的变量 --window-bottom
官方链接
3、uni-app 在 H5端和APP端默认 scoped是打开的,这就造成了用微信小程序生成的骨架屏样式问题
需要将样式抽离出去
@import “./style/xxx.scss” 引进来
4、vue3 语法尽量还是将模板放到一个根标签中,避免不必要的样式错乱问题
十七、uni-app 跨端兼容(组件)
wx.login()
wx.requestPayment()
button 按钮中 open-type
等等都是微信小程序中特有的, 放在 H5 端 和 APP 端没有效果
十八、uni-app(vue3语法)配置eslint + prettier
安装依赖
pnpm i -D eslint prettier eslint-plugin-vue @vue/eslint-config-prettier @vue/eslint-config-typescript @rushstack/eslint-patch @vue/tsconfig
项目根目录创建 .eslintrc.js 和 .prettierrc.json 文件
// eslintrc.js 文件

/* eslint-env node */
require("@rushstack/eslint-patch/modern-module-resolution")

module.exports = {
    root: true,
    extends: [
        "plugin:vue/vue3-essential",
        "eslint:recommended",
        "@vue/eslint-config-typescript",
        "@vue/eslint-config-prettier",
    ],
    // 小程序全局变量
    globals: {
        uni: true,
        wx: true,
        WechatMiniprogram: true,
        getCurrentPages: true,
        getApp: true,
        UniApp: true,
        UniHelper: true,
        App: true,
        Page: true,
        Component: true,
        AnyObject: true,
    },
    parserOptions: {
        ecmaVersion: "latest",
    },
    rules: {
        "prettier/prettier": [
            "warn",
            {
                singleQuote: false,
                semi: false,
                printWidth: 100,
                trailingComma: "all",
                endOfLine: "auto",
            },
        ],
        "vue/multi-word-component-names": ["off"],
        "vue/no-setup-props-destructure": ["off"],
        "vue/no-deprecated-html-element-is": ["off"],
        "@typescript-eslint/no-unused-vars": ["off"],
    },
}


// .prettierrc.json 文件
{
    "singleQuote": false,
    "semi": false,
    "printWidth": 400,
    "trailingComma": "all",
    "endOfLine": "auto"
}
在 package.json 文件的 scripts 脚本中添加
"dev": "xxxx",
"lint": "eslint . --ext .vue,.js,.ts --fix --ignore-path .gitignore"
到此就配置好了
vscode 编辑器安装 eslint 和 Prettier - Code formatter 插件
安装好了之后在项目根目录下创建 .editorconfig 文件
// .editorconfig 文件是 自己项目里面的配置,权重大于 vscode 设置里面的配置

# editorconfig.org
root = true

[*]
indent_style = space
indent_size = 4
end_of_line = lf
charset = utf-8
trim_trailing_whitespace = true
insert_final_newline = true

[*.md]
trim_trailing_whitespace = false
项目根目录下创建 .vscode/extensions.json 、 .vscode/launch.json 、 .vscode/settings.json 三个文件
// extensions.json 文件
{
// 推荐的扩展插件
"recommendations": [
"mrmaoddxxaa.create-uniapp-view", // 创建 uni-app 页面
"uni-helper.uni-helper-vscode", // uni-app 代码提示
"evils.uniapp-vscode", // uni-app 文档
"vue.volar", // vue3 语法支持
"vue.vscode-typescript-vue-plugin", // vue3 ts 插件
"editorconfig.editorconfig", // editorconfig
"dbaeumer.vscode-eslint", // eslint
"esbenp.prettier-vscode" // prettier
]
}
// launch.json 文件
{
// 使用 IntelliSense 了解相关属性。
// 悬停以查看现有属性的描述。
// 欲了解更多信息,请访问: https://go.microsoft.com/fwlink/?linkid=830387
"version": "0.2.0",
"configurations": [
{
"type": "chrome",
"request": "launch",
"name": "针对 localhost 启动 Chrome",
"url": "http://localhost:8080",
"webRoot": "${workspaceFolder}"
}
]
}
// settings.json 文件
{
// 在保存时格式化文件
"editor.formatOnSave": true,
// 文件格式化配置
"[json]": {
"editor.defaultFormatter": "esbenp.prettier-vscode"
},
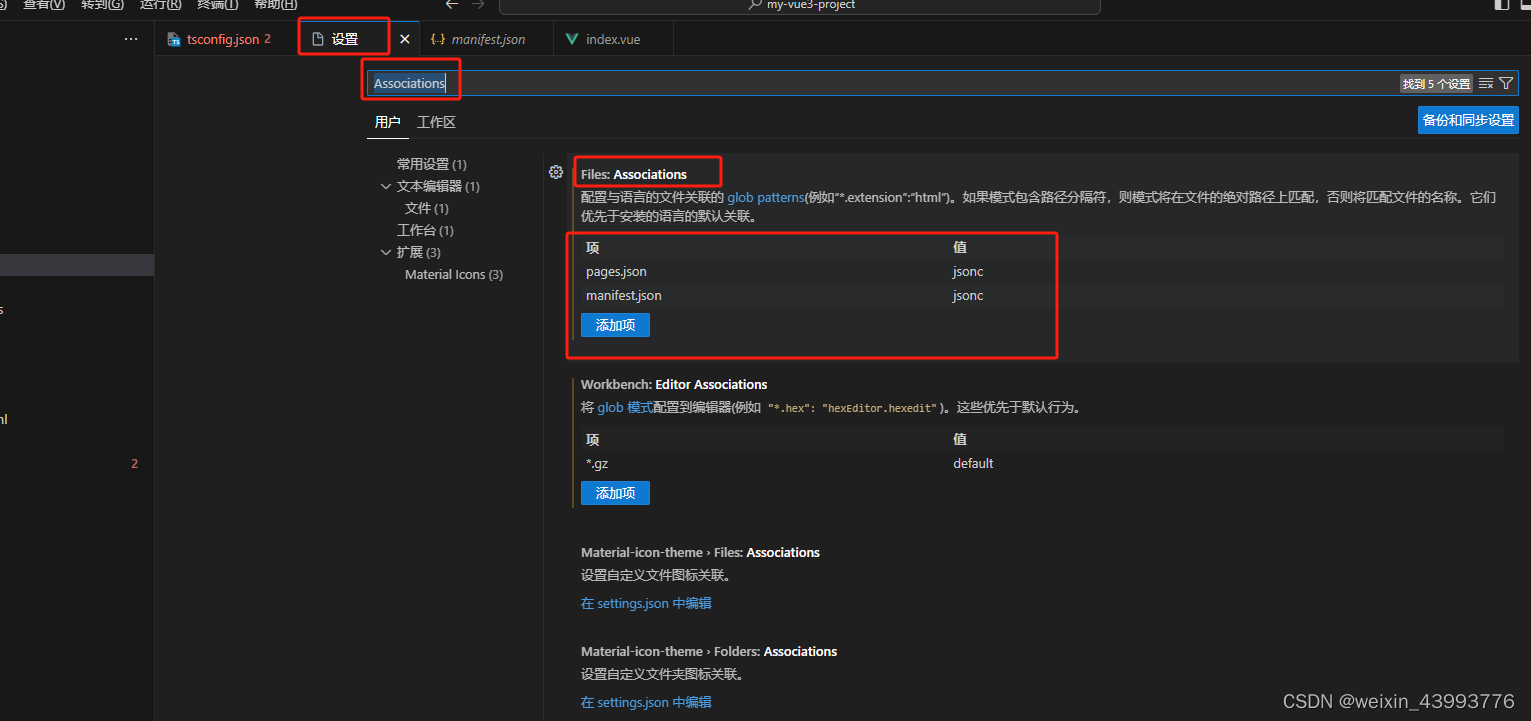
// 配置语言的文件关联
"files.associations": {
"pages.json": "jsonc", // pages.json 可以写注释
"manifest.json": "jsonc" // manifest.json 可以写注释
}
}
到此vscode编辑器就可以正常检测文件了 保存也自动格式化代码了
十九、uni-app(vue3语法)配置 husky
kusky 是验证提交代码的时候不符合eslint 规范不让提交
1、下载husky
pnpm i -D husky
2、项目根目录创建 .husky 目录
3、 初始化 husky
pnpm dlx husky-init 或者 npx husky-init
4、修改package.json 文件
在 scripts 脚本中添加
"dev": "xxx",
"lint-staged": "lint-staged"
与scripts 平级添加
"lint-staged": {
    "*.{vue,ts,js}": [
         "eslint --fix"
    ]
},
5、下载 lint-staged
pnpm i -D lint-staged
6、修改文件 .husky/pre-commit ( 初始化husky 生成的)
npm run lint-staged    // 增加
npm test               // 删掉
到此 husky 配置完成, 提交试试,不符合 eslint 规范的代码直接报错,不让提交
二十、uni-app 中的安全区域(flutter中的 Safarea)
const { safeAreaInsets } = uni.getSystemInfoSync()
二十一、TS中的 方法 定义需要的数据类型
// 定义方法
const handle1 = <T>() => {
	...
}
// 泛型 T 表示在调用 handle1 方法的时候返回的类型不确定,需要传入 泛型(传入什么类型,返回什么类型)
handle1<string[]>()


// 定义方法,传的数据类型是什么, 返回的数据类型就是什么
const handle2 = <T>() => {
	return new Promise<T>(resolve, reject) {
		ajax....
		resolve(...)
	}
}
二十二、TS 类型创建和引用
// 创建类型的文件 xxx.d.ts
export type test1 {
	"name": string
	"age": number
}

// 在项目中使用需要引入
import type { test1 } from "./xxx.d.ts"
二十三、TS 在定义对象的时候注意事项
const typy Obj {
	name: string
	age: number
}
let obj = ref<Obj>({})
// 上面的定义会报错,已改这样定义对象
let obj = ref<Obj>({} as Obj)
二十四、uni-app获取dom元素
const query = uni.createSelectorQuery().in(this);
query.select(".input_search").boundingClientRect((data) => {
 	console.log(data)
}).exec();


 2733
2733


 被折叠的 条评论
为什么被折叠?
被折叠的 条评论
为什么被折叠?
 到【灌水乐园】发言


