目录
一、Spring框架讲解
1.1 单例和多例
1.1.1 关于单例和多例说明
单例: 在内存中只有一份
多例: 在内存中可能有多份
1.1.2 编辑User类
package com.jt.demo;

import org.springframework.stereotype.Component;

public class User {
    public User(){
        System.out.println("我是无参构造,创建对象");
    }

    public void say(){
        System.out.println("测试对象是单例还是多例");
    }
}
1.1.3 关于单例多例的测试
规则1:Spring默认管理的对象都是单例的。
规则2: 通过@Scope注解,控制对象单例/多例
package com.jt.config;

import com.jt.demo.User;
import org.springframework.context.annotation.Bean;
import org.springframework.context.annotation.ComponentScan;
import org.springframework.context.annotation.Configuration;
import org.springframework.context.annotation.Scope;

@Configuration  //标识这是配置类
@ComponentScan("com.jt")
public class SpringConfig {

    @Bean
    @Scope("singleton")     //默认值 单例模式
    //@Scope("prototype")   //      多例模式
    public User user(){
        return new User();
    }
}
1.1.4 编辑测试类
package com.jt;

import com.jt.config.SpringConfig;
import com.jt.demo.User;
import org.junit.jupiter.api.Test;
import org.springframework.context.ApplicationContext;
import org.springframework.context.annotation.AnnotationConfigApplicationContext;
import org.springframework.context.support.ClassPathXmlApplicationContext;

public class TestSpring {


    @Test
    public void testDemo1(){
        ApplicationContext context =
                new AnnotationConfigApplicationContext(SpringConfig.class);
        User user1 = context.getBean(User.class);
        User user2 = context.getBean(User.class);
        user1.say();
        System.out.println(user1 == user2);//true
    }
}
1.2 懒加载机制
1.2.1 懒加载说明
说明: 如果Spring容器创建,对象立即创建则该加载方式为 “立即加载”, 容器启动创建
如果Spring容器创建,对象在被使用的时候才创建, 则称为"懒加载" 用时才创建
注解: @Lazy 添加表示改为懒加载
测试说明: 主要测试对象中的无参构造什么时候执行!!!
1.2.2 懒加载用法
package com.jt.config;

import com.jt.demo.User;
import org.springframework.context.annotation.*;

@Configuration  //标识这是配置类
@ComponentScan("com.jt")
public class SpringConfig {

    @Bean
    //@Scope("singleton")    //默认值 单例模式
    //@Scope("prototype")    //  多例模式
    @Lazy                    //懒加载
    public User user(){
        return new User();
    }
}
1.2.3 多例与懒加载的关系
说明: 只要对象是多例模式,则都是懒加载!, 在单例模式中控制懒加载才有效.
规则说明:
lazy true lazy false
单例模式: 有效 懒加载 有效 立即加载
多例模式: 无效 懒加载 无效 懒加载
1.2.4 关于lazy 使用场景的说明
场景1: 服务器启动时,如果加载太多的资源,则必然导致服务器启动慢, 适当的将不重要的资源设置为懒加载.
场景2: 有时用户会需要一些特殊的"链接",而这些链接的创建需要很长的时间.可以使用懒加载.
1.3 Spring对象生命周期管理
1.3.1 关于对象生命周期说明
说明: 一个对象从创建到消亡,可以划分为四个阶段. 如果需要对程序进行干预.则可以通过周期方法进行干预. (回调函数/钩子函数/接口回调)
图解说明生命周期函数的作用: 主要作用可以在各个时期对对象进行干预

1.3.2 生命周期函方法的使用
package com.jt.demo;

import org.springframework.stereotype.Component;

import javax.annotation.PostConstruct;
import javax.annotation.PreDestroy;

@Component  //将对象交给Spring容器管理 key=person value:反射对象
public class Person {

    public Person(){
        System.out.println("张三出生了,资质拉满");
    }

    @PostConstruct  //在对象创建之后立即调用
    public void init(){
        System.out.println("张三称为少年奇才");
    }

    //业务方法
    public void doWork(){
        System.out.println("迎娶美人鱼!!!");
    }

    @PreDestroy //对象消亡时 进行调用
    public void destory(){
        System.out.println("销毁:全世界哀悼");
    }
}
1.3.3 测试案例
@Test
    public void testDemo3Init(){
        //容器启动对象创建
        AnnotationConfigApplicationContext context =
                new AnnotationConfigApplicationContext(SpringConfig.class);
        Person person = context.getBean(Person.class);
        person.doWork();
        //将容器关闭
        context.close();
    }
1.3.4 使用注解
@PostConstruct //在对象创建之后立即调用
@PreDestroy //对象消亡时 进行调用
1.4 依赖注入(Dependency Injection,简称DI)
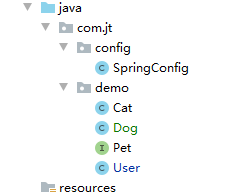
1.4.1 创建结构
准备User类
准备Dog类
准备Cat类
说明: Dog/Cat向User类进行对象的注入功能.

1.4.2 @Autowired注解
说明: 在对象中如果需要使用属性注入.一般使用@Autowired注解.
功能: 可以将Spring容器中的对象,自动注入到属性中.
注入方式:
- 默认按照类型注入. 如果注入的属性是接口,则自动注入实现类
- 按照名称注入(key). 一般不用
重要前提: 如果需要依赖注入.则对象必须交给Spring容器管理.
1.4.3 编辑Pet接口
public interface Pet {
    void hello();
}
1.4.4 编辑Cat类
package com.jt.demo;

import org.springframework.stereotype.Component;

@Component //将对象交给spring容器管理 key:cat value:反射Cat对象
public class Cat implements Pet{

    @Override
    public void hello() {
        System.out.println("我是喵喵喵");
    }
}
1.4.5 编辑User类
package com.jt.demo;

import org.springframework.beans.factory.annotation.Autowired;
import org.springframework.stereotype.Component;

@Component  //将user交给Spring容器管理
public class User {

    //效果: 将当前接口的实现类自动注入
    @Autowired
    private Pet pet;

    public void say(){
        //调用宠物的方法
        pet.hello();
    }
}
1.4.6 编辑配置类
package com.jt.config;

import org.springframework.context.annotation.ComponentScan;
import org.springframework.context.annotation.Configuration;

@Configuration            //标识我是配置类
@ComponentScan("com.jt")  //必须添加包路径
public class SpringConfig {

}
1.4.7 编辑测试类
package com.jt;

import com.jt.config.SpringConfig;
import com.jt.demo.User;
import org.junit.jupiter.api.Test;
import org.springframework.boot.test.context.SpringBootTest;
import org.springframework.context.ApplicationContext;
import org.springframework.context.annotation.AnnotationConfigApplicationContext;

class TestSpring {

    @Test
    public void testDemo1(){
        ApplicationContext context =
                new AnnotationConfigApplicationContext(SpringConfig.class);
        User user = context.getBean(User.class);
        user.say();
    }

}
1.5 接口多实现的情况说明
1.5.1 代码说明
- 一个接口 2个实现类 结构如下

- 猫类

package com.jt.demo;

import com.jt.demo.Pet;
import org.springframework.stereotype.Component;

@Component   //component map类型   key = 类名首字母小写, value = 反射后的类
public class Cat implements Pet {
    @Override
    public void hello() {
        System.out.println("小猫喵喵喵...");
    }
}
- 狗类

package com.jt.demo;

import com.jt.demo.Pet;
import org.springframework.stereotype.Component;

@Component	//component map类型   key = 类名首字母小写, value = 反射后的类
public class Dog implements Pet {
    @Override
    public void hello() {
        System.out.println("小狗汪汪汪...");
    }
}
1.5.2 报错说明
- 说明: 一个接口应该只有一个实现类,否则spring程序无法选择.

- 解决方案
package com.jt.demo;

import org.springframework.beans.factory.annotation.Autowired;
import org.springframework.beans.factory.annotation.Qualifier;
import org.springframework.stereotype.Component;

@Component  //将user交给Spring容器管理
public class User {

    //效果: 将当前接口的实现类自动注入
    @Autowired
    @Qualifier("cat") //该注解不能单独使用,必须配合Autowired使用,根据key进行注入
    private Pet pet;  //2选1

    public void say(){
        //调用宠物的方法
        pet.hello();
    }
}
1.5.3 @Resource注解说明
@Component
public class User {
    @Autowired
    @Qualifier("cat")   //该注解配合Autowirde使用,根据key进行注入
//    @Resource(name = "cat")    //@Autowired + @qualifier 的组合体。 出自javax包,避免spring升级迭代出现问题,不建议使用
    private Pet pet;
二、MVC设计三层结构
2.1 MVC 设计思想
2.1.1 MVC思想说明
经典MVC模式中,M是指业务模型,V是指用户界面,C则是控制器,使用MVC的目的是将M和V的实现代码分离,从而使同一个程序可以使用不同的表现形式。其中,View的定义比较清晰,就是用户界面。
M: model 业务模型
V: view 用户界面
C: control 控制层
历史说明:
JSP动态页面 html代码 + java代码 写到一起 xxx.jsp
不方便后期维护. 页面和业务执行紧紧的绑定在一起耦合性高.

小结:
- MVC是一种设计思想,编码中降低代码的耦合性.
- 前端专注于开发页面 view
- 后端专注于开发后端 model
- 两者通过control 进行控制
2.1.2 层级代码结构
说明: MVC设计思想,实现了前端和后端的松耦合.但是根据实际的开发情况,很多的业务逻辑比较复杂.如果后端将所有的代码都写到同一个java类中.这样的代码结构很臃肿. 为了很好的实现MVC设计思想.所以后端代码也应该分层.
分层说明:
- 控制层 Controller 与前端页面交互的. @Controller
- 业务层 Service 编辑业务逻辑. @Service
- 持久层 Mapper 实现数据库的相关操作 暂时:@Repository
MVC > 三层代码结构!!!
2.2 三层代码结构
2.2.1 编辑Mapper层(dao层)
- 编辑UserMapper接口
package com.jt.mapper;
//面向接口开发
public interface UserMapper {

    void  addUser();
}
- 编辑UserMapper接口实现类UserMapperImpl
package com.jt.mapper;

import org.springframework.stereotype.Repository;

@Repository //为了让程序员开发有层级的概念
public class UserMapperImpl implements UserMapper{

    @Override
    public void addUser() {
        System.out.println("新增用户AAA");
    }
}
2.2.2 编辑Service层
- 编辑UserService接口
package com.jt.service;

public interface UserService {

    void addUser();
}
- 编辑UserService接口实现类UserServiceImpl
package com.jt.service;

import com.jt.mapper.UserMapper;
import com.jt.mapper.UserMapperImpl;
import org.springframework.beans.factory.annotation.Autowired;
import org.springframework.stereotype.Service;

@Service
public class UserServiceImpl implements UserService{

    @Autowired
    private UserMapper userMapper; //默认按照类型注入

    @Override
    public void addUser() {
        userMapper.addUser();
    }
}
2.2.3 编辑Controller层
package com.jt.controller;

import com.jt.service.UserService;
import com.jt.service.UserServiceImpl;
import org.springframework.beans.factory.annotation.Autowired;
import org.springframework.stereotype.Controller;

//controller层只有类 不用写接口
@Controller
public class UserController {

    @Autowired
    private UserService userService;

    public void addUser(){
        userService.addUser();
    }
}
2.2.4 编辑配置类
package com.jt.config;

import org.springframework.context.annotation.ComponentScan;
import org.springframework.context.annotation.Configuration;

@Configuration
@ComponentScan("com.jt")
public class SpringConfig {
}
2.2.5 编辑测试类
package com.jt;

import com.jt.config.SpringConfig;
import com.jt.controller.UserController;
import org.junit.jupiter.api.Test;
import org.springframework.context.ApplicationContext;
import org.springframework.context.annotation.AnnotationConfigApplicationContext;

public class TestSpring {

    @Test
    public void testDemo1(){
        ApplicationContext context =
                new AnnotationConfigApplicationContext(SpringConfig.class);
        UserController userController = context.getBean(UserController.class);
        userController.addUser();
    }
}
2.3 简单谈一下对IOC/DI的看法(开放)
历史: 传统代码其中的属性对象一般都是通过new关键字手动创建,这样的代码耦合性高,不方便扩展
功能:
- IOC: 由Spring容器管理对象的生命周期.
- 使得对象与对象之间的耦合性降低.
- DI是依赖注入. 只有被spring容器管理的对象才可以被依赖注入. 默认的条件下采用类型注入.如果有特殊需求也可以采用名称注入(@Qualifier(“cat”))
- Spring中 IOC和DI相互配合,可以极大程度上降低耦合性.
意识:
Spring由于采用了IOC/DI的设计方式,可以整合其它的第三方框架.使得程序的调用"浑然一体"
2.4 @Value注解说明
2.4.1 注解赋值
说明: @Value注解 可以直接为基本类型赋值和String类型
问题: 如果像图中赋值,则耦合性依然很高,不通用. 需要优化!!!

2.4.2 编辑user.properties
说明: 对象中的属性一般都是业务数据,如果需要为业务数据赋值,则一般采用properties文件 更加灵活.
- 位置: 在resources目录下

- 编辑文件内容
# key=Value 结构 等号连接 中间不需要多余空格
Name=葫芦娃
# 关键字最好绕开username,username会默认使用计算机用户名
user.userName=钢铁侠

password=123456
- 字符集编码说明:

- 代码编写
- 使用
@PropertySource(value = "classpath:/user.properties", encoding = "UTF-8")配置来源,指定配置文件地址以及编码格式 **classpath:/**代表resources的根目录@Value("${user.userName}")关键字最好绕开username,username会默认使用计算机用户名
package com.chuci.mybatisdemo002.springdemo007_mvc.dao.impl;

import com.chuci.mybatisdemo002.springdemo007_mvc.dao.UserMapper;
import org.springframework.beans.factory.annotation.Value;
import org.springframework.context.annotation.PropertySource;
import org.springframework.stereotype.Repository;

@Repository
@PropertySource(value = "classpath:/user.properties", encoding = "UTF-8")   //配置来源,指定配置文件地址
//@PropertySource(value = "classpath:/userYAML.yml", encoding = "UTF-8")   //配置来源,指定配置文件地址
// classpath:/ 代表resources的根目录
public class UserMapperImpl implements UserMapper {

    @Value("${user.userName}")     //关键字最好绕开username,username会默认使用计算机用户名
    private String userName1;

    @Value("${Name}")     //关键字最好绕开username,username会默认使用计算机用户名
    private String userName2;

    @Value("${username}")     //关键字最好绕开username,username会默认使用计算机用户名
    private String userName3;

    @Value("${password}")
    private int password;

    @Override
    public void addUser() {
        System.out.println("新增用户~~~"+ userName1 +" "+ userName2 +" "+ userName3 + ", 密码 = " + password);
    }
}
运行结果:

至此,本节完~~~
此 系 列 以 完 整 记 录 自 己 在 J a v a 学 习 路 的 过 程 此系列以完整记录自己在Java学习路的过程 此系列以完整记录自己在Java学习路的过程


 8762
8762


 被折叠的 条评论
为什么被折叠?


