


xml方式AOP快速入门
2、准备目标类、准备增强类,并配置给Spring管理

3、配置切点表达式(哪些方法被增强)
4、配置织入(切点被哪些通知方法增强,是前置增强还是后置增强)
<aop:config>
	<!--配置切点表达式,对哪些方法进行增强-->
	<aop:pointcut id="myPointcut" expression="execution(void com.itheima.service.impl.UserServiceImpl.show1())"/>
	<!--切面=切点+通知-->
	<aop:aspect ref="myAdvice">
		<!--指定前置通知方法是beforeAdvice-->
		<aop:before method="beforeAdvice" pointcut-ref="myPointcut"/>
		<!--指定后置通知方法是afterAdvice-->
		<aop:after-returning method="afterAdvice" pointcut-ref="myPointcut"/>
	</aop:aspect>
</aop:config>
写法二
<aop:config>
	<!--配置切点表达式,对哪些方法进行增强-->
	<aop:pointcut id="myPointcut" expression="execution(void com.itheima.service.impl.UserServiceImpl.show1())"/>
	<!--切面=切点+通知-->
	<aop:aspect ref="myAdvice">
		<!--指定前置通知方法是beforeAdvice-->
		<aop:before method="beforeAdvice" pointcut-ref="myPointcut"/>
		<!--指定后置通知方法是afterAdvice-->
		<aop:after-returning method="afterAdvice" pointcut="execution(void com.itheima.service.impl.UserServiceImpl.show1())"/>
	</aop:aspect>
</aop:config>
xml方式AOP配置详解
切点表达式是配置要对哪些连接点(哪些类的哪些方法)进行通知的增强,语法如下:
execution([访问修饰符]返回值类型 包名.类名.方法名(参数))
其中,
⚫ 访问修饰符可以省略不写;
⚫ 返回值类型、某一级包名、类名、方法名 可以使用 * 表示任意;
⚫ 包名与类名之间使用单点 . 表示该包下的类,使用双点 … 表示该包及其子包下的类;
⚫ 参数列表可以使用两个点 … 表示任意参数
xml方式AOP配置详解
切点表达式举几个例子方便理解
//表示访问修饰符为public、无返回值、在com.itheima.aop包下的TargetImpl类的无参方法show
execution(public void com.itheima.aop.TargetImpl.show())
//表述com.itheima.aop包下的TargetImpl类的任意方法
execution(* com.itheima.aop.TargetImpl.*(..))
//表示com.itheima.aop包下的任意类的任意方法
execution(* com.itheima.aop.*.*(..))
//表示com.itheima.aop包及其子包下的任意类的任意方法
execution(* com.itheima.aop..*.*(..))
//表示任意包中的任意类的任意方法
execution(* *..*.*(..)
AspectJ的通知由以下五种类型
通知名称     配置方式       			执行时机
前置通知 < aop:before >          目标方法执行之前执行
后置通知 < aop:after-returning > 目标方法执行之后执行,目标方法异常时,不在执行
环绕通知 < aop:around > 			目标方法执行前后执行,目标方法异常时,环绕后方法不在执行
异常通知 < aop:after-throwing >  目标方法抛出异常时执行
最终通知 < aop:after > 			不管目标方法是否有异常,最终都会执行
环绕通知
public void around(ProceedingJoinPoint joinPoint) throws Throwable {
	//环绕前
	System.out.println("环绕前通知");
	//目标方法
	joinPoint.proceed();
	///环绕后
	System.out.println("环绕后通知");
}
<aop:around method="around" pointcut-ref="myPointcut"/>
异常通知,当目标方法抛出异常时,异常通知方法执行,且后置通知和环绕后通知不在执
public void afterThrowing(){
	System.out.println("目标方法抛出异常了,后置通知和环绕后通知不在执行");
}
<aop:after-throwing method="afterThrowing" pointcut-ref="myPointcut"/>
最终通知,类似异常捕获中的finally,不管目标方法有没有异常,最终都会执行的通知
public void after(){
	System.out.println("不管目标方法有无异常,我都会执行");
}
<aop:after method="after" pointcut-ref="myPointcut"/>
通知方法在被调用时,Spring可以为其传递一些必要的参数
参数类型 			 作用
JoinPoint 			 连接点对象,任何通知都可使用,可以获得当前目标对象、目标方法参数等信息
ProceedingJoinPoint  JoinPoint子类对象,主要是在环绕通知中执行proceed(),进而执行目标方法
Throwable 			 异常对象,使用在异常通知中,需要在配置文件中指出异常对象名称
JoinPoint 对象
public void 通知方法名称(JoinPoint joinPoint){
	//获得目标方法的参数
	System.out.println(joinPoint.getArgs());
	//获得目标对象
	System.out.println(joinPoint.getTarget());
	//获得精确的切点表达式信息
	System.out.println(joinPoint.getStaticPart());
}
ProceedingJoinPoint对象
public Object around(ProceedingJoinPoint joinPoint) throws Throwable {
	System.out.println(joinPoint.getArgs());//获得目标方法的参数
	System.out.println(joinPoint.getTarget());//获得目标对象
	System.out.println(joinPoint.getStaticPart());//获得精确的切点表达式信息
	Object result = joinPoint.proceed();//执行目标方法
	return result;//返回目标方法返回值
}
Throwable对象
public void afterThrowing(JoinPoint joinPoint,Throwable th){
//获得异常信息
System.out.println("异常对象是:"+th+"异常信息是:"+th.getMessage());
}
<aop:after-throwing method="afterThrowing" pointcut-ref="myPointcut" throwing="th"/>
基于注解配置的AOP
注解方式AOP配置,该方式需要通知类实现Advice的子功能接口
public interface Advice {
}
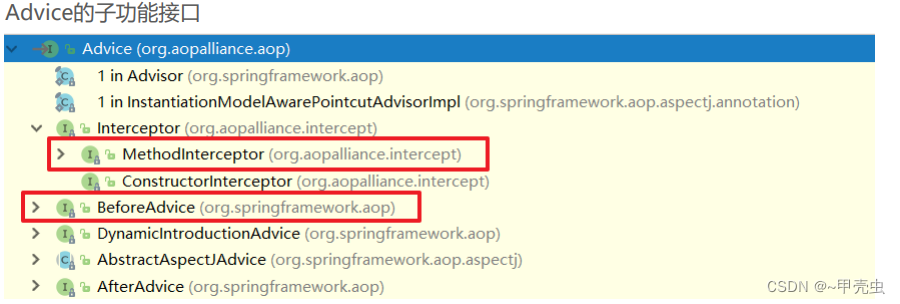
例如:通知类实现了前置通知和后置通知接口
public class Advices implements MethodBeforeAdvice, AfterReturningAdvice {
	public void before(Method method, Object[] objects, Object o) throws Throwable {
		System.out.println("This is before Advice ...");
	}
	public void afterReturning(Object o, Method method, Object[] objects, Object o1) throws Throwable {
		System.out.println("This is afterReturn Advice ...");
	}
}
切面使用advisor标签配置
<aop:config>
	<!-- 将通知和切点进行结合 -->
	<aop:advisor advice-ref="advices" pointcut="execution(void com.itheima.aop.TargetImpl.show())"/>
</aop:config>
通知类实现了方法拦截器接口
public class MyMethodInterceptor implements MethodInterceptor {
	@Override
	public Object invoke(MethodInvocation methodInvocation) throws Throwable {
		System.out.println("前置逻辑功能...");
		//执行目标方法
		Object invoke = methodInvocation.getMethod().invoke(methodInvocation.getThis(),methodInvocation.getArguments());
		System.out.println("后置逻辑功能...");
		return invoke;
	}
}
切面使用advisor标签配置
<aop:config>
	<!-- 将通知和切点进行结合 -->
	<aop:advisor advice-ref=“myMethodInterceptor" pointcut="execution(void com.itheima.aop.TargetImpl.show())"/>
</aop:config>
使用aspect和advisor配置区别如下:
1)配置语法不同:
<!-- 使用advisor配置 -->
<aop:config>
	<!-- advice-ref:通知Bean的id -->
	<aop:advisor advice-ref="advices" pointcut="execution(void com.itheima.aop.TargetImpl.show())"/>
</aop:config>

<!-- 使用aspect配置 -->
<aop:config>
	<!-- ref:通知Bean的id -->
	<aop:aspect ref="advices">
		<aop:before method="before" pointcut="execution(void com.itheima.aop.TargetImpl.show())"/>
	</aop:aspect>
</aop:config
2)通知类的定义要求不同,advisor 需要的通知类需要实现Advice的子功能接口:
public class Advices implements MethodBeforeAdvice {
	public void before(Method method, Object[] objects, Object o) throws Throwable {
		System.out.println("This is before Advice ...");
	}
	public void afterReturning(Object o, Method method, Object[] objects, Object o1) throws Throwable {
		System.out.println("This is afterReturn Advice ...");
	}
}
aspect 不需要通知类实现任何接口,在配置的时候指定哪些方法属于哪种通知类型即可,更加灵活方便:
public class Advices {
	public void before() {
		System.out.println("This is before Advice ...");
	}
	public void afterReturning() {
		System.out.println("This is afterReturn Advice ...");
	}
}
3)可配置的切面数量不同:
一个advisor只能配置一个固定通知和一个切点表达式;
一个aspect可以配置多个通知和多个切点表达式任意组合,粒度更细。
4)使用场景不同:
如果通知类型多、允许随意搭配情况下可以使用aspect进行配置;
如果通知类型单一、且通知类中通知方法一次性都会使用到的情况下可以使用advisor进行配置;
在通知类型已经固定,不用人为指定通知类型时,可以使用advisor进行配置,例如后面要学习的Spring事务控制的配置;
所以实际开发中我们使用的更多的是aspect,所以接下来详解aspect
基于xml配置的AOP详解
通过xml方式配置AOP时,我们引入了AOP的命名空间,根据讲解的,要去找spring-aop包下的META-INF,在去
找spring.handlers文件
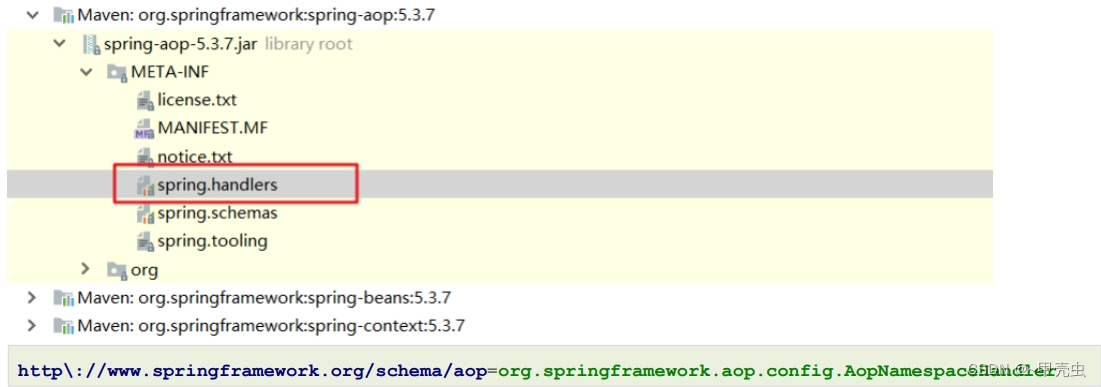
xml方式AOP原理剖析
最终加载的是 AopNamespaceHandler,该Handler的init方法中注册了config标签对应的解析器
this.registerBeanDefinitionParser("config", new ConfigBeanDefinitionParser());
以ConfigBeanDefinitionParser作为入口进行源码剖析,最终会注册一个AspectJAwareAdvisorAutoProxyCreator
进入到Spring容器中,那该类作用是什么呢?看一下集成体系图
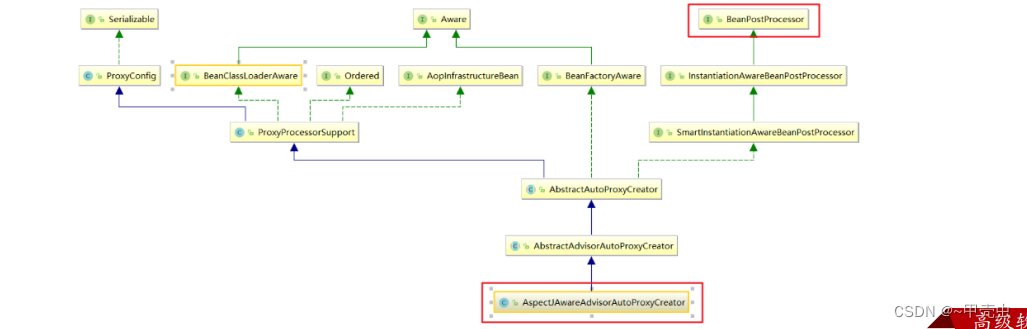
AspectJAwareAdvisorAutoProxyCreator 的上上级父类AbstractAutoProxyCreator中的
postProcessAfterInitialization方法
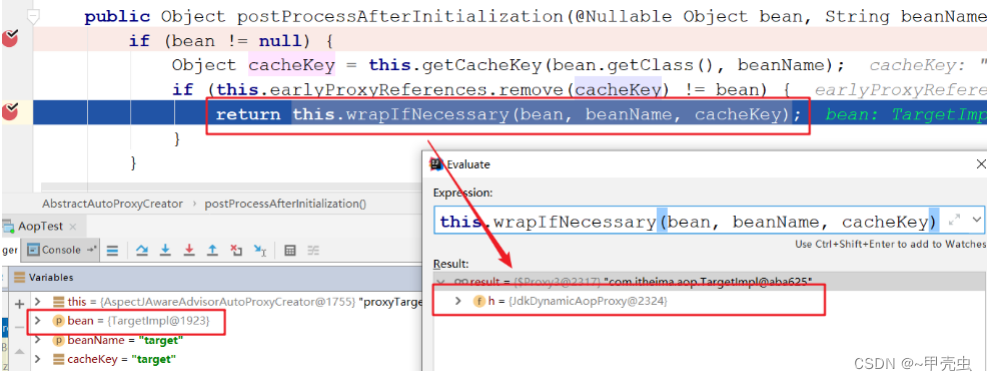
//参数bean:为目标对象
public Object postProcessAfterInitialization(@Nullable Object bean, String beanName) {
	if (bean != null) {
		Object cacheKey = this.getCacheKey(bean.getClass(), beanName);
		if (this.earlyProxyReferences.remove(cacheKey) != bean) {
			//如果需要被增强,则wrapIfNecessary方法最终返回的就是一个Proxy对象
			return this.wrapIfNecessary(bean, beanName, cacheKey);
		}
	}
	return bean;
}
通过断点方式观察,当bean是匹配切点表达式时,this.wrapIfNecessary(bean, beanName, cacheKey)返回的是
一个JDKDynamicAopProxy
可以在深入一点,对wrapIfNecessary在剖析一下,看看是不是我们熟知的通过JDK的
Proxy.newProxyInstance(ClassLoader loader, Class<?>[] interfaces,InvocationHandler h) 的方式创建的代理
对象呢?经过如下一系列源码跟踪
==> this.wrapIfNecessary(bean, beanName, cacheKey)
==> Object proxy = this.createProxy(参数省略)
==> proxyFactory.getProxy(classLoader)
==> this.createAopProxy().getProxy(classLoader)
==> getProxy()是一个接口方法,实现类有两个,如下截图
==> Proxy.newProxyInstance(classLoader, this.proxiedInterfaces, this

动态代理的实现的选择,在调用getProxy() 方法时,我们可选用的 AopProxy接口有两个实现类,如上图,这两种
都是动态生成代理对象的方式,一种就是基于JDK的,一种是基于Cglib的

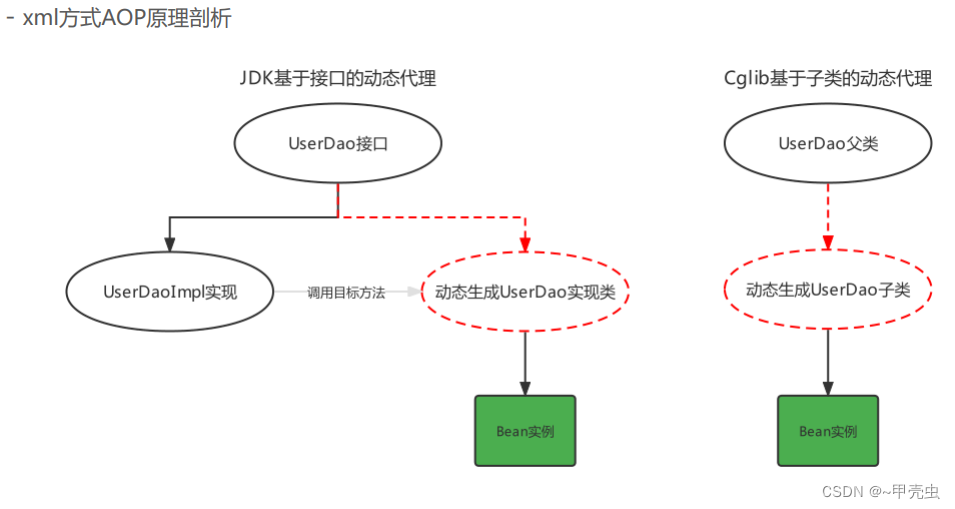
JDK的动态代理代码,之前已经写过了,下面看一下Cglib基于超类的动态代理
Target target = new Target();//目标对象
Advices advices = new Advices();//通知对象
Enhancer enhancer = new Enhancer();//增强器对象
enhancer.setSuperclass(Target.class);//增强器设置父类
//增强器设置回调
enhancer.setCallback((MethodInterceptor )(o, method, objects, methodProxy) -> {
	advices.before();
	Object result = method.invoke(target, objects);
	advices.afterReturning();
	return result;
});
//创建代理对象
Target targetProxy = (Target) enhancer.create();
//测试
String result = targetProxy.show("haohao");


 73
73


 被折叠的 条评论
为什么被折叠?
被折叠的 条评论
为什么被折叠?
 到【灌水乐园】发言


