


文章目录
前两章讲解了类和对象声明的基本语法。现在运用面向对象原则来做一些有趣和有用的事情。
首先探讨二叉树,它在编程界很有名,既有趣,又烧脑。接着重拾第5章的汉诺塔例子,新版本用字符动画展示解题过程。
但首先要进行一些铺垫。
12.1 动态对象创建
指针还有另一个用途:建立对象网络,这称为“动态内存分配”,因其是在运行时请求内存,让程序判断何时分配新对象,而不是在程序运行前就固化内存需求。
C++在运行时分配内存最简单的方式就是使用 new 关键字。
ptr = new type;
type 可以是内建类型(比如 int 或 double ),也可以是用户自定义类型(比如类),ptr 是相应类型的指针。例如,假定 Fraction 类已声明好,以下语句创建 Fraction 对象并返回指向它的指针:`
Fraction *p = new Fraction;
对象本身无名( Fraction 是类名而不是对象名),你或许觉得这样引用对象麻烦,但通过指针其实非常简单。以下语句通过指针操纵对象:
(*p).set(10, 20);	// 值设为 10,20.
(*p).set(2, 27);	// 值设为 2, 27
cout << (*p).get_num();	// 打印 num 值(分子)
cout << (*p).get_den();	// 打印 den 值(分母)
本例(以后会重写)使用了以下语法:
(*ptr).成员名
该语法如此常见,以至于专门有个操作符来简化,不仅可以少打两个字,还可以使程序更易读:
ptr->成员名
意思是对 ptr 进行解引用来获得对象(提领对象)并访问其指定成员。
后面几个小节会大量运用 ->操作符。例如,可像下面这样重写之前的语句
p->set(10, 20);	//值设为10,20.
p->set(2, 27);	//值设为2,27
cout << p->getnum();	//打印num值(分子)
cout << p->xget_den();	//打印den值(分母)
new 关键字有一些变种。可指定实参来初始化对象,例如:
Fraction *p = new Fraction(2, 3);
该语句向匹配的构造函数传递实参2和3,找不到匹配的构造函数会报告语法错误。
12.2 new 和 delete 的其他用法
本节算是额外内容。如急于接触实例,可直接跳到下一节。但 new 有一些额外的用法。
delete 关键字也是,它通常和 new 一起使用。
可用 new 创建一系列数据项。定义好的任何类型都允许,不管是内建类型还是用户自定义类型。以下语句为10个 int 和50个 Point 分配内存:
int pInt = new int[10];	// 分配10个int.
Point pPt = new Point[50];	// 分配50个Point
每种情况都要指定大小,可以是常数或运行时计算的值(比如变量)。
分配好内存后,可通过由 new 返回并存储到指针中的地址来访问数据项,感觉所有项都是某个数组的一部分。例如,以下语句初始化所有数据项:
for (int i = 0; i < 10; ++i)
{
    pInt[i] = i;
}

for (int i = 0; i < 50; ++i)
{
    pPt[i].set(i, 2);
}
最好显式回收请求的内存来防止内存泄漏。C++程序终止时,请求的所有内存都归还给系统,但某些程序一直在后台或长时间运行,一旦此类程序疏于释放内存,就可能造成内存泄漏,最终拖慢系统甚至使之崩溃。
delete 关键字有两种形式。分配了多个项就用第二种,每种形式都不是销毁指针,而是释放之前分配给该指针的内存。
delete ptr;
delete [] ptr;
例如:
delete pNode;	//删除一个节点
delete [] pInt;	//删除全部10个int
12.3 二叉树应用
下面,来看一个实例,如何获取一个名字列表并按字母顺序打印?这要求对列表进行排序。有许多方式都可达成目标,本章选择有序二叉树。随后马上就要解释为什么称为“树”
C++标准模板库(STL)已在和
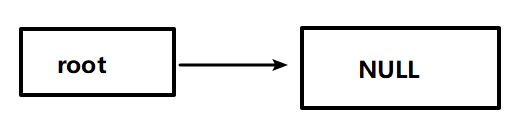
二叉树从指向根节点的指针开始。如下图所示,如果是空树,根指针将具有空值.
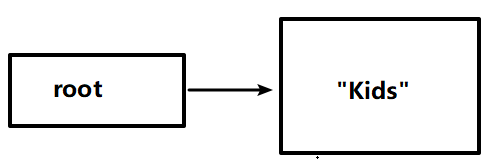
插入第一个节点后,树的样子如下图所示。这就是含单个节点的一个树,该节点当然就是根节点。“Kids"节点其实有两个子节点,每个都是NULL,但为了保持图的整洁,并没有将它们画出。
再来添加两个值:“Mark"和"Brian”,每个节点都添加到正确位置。如新节点的值字母顺序靠前,就作为现有节点的左子节点,靠后则作为右子节点。如下图所示,本例是将"Brian” 作为左子节点,"Mark"作为右子节点。

现在添加第4个值"Marthy".应该放到哪里?“Brian"和"Mark"节点都有空位来添加子点,但"Marthy"应放到最右边,因为按照字母顺序,它比其他任何节点都靠后,如下图所示

最后添加"Allan"和"Colin”。知道它们为什么必须作为"Brian"的子节点吗?记住规则:第一,子节点只能在开放位置添加:第二,“较小”值(字母顺序比父节点靠前的字符串)作为左子节点添加,而“较大”值(字母顺序比父节点靠后的字符串)作为右子节点添加,如下图所示。

现在你知道了应将"Lisa"和"Zelda"放到哪里。每次在树中插入的新节点都有一个明确的、无歧义的去处。重点在于,左子树中的一切都比右子树中的“小”。
有了这个树,按字母打印所有名字非常简单,该算法非常奇妙,几个步骤就能做好多事情。这是一个优美的递归例子。
打印子树所需的步骤(p指向根):
如指向的节点不为空,
	打印左子树
		打印当前节点的值
		打印右子树
算法虽小,本事很大。即使树成长到成千上万个节点,算法也能完美工作。这就是递归的厉害之处!
创建名字排序程序需设计并编码两个类:Bnode 和 Btree.
Bnode 类
首先需要一个建模节点的类。节点不含行动,是被动的。但类的构造函数不仅好用,还是防止出错的有效方式。所以很有必要创建节点类。
每个节点对象都需要三个公共成员:本身的字符串值以及指向左右两个子树的指针。下面是 Bnode类的声明。记住所有类声明的结束大括号后面都要加一个分号。
// 二叉树的节点类
class Bnode
{
    public:
    string val;
    Bnode* pLeft;
    Bnode* pRight;
    Bnode(string s)
    {
        val = s;
        pLeft = PRight = nullptr;
    }
};
类不可包含它自己的实例。否则就会像罗素悖论那样,一个集合到底应不应该包含它自身?如果可以(实际不可以),这样的一个类将会无限大。
罗素悖论,也称为“理发师悖论”.小城里的理发师放出豪言,他只为而且一定要为城里所有不为自己刮胡子的人刮胡子,但问题是理发师该为自己刮胡子吗?如果为自己刮胡子,那么按照他的豪言“只为城里所有不为自己刮胡子的人刮胡子”,就不应该为自己刮胡子;但如果不为自己刮胡子,同样按照他的豪言“一定要为城里所有不为自己刮胡子的人刮胡子”,又应该为自已刮胡子.
但 pLeft 和 pRight 并非 Bnode 的实例,它们只是指向同一个类的其他对象的指针。正是因为有这种指针,才可以在内存中建立起网络和树。你可以这样想,父母不“包含”孩子(当然在十月怀胎之后),但父母可以和一个或多个孩子组建家庭。
Bnode 的每个实例都可以这样建构:每个指针(pLeft 和 pRight)既可以是空值,也可以是指向一个子节点的指针。两个指针都可为空,表明对应一侧无子。两个指针都为空,表明该节点对象是“叶”或“终点”,没有更多子了,如下图所示。

构造函数很好用,还能防错。该类无默认构造函数,用户不赋值便不能创建节点:
Bnode my_node; //错误!没有赋值!
相反,应该在创建节点时用字符串值初始化节点:
Bnode my_node("Emily"); //合法!
但该构造函数最大的好处是两个指针默认为空值(nullptr,不支持的话则为 NULL),这是最起码的要求。千万不可忽视这个保底要求。如允许不初始化指针,会包含“垃圾”值,结果会是灾难性的。有了保底才能防止出错。
nullptr关键字自C+11起支持。编译器太老就用 NULL 替代 nullptr。
C++11 和更高版本的编译器支持类内部的初始化。例如,在 Bnode 类的私有区域声明pLeft 和 pRight 时可把它们初始化成空指针。构造函数(如果有的话)可选择覆盖这些设置,否则就使用默认值。之前已在11.1节讨论过这些问题。
Btree 类
除了节点类,本程序还需要 Btree 类(即二叉树,binary tree),可不可以不写类,而是用一系列单独的函数和数据结构代替?可以,但写 Btree 类有多项好处。
首先,类函数设计用于操纵类数据,不可在其他任何情况下使用。代码和数据紧密协作,OOP提供了很好的方式打包它们。
更重要的是,访问树中的数据是受控的。类用户不可能直接接触并污染私有数据。对任何节点的直接访问都是不允许的。用户不可能做一些愚蠢的事情,比如胡乱为指针赋值。一个符合规范的类,类的用户只能做两件事情:在树中插入一个名字以及打印内容。
下面是 Btree 类的初始声明,稍后会完善。注意,树的位置(它的根)保持私有。
// 二叉树类的初始版本
class Btree
{
public:
    Btree()
    {
        root = nullptr;
    }
    void insert(string s);
    void print();
private:
    Bnode* root;
};
类的用户访问不了根,便无法直接访问任何节点。这能防止他们做一些危险的事情,比如修改指针值。有时并不是用户想造成系统出错,而是很想知道数据结构的内部情况。
下面是类的完整声明,包括辅助函数。这些函数和 root 变量一样是私有的,不可在外部使用。
// 二叉树类的完整声明,含辅助函数
class Btree
{
    public:
    Btree()
    {
        root = nullptr;
    }
    void insert(string s)
    {
        root = insert_at_sub(s, root);
    }
    void print()
    {
        print_sub(root);
    }
    private:
    Bnode* root;
    Bnode* insert_at_sub(string s, Bnode* p);
    void print_sub(Bnode* p);
};
类的声明添加了两个私有 “辅助” 函数来支持公共函数。这两个辅助函数,insert_at_sub 和 print_sub,是递归的所以不可内联。必须在类声明的外部定义,所以要用 Btree::前缀澄清作用域。
Bnode* Btree::insert_at_sub(string s, Bnode* p)
{
    if (!p)
    {
        return new Bnode(s);
    }
    else
        if (s < p->val)
        {
            p->pLeft = insert_at_sub(s, p->pLeft);
        }
    	else
            if (s > p->val)
            {
                p->pRight = insert_at_sub(s, p->pRight);
            }
    return p;
}

void Btree::print_sub(Bnode* p)
{
    if (p)
    {
        print_sub(p->pLeft);
        cout << p->val << endl;
        print_sub(p->pRight);
    }
}
print_sub 函数的定义太优雅了。照着读就可以了:打印我左边的树,打印我自己的值,再打印我右边的树。递归大幅简化了算法。注意终止条件:指向子的指针是空值,函数就返回。
另一个函数 insert_at_sub 可以不用递归而改为迭代,但难度会增加。迭代方案需依赖循环而不是让函数调用自身,这种写法留给之后的练习。
和所有递归函数一样,insert_at_sub 也需终止条件,即遍历树并抵达一个空指针。此时应创建一个新节点:
return new Bnode(s);
新对象的地址返回调用者,并在那里赋给 pLeft,pRight 或根指针。如果没有抵达空指针,函数直接返回传给它的指针。
但这也意味着大多数情况(不创建新节点)不会对返回值进行特殊处理,所以这种写法井将最优,这也解释了为什么虽然迭代方案的编码量会增加,但更高效。
例12.1 :按字母顺序排序
# include <iostream>
# include <string>
using namespace std;

// 在这里插入 Bnode 和 Btree 类的声明
// 以及 Btree 类的各个函数的声明

int main()
{
	Btree my_tree;
	string sPrompt = "输入名字(在每个名字后按ENTER):";
	string sInput = "";

	while (true)
	{
		cout << sPrompt;
		getline(cin, sInput);
		if (sInput.size() == 0)
		{
			break;
		}
		my_tree.insert(sInput);
	}

	cout << "排序后的名字:" << endl;
	my_tree.print();
}
以下是程序的一次示范会话,手动输入内容加粗:
输入名字(在每个名字后按ENTER,直接按ENTER结束):John
输入名字(在每个名字后按ENTER,直接按ENTER结束):Paul
输入名字(在每个名字后按ENTER,直接按ENTER结束):George
输入名字(在每个名字后按ENTER,直接按ENTER结束):Ringo
输入名字(在每个名字后按ENTER,直接按ENTER结束):Brian
输入名字(在每个名字后按ENTER,直接按ENTER结束):Mick
输入名字(在每个名字后按ENTER,直接按ENTER结束):Elton
输入名字(在每个名字后按ENTER,直接按ENTER结束):Dylan
输入名字(在每个名字后按ENTER,直接按ENTER结束):
排序后的名字:
Brian
Dylan
Elton
George
John
Mick
Paul
Ringo
工作原理
程序创建 Btree 对象 my_tree。Btree 继而创建多个 Bnode 对象,每个都包含用户输入的名字。但是,只有 Btree 对象才能看到这些节点。
还有其他许多方式可生成排序名字列表。例如,可将所有名字放到数组中,再用第6章介绍的技术对数组进行排序。但是,二叉树有一些特殊的优势。
至少,二叉树可无限扩容,只受限于内存容量。此外,操纵非常大的数据类型时,二叉相可能比数组快得多。这是由于在树中的访问时间是对数级增长。也就是说,在100万个元素中查找一个元素,花的时间比在1000个元素中查找长不了多少。当然,这要求树比较平衡,但这无法保证。有些算法可一直保持树的平衡,但那比较难,也超出了本书范围。
这方面的主题请自行探寻。
程序核心是 Btree::insert_at_sub 函数,它保证添加到树的字符串严格保持字母顺序。下面是函数的伪代码。
在p指向的子树中插入字符串所需的步骤
If p为NULL,
    创建新节点并返回指向它的指针
Else if s “小于”该书点的字符串
		在左子树插入s
    ELse if s “大于"该节点的字符串
		在右子树插入s
     返回p
如目标字符串s按字母顺序既不小于、也不大于当前节点的值,表明发现了一个匹配的字符串。此时不应采取进一步行动,函数直接返回,不创建新节点。
返回值大多数时候意义不大,因为函数直接返回传给它的指针实参。但只要创建了新节点,其地址就会传回父节点,使新节点能正确连上。
练习
练习12.1.1.为Btree类编写并测试get-size函数,获取整个树的节点数量。添加私有数据成员nsize来完成。
答案:
# include <iostream>
# include <string>

using namespace std;

class Bnode
{
public:
	string val;
	Bnode* pLeft;
	Bnode* pRight;
	Bnode(string s)
	{
		val = s;
		pLeft = pRight = nullptr;
	}
};

class Btree
{
public:
	Btree()
	{
		root = NULL;
		size = 0;
	}
	void insert(string s)
	{
		root = insert_at_sub(s, root);
		size++;
	}
	void print()
	{
		print_sub(root);
	}
	int get_size()
	{
		return size;
	}
private:
	Bnode* root;
	int size;
	Bnode* insert_at_sub(string s, Bnode* p);
	void print_sub(Bnode* p);
};

int main()
{
	Btree my_tree;

	string sPrompt = "Enter a name(Enter when done): ";
	string sInput = " ";

	while (true)
	{
		cout << sPrompt;
		getline(cin, sInput);
		if (sInput.size() == 0)
		{
			break;
		}
		my_tree.insert(sInput);
	}
	cout << "Here are the names, in order." << endl;
	my_tree.print();
	cout << "Size of tree is: " << my_tree.get_size() << endl;
	return 0;
}

Bnode* Btree::insert_at_sub(string s, Bnode* p)
{
	if (!p)
	{
		return new Bnode(s);
	}
	else
		if (s < p->val)
		{
			p->pLeft = insert_at_sub(s, p->pLeft);
		}
		else
			if (s > p->val)
			{
				p->pRight = insert_at_sub(s, p->pRight);
			}
	return p;
}

void Btree::print_sub(Bnode* p)
{
	if (p)
	{
		print_sub(p->pLeft);
		cout << p->val << endl;
		print_sub(p->pRight);
	}
}
练习12.1.2,为Btree类编写并测试size-of-subtree函数,计算p指向的子树的节点数量。如传递根指针来计算整个树,应获得和练习12.1一样的结果。测试该理论是否正确。
答案:
# include <iostream>
# include <string>

using namespace std;

class Bnode
{
public:
	string val;
	Bnode* pLeft;
	Bnode* pRight;
	Bnode(string s)
	{
		val = s;
		pLeft = pRight = nullptr;
	}
};

class Btree
{
public:
	Btree()
	{
		root = NULL;
	}
	void insert(string s)
	{
		root = insert_at_sub(s, root);
	}
	void print()
	{
		print_sub(root);
	}
	int get_size()
	{
		return size_subtree(root);
	}
private:
	Bnode* root;
	Bnode* insert_at_sub(string s, Bnode* p);
	void print_sub(Bnode* p);
	int size_subtree(Bnode* p);
};

int main()
{
	Btree my_tree;

	string sPrompt = "Enter a name(Enter when done): ";
	string sInput = "";

	while (true)
	{
		cout << sPrompt;
		getline(cin, sInput);
		if (sInput.size() == 0)
		{
			break;
		}
		my_tree.insert(sInput);
	}
	cout << "Here are the name, in order." << endl;
	my_tree.print();
	cout << "Size of tree is: " << my_tree.get_size() << endl;
	return 0;
}

Bnode* Btree::insert_at_sub(string s, Bnode* p)
{
	if (!p)
	{
		return new Bnode(s);
	}
	else
		if (s < p->val)
		{
			p->pLeft = insert_at_sub(s, p->pLeft);
		}
		else
			if (s > p->val)
			{
				p->pRight = insert_at_sub(s, p->pRight);
			}
	return p;
}

void Btree::print_sub(Bnode* p) {
	if (p) {
		print_sub(p->pLeft);
		cout << p->val << endl;
		print_sub(p->pRight);
	}
}

int Btree::size_subtree(Bnode* p) {
	if (!p) {
		return 0;
	}
	return size_subtree(p->pLeft) + size_subtree(p->pRight) + 1;
}
练习12.1.3,为Btree类编写并测试find函数,获取一个字符串,查找该字符串是否在树中,返回true或false.采用递归方案。
答案:
#include <iostream>
#include <string>

using namespace std;

class Bnode {
public:
	string val;
	Bnode* pLeft;
	Bnode* pRight;
	Bnode(string s) { val = s; pLeft = pRight = nullptr; }
};

class Btree {
public:
	Btree() { root = NULL; }
	void insert(string s)
	{
		root = insert_at_sub(s, root);
	}
	void print() { print_sub(root); }
	bool find(string s) { return find_in_subtree(s, root); }
private:
	Bnode* root;
	Bnode* insert_at_sub(string s, Bnode* p);
	void   print_sub(Bnode* p);
	bool   find_in_subtree(string s, Bnode* p);
};


int main() {
	Btree my_tree;

	string sPrompt = "Enter a name (ENTER when done): ";
	string sInput = "";

	while (true) {
		cout << sPrompt;
		getline(cin, sInput);
		if (sInput.size() == 0) {
			break;
		}
		my_tree.insert(sInput);
	}
	cout << "Here are the names, in order." << endl;
	my_tree.print();
	if (my_tree.find("Bob")) {
		cout << "The name Bob is in the tree." << endl;
	}
	else {
		cout << "The name Bob is NOT in the tree." << endl;
	}
	return 0;
}


Bnode* Btree::insert_at_sub(string s, Bnode* p) {
	if (!p) {
		return new Bnode(s);
	}
	else if (s < p->val) {
		p->pLeft = insert_at_sub(s, p->pLeft);
	}
	else if (s > p->val) {
		p->pRight = insert_at_sub(s, p->pRight);
	}
	return p;
}

void Btree::print_sub(Bnode* p) {
	if (p) {
		print_sub(p->pLeft);
		cout << p->val << endl;
		print_sub(p->pRight);
	}
}


// Here is the recursive find procedure. Return
// value of false indicates failure; return true
// if a match is found.
//
bool Btree::find_in_subtree(string s, Bnode* p) {
	if (!p) {
		return false;
	}
	if (s < p->val) {
		return find_in_subtree(s, p->pLeft);
	}
	else if (s > p->val) {
		return find_in_subtree(s, p->pRight);
	}
	else {
		return true;
	}
}
练习12.1.4,写和上个练习一样的find函数,但这次采用迭代方案,依赖循环而不是调用自身。
答案:
#include <iostream>
#include <string>

using namespace std;

class Bnode {
public:
	string val;
	Bnode* pLeft;
	Bnode* pRight;
	Bnode(string s) { val = s; pLeft = pRight = nullptr; }
};

class Btree {
public:
	Btree() { root = NULL; }
	void insert(string s)
	{
		root = insert_at_sub(s, root);
	}
	void print() { print_sub(root); }
	bool find(string s);
private:
	Bnode* root;
	Bnode* insert_at_sub(string s, Bnode* p);
	void   print_sub(Bnode* p);
};


int main() {
	Btree my_tree;

	string sPrompt = "Enter a name (ENTER when done): ";
	string sInput = "";

	while (true) {
		cout << sPrompt;
		getline(cin, sInput);
		if (sInput.size() == 0) {
			break;
		}
		my_tree.insert(sInput);
	}
	cout << "Here are the names, in order." << endl;
	my_tree.print();
	if (my_tree.find("Bob")) {
		cout << "The name Bob is in the tree." << endl;
	}
	else {
		cout << "The name Bob is NOT in the tree." << endl;
	}
	return 0;
}


Bnode* Btree::insert_at_sub(string s, Bnode* p) {
	if (!p) {
		return new Bnode(s);
	}
	else if (s < p->val) {
		p->pLeft = insert_at_sub(s, p->pLeft);
	}
	else if (s > p->val) {
		p->pRight = insert_at_sub(s, p->pRight);
	}
	return p;
}

void Btree::print_sub(Bnode* p) {
	if (p) {
		print_sub(p->pLeft);
		cout << p->val << endl;
		print_sub(p->pRight);
	}
}


// Here is the iterative find procedure. Return
// value of false indicates failure; return true
// if a match is found.
//
bool Btree::find(string s) {
	Bnode* p = root;

	while (p) {
		if (s < p->val) {
			p = p->pLeft;
		}
		else if (s > p->val) {
			p = p->pRight;
		}
		else {
			return true;
		}
	}
	return false;
}
练习12.1.5.为Btree类编写并测试get-first和get-last函数,返回字母顺序排在第一位和最后一位的字符串。递归或迭代都可以。
答案:
#include <iostream>
#include <string>

using namespace std;

class Bnode {
public:
	string val;
	Bnode* pLeft;
	Bnode* pRight;
	Bnode(string s) { val = s; pLeft = pRight = nullptr; }
};

class Btree {
public:
	Btree() { root = NULL; }
	void insert(string s)
	{
		root = insert_at_sub(s, root);
	}
	void print() { print_sub(root); }

	string get_first();    // <- Here are decl's of the
	string get_last();     //    new functions.

private:
	Bnode* root;
	Bnode* insert_at_sub(string s, Bnode* p);
	void   print_sub(Bnode* p);
};


int main() {
	Btree my_tree;

	string sPrompt = "Enter a name (ENTER when done): ";
	string sInput = "";

	while (true) {
		cout << sPrompt;
		getline(cin, sInput);
		if (sInput.size() == 0) {
			break;
		}
		my_tree.insert(sInput);
	}
	cout << "Here are the names, in order." << endl;
	my_tree.print();
	cout << "First name in tree is: " << my_tree.get_first();
	cout << endl;
	cout << "Last name in tree is: " << my_tree.get_last();
	cout << endl;
	return 0;
}


Bnode* Btree::insert_at_sub(string s, Bnode* p) {
	if (!p) {
		return new Bnode(s);
	}
	else if (s < p->val) {
		p->pLeft = insert_at_sub(s, p->pLeft);
	}
	else if (s > p->val) {
		p->pRight = insert_at_sub(s, p->pRight);
	}
	return p;
}

void Btree::print_sub(Bnode* p) {
	if (p) {
		print_sub(p->pLeft);
		cout << p->val << endl;
		print_sub(p->pRight);
	}
}

// Get first function.
// This function returns an empty string if the
// tree is empty. Otherwise, it movers as far to
// the left as possible, and returns the value
// at that node.
//
string Btree::get_first() {
	Bnode* p = root;

	if (!p) {
		return "";
	}
	while (p->pLeft) {
		p = p->pLeft;
	}
	return p->val;
}

// Get last function.
// This function returns an empty string if the
// tree is empty. Otherwise, it movers as far to
// the right as possible, and returns the value
// at that node.
//
string Btree::get_last() {
	Bnode* p = root;

	if (!p) {
		return "";
	}
	while (p->pRight) {
		p = p->pRight;
	}
	return p->val;
}
练习12.1.6,未用内存长时间不释放可能造成内存泄漏,浪费资源并降低性能。所以二叉树用完后最好马上释放,包括树中所有节点。写一个函数专门删除每个节点,采用递归方案,向其传递根地址。提示:释放用new分配的对象要用语句delete p;,其中p是指向对象的指针。
答案:
#include <iostream>
#include <string>

using namespace std;

class Bnode {
public:
	string val;
	Bnode* pLeft;
	Bnode* pRight;
	Bnode(string s) { val = s; pLeft = pRight = nullptr; }
};

class Btree {
public:
	Btree() { root = NULL; }
	void insert(string s) {
		root = insert_at_sub(s, root);
	}
	void print() { print_sub(root); }

	void erase() {
		erase_subtree(root); // <- Here is the
		root = nullptr;
	}    // erase() declaration.
private:
	Bnode* root;
	Bnode* insert_at_sub(string s, Bnode* p);
	void   print_sub(Bnode* p);
	void   erase_subtree(Bnode* p);
};


int main() {
	Btree my_tree;

	string sPrompt = "Enter a name (ENTER when done): ";
	string sInput = "";

	while (true) {
		cout << sPrompt;
		getline(cin, sInput);
		if (sInput.size() == 0) {
			break;
		}
		my_tree.insert(sInput);
	}
	cout << "Here are the names, in order." << endl;
	my_tree.print();
	my_tree.erase();
	cout << "Now here is an empty tree..." << endl;
	my_tree.print();
	cout << endl;
	return 0;
}


Bnode* Btree::insert_at_sub(string s, Bnode* p) {
	if (!p) {
		return new Bnode(s);
	}
	else if (s < p->val) {
		p->pLeft = insert_at_sub(s, p->pLeft);
	}
	else if (s > p->val) {
		p->pRight = insert_at_sub(s, p->pRight);
	}
	return p;
}

void Btree::print_sub(Bnode* p) {
	if (p) {
		print_sub(p->pLeft);
		cout << p->val << endl;
		print_sub(p->pRight);
	}
}

// Erase subtree function.
//
void Btree::erase_subtree(Bnode* p) {
	if (!p) {
		return;
	}
	erase_subtree(p->pLeft);
	erase_subtree(p->pRight);
	delete p;
}
练习12.1.7,将本例的插入函数替换为迭代版本。提示:在循环中先判断目标字符串按字母顺序是小于还是大于当前节点的字符串,再判断对应的子节点(pLeft或pRight)
是否为空。
答案:
#include <iostream>
#include <string>

using namespace std;

class Bnode {
public:
	string val;
	Bnode* pLeft;
	Bnode* pRight;
	Bnode(string s) { val = s; pLeft = pRight = nullptr; }
};

class Btree {
public:
	Btree() { root = NULL; }
	void insert(string s);
	void print() { print_sub(root); }

private:
	Bnode* root;
	void   print_sub(Bnode* p);
};


int main() {
	Btree my_tree;

	string sPrompt = "Enter a name (ENTER when done): ";
	string sInput = "";

	while (true) {
		cout << sPrompt;
		getline(cin, sInput);
		if (sInput.size() == 0) {
			break;
		}
		my_tree.insert(sInput);
	}
	cout << "Here are the names, in order." << endl;
	my_tree.print();
	return 0;
}

// Interative version of insert().
// If root is null, then create new node and it
// becomes the root. Otherwise, search for proper
// insertion point and then create the node. If
// duplicate is found, don't insert new node.
//
void Btree::insert(string s) {
	Bnode* p = root;

	if (!p) {
		root = new Bnode(s);
		return;
	}
	while (true) {
		if (s < p->val) {
			if (p->pLeft) {
				p = p->pLeft;
			}
			else {
				p->pLeft = new Bnode(s);
				return;
			}
		}
		else if (s > p->val) {
			if (p->pRight) {
				p = p->pRight;
			}
			else {
				p->pRight = new Bnode(s);
				return;
			}
		}
		else {
			return;  // Do nothing if match found.
		}  // end if-else
	}   // end while
}  // end function


void Btree::print_sub(Bnode* p) {
	if (p) {
		print_sub(p->pLeft);
		cout << p->val << endl;
		print_sub(p->pRight);
	}
}
对比递归和迭代
删除列表用递归方案似乎更诱人,因为代码会短一些。但效率一定更高?事实上,如果可以在迭代和递归方案之间选择,迭代通常更高效。有时会因为写的代码较少而倾向于递归,但务必理解采用该方案会发生什么。
递归方案造成在每一级都发生一次函数调用。在二叉树的例子中,每个节点都发生一次额外的函数调用。一百万个节点深度的树便是一百万次函数调用!这种数量级的函数调用开销会变得非常昂贵。程序遍历列表,将每个节点的地址放到特殊 C++栈区段(stack segment),该内存区域专门用于容纳实参和局部变量。例如:
0x1000540
0x1000ff30
0x1000ff20
0x1000ff10
. . .
相反,迭代方案遍历列表,按发现顺序删除节点。形象一点说,递归实际是一种“面包屑”方案,一边遍历列表,一边留下面包屑。最后一边捡起面包屑(同时删除节点),一边返回。节点多了自然效率不高。
递归胜在优雅,而且对于某些问题来说是唯一实际的解决方案。例如马上就要讨论的汉诺塔问题,不用递归会很难。另外,编译器本身也是用C+写的,其中涉及大量递归函数调用,不用递归几乎不可能实现。
12.4 汉诺塔问题:动画版
第5章打印文本指示如何移动圆盘来解决汉诺塔问题。但亲眼观看圆盘如何移动是不是更妙?动画版本需更多编程。如何分解问题?
首先认识到,要处理的是三叠穿孔圆盘(或者说三个栈,stacks),可设计常规类 Cstack 并用它创建三个对象,每个对象都遵守以下约定。
-
每一叠(每个栈)最高一层是0层,下一层是1层,再下一个2层,以此类推。
-
对于每个 Cstack 对象,变量 tos 代表栈顶(Top of Stack),或者说是最高圆盘的上一层。所以 tos 范围在-1(所有圆盘都在,满栈)到 n-1(一个圆盘都没有,空栈)之间。例如,假定 n = 5(一塔5盘),下图展示了满栈和空栈时的 tos 值:

需跟踪每一叠圆盘的状态,假定每个盘都用一个编号代表其相对大小,1最小,0 空白
(无盘),所以,假定一叠 4 盘,那么就有以下情况。 -
空栈数组值为 {0,0,0,0};tos = 3.第四个位置(素引3)比栈顶高一层。
-
次大盘入栈,数组值为 {0,0,0,3};tos = 2。第三个位置(索引2)比栈顶高一层.
-
次小盘入栈,数组值为 {0,0,2,3);tos = 1。第二个位置(索引1)比栈顶高一层。
-
最小盘入栈,数组值为 {0,1,2,3);tos = 1。第一个位置(索引0)比栈顶高一层。
-
所有盘都在,则是一个完整的栈,数组值为(1,2,3,4);tos = - 1。
tos 永远是比顶层圆盘“高一层”的数组索引值。以满栈4个盘为例,如空栈(一个盘都没有),则 tos = 3,弹出(pop)一个盘之前,当前栈的 tos 值会递增1,指向“低一层"。压入(push)一个盘,tos 值则递减1,指向“高一层”。
1.n = stacks[0].pop();之前栈的情况,如下图所示。

2.stacks[1].push(n);之后栈的情况,如下图所示。

我承认,听起来一点都不直观,但要动画显示这些“栈”,只有这样设计才最简单。记住,每个栈的第一个数组位置永远对应物理上的最顶层。事实上,满栈(所有盘子,从最小到最大都在)的情况少,大多数时候栈都不满,所以最顶层的数组值经常都是0.
涉及栈类
为了存储三个“栈”的圆盘,需创建“栈”(tack)数据结构,第5章讨论了“栈”作为一种特殊内存区域,用于存储实参和局部变量,但此栈非彼栈。
本例需要一个特殊的、自定义的栈类,和大多数栈不同,该类顶部允许留空,使圆盘能掉落到底部,前几个位置通常包含0.运行程序并显示三个栈的动态图时,就明白为什么要这样设计.
我们将该栈类命名为 cstack ,将创建它的三个对象,类的设计如下图所示。

大多数数据都包含在每个对象的rings(圆盘)数组中。数组用一组整数存储不同大小的圆盘。1代表最小的盘,0代表空白。因此,对于一叠三盘的汉诺塔(1,2,3}代表三个盘都在,而(0,0,2}代表只有次小的盘,上方两个空白。tos 成员代表栈顶(top-of-the-stack)位置。
push 和 pop 函数已在上一节演示,它们是任何栈都有的常规操作。populate 和 clear 函数用于重置和初始化整个栈。
使用 Cstack类
声明好 Cstack 类之后,用它创建并初始化三个自定义栈对象。创建包含三个 Cstack 对象的数组:
Cstack stacks[3];
每次开始动画都发生以下两个事情。
-
调用 stacks[0].populate() 填充第一个栈。
-
调用 stacks[1].clear() 和 stacks[2].clear() 将其他栈设为空白状态。
这提供了极大的灵活性,用户可指定任意不超过 MAX_LEVELS(程序开头声明的常量)的大小来重启动画。例如,假定栈的大小是5,populate 和 clear 函数用值1到5填充第一个栈,另两个栈的前5个位置保持空白(0值)。如下图所示。

例12.2:动画汉诺塔
设计好 Cstack 类之后,就可以写汉诺塔的动画版。程序基于第5章的汉诺塔例子(例 5.5),当时是用递归逻辑将所有圆盘从塔1移至塔3。
记住两个规则:一次只能移动一个盘;大盘不能叠在小盘上。
新版本除了解题,还在每次移动后显示三个塔(即三叠圆盘)的状态。
// tower_visi.cpp
# include <iostream>

# define MAX_LEVELS 10

using namespace std;

// 声明三个栈,每个栈都是包含圆盘大小编号的一个对象
// stacks[3] 数组包含三个这样的对象
class Cstack
{
public:
	int rings[MAX_LEVELS];	// 该数组容纳圆盘大小编号
	int tos;	// 栈顶索引
	void populate(int size);	// 初始化栈
	void clear(int size);	// 清除栈
	void push(int n);	// 入栈
	int pop(void);	// 出栈
}
stacks[3];

void Cstack::populate(int size)
{
	for (int i = 0; i < size; i++)
	{
		rings[i] = i + 1;
	}
	tos = -1;
}

void Cstack::clear(int size)
{
	for (int i = 0; i < size; i++)
	{
		rings[i] = 0;
	}
	tos = size - 1;
}

void Cstack::push(int n)
{
	rings[tos--] = n;
}
int Cstack::pop(void)
{
	int n = rings[++tos];
	rings[tos] = 0;
	return n;
}

void move_stacks(int src, int dest, int other, int n);
void move_a_ring(int source, int dest);
void print_stacks(void);
void pr_chars(int ch, int n);
int stack_size = 7;

int main()
{
	stacks[0].populate(stack_size);
	stacks[1].clear(stack_size);
	stacks[2].clear(stack_size);
	print_stacks();
	move_stacks(stack_size, 0, 2, 1);
	return 0;
}

// 移动栈:递归解题。。。
// 假定已解决了移动 N-1 个盘的问题,在此前提下移动 N 个盘
// src = 来源找,dest = 目标栈
void move_stacks(int n, int src, int dest, int other)
{
	if (n == 1)
	{
		move_a_ring(src, dest);
	}
	else
	{
		move_stacks(n - 1, src, other, dest);
		move_a_ring(src, dest);
		move_stacks(n - 1, other, dest, src);
	}
}

// 移动一个盘, 从来源栈弹出盘,压入目标栈,打印新状态
void move_a_ring(int source, int dest)
{
	int n = stacks[source].pop();	// 从来源出栈
	stacks[dest].push(n);	// 压入目标栈
	print_stacks();	// 显示新状态
}

// 打印栈:打印三个栈的每个物理层的圆盘
void print_stacks(void)
{
	int n = 0;
	for (int i = 0; i < stack_size; i++)
	{
		for (int j = 0; j < 3; j++)
		{
			n = stacks[j].rings[i];
			pr_chars(' ', 12 - n);
			pr_chars('*', 2 * n);
			pr_chars(' ', 12 - n);
		}
		cout << endl;
	}
	system("PAUSE");	// 此处需暂停,其他系统可用其他方式
}

void pr_chars(int ch, int n)
{
	for (int i = 0; i < n; i++)
	{
		cout << (char)ch;
	}
}
程序核心是和第5章例子一样的递归函数,具体逻辑请参考例5.5.该函数 move-stacks 大多数时候都在调用自身。只有部分行动涉及移动一个盘。
区别在于,移动一个盘的时候不是单单打印一条消息,该版本调用新函数move-a-ring将单个盘从一个栈移到另一个,同时显示结果。
// 移动栈:递归解题。。。
// 假定已解决了移动 N-1 个盘的问题,在此前提下移动 N 个盘
// src = 来源找,dest = 目标栈
void move_stacks(int n, int src, int dest, int other)
{
	if (n == 1)
	{
		move_a_ring(src, dest);
	}
	else
	{
		move_stacks(n - 1, src, other, dest);
		move_a_ring(src, dest);
		move_stacks(n - 1, other, dest, src);
	}
}
那么,具体如何将单个盘从一个位置移到另一个?例 5.5 做不到,它只是打印一条消息。
但现在由于有三个栈对象反映当前状态,所以可采取以下步骤操纵状态。
- 顶部圆盘从来源栈弹出,记住其大小n.
- 将大小为n的圆盘压入目标栈。
- 打印新状态。
movearing函数用三条简单的语句完成上述步骤:
// 移动一个盘, 从来源栈弹出盘,压入目标栈,打印新状态
void move_a_ring(int source, int dest)
{
int n = stacks[source].pop();	// 从来源出栈
stacks[dest].push(n);	// 压入目标栈
print_stacks();	// 显示新状态
}
pop 和 push 函数定义成类的成员函数。它们利用每个对象的栈顶标记 tos 来获得栈顶圆盘(pop)或者将一个新盘放到栈顶(push)。
记住,成员函数在类(本例是 Cstack )的内部定义,通过类的对象(stacks[])实际调用。
void Cstack::push(int n)
{
	rings[tos--] = n;
}
int Cstack::pop(void)
{
	int n = rings[++tos];
	rings[tos] = 0;
	return n;
}
pop 函数获取当前栈顶部圆盘的大小编号,将那个盘替换成空白(0),从而将该盘从栈中移除,最后返回 n,即保存下来的大小编号。该编号作为 push 函数的输入,以便将相应大小的一个盘放到另一个栈上。
最后,程序使用 print_stacks 和辅助函数 pr_chars 打印当前状态。
现在应该明白为什么要用 0 代表空白,以及为什么必须将一个或多个 0 放到正的圆盘大小值“上面”。也就是说,如栈不满,那么最顶部(靠前)位置总是有一个或多个0。某一层的圆盘值为 0,表明此处无盘,程序打印空格。这就实现了物理模拟:圆盘向下掉落。
用行话讲,函数访问每个对象中的 rings[] 数组,获取一个完整的物理层下移前的值。
如特定位置的圆盘值为 0,除了空格之外什么都不打印(对应不满的一个栈顶部的空白)
如圆盘值大于0,则打印圆盘大小值两倍数量的星号(*),两边打印空格。例如,为大小为3的圆盘打印6个星号。// 打印栈:打印三个栈的每个物理层的圆盘 void print_stacks(void) { int n = 0; for (int i = 0; i < stack_size; i++) { for (int j = 0; j < 3; j++) { n = stacks[j].rings[i]; pr_chars(' ', 12 - n); pr_chars('*', 2 * n); pr_chars(' ', 12 - n); } cout << endl; } }pr_chars 函数是打印重复字符的一个辅助函数.
void pr_chars(int ch, int n)
{
	for (int i = 0; i < n; i++)
	{
		cout << (char)ch;
	}
}
最后,程序不应一次性全部输出完,中途应暂停,让人看清楚各个栈的变化.Windows系统使用system(“PAUSE”)命令就很理想
system("PAUSE");如果是其他系统,或者想写更好移植的代码,可用第8章介绍的技术提示用户继续.
# include <cstring>;	// 放到程序开头
,,,
string dummy;
cout << "按Enter 键继续。";
getline(cin, dummy);
练习
练习12.2.1,提示用户输入最开始一叠多少盘,而不是硬编码的 7,该数字不应超过MAX_LEVELS(本例设为10,主要是考虑到屏幕宽度),动画全部显示完成后重复,输入0则退出程序,这个版本的 populate 和 clear 成员函数显得很重要,因为需要重置初始状态.
练习12.2.2,不是将圆盘作为每个对象中的数组来实现,而是作为int*类型的指针来实现,在populate和clear成员函数中用new分配一系列整数,你能用delete关键字有效防范内存泄漏吗?
小结
-
有的C+代码严重依赖对象指针,对于这种指针,用成员访问操作符->访问对象的成员,例如
//获取指针指向之对象的num成员 int n = pFraction->num; //调用访问指针指向之对象的 set 函数 pFraction->set(0, 1); -
为对象使用动态内存分配和指针,可在内存中创建链表和二叉树这样的复杂数据结构。或简单,或复杂,随你心意.
-
用 new 关键字在运行时动态分配对象(的内存).
Node *pNode = new Node; -
在内存中创建列表和树时,有必要及时删除不再需要的对象,以防内存泄漏。否则计算机可能内存不足以至于需要重启。
-
用delete关键字释放对象占据的内存。
delete p; //p指向一个对象
delete[ ] p; //p指向一个对象数组
- 可创建对象(类的实例)数组,和创建其他种类的数组无异。
```c++
class Cstack{
, , ,
}stacks[3];
- 有时,应用程序要输出大量数据,需暂停并提示用户继续,system(“PAUSE”);对于支持的系统来说很理想。如果不支持,或者想写更好移植的代码,可按第 8 章的描述提示用户继续。
#include <string> //放到程序开头 , , , , string dummy; cout << "按ENTER维续."; getline(cin, dummy); - 递归有时是解决问题的唯一实际方案,如汉诺塔问题,但在迭代(循环)和递归方案都可以的情况下,迭代的效率几乎总是更高.


 1103
1103


 被折叠的 条评论
为什么被折叠?
被折叠的 条评论
为什么被折叠?
 到【灌水乐园】发言


