


本文目录
一、文件操作
1.1 字符串写入文件中
file_put_contents('filename, content);
例:
<?php
    $str='大家好,我是Counterrr';
    file_put_contents('text.txt', $str);
效果:

再原有基础,我们再次执行:
<?php
    $str='大家好,我是编程华仔';
    file_put_contents('text.txt', $str);
效果:

可以知道只要运行一层必定是清空重写。
在记事本中如果要实现换行,如下写法:
<?php
    $str="大家好,\r\n我是编程华仔";
    file_put_contents('text.txt', $str);
效果:

1.2 从文件中读取
file_get_contents( filename,);readfile(filename);
例:
<?php
    echo file_get_contents('./text.txt');
效果:

例:
<?php
    readfile('./text.txt');
效果:

1.3 文件操作
fopen(地址, 模式);常见3中模式:r:读,w:写,a:追加。
- w:写
<?php
    $fp = fopen('./text.txt', 'w'); // 打开文件返回文件指针
    var_dump($fp); // 文件指针类型,属于资源类型
    fputs($fp, '大河之水天上来'); // 写数据
    fclose($fp); // 关闭文件
效果:

2. r:读
<?php
    $fp =  fopen('./text.txt', 'r'); // 返回文件指针
    echo fgets($fp); // 读一行
效果:

3. a:追加
<?php
    $fp = fopen('./text.txt', 'a'); // 返回文件指针
    fputs($fp, '奔流到海不复还');
效果:

1.4 是否是文件(is_file())
例:
<?php
    echo is_file('./text.txt') ? '是文件' : '不是文件';
效果:

1.5 判断文件或者文件夹是否存在(file_exists())
例:
<?php
    echo file_exists('./text.txt') ? '文件存在' : '文件不存在';
效果:

1.6 删除文件(unlink())
例:
<?php
    $path = './tex.txt';
    if (file_exists($path)) {
        if (is_dir($path)) { // 如果是文件夹
            rmdir($path);
        }
        elseif (is_file($path)) { // 如果是文件
            unlink($path);
        }
    }
    else {
        echo '文件不存在';
    }
效果:

1.7 二进制读取(fread(resource, length))
例:
<?php
    $path = './favicon.ico';
    $fp = fopen($path, 'r');
    echo fread($fp, filesize($path));
效果:

可以使用header()告诉浏览器接下来解析的内容按照这个格式解析:
<?php
    $path = './favicon.ico';
    $fp = fopen($path, 'r');
    header('content-type:image/png');
    echo fread($fp, filesize($path));
效果:

file_get_contents( )也可以进行二进制的读取。
例:
<?php
    header('content-type:image/png');
    echo file_get_contents('./favicon.ico');
效果:

1.8 小结
- 文本流有明确的结束符,二进制没有,只有通过文件大小字节判断文件是否读取完毕。
- file_get_contents既可以进行字符的读取,也可以进行二进制读取。
二、表单数据提交的两种方式
- get
例:
<!DOCTYPE html>
<html lang="en">
<head>
    <meta charset="UTF-8">
    <meta name="viewport" content="width=device-width, initial-scale=1.0">
    <title>Document</title>
</head>
<body>
    <form action="" method="get">
        账号:<input type="text" name="user">
        密码:<input type="password" name="password">
        <button type="submit">确认</button>
    </form>
</body>
</html>
效果:

2. post
<!DOCTYPE html>
<html lang="en">
<head>
    <meta charset="UTF-8">
    <meta name="viewport" content="width=device-width, initial-scale=1.0">
    <title>Document</title>
</head>
<body>
    <form action="" method="post">
        账号:<input type="text" name="user">
        密码:<input type="password" name="password">
        <button type="submit">确认</button>
    </form>
</body>
</html>
效果:

get和post的区别:
- 外观上get请求可以在url地址栏上看到参数,post在地址栏上看不到参数。
- 安全性上post的安全性高于get。
- 提交原理,get提交是参数一个个的提交,post提交是将所有参数作为一个整体一起提交。
- 提交数据大小,一般get提交一般不超过255个字节,post的大小区别于服务器,post提交数据的大小可以在php.ini中配置(post_max_size = 8M)。
- 灵活性,get提交只要有页面的跳转就可以传递参数。post不灵活,提交需要有表单的参与。
get的三种跳转:
- html跳转
<a href="./test.php?name=counter&age=18">跳转</a>
- js跳转
location.href='./test.php?name=counter&age=18';
        location.assign('./test.php?name=counter&age=18');
        location.replace('./test.php?name=counter&age=18');
- php跳转
header('location:test.php?name=counter&age=18');
三、服务器接收数据
3.1 post接收数据
demo.php代码如下:
<!DOCTYPE html>
<html lang="en">
<head>
    <meta charset="UTF-8">
    <meta name="viewport" content="width=device-width, initial-scale=1.0">
    <title>Document</title>
</head>
<body>
    <form action="./test.php" method="post">
        账号:<input type="text" name="user">
        密码:<input type="password" name="password">
        <button type="submit">确认</button>
    </form>
</body>
</html>
test.php代码如下:
<?php
    if (!empty($_POST)) {
        echo '账号:'.$_POST['user'],'<br/>';
        echo '密码:'.$_POST['password'],'<br/>';
    }
?>
效果:

3.2 get接收数据
demo.php代码如下:
<!DOCTYPE html>
<html lang="en">
<head>
    <meta charset="UTF-8">
    <meta name="viewport" content="width=device-width, initial-scale=1.0">
    <title>Document</title>
</head>
<body>
    <form action="./test.php" method="get">
        账号:<input type="text" name="user">
        密码:<input type="password" name="password">
        <button type="submit">确认</button>
    </form>
</body>
</html>
test.php代码如下:
<?php
    if (!empty($_GET)) {
        echo '账号:'.$_GET['user'],'<br/>';
        echo '密码:'.$_GET['password'],'<br/>';
    }
?>
效果:

get的三种跳转方式都可以,这边就不演示了。
3.3 request接收数据
$_REQUEST() 保存GET和POST提交的值。技能获取get的数据又能post提交的数据。
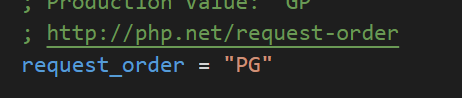
$_REQUEST()有个问题,就是当get和post的参数名一样时,那么$_REQUEST()获取的值取决于php的配置文件php.ini,如下:

先获取GET,再获取POST。那么POST会将GET给覆盖了。
如下代码,即有GET提交也有POST提交,demo.php:
<!DOCTYPE html>
<html lang="en">
<head>
    <meta charset="UTF-8">
    <meta name="viewport" content="width=device-width, initial-scale=1.0">
    <title>Document</title>
</head>
<body>
<?php
    if (!empty($_POST)) {
        echo '账号:'.$_REQUEST['user'],'<br/>';
    }
?>
    <form action="?user=justin" method="post">
        账号:<input type="text" name="user">
        <button type="submit">确认</button>
    </form>
</body>
</html>
效果:

可以看到GET的数据被POST的给覆盖掉了,接下来我们修改下配置文件如图:
先获取POST,再获取GET。那么GET会将POST给覆盖了。
还是同样的代码,效果如下:

在学习的php的路上,如果你觉得本文对你有所帮助的话,那就请关注点赞评论三连吧,谢谢,你的肯定是我写博的另一个支持。


 962
962


 被折叠的 条评论
为什么被折叠?
被折叠的 条评论
为什么被折叠?
 到【灌水乐园】发言


