


文章目录
前言:20天吃掉pytorch——学习解读
- 本人将依据《20天吃掉那只pytorch》这个优秀的项目回顾一遍pytorch的基本知识,总结成十个章节
项目地址:https://github.com/lyhue1991/eat_pytorch_in_20_days
思维导图
- 假设转化成tensor数据类型前的数据是data
- 假设转化成tensor数据类型后的数据是tensor_data
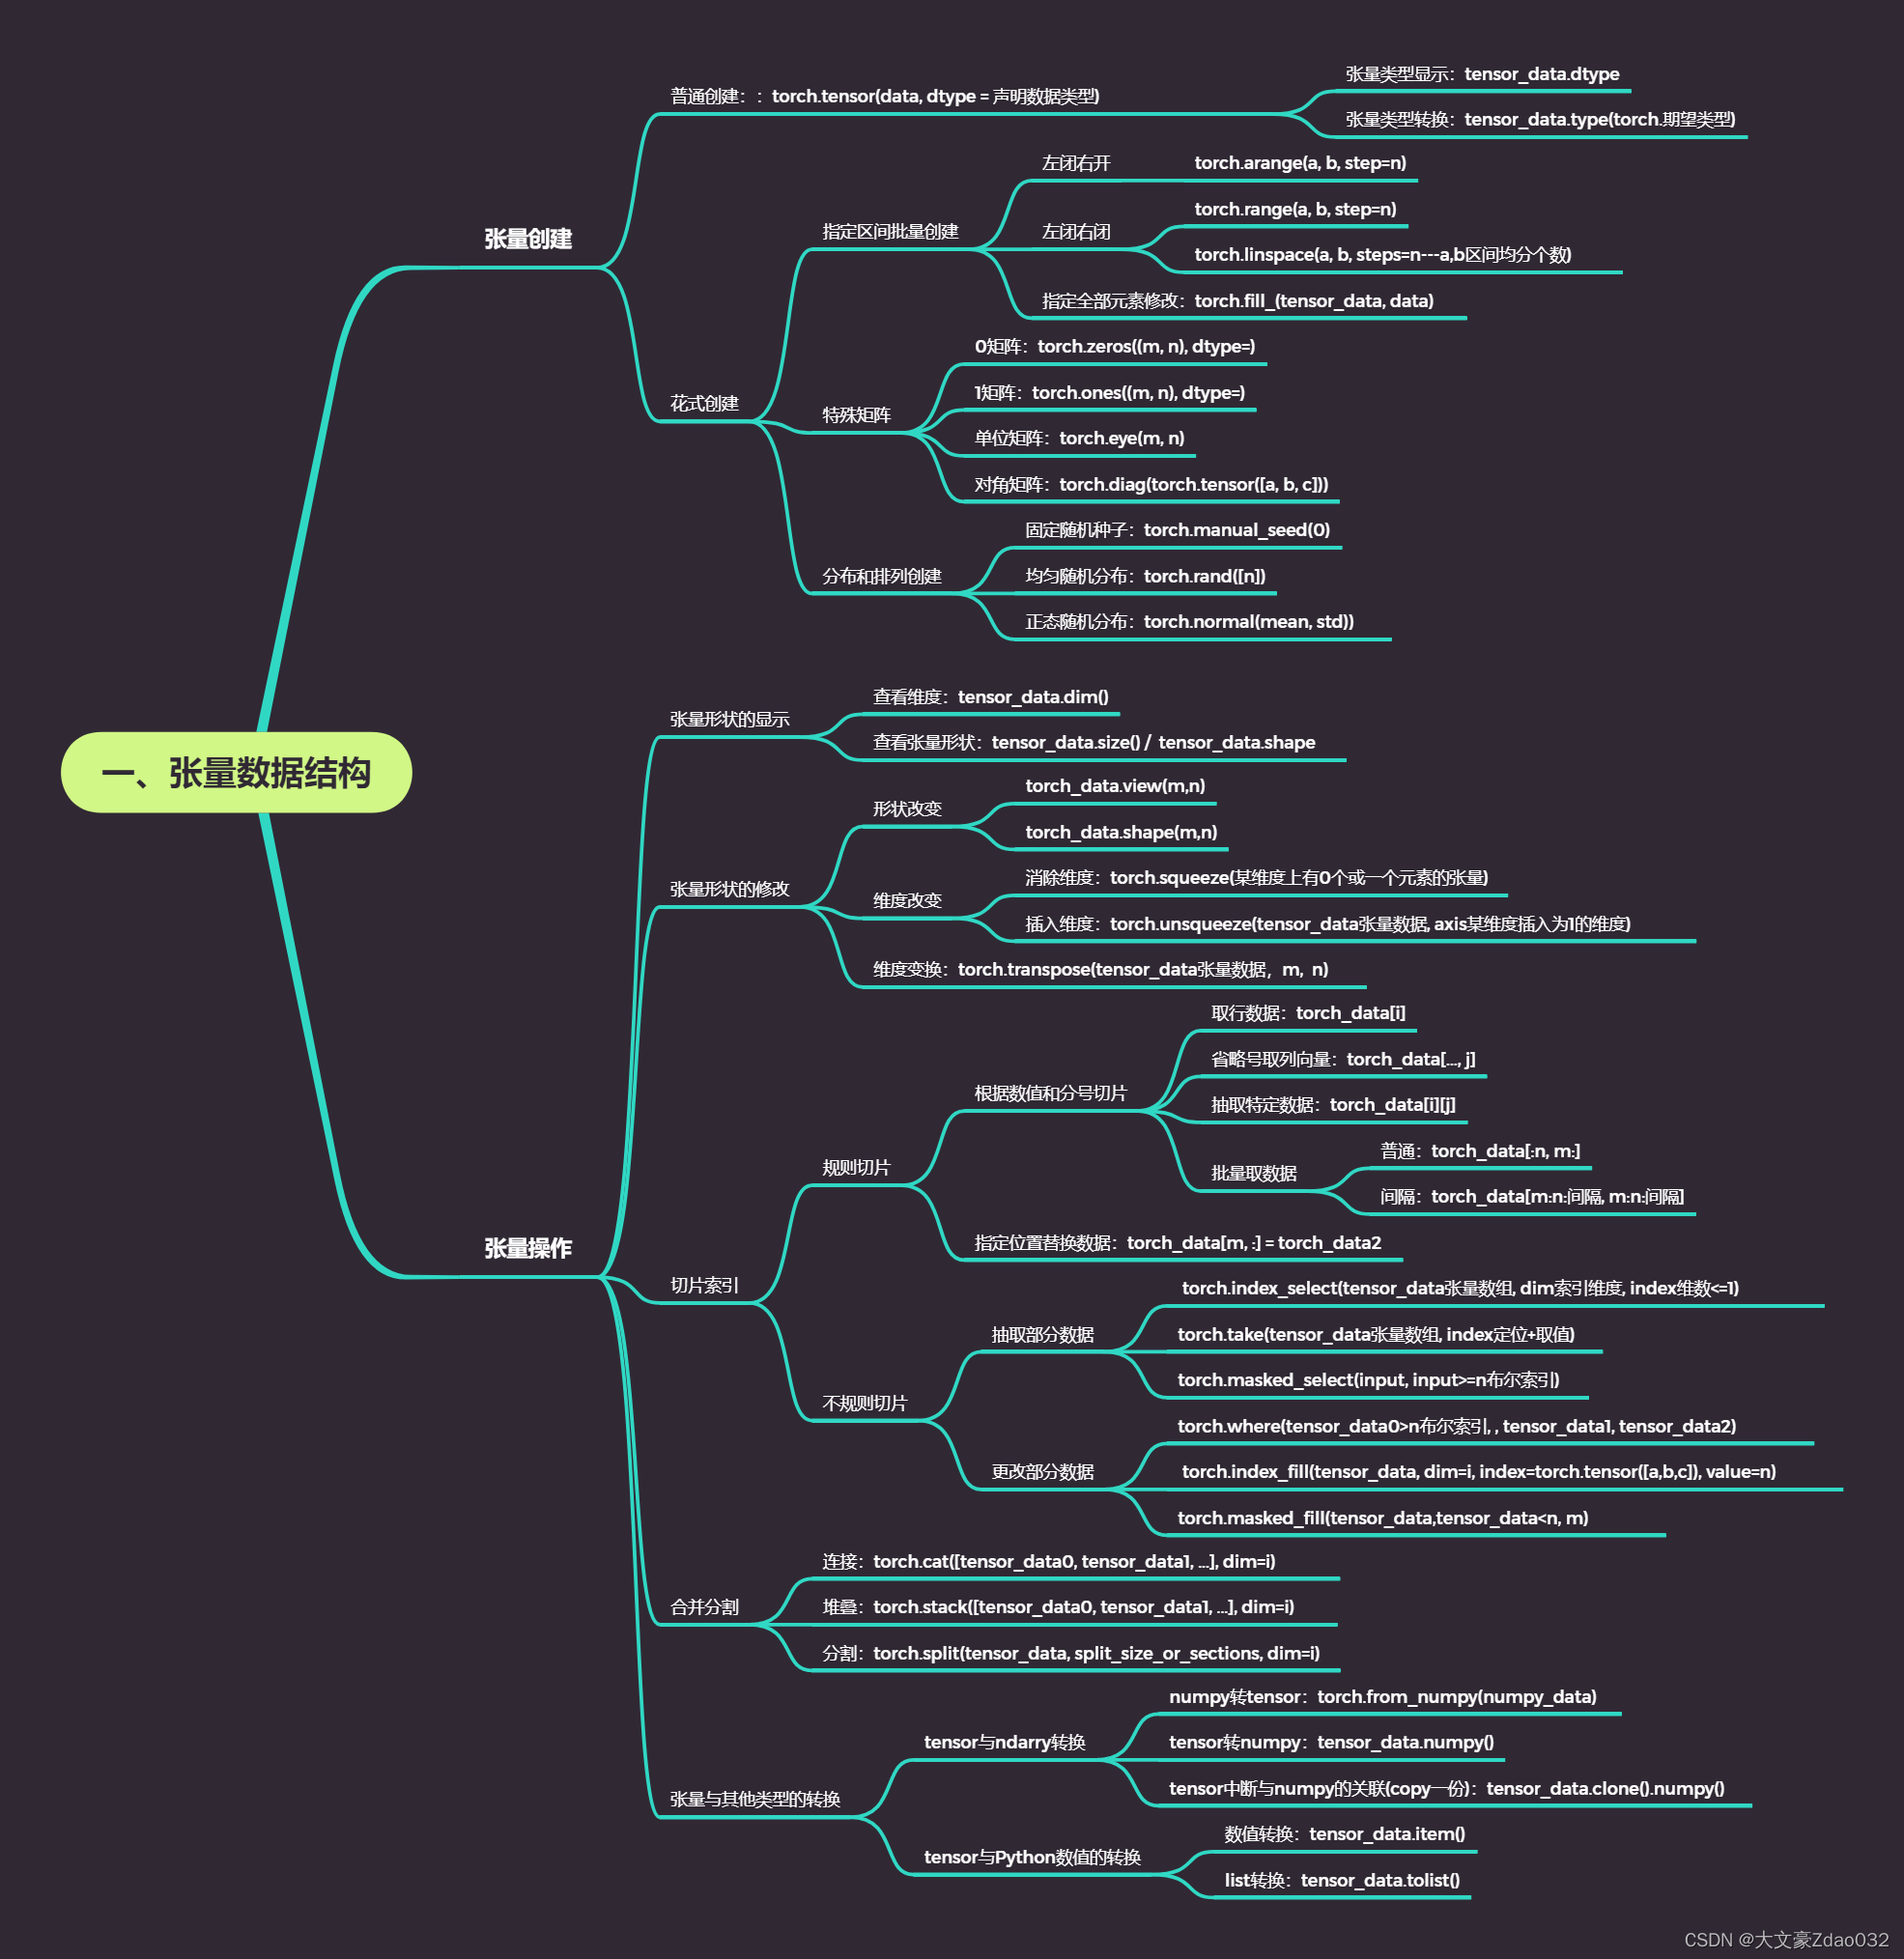
一、张量的创建
1.普通创建
import numpy as np
import torch

i = torch.tensor([1, 2, 3])
j = torch.tensor(2.0, dtype = torch.int)  # 指定tensor的数据类型
k = j.type(torch.bool)                    # 不同类型进行转换
# 输出tensor以及tensor的数据类型

print(i, i.dtype)
print(j, j.dtype)
print(k, k.dtype)

# 输出
# tensor([1, 2, 3]) torch.int64
# tensor(2, dtype=torch.int32) torch.int32
# tensor(True) torch.bool
2.花式创建
2.1指定批量区间创建
a = torch.tensor([1,2,3], dtype = torch.float)

# 左闭右开
b = torch.arange(1, 10, step=2)

# 左闭右闭
c = torch.range(1, 11, step=2)
d = torch.linspace(1, 2*3.14, steps=10)

print(torch.fill_(a, 3))  # a里的元素全部换为3
print(b)
print(c)
print(d)

# 输出
# tensor([3., 3., 3.])
# tensor([1, 3, 5, 7, 9])
# tensor([ 1.,  3.,  5.,  7.,  9., 11.])
# tensor([1.0000, 1.5867, 2.1733, 2.7600, 3.3467, 3.9333, 4.5200,5.1067, 5.6933,6.2800])
#
2.2特殊矩阵创建
print(torch.zeros(3,3))  #0矩阵
print(torch.ones(3,3)))  #1矩阵

# 单位矩阵
k = torch.eye(3,3)
# 对角矩阵
l = torch.diag(torch.tensor([1,2,3]))

print(k)
print(l)

# 输出
#tensor([[0., 0., 0.],
#        [0., 0., 0.],
#        [0., 0., 0.]])
#tensor([[1., 1., 1.],
#        [1., 1., 1.],
#        [1., 1., 1.]])
#tensor([[1., 0., 0.],
#        [0., 1., 0.],
#        [0., 0., 1.]])
#tensor([[1, 0, 0],
#        [0, 2, 0],
#        [0, 0, 3]])
2.3分布与排列创建
# 添加随机种子
torch.manual_seed(0)

# 均匀随机分布
h = torch.rand([5])
# 正态随机分布
# means: 均值为张量,包含每个输出元素相关的正态分布均值
# std: 标准差为张量,包含每个输出元素相关的正态分布标准差
i = torch.normal(mean=torch.zeros(3,3), std=torch.ones(3,3))
# 整数随机排列
j = torch.randperm(20)

print(h)
print(i)
print(j)

# 输出
# tensor([0.4963, 0.7682, 0.0885, 0.1320, 0.3074])
# tensor([[ 0.5507,  0.2704,  0.6472],
#        [ 0.2490, -0.3354,  0.4564],
#        [-0.6255,  0.4539, -1.3740]])
# tensor([1, 2, 4, 0, 3])
二、张量操作
- 标量是0维张量、向量是1维张量、矩阵是2维张量
- 有几层中括号就是多少维张量
1.张量形状的显示
tensor0 = torch.tensor(0)
tensor1 = torch.tensor([0,1])
tensor2 = torch.tensor([[0,1],[2,3]])

# dim方法查看维度
print(tensor0.dim(), tensor1.dim(), tensor2.dim())
# 使用size方法或shape属性查看张量形状
print(tensor0.size(), tensor1.size(), tensor2.size())
print(tensor0.shape, tensor1.shape, tensor2.shape)

# 输出
# 0 1 2
# torch.Size([]) torch.Size([2]) torch.Size([2, 2])
# torch.Size([]) torch.Size([2]) torch.Size([2, 2])
2.张量形状的修改
- 连续改变:torch_data.view(m,n)
- 扭曲改变:torch_data.shape(m,n)
matrix0 = torch.arange(0, 12).view(3, -1)  # 3, 4
matrix1 = matrix0.t()                      # 4, 3
matrix2 = matrix1.reshape(2, -1)           # 2, 6
print(matrix0)
print(matrix1)
print(matrix2)

# 输出
# tensor([[ 0,  1,  2,  3],
#         [ 4,  5,  6,  7],
#         [ 8,  9, 10, 11]])
# tensor([[ 0,  4,  8],
#         [ 1,  5,  9],
#         [ 2,  6, 10],
#         [ 3,  7, 11]])
# tensor([[ 0,  4,  8,  1,  5,  9],
#         [ 2,  6, 10,  3,  7, 11]])
- 消除维度:torch.squeeze(某维度上有0个或一个元素的张量)
- 插入维度:torch.unsqueeze(tensor_data张量数据, axis某维度插入为1的维度)
a = torch.tensor([[1.0,2.0],])
b = torch.squeeze(a)
d0 = torch.unsqueeze(b, axis=0)
d1 = torch.unsqueeze(b, axis=1)

print(a.shape)
print(b.shape)
print(d0.shape)
print(d1.shape)

# 输出
# torch.Size([1, 2])
# torch.Size([2])
# torch.Size([1, 2])
# torch.Size([2, 1])
- 维度变换:torch.transpose(tensor_data张量数据,m, n)
# torch.transpose可以变换张量的维度,常用于图像存储格式的变换
data = torch.floor(0 + (255-0)*torch.rand([100,256,256,4])).int()
# 起始:Batch, Height, Width, Channel
# 第一次变换:Batch, Width, Height, Channel
# 第二次变换:Batch, Channel, Height, Width
data_t = torch.transpose(torch.transpose(data, 1, 2), 1, 3)

print(data.shape)
print(data_t.shape)

# 输出
# torch.Size([100, 256, 256, 4])
# torch.Size([100, 4, 256, 256])
3.切片索引
3.1规则切片
torch.manual_seed(0)

a = torch.randn([5,5])
b = torch.floor(a)    # 地板除法:返回输入张量元素下限的新张量
c = torch.tensor([[1,2],[3,4]])
print(a)
print(b)
print(c)

# 输出
#tensor([[-1.1258, -1.1524, -0.2506, -0.4339,  0.8487],
#        [ 0.6920, -0.3160, -2.1152,  0.3223, -0.1577],
#        [ 1.4437,  0.2660,  0.1665,  0.8744, -0.1435],
#        [-0.1116, -0.6136,  1.2590,  2.0050,  0.0537],
#        [ 0.6181, -0.4128, -0.8411, -2.3160, -0.1023]])
#tensor([[-2., -2., -1., -1.,  0.],
#        [ 0., -1., -3.,  0., -1.],
#        [ 1.,  0.,  0.,  0., -1.],
#        [-1., -1.,  1.,  2.,  0.],
#        [ 0., -1., -1., -3., -1.]])
#tensor([[1, 2],
#        [3, 4]])

print(b[0]) # 第一行
print(b[-1]) # 第二行
print(b[0,2])  # 第0行第2列元素,等价于b[0][2]
print(b[:3])   # 第0行到第2行,等价于b[:3, :]
print(b[0::2, 0::2])  # 第0行到最后一行,每隔1行取一行;第0列到最后一列,每隔1列取一列

c.data[1,:] = torch.tensor([0.0,0.0])  # 指定位置替换元素
print(c)

# 输出
# tensor([-2., -2., -1., -1.,  0.])
# tensor([ 0., -1., -1., -3., -1.])
# tensor(-1.)
# tensor([[-2., -2., -1., -1.,  0.],
#         [ 0., -1., -3.,  0., -1.],
#         [ 1.,  0.,  0.,  0., -1.]])
# tensor([[-2., -1.,  0.],
#         [ 1.,  0., -1.],
#         [ 0., -1., -1.]])
#tensor([[1, 2],
#        [0, 0]])
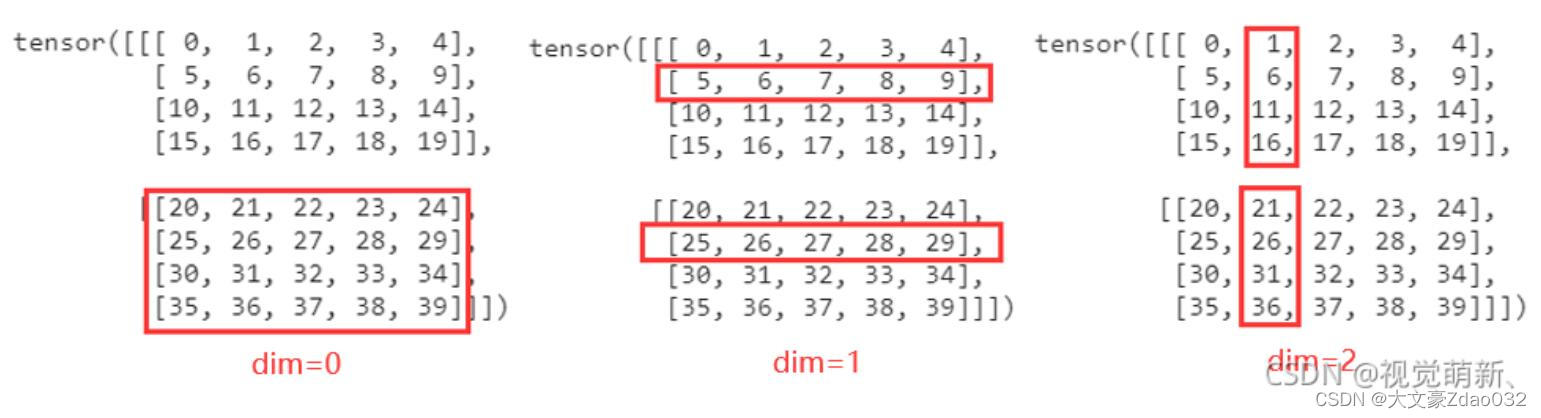
省略号的作用
# 省略号可以表示多个冒号
d = torch.arange(27).view(3,3,3)
print(d)
print(d[..., 1])

# 输出
# tensor([[[ 0,  1,  2],
#          [ 3,  4,  5],
#          [ 6,  7,  8]],

#         [[ 9, 10, 11],
#          [12, 13, 14],
#          [15, 16, 17]],

#         [[18, 19, 20],
#          [21, 22, 23],
#          [24, 25, 26]]])
# tensor([[ 1,  4,  7],
#         [10, 13, 16],
#         [19, 22, 25]])
3.2不规则切片
- 这里用实例进行理解,假设有4个班级,每个班级10个学生,每个学生有7门科目成绩,用4 * 10 * 7的张量来表示
# 利用均匀随机分布生成0到100区间的整数分数数据
scores = torch.floor(0+(100-0)*torch.rand([4,10,7])).int()
3.2.1抽取部分数据
- torch.index_select(tensor_data张量数组, dim索引维度, index维数<=1)
# 抽取每个班级第0个学生,第5个学生的第3门课程,第6门课程成绩

# 先抽取每个班级第0个学生,第5个学生的全部成绩
# 再将全部成绩的张量嵌套,取第3门课程,第6门课程成绩
torch.index_select(torch.index_select(scores, dim=1, index=torch.tensor([0, 5])), dim=2, index=torch.tensor([3,6]))

# 输出
# tensor([[[13, 79],
#          [18, 88]],

#         [[84, 52],
#          [11, 39]],

#         [[74, 39],
#          [ 9, 68]],

#         [[20, 72],
#          [47, 65]]], dtype=torch.int32)
- torch.take(tensor_data张量数组, index定位+取值)
- take方法将输入张量看成一维数组,输出和index同形状
- 如4107的张量分数集,抽取第1个班级第3个学生的第5门课程
- 定位dim0: 1 * 10 * 7
- 定位dim1: 3 * 7
- 取值:5
- 合并索引index:torch.tensor([1107 + 3*7 + 5])
# 抽取第0个班级第0个学生的第0门课程
# 抽取第2个班级的第4个学生的第1门课程
# 抽取第3个班级的第9个学生第6门课程成绩
torch.take(scores, index=torch.tensor([0*10*7+0, 2*10*7+4*7+1, 3*10*7+9*7+6]))

# 输出
# tensor([24, 49, 54], dtype=torch.int32)
- torch.masked_select(tensor_data张量数组, tensor_data>=n布尔索引)
# 抽取分数大于等于80分的分数
torch.masked_select(scores, scores>=80)

# 输出
# tensor([81, 81, 99, 83, 81, 98, 91, 93, 94, 94, 88, 85, 97, 83, 95, 84, 85, 81,
#        97, 81, 97, 84, 81, 93, 95, 81, 89, 85, 89, 84, 82, 84, 92, 90, 99, 91,
#        94, 80, 87, 86, 91, 88, 91, 93, 89, 91, 84, 83], dtype=torch.int32)
3.2.2更改部分数据
- torch.where(tensor_data0>n布尔索引, , tensor_data1, tensor_data2)
# 分数大于60分更改为1,否则更改为0
torch.where(scores>60, torch.tensor(1), torch.tensor(0))

# 输出
# tensor([[[0, 0, 0, 0, 0, 1, 1],
#          [0, 0, 1, 1, 1, 0, 1],
#          [0, 0, 0, 0, 0, 1, 1],
#          ...]]])
- torch.index_fill(tensor_data, dim=i, index=torch.tensor([a,b,c]), value=n)
# 将每个班级第0个学生,第5个学生,第9个学生的全部成绩赋值成满分
torch.index_fill(scores, dim = 1, index = torch.tensor([0,5,9]), value = 100)

# 输出
# tensor([[[100, 100, 100, 100, 100, 100, 100],
#          [ 27,  48,  81,  99,  69,  56,  83],
#          [ 20,  59,  11,  15,  24,  72,  70],
#          ...]]])
- torch.masked_fill(tensor_data, tensor_data<n, m)
# 将分数小于60分的分数赋值成60分
torch.masked_fill(scores, scores<60, 60)

# 输出
# tensor([[[60, 60, 60, 60, 60, 81, 79],
#          [60, 60, 81, 99, 69, 60, 83],
#          [60, 60, 60, 60, 60, 72, 70],
#          ...]]])
4.合并分割
- 连接(不增加维度):torch.cat([tensor_data0, tensor_data1, …], dim=i)
- 堆叠(增加维度):torch.stack([tensor_data0, tensor_data1, …], dim=i)
a = torch.tensor([[1.0,2.0],[3.0,4.0]])
b = torch.tensor([[5.0,6.0],[7.0,8.0]])
c = torch.tensor([[9.0,10.0],[11.0,12.0]])

print(torch.cat([a,b,c], dim=0))
print(torch.cat([a,b,c], dim=1))
print(torch.stack([a,b,c], axis=0))
print(torch.stack([a,b,c], axis=1))

# 输出
# tensor([[ 1.,  2.],
#         [ 3.,  4.],
#         [ 5.,  6.],
#         [ 7.,  8.],
#         [ 9., 10.],
#         [11., 12.]])
# tensor([[ 1.,  2.,  5.,  6.,  9., 10.],
#         [ 3.,  4.,  7.,  8., 11., 12.]])
# tensor([[[ 1.,  2.],
#          [ 3.,  4.]],

#         [[ 5.,  6.],
#          [ 7.,  8.]],

#         [[ 9., 10.],
#          [11., 12.]]])
# tensor([[[ 1.,  2.],
#          [ 5.,  6.],
#          [ 9., 10.]],

#         [[ 3.,  4.],
#          [ 7.,  8.],
#          [11., 12.]]])
- 分割torch.split(tensor_data, split_size_or_sections, dim=i)
d = torch.cat([a,b,c], dim=0)

# 指定分割份数平均分割
print(torch.split(d, split_size_or_sections=2, dim=0))
# 通过指定每份的记录数量进行分割
print(torch.split(d,split_size_or_sections =[4,1,1],dim = 0))

# 输出
# (tensor([[1., 2.],
#         [3., 4.]]), tensor([[5., 6.],
#         [7., 8.]]), tensor([[ 9., 10.],
#         [11., 12.]]))
# (tensor([[1., 2.],
#         [3., 4.],
#         [5., 6.],
#         [7., 8.]]), tensor([[ 9., 10.]]), tensor([[11., 12.]]))
5.张量与其他类型的转换
5.1tensor与ndarry转换
# tensor和numpy共享数据内存的转换
array0 = np.zeros(3)
array0_tensor = torch.from_numpy(array0)   #  numpy数组转Tensor
np.add(array0, 1, out=array0)              # numpy+1
array0_tensor_arr = array0_tensor.numpy()  #  Tensor转numpy数组
array0_tensor.add_(1)                      # tensor+1

print(array0)
print(array0_tensor)
print(array0_tensor_arr)

# 用clone方法拷贝张量来中断关联
array0_tensor_arr1 = array0_tensor.clone().numpy()
np.add(array0_tensor_arr1, 1, array0_tensor_arr1)

print('--------------------------')
print(array0_tensor_arr1)
print(array0_tensor)

# 输出
# [2. 2. 2.]
# tensor([2., 2., 2.], dtype=torch.float64)
# [2. 2. 2.]
# --------------------------
# [3. 3. 3.]
# tensor([2., 2., 2.], dtype=torch.float64)
5.2tensor与Python数值的转换
# item方法和tolist方法转换张量
a = torch.tensor(1)

a_num = a.item()
b = torch.rand(2, 2)
b_list = b.tolist()

print(a_num, b_list)

# 输出
# 1 [[0.013463497161865234, 0.14680331945419312], [0.3517596125602722, 0.7597661018371582]]
总结
如有错误或不足的地方,请评论区指出,本人认真修改,谢谢~!


 2862
2862


 被折叠的 条评论
为什么被折叠?
被折叠的 条评论
为什么被折叠?
 到【灌水乐园】发言


