


目录
3、.yml配置文件值的获取@ConfigurationProperties
5、@ConfigurationProperties和@Value的区别
6、@PropertySource和@ImportResource
一、了解
1、简介
Spring Boot来简化Spring应用的开发,约定大于配置,去繁从简,仅仅run就可以创建一个独立的、产品级别的应用。
整个Spring技术栈的整和;
优点如下:
- 快速创建可独立运行的Spring项目以及主流框架集合
- 使用嵌入式的Servlet容器,应用无需打成WAR包
- starters(启动器)自动依赖与版本控制
- 大量的自动配置,简化开发
- 无需配置XML,无代码生成,开箱即用
- 准生成环境的运行时应用监控
- 与云计算的天然集成
2、微服务
http://www.bdata-cap.com/newsinfo/1713874.html
2014 martinflower
微服务:架构风格
一个应用应该是一组小型服务,可以通过HTTP进行互通
每一个功能元素最终都是一个可独立替换和独立升级的软件单元
二、Helloword
环境:
- JDK1.7及以上
- Maven3.3及以上
- Spring Boot
- IDEA、STS或者Eclipse
1、创建Maven项目
2、导入Spring Boot相关依赖
    <parent>
        <groupId>org.springframework.boot</groupId>
        <artifactId>spring-boot-starter-parent</artifactId>
        <version>2.3.4.RELEASE</version>
    </parent>

    <dependencies>
        <!-- https://mvnrepository.com/artifact/org.springframework.boot/spring-boot-starter-web -->
        <dependency>
            <groupId>org.springframework.boot</groupId>
            <artifactId>spring-boot-starter-web</artifactId>
            <version>2.3.4.RELEASE</version>
        </dependency>
    </dependencies>
3、配置Spring Boot应用
HelloWordMainApplication.java
package com.springboot.rocke;

import org.springframework.boot.SpringApplication;
import org.springframework.boot.autoconfigure.SpringBootApplication;
import org.springframework.context.ConfigurableApplicationContext;

/**
 * ClassName:HelloWordMainApplication
 * Package:com.springboot.rocke
 * Description:
 *
 * @createDate:2021-02-10 14:28
 * @author:2655179348@qq.com
 */


/*
* @SpringBootApplication:来标注一个主程序类,表明这是一个SpringBoot应用
* */
@SpringBootApplication
public class HelloWordMainApplication {
    public static void main(String[] args) {

        //启动Spring应用
        final ConfigurableApplicationContext run = SpringApplication.run(HelloWordMainApplication.class, args);
    }
}
4、编写Controller
package com.springboot.rocke;

import org.springframework.stereotype.Controller;
import org.springframework.web.bind.annotation.RequestMapping;
import org.springframework.web.bind.annotation.ResponseBody;

/**
 * ClassName:HelloWordController
 * Package:com.springboot.rocke
 * Description:
 *
 * @createDate:2021-02-10 14:36
 * @author:2655179348@qq.com
 */
@Controller
public class HelloWordController {

    @ResponseBody
    @RequestMapping("/hello")
    public String hello(){
        return "hello word";
    }
}
5、启动应用
启动main方法即可

6、简化部署
导入插件:
    <build>
        <plugins>
            <plugin>
                <groupId>org.springframework.boot</groupId>
                <artifactId>spring-boot-maven-plugin</artifactId>
            </plugin>
        </plugins>
    </build>
package打包后,直接使用java -jar命令即可运行

7、分析
(1)spring-boot-dependencies
<parent>
    <groupId>org.springframework.boot</groupId>
    <artifactId>spring-boot-starter-parent</artifactId>
    <version>2.3.4.RELEASE</version>
</parent>
父项目的父项目:真正管理SpringBoot的所有依赖版本;版本总裁:
<parent>
  <groupId>org.springframework.boot</groupId>
  <artifactId>spring-boot-dependencies</artifactId>
  <version>2.3.4.RELEASE</version>
</parent>
所以我们导入默认依赖时不需要声明版本的;
(2)spring-boot-starter-web
帮我们导入了web模块正常运行所依赖的组件
spring-boot-starter:SpringBoot场景启动器
SpringBoot将所有的功能场景都抽取出来了,做成一个个starters,我们只需要在项目中引入这些starters,相关场景的所以依赖,都会导入进来,要用什么功能,就导入对应的启动器
(3)主程序类,主入口类
@SpringBootApplication:标注一个主程序类,表明这是一个SpringBoot的主配置类,SpringBoot会运行这个类的main方法来启动SpringBoot应用

@SpringBootConfiguration:标识这是个Springboot的配置类
@EnableAutoConfiguration:开启自动配置功能:-》
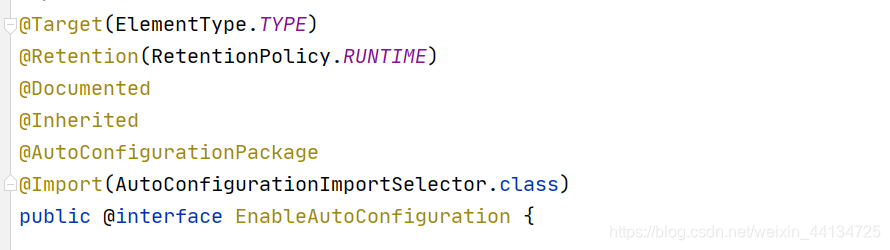
@AutoConfigurationPackage:自动配置包-》
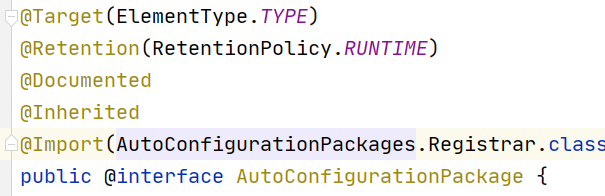
@Import(AutoConfigurationPackages.Registrar.class):
@Import:Spring的底层注解,给容器中导入组件,导入的组件由AutoConfigurationPackages.Registrar.class这个类来指定;

AutoConfigurationPackages.Registrar.class:将主配置类(@SpringBootApplication所标注的类)所在的包以及下面所有的子包得到所有组件扫描到Spring容器中;
@Import(AutoConfigurationImportSelector.class):导入哪些组件的选择器
将所有需要导入的组件,以全类名的方式返回;这些组件就会被添加到容器中;最终会给容器中导入非常多的自动配置类:给容器中导入这个场景需要的所有组件并配置好这些组件。
有了自动配置类,就免去了我们收到编写配置和注入组件的工作;
Spring Boot在启动时,从类路径下的META-INF/spring.factories中获取EnableAutoConfiguration指定的值,作为指定配置类,导入到容器中,自动配置类就生效了,帮我们进行自动配置。
J2EE的整体的整合解决方案和自动装配都在spring-boot-autoconfigure这个包下
8、快速创建SpringBoot应用
使用Spring Initializer快速创建SpringBoot项目

快速生成的SpringBoot项目:
- 主程序已经生成好了,我们只需要编写我们自己的逻辑
- 配置文件夹(resource)的结构:
-
static=》静态资源(css,js),
-
templates=》所有的模板页面(嵌入式的tomcat不支持jsp,但我们可以使用模板引擎,比如freemarker、thymeleaf)
-
application.properties:SpringBoot应用的配置文件,,可以修改一些默认配置
三、SpringBoot的配置
SpringBoot使用一个全局配置文件,配置文件名是固定的
- application.properties
- application.yml
配置文件的作业:修改SpringBoot自动配置的默认值
.yml是YAML(YAML Ain`t Markup Language)语言的文件,以数据为中心,比JSON、XML等更适合做配置文件。
同一目录下,properties优先级高于yml
1、yml的基本语法
key:(空格,必须要有)value
表示一组键值对,
如果属性有层级关系,以空格的缩进来控制层级关系,只要是左对齐的一列数据,都是同一个层级的。

2、值的写法
字面量:数字,字符串,布尔值
k: v 字面量直接写就好了
字符串默认不用加上单引号或者双引号
“”:双引号引起的字符串,不会转义里边的特殊字符,特殊字符会作为本身要表示的意思
‘’:单引号引起的字符串,会转义特殊字符,特殊字符最终只是一个普通字符串数据
对象:
k: v 对象还是键值对的方式,在下一行来写对象的属性和值的对应关系,注意缩进
也可以这样写:
k: {xx:xx,xxx:xxx}
数组:
用-(空格)值表示数组中的一个元素
也可以这么来写:

3、.yml配置文件值的获取@ConfigurationProperties
安装依赖:
        <dependency>
            <groupId>org.springframework.boot</groupId>
            <artifactId>spring-boot-configuration-processor</artifactId>
            <optional>true</optional>
        </dependency>

结果:

4、properties配置文件编码的问题

5、@ConfigurationProperties和@Value的区别
@Value
    /*
    * <bean>
        <property name="" value="字面量/${}从环境变量、配置文件中取值/#{SpEL}"></property>
      </bean>
    * */

    @Value("${person.lastName}")
    private String lastName;
    @Value("#{11*2}")
    private Integer age;
    @Value("true")
    private Boolean man;
| @ConfigurationProperties | @Value | |
| 功能 | 批量注入配置文件的属性,只需要制定prefix | 一个一个指定 |
| 松散绑定 | name支持驼峰与-、_的转化 | 不支持 |
| SpEL | 不支持 | 支持 |
| JSR303数据校验 | 支持,@Validated | 不支持 |
JSR303校验:
@Component
@Validated
@ConfigurationProperties(prefix = "person")
public class Person {


    @Email
    private String lastName;
如果我们只是在某个业务逻辑中需要获取一下配置文件中的某项值,我们就使用@Value,
如果是我们专门编写了1一个javaBean来和配置文件进行映射,我们就直接使用@ConfigurationProperties
6、@PropertySource和@ImportResource
@PropertySource:加载指定的配置文件
@Component
@ConfigurationProperties(prefix = "person")
@PropertySource(value = "classpath:person.properties")
public class Person {
@ImportResource:导入Spring的配置文件,@ImportResource标注在配置类上,让配置文件中的内容生效

SpringBoot推荐给容器中添加组件的方式:全注解的方式
/*@Configuration:指明当前类是一个配置类
* */
@Configuration
public class MyAppConfig {

    //@Bean将方法的返回值添加到容器中,这个组件的默认id就是方法名
    @Bean
    public HelloService helloService(){
        return new HelloService();
    }
}
7、配置文件的占位符

8、Profile
Profile是Spring对不同环境提供不同配置功能的支持,可以通过激活、指定参数等方式快速切换环境。
(1)多profile文件形式
在主配置文件编写的时候,文件名可以是application-{profile}.properties/yml
多个主配置文件,默认使用appl.properties的配置

在主配置文件中指定要激活的配置

(2)yml支持多文档块的方式
server:
  port: 8080
spring:
  profiles:
    active: dev


---
server:
  port: 8083
spring:
  profiles: dev


---
server:
  port: 8084

spring:
  profiles: prod
(3)命令行激活
命令行
--spring.profiles.active=dev

9、配置文件的加载位置
springboot启动会默认扫描一下位置的application.properties或者.yml作为默认配置
- file:./config/
- file: ./
- classpath:/config/
- classpath:/
以上优先级是从高到低,所有位置的文件都会被加载,高优先级配置的内容会覆盖低优先级配置的内容
我们可以通过spring.config.location来改变默认配置文件的位置:项目打包后,我们可以使用命令行参数的形式来指定配置文件的新位置;指定的新配置文件和默认加载的配置文件会同时起作用,形成互补配置
10、自配置原理
(1)SpringBoot启动的时候,加载主配置类,开启了自动配置功能(@EnableAutoConfiguration)
(2)@EnableAutoConfiguration的作用
利用AutoConfigurationImportSelector给容器中导入组件
可以查看selectImports方法的内容
List<String> configurations = this.getCandidateConfigurations(annotationMetadata, attributes);
List<String> configurations = SpringFactoriesLoader.loadFactoryNames(getSpringFactoriesLoaderFactoryClass(),
				getBeanClassLoader());
SpringFactoriesLoader.loadFactoryNames()扫描所有的jar包下的META-INF/spring.factories,把扫描到的这些文件的内容包装成properties对象,从properties中获取EnableAutoConfiguration.class(类)对应的值,添加在容器中。


总结:
将内路径下META_INF/spring.factories里边配置的所有EnableAutoConfiguration的值添加到容器中
# Auto Configure
org.springframework.boot.autoconfigure.EnableAutoConfiguration=\
org.springframework.boot.autoconfigure.admin.SpringApplicationAdminJmxAutoConfiguration,\
org.springframework.boot.autoconfigure.aop.AopAutoConfiguration,\
org.springframework.boot.autoconfigure.amqp.RabbitAutoConfiguration,\
org.springframework.boot.autoconfigure.batch.BatchAutoConfiguration,\
org.springframework.boot.autoconfigure.cache.CacheAutoConfiguration,\
org.springframework.boot.autoconfigure.cassandra.CassandraAutoConfiguration,\
org.springframework.boot.autoconfigure.context.ConfigurationPropertiesAutoConfiguration,\
org.springframework.boot.autoconfigure.context.LifecycleAutoConfiguration,\
org.springframework.boot.autoconfigure.context.MessageSourceAutoConfiguration,\
org.springframework.boot.autoconfigure.context.PropertyPlaceholderAutoConfiguration,\
org.springframework.boot.autoconfigure.couchbase.CouchbaseAutoConfiguration,\
org.springframework.boot.autoconfigure.dao.PersistenceExceptionTranslationAutoConfiguration,\
org.springframework.boot.autoconfigure.data.cassandra.CassandraDataAutoConfiguration,\
org.springframework.boot.autoconfigure.data.cassandra.CassandraReactiveDataAutoConfiguration,\
org.springframework.boot.autoconfigure.data.cassandra.CassandraReactiveRepositoriesAutoConfiguration,\
org.springframework.boot.autoconfigure.data.cassandra.CassandraRepositoriesAutoConfiguration,\
org.springframework.boot.autoconfigure.data.couchbase.CouchbaseDataAutoConfiguration,\
org.springframework.boot.autoconfigure.data.couchbase.CouchbaseReactiveDataAutoConfiguration,\
org.springframework.boot.autoconfigure.data.couchbase.CouchbaseReactiveRepositoriesAutoConfiguration,\
org.springframework.boot.autoconfigure.data.couchbase.CouchbaseRepositoriesAutoConfiguration,\
org.springframework.boot.autoconfigure.data.elasticsearch.ElasticsearchDataAutoConfiguration,\
org.springframework.boot.autoconfigure.data.elasticsearch.ElasticsearchRepositoriesAutoConfiguration,\
org.springframework.boot.autoconfigure.data.elasticsearch.ReactiveElasticsearchRepositoriesAutoConfiguration,\
org.springframework.boot.autoconfigure.data.elasticsearch.ReactiveElasticsearchRestClientAutoConfiguration,\
org.springframework.boot.autoconfigure.data.jdbc.JdbcRepositoriesAutoConfiguration,\
org.springframework.boot.autoconfigure.data.jpa.JpaRepositoriesAutoConfiguration,\
org.springframework.boot.autoconfigure.data.ldap.LdapRepositoriesAutoConfiguration,\
org.springframework.boot.autoconfigure.data.mongo.MongoDataAutoConfiguration,\
org.springframework.boot.autoconfigure.data.mongo.MongoReactiveDataAutoConfiguration,\
org.springframework.boot.autoconfigure.data.mongo.MongoReactiveRepositoriesAutoConfiguration,\
org.springframework.boot.autoconfigure.data.mongo.MongoRepositoriesAutoConfiguration,\
org.springframework.boot.autoconfigure.data.neo4j.Neo4jDataAutoConfiguration,\
org.springframework.boot.autoconfigure.data.neo4j.Neo4jReactiveDataAutoConfiguration,\
org.springframework.boot.autoconfigure.data.neo4j.Neo4jReactiveRepositoriesAutoConfiguration,\
org.springframework.boot.autoconfigure.data.neo4j.Neo4jRepositoriesAutoConfiguration,\
org.springframework.boot.autoconfigure.data.solr.SolrRepositoriesAutoConfiguration,\
org.springframework.boot.autoconfigure.data.r2dbc.R2dbcDataAutoConfiguration,\
org.springframework.boot.autoconfigure.data.r2dbc.R2dbcRepositoriesAutoConfiguration,\
org.springframework.boot.autoconfigure.data.redis.RedisAutoConfiguration,\
org.springframework.boot.autoconfigure.data.redis.RedisReactiveAutoConfiguration,\
org.springframework.boot.autoconfigure.data.redis.RedisRepositoriesAutoConfiguration,\
org.springframework.boot.autoconfigure.data.rest.RepositoryRestMvcAutoConfiguration,\
org.springframework.boot.autoconfigure.data.web.SpringDataWebAutoConfiguration,\
org.springframework.boot.autoconfigure.elasticsearch.ElasticsearchRestClientAutoConfiguration,\
org.springframework.boot.autoconfigure.flyway.FlywayAutoConfiguration,\
org.springframework.boot.autoconfigure.freemarker.FreeMarkerAutoConfiguration,\
org.springframework.boot.autoconfigure.groovy.template.GroovyTemplateAutoConfiguration,\
org.springframework.boot.autoconfigure.gson.GsonAutoConfiguration,\
org.springframework.boot.autoconfigure.h2.H2ConsoleAutoConfiguration,\
org.springframework.boot.autoconfigure.hateoas.HypermediaAutoConfiguration,\
org.springframework.boot.autoconfigure.hazelcast.HazelcastAutoConfiguration,\
org.springframework.boot.autoconfigure.hazelcast.HazelcastJpaDependencyAutoConfiguration,\
org.springframework.boot.autoconfigure.http.HttpMessageConvertersAutoConfiguration,\
org.springframework.boot.autoconfigure.http.codec.CodecsAutoConfiguration,\
org.springframework.boot.autoconfigure.influx.InfluxDbAutoConfiguration,\
org.springframework.boot.autoconfigure.info.ProjectInfoAutoConfiguration,\
org.springframework.boot.autoconfigure.integration.IntegrationAutoConfiguration,\
org.springframework.boot.autoconfigure.jackson.JacksonAutoConfiguration,\
org.springframework.boot.autoconfigure.jdbc.DataSourceAutoConfiguration,\
org.springframework.boot.autoconfigure.jdbc.JdbcTemplateAutoConfiguration,\
org.springframework.boot.autoconfigure.jdbc.JndiDataSourceAutoConfiguration,\
org.springframework.boot.autoconfigure.jdbc.XADataSourceAutoConfiguration,\
org.springframework.boot.autoconfigure.jdbc.DataSourceTransactionManagerAutoConfiguration,\
org.springframework.boot.autoconfigure.jms.JmsAutoConfiguration,\
org.springframework.boot.autoconfigure.jmx.JmxAutoConfiguration,\
org.springframework.boot.autoconfigure.jms.JndiConnectionFactoryAutoConfiguration,\
org.springframework.boot.autoconfigure.jms.activemq.ActiveMQAutoConfiguration,\
org.springframework.boot.autoconfigure.jms.artemis.ArtemisAutoConfiguration,\
org.springframework.boot.autoconfigure.jersey.JerseyAutoConfiguration,\
org.springframework.boot.autoconfigure.jooq.JooqAutoConfiguration,\
org.springframework.boot.autoconfigure.jsonb.JsonbAutoConfiguration,\
org.springframework.boot.autoconfigure.kafka.KafkaAutoConfiguration,\
org.springframework.boot.autoconfigure.availability.ApplicationAvailabilityAutoConfiguration,\
org.springframework.boot.autoconfigure.ldap.embedded.EmbeddedLdapAutoConfiguration,\
org.springframework.boot.autoconfigure.ldap.LdapAutoConfiguration,\
org.springframework.boot.autoconfigure.liquibase.LiquibaseAutoConfiguration,\
org.springframework.boot.autoconfigure.mail.MailSenderAutoConfiguration,\
org.springframework.boot.autoconfigure.mail.MailSenderValidatorAutoConfiguration,\
org.springframework.boot.autoconfigure.mongo.embedded.EmbeddedMongoAutoConfiguration,\
org.springframework.boot.autoconfigure.mongo.MongoAutoConfiguration,\
org.springframework.boot.autoconfigure.mongo.MongoReactiveAutoConfiguration,\
org.springframework.boot.autoconfigure.mustache.MustacheAutoConfiguration,\
org.springframework.boot.autoconfigure.neo4j.Neo4jAutoConfiguration,\
org.springframework.boot.autoconfigure.orm.jpa.HibernateJpaAutoConfiguration,\
org.springframework.boot.autoconfigure.quartz.QuartzAutoConfiguration,\
org.springframework.boot.autoconfigure.r2dbc.R2dbcAutoConfiguration,\
org.springframework.boot.autoconfigure.r2dbc.R2dbcTransactionManagerAutoConfiguration,\
org.springframework.boot.autoconfigure.rsocket.RSocketMessagingAutoConfiguration,\
org.springframework.boot.autoconfigure.rsocket.RSocketRequesterAutoConfiguration,\
org.springframework.boot.autoconfigure.rsocket.RSocketServerAutoConfiguration,\
org.springframework.boot.autoconfigure.rsocket.RSocketStrategiesAutoConfiguration,\
org.springframework.boot.autoconfigure.security.servlet.SecurityAutoConfiguration,\
org.springframework.boot.autoconfigure.security.servlet.UserDetailsServiceAutoConfiguration,\
org.springframework.boot.autoconfigure.security.servlet.SecurityFilterAutoConfiguration,\
org.springframework.boot.autoconfigure.security.reactive.ReactiveSecurityAutoConfiguration,\
org.springframework.boot.autoconfigure.security.reactive.ReactiveUserDetailsServiceAutoConfiguration,\
org.springframework.boot.autoconfigure.security.rsocket.RSocketSecurityAutoConfiguration,\
org.springframework.boot.autoconfigure.security.saml2.Saml2RelyingPartyAutoConfiguration,\
org.springframework.boot.autoconfigure.sendgrid.SendGridAutoConfiguration,\
org.springframework.boot.autoconfigure.session.SessionAutoConfiguration,\
org.springframework.boot.autoconfigure.security.oauth2.client.servlet.OAuth2ClientAutoConfiguration,\
org.springframework.boot.autoconfigure.security.oauth2.client.reactive.ReactiveOAuth2ClientAutoConfiguration,\
org.springframework.boot.autoconfigure.security.oauth2.resource.servlet.OAuth2ResourceServerAutoConfiguration,\
org.springframework.boot.autoconfigure.security.oauth2.resource.reactive.ReactiveOAuth2ResourceServerAutoConfiguration,\
org.springframework.boot.autoconfigure.solr.SolrAutoConfiguration,\
org.springframework.boot.autoconfigure.task.TaskExecutionAutoConfiguration,\
org.springframework.boot.autoconfigure.task.TaskSchedulingAutoConfiguration,\
org.springframework.boot.autoconfigure.thymeleaf.ThymeleafAutoConfiguration,\
org.springframework.boot.autoconfigure.transaction.TransactionAutoConfiguration,\
org.springframework.boot.autoconfigure.transaction.jta.JtaAutoConfiguration,\
org.springframework.boot.autoconfigure.validation.ValidationAutoConfiguration,\
org.springframework.boot.autoconfigure.web.client.RestTemplateAutoConfiguration,\
org.springframework.boot.autoconfigure.web.embedded.EmbeddedWebServerFactoryCustomizerAutoConfiguration,\
org.springframework.boot.autoconfigure.web.reactive.HttpHandlerAutoConfiguration,\
org.springframework.boot.autoconfigure.web.reactive.ReactiveWebServerFactoryAutoConfiguration,\
org.springframework.boot.autoconfigure.web.reactive.WebFluxAutoConfiguration,\
org.springframework.boot.autoconfigure.web.reactive.error.ErrorWebFluxAutoConfiguration,\
org.springframework.boot.autoconfigure.web.reactive.function.client.ClientHttpConnectorAutoConfiguration,\
org.springframework.boot.autoconfigure.web.reactive.function.client.WebClientAutoConfiguration,\
org.springframework.boot.autoconfigure.web.servlet.DispatcherServletAutoConfiguration,\
org.springframework.boot.autoconfigure.web.servlet.ServletWebServerFactoryAutoConfiguration,\
org.springframework.boot.autoconfigure.web.servlet.error.ErrorMvcAutoConfiguration,\
org.springframework.boot.autoconfigure.web.servlet.HttpEncodingAutoConfiguration,\
org.springframework.boot.autoconfigure.web.servlet.MultipartAutoConfiguration,\
org.springframework.boot.autoconfigure.web.servlet.WebMvcAutoConfiguration,\
org.springframework.boot.autoconfigure.websocket.reactive.WebSocketReactiveAutoConfiguration,\
org.springframework.boot.autoconfigure.websocket.servlet.WebSocketServletAutoConfiguration,\
org.springframework.boot.autoconfigure.websocket.servlet.WebSocketMessagingAutoConfiguration,\
org.springframework.boot.autoconfigure.webservices.WebServicesAutoConfiguration,\
org.springframework.boot.autoconfigure.webservices.client.WebServiceTemplateAutoConfiguration
每一个这样的xxxAutoConfiguration类都是容器中的一个组件,加入到容器中,用他们来做自动配置;
(3)每一个自动配置类进行自动配置功能
这里我们以HttpEncodingAutoConfiguration(http编码自动配置)为例:


根据当前的不同条件判断,决定这个配置类是否生效,一旦生效,这个配置类就会给容器中添加各种组件,这些组件的属性是从对应的properties中获取的,这些类里边的每一个属性又是和配置文件绑定的。
SpringBoot精髓
(1)SpringBoot启动会加载大量的自动配置类
(2)我们看我们需要的功能有没有SpringBoot写好的自动配置类;
(3)我们再来看,这个自动配置类中到底配置了哪些组件(只要我们要用的组件,我们就不需要再来配置了,如果没有,就需要我们自己写一个配置注入)
(4)给容器中的自动配置类添加组件的时候,会从properties类中获取某些属性,我们就可以在配置文件中指定这些属性的值
xxxAutoConfiguration:指定配置类:给容器中添加组件
xxxProperties:封装配置文件中的相关属性
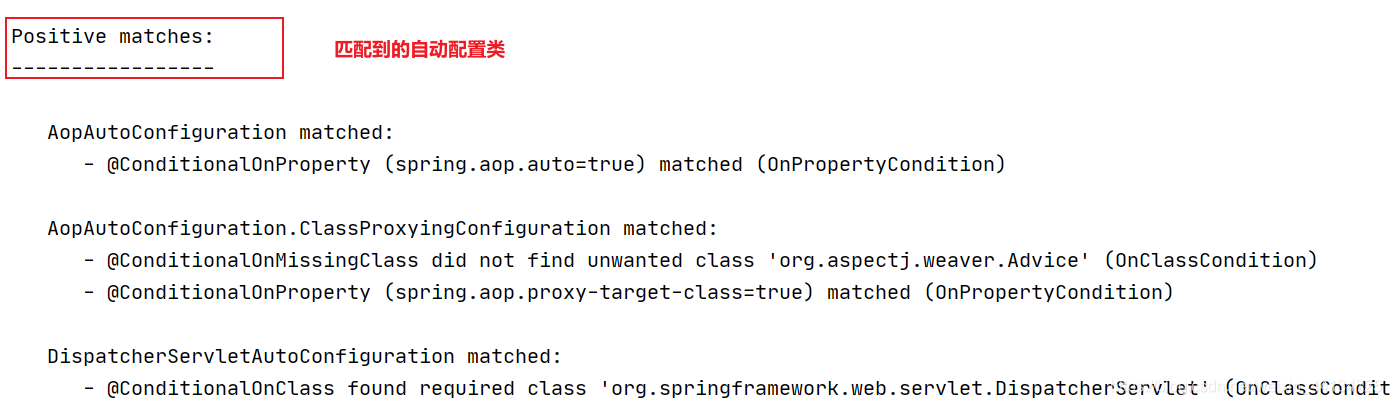
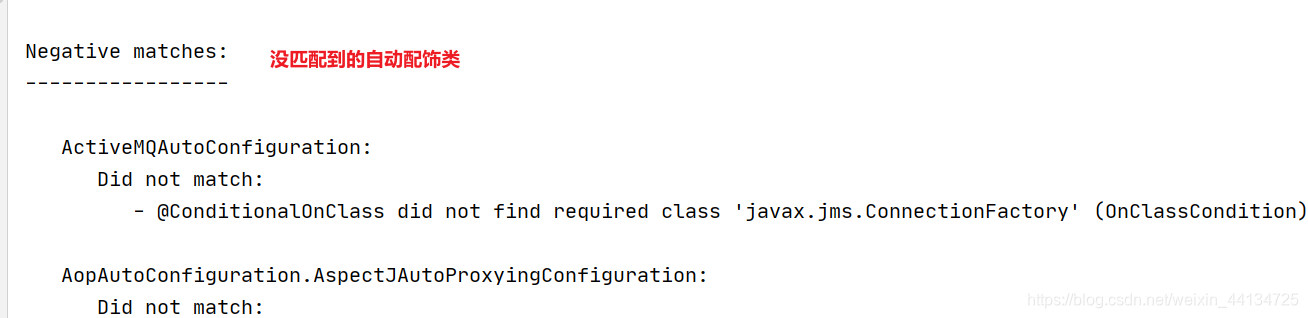
11、配置@Conditional自动配置报告
自动配置类在一定的条件下才能生效
我们怎么知道哪些自动配置类生效了?
我们可以配置debuh=true,开启springboot的debug模式,可以很方便的知道哪些配置类生效了

四、SpringBoot与日志
1、日志框架
| 日志门面(日志的抽象层) | 日志实现 |
|---|---|
|
SLF4j(Simple Logging Facade for java)
| Log4j
JUC(java.utils.logging)
Log4j2
Logback |
日志门面选slf4j,日志实现选择logback
SpringBoot:底层是Spring,Spring默认使用的是JCL,SprngBoot选用的是SLF4J和Logback
2、SLF4J的使用
官方文档:http://www.slf4j.org/manual.html
日志记录方法的调用,应该调用日志抽象层的方法,而不是日志的实现类

每一个日志的实现框架都有自己的配置文件,使用slf4j后,配置文件还是做成日志实现框架的配置文件。
3、遗留问题
不同框架使用不同的默认日志框架实现,
所以我们需要统一日志记录,即使别的框架,我们也要统一使用slf4j和logback进行日志输出。

(1)系统中先将其他的日志框架都排除出去,
(2)用中间包来替换原有的日志框架(狸猫换太子包)
(3)导入slf4j其他的实现
4、SpringBoot中的日志使用
    <dependency>
      <groupId>org.springframework.boot</groupId>
      <artifactId>spring-boot-starter</artifactId>
      <version>2.4.2</version>
      <scope>compile</scope>
    </dependency>
SpringBoot使用它来做日志功能
    <dependency>
      <groupId>org.springframework.boot</groupId>
      <artifactId>spring-boot-starter-logging</artifactId>
      <version>2.4.2</version>
      <scope>compile</scope>
    </dependency>
(1)SpringBoot底层也是使用slf4j加logback的方式进行日志记录;
(2)SpringBoot也把其他的日志替换成了slf4j;
(3)如果我们引入其他组件,一定要把引入的框架的日志依赖移除掉;
5、SpringBoot的默认配置
默认已经帮我们配置好日志了,我们直接使用就可以了
package com.springbootlogin.demomain;

import org.junit.jupiter.api.Test;
import org.slf4j.Logger;
import org.slf4j.LoggerFactory;
import org.springframework.boot.test.context.SpringBootTest;

@SpringBootTest
class DemomainApplicationTests {
    final Logger logger = LoggerFactory.getLogger(getClass());

    @Test
    void contextLoads() {

        //日志的级别:由低到高:trace-debug-info-warn-error
        //我们可以调整日志的输出级别,日志就只会在这个级别以及以后的高级别生效
        //springboot默认给我们使用的是info级别的日志
        //没有指定级别的,就用SpringBoot默认规定的级别
        logger.trace("这是trace日志");
        logger.debug("这是debug日志");
        logger.info("这是info日志");
        logger.warn("这是warn日志");
        logger.error("这是error日志");

    }
}
全局配置:
#调整日志级别
logging.level.com.springbootlogin=trace
#logging.file.name和logging.file.path都不指定的情况下,日志只在控制台输出
#只指定logging.file.name文件名,那就把日志输出到当前项目下的指定的文件
logging.file.name=springlogging.log
#也可以指定生成日志的目录,name和path是互斥的
logging.file.path=./spring/log
#在控制台输出的日志的格式
logging.pattern.console=%d{yyyy-MM-dd HH:mm:ss.SSS}[%thread] %5level %logger{50} -%msg%n
#指定文件中日志输出的格式
logging.pattern.file=%d{yyyy-MM-dd}===[%thread] === %-5level === %logger{50} ==== -%msg%n
6、指定配置和Profile环境
给类路径下放上每个日志框架自己的配置文件即可,SpringBoot就不会使用自己的默认配置

logback.xml会直接被日志框架识别了;
我们推荐使用logback-spring.xml,日志框架识别不了,这个时候由SpringBoot加载,可以使用SpringProfile功能:指定某段配置只在某个环境下生效。
五、SpringBoot与Web开发
使用SpringBoot:
1、创建SpringBoot应用
2、SpringBoot已经默认将这些场景配置好了,只需要在配置文件中指定少量配置,几月可以运行起来了
3、编写业务代码
自动配置原理:
xxxAutoConfiguration:帮我们给容器中自动配置文件
xxxProperties:配置类,来封装配置文件的内容
1、静态资源映射规则
        @Override
		protected void addResourceHandlers(ResourceHandlerRegistry registry) {
			super.addResourceHandlers(registry);
			if (!this.resourceProperties.isAddMappings()) {
				logger.debug("Default resource handling disabled");
				return;
			}
			ServletContext servletContext = getServletContext();
			addResourceHandler(registry, "/webjars/**", "classpath:/META-INF/resources/webjars/");
			addResourceHandler(registry, this.mvcProperties.getStaticPathPattern(), (registration) -> {
				registration.addResourceLocations(this.resourceProperties.getStaticLocations());
				if (servletContext != null) {
					registration.addResourceLocations(new ServletContextResource(servletContext, SERVLET_LOCATION));
				}
			});
		}

		private void addResourceHandler(ResourceHandlerRegistry registry, String pattern, String... locations) {
			addResourceHandler(registry, pattern, (registration) -> registration.addResourceLocations(locations));
		}

		private void addResourceHandler(ResourceHandlerRegistry registry, String pattern,
				Consumer<ResourceHandlerRegistration> customizer) {
			if (registry.hasMappingForPattern(pattern)) {
				return;
			}
			ResourceHandlerRegistration registration = registry.addResourceHandler(pattern);
			customizer.accept(registration);
			registration.setCachePeriod(getSeconds(this.resourceProperties.getCache().getPeriod()));
			registration.setCacheControl(this.resourceProperties.getCache().getCachecontrol().toHttpCacheControl());
			customizeResourceHandlerRegistration(registration);
		}
(1)所有“/webjars/**”,都去classpath:/META-INF/resources/webjars/找资源;
- webjars:以jar包的方式引入静态资源;https://www.webjars.org
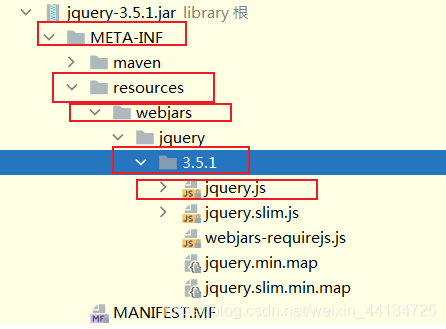
在访问时,只需要写webjars下边资源的名称;
(2)“/**”会去以下路径查找:

"classpath:/META-INF/resources/",
"classpath:/resources/",
"classpath:/static/",
"classpath:/public/"
(3)欢迎页:静态资源文件夹下的所有index.html页面
		@Bean
		public WelcomePageHandlerMapping welcomePageHandlerMapping(ApplicationContext applicationContext,
				FormattingConversionService mvcConversionService, ResourceUrlProvider mvcResourceUrlProvider) {
			WelcomePageHandlerMapping welcomePageHandlerMapping = new WelcomePageHandlerMapping(
					new TemplateAvailabilityProviders(applicationContext), applicationContext, getWelcomePage(),
					this.mvcProperties.getStaticPathPattern());
			welcomePageHandlerMapping.setInterceptors(getInterceptors(mvcConversionService, mvcResourceUrlProvider));
			welcomePageHandlerMapping.setCorsConfigurations(getCorsConfigurations());
			return welcomePageHandlerMapping;
		}
(4)favicon.ioc:所有的**/favicon.ico都是在静态资源文件夹下找
(5)自定义静态资源路径,会取消默认配置(默认配置就不生效了)

2、模板引擎Thymeleaf
SpringBoot推荐Thymeleaf:语法简单,功能强大;
(1)引入
        <dependency>
            <groupId>org.springframework.boot</groupId>
            <artifactId>spring-boot-starter-thymeleaf</artifactId>
        </dependency>
(2)使用
@ConfigurationProperties(prefix = "spring.thymeleaf")
public class ThymeleafProperties {

	private static final Charset DEFAULT_ENCODING = StandardCharsets.UTF_8;

	public static final String DEFAULT_PREFIX = "classpath:/templates/";

	public static final String DEFAULT_SUFFIX = ".html";
只要我们把HEML页面放在classpath:/templates/下,thymeleaf就会自动渲染;
    @RequestMapping("/success")
    public String success() {
        //classpath:/templates/success.html
        return "success";
    }
使用:
- 导入thymeleaf的名称空间:
<html lang="en" xmlns:th="http://www.thymeleaf.org">
<!DOCTYPE html>
<html lang="en" xmlns:th="http://www.thymeleaf.org">
<head>
    <meta charset="UTF-8">
    <title>success</title>
</head>
<body>
<h2>我是success页面</h2>
<div>
    <!--th:text:将div里的文本内容设置为指定的值-->
    <div th:text="${hello}">这里显示欢迎信息</div>
</div>
</body>
</html>
(3)语法规则
具体参考:https://www.cnblogs.com/itdragon/archive/2018/04/13/8724291.html

3、SpringMVC自动配置原理
https://docs.spring.io/spring-boot/docs/current/reference/htmlsingle/#boot-features-spring-mvc
Spring MVC自动配置
Spring Boot为Spring MVC提供了自动配置,可与大多数应用程序完美配合。
自动配置在Spring的默认值之上添加了以下功能:
包含
ContentNegotiatingViewResolver和BeanNameViewResolver。支持提供静态资源,包括对WebJars的支持。
自动注册
Converter,GenericConverter和Formatter豆类。支持
HttpMessageConverters。自动注册
MessageCodesResolver。静态
index.html支持。静态首页访问自动使用
ConfigurableWebBindingInitializer。如果要保留这些Spring Boot MVC定制并进行更多的MVC定制(拦截器,格式化程序,视图控制器和其他功能),则可以添加自己
@Configuration的type类,WebMvcConfigurer但不添加@EnableWebMvc。如果你想提供的定制情况
RequestMappingHandlerMapping,RequestMappingHandlerAdapter或者ExceptionHandlerExceptionResolver,仍然保持弹簧引导MVC自定义,你可以声明类型的豆WebMvcRegistrations,并用它来提供这些组件的定制实例。如果你想利用Spring MVC中的完全控制,你可以添加自己的
@Configuration注解为@EnableWebMvc,或者添加自己的@Configuration-annotatedDelegatingWebMvcConfiguration中的Javadoc中所述@EnableWebMvc。
ContentNegotiatingViewResolver:
-
自动配置了
ViewResolver()视图解析器:根据方法的返回值,获取视图对象(View),视图对象决定如何渲染(转发、重定向) -
ContentNegotiatingViewResolver:组合所有的视图解析器的; 我们可以自己个容器中添加一个视图解析器,ContentNegotiatingViewResolver自动的将其组合进来;
Converter:转换器,类型转换使用Converter组件;
Formatter:格式化器,日期转化等;
		@Bean
		@Override
		public FormattingConversionService mvcConversionService() {
			Format format = this.mvcProperties.getFormat();
			WebConversionService conversionService = new WebConversionService(new DateTimeFormatters()
					.dateFormat(format.getDate()).timeFormat(format.getTime()).dateTimeFormat(format.getDateTime()));
			addFormatters(conversionService);
			return conversionService;
		}
我们自己添加的格式化器,只需要放在容器中即可;
HttpMessageConverters:Springmvc用来转换http请求和响应的,POJO-》Json
private final ObjectProvider<HttpMessageConverters> messageConvertersProvider;从容器中获取所有的HttpMessageConverters,我们要自定义,也是直接添加到容器中即可
MessageCodesResolver:定义错误代码生成规则的;
ConfigurableWebBindingInitializer:初始化WebDataBinder(请求数据绑定到JavaBean中)
@Override
		protected ConfigurableWebBindingInitializer getConfigurableWebBindingInitializer(
				FormattingConversionService mvcConversionService, Validator mvcValidator) {
			try {
				return this.beanFactory.getBean(ConfigurableWebBindingInitializer.class);
			}
			catch (NoSuchBeanDefinitionException ex) {
				return super.getConfigurableWebBindingInitializer(mvcConversionService, mvcValidator);
			}
		}
4、扩展SpringMVC
    <mvc:view-controller path="/hello" view-name="success"/>

    <mvc:interceptors>
        <mvc:interceptor>
            <mvc:mapping path="/hello"/>
            <bean></bean>
        </mvc:interceptor>
</mvc:interceptors>编写一个配置类(@Configuration),是WebMVCConfigurationAdapter类型(现在是实现WebMvcConfigurer这个接口),不能标注@EnableWebMvc注解
* 使用WebMvcConfigurer扩展SpringMvc功能*/
@Configuration
public class MyMvcConfig implements WebMvcConfigurer {

    @Override
    public void addViewControllers(ViewControllerRegistry registry) {
        //浏览器发送rocke请求,也是来到success页面
        registry.addViewController("/rocke").setViewName("success");
    }
}
既保留了所有的自动配置,也能使用我们扩展配置
原理:

(1)WebMvcAutoConfiguration是SpringMvc的自动配置类
(2)在做其他配置时,会导入@Import(EnableWebMvcConfiguration.class)
@Configuration(proxyBeanMethods = false)
	@EnableConfigurationProperties(WebProperties.class)
	public static class EnableWebMvcConfiguration extends DelegatingWebMvcConfiguration implements ResourceLoaderAware {


    //从容器中获取所有的WebMvcConfigurers
	@Autowired(required = false)
	public void setConfigurers(List<WebMvcConfigurer> configurers) {
		if (!CollectionUtils.isEmpty(configurers)) {
			this.configurers.addWebMvcConfigurers(configurers);
		}
	}
(3)容器中所有的WebMvcConfigurer都会一起起作用
(4)我们的配置类也会起作用
效果:SpringMvc自动配置和我们自己的配置都会起作用
5、全面接管SpringMVC
SpringBoot对SpringMvc的自动配置我们不需要了,所有的都是我们自己配;
只需要在配置类中添加@EnableWebMvc,所有的SpringMvc的自动配置都失效了;
原理:

@EnableWebMvc将WebMvcConfigurationSupport组件导入进来;
导入的WebMvcConfigurationSupport只是SpringMvc的最基本的功能;
...............................................................
...........以后熟练使用再回来啃源码吧,今天先跳过,脑子嗡嗡的
如何修改SpringBoot的默认配置
模式:
(1)Springboot自动配置很多组件时,先看容器中有没有用户自己配置的(@ConditionalOnMissingBean),如果有,就使用用户配置的,如果没有,才自动配置;
如果有些组件可以有多个(比如ViewResolver),就将用户配置和自己默认的组合起来;
六、SpringBoot与Docker
1、Docker
- Docker容器 是一个开源的应用容器引擎,基于Go语言并遵从Apache2.0协议开源。
- Docker可以让开发者打包他们的应用以及依赖包到一个轻量级、可移植的容器中,然后发布到任何流行的Linux机器上,也可以实现虚拟化
- 容器完全使用沙箱机制,互相之间没有任何接口
- 容器性能开销极低
2、核心概念:
docker主机(Host):安装了Docker程序的机器(Docker直接安装在操作系统上的),用于执行Docker守护进程和容器;
docker客户端(Client):连接Docker主机进行操作;
docker仓库(Registry):用来保存各种打包好的软件镜像;
docker镜像(Images):软件打包好的镜像,放在Docker仓库中
docker容器(Container):镜像启动后的实例,我们称为一个容器;
3、使用步骤
- 安装Docker;
- 去Docker仓库找到要安装软件的镜像;
- 使用Docker运行这个镜像,这个镜像就会生成一个Docker容器;
- 对容器的启动停止,就是对软件的启动、停止;
4、安装
- Docker要求CentOS的内核版本高于3.10
查看内核版本:
uname -r如果内核版本不够,可以选择升级软件包以及内核:
yun update
安装docker:
yum install docker
启动Docker:
systemctl start docker
#检查版本
docker -v
开机自启动Docker:
systemctl enable docker
停止Docker
systemctl stop docker
5、Docker常用操作
(1)镜像操作
这里以mysql为例
检索镜像:
docker search mysql
拉取镜像:
docker pull mysql:5.5
#5.5是版本号
查看所有下载的镜像:
docker images
删除镜像:
docker rmi 镜像ID
(2)容器操作
得到软件镜像=》运行镜像=》产生容器(正在运行的软件)
根据镜像启动容器:
docker run [--name 自定义容器名] -d(后台运行) [-p(端口映射 ) 主机端口:容器端口] 镜像名[:标签(版本)]
docker run --name mytomcat -d -p 8080:8080 tomcat
查看运行中的镜像:
docker ps
查看所有容器:
docker ps -a
停止运行中的容器:
docker stop 容器名或者容器id
docker stop mytomcat
删除容器(必须是停止运行的容器):
docker rm 容器名或者容器id
docker rm mytomcat
七、SpringBoot与数据访问
SpringBoot默认采用SpringData的方式进行统一处理,添加大量自动配置,屏蔽了很多设置。引入各种xxxtemplate,xxxRepository来简化我们对数据库访问层的操作。
1、整合基本JDBC与数据源
#配置数据源
spring.datasource.driver-class-name        = com.mysql.cj.jdbc.Driver
spring.datasource.url                      = jdbc:mysql://localhost:3306/bookstore?serverTimezone=GMT
spring.datasource.username                 = rocke
spring.datasource.password                 = 123456789
@SpringBootTest
class JdbcApplicationTests {

    @Autowired
    DataSource dataSource;

    @Test
    void contextLoads() throws SQLException {
        System.out.println(dataSource.getClass());

        try(final Connection connection = dataSource.getConnection();){
            System.out.println("connection.getClass() = " + connection.getClass());
        }
    }

}
class com.zaxxer.hikari.HikariDataSource
connection.getClass() = class com.zaxxer.hikari.pool.HikariProxyConnection
2、JDBC-使用Druid数据源
<!-- https://mvnrepository.com/artifact/com.alibaba/druid -->
<dependency>
    <groupId>com.alibaba</groupId>
    <artifactId>druid</artifactId>
    <version>1.2.4</version>
</dependency>
#配置数据源
spring.datasource.driver-class-name = com.mysql.cj.jdbc.Driver
spring.datasource.url               = jdbc:mysql://localhost:3306/bookstore?serverTimezone=GMT
spring.datasource.username          = rocke
spring.datasource.password          = 123456789
spring.datasource.type              = com.alibaba.druid.pool.DruidDataSource
#druid配置
spring.datasource.initialSize=5
spring.datasource.minIdle=5
spring.datasource.maxActive=20
spring.datasource.maxWai=60000
spring.datasource.timeBetweenEvictionRunsMillis=60000
spring.datasource.minEvictableIdleTimeMillis=300000
spring.datasource.validationQuery=SELECT 1 FROM DUAL
spring.datasource.testWhileIdle=true
spring.datasource.testOnBorrow=false
spring.datasource.testOnReturn=false
spring.datasource.poolPreparedStatements=true
#配置监控统计拦截的filters,,去掉监控界面sql无法统计,wall用于防火墙
spring.datasource.filters=stat,wall,log4j2
spring.datasource.maxPoolPreparedStatementPerConnectionSize=20
spring.datasource.useGlobalDataSourceStat=true
spring.datasource.connectionProperties=druid.stat.mergeSql=true;druid.stat.slowSqlMillis=500
自己定义数据源,绑定配置
@Configuration
public class DruidConfig {

    @Bean
    @ConfigurationProperties(prefix = "spring.datasource")
    public DataSource druid(){
        return new DruidDataSource();
    }

    //配置Druid的监控
    //1、配置管理后台的监控Servlet
    @Bean
    public ServletRegistrationBean statViewServlet(){
        final ServletRegistrationBean<StatViewServlet> statViewServlet = new ServletRegistrationBean<>(new StatViewServlet(), "/druid/*");
        final HashMap<String, String> initParams = new HashMap<>();
        initParams.put("loginUsername","admin");
        initParams.put("loginPassword","12312037");
        initParams.put("allow","localhost");//不设置就默认允许所有
        statViewServlet.setInitParameters(initParams);
        return statViewServlet;
    }
    //2、配置一个监控的filter
    @Bean
    public FilterRegistrationBean webStatFilter(){
        final FilterRegistrationBean<Filter> bean = new FilterRegistrationBean<>();
        bean.setFilter(new WebStatFilter());
        final HashMap<String, String> initParams = new HashMap<>();
        initParams.put("exclusions","*.js,*.css,/druid/*");
        bean.setInitParameters(initParams);
        bean.setUrlPatterns(Collections.singletonList("/*"));
        return bean;
    }
}

3、整合Mybatis
注解版
//指定这是一个操作数据库的mapper
@Mapper
public interface BookMapper {

    @Select("select * from book where id=#{id}")
    //不推荐使用查询注解,耦合性太高
    Book getBookById(Integer id);

}
注解联合配置文件


八、SpringBoot启动配置原理
几个重要的配置原理:
配置在META-INF配置在spring.factories中的:
ApplicationContextInitializer
SpringApplicationRunListener
只需要放在ioc容器中的:
ApplicationRunner
CommandLineRunner
启动流程:
1、创建SpringApplication对象
    public SpringApplication(Class<?>... primarySources) {
        this((ResourceLoader)null, primarySources);
    }
2、运行run方法
    public ConfigurableApplicationContext run(String... args) {
        StopWatch stopWatch = new StopWatch();
        stopWatch.start();
        ConfigurableApplicationContext context = null;
        Collection<SpringBootExceptionReporter> exceptionReporters = new ArrayList();
        this.configureHeadlessProperty();
        //获取SpringApplicationRunListeners,从类路径下的MEAT-INF/spring.factories
        SpringApplicationRunListeners listeners = this.getRunListeners(args);
        //回调所有的SpringApplicationRunListeners的starting方法
        listeners.starting();
        Collection exceptionReporters;
        try {
            //封装命令行参数
            ApplicationArguments applicationArguments = new DefaultApplicationArguments(args);
            //准备环境
            ConfigurableEnvironment environment = this.prepareEnvironment(listeners, applicationArguments);
            this.configureIgnoreBeanInfo(environment);
            Banner printedBanner = this.printBanner(environment);
            //创建ApplicationContext:决定创建web的ioc还是普通的ioc容器
            context = this.createApplicationContext();
            exceptionReporters = this.getSpringFactoriesInstances(SpringBootExceptionReporter.class, new Class[]{ConfigurableApplicationContext.class}, context);
            //准备上下文环境:将environment保存到ioc容器中,而且applyInitializer():回调之前保存的所有的ApplicationContextInitializer的initialize方法
            //回调所有的SpringApplicationRunListener的ContextPrepare方法
            this.prepareContext(context, environment, listeners, applicationArguments, printedBanner);
            //prepareContext运行完成后回调所有的SpringApplicationRunListener的contextLoaded方法
            //刷新容器:ioc容器初始化的过程(如果是web应用,还会创建嵌入式的tomcat)
            //扫描、创建、加载所有组件的地方(配置类,组件(自动装配))
            this.refreshContext(context);
            this.afterRefresh(context, applicationArguments);
            stopWatch.stop();
            if (this.logStartupInfo) {
                (new StartupInfoLogger(this.mainApplicationClass)).logStarted(this.getApplicationLog(), stopWatch);
            }
            listeners.started(context);
            //从ioc容器中获取所有的ApplicationRunner和CommandLineRunner,进行回调
            //ApplicationRunner先回调,再回调CommandLineRunner
            this.callRunners(context, applicationArguments);
        } catch (Throwable var10) {
            this.handleRunFailure(context, var10, exceptionReporters, listeners);
            throw new IllegalStateException(var10);
        }

        try {
            listeners.running(context);
            ///整个SpringBoot应用启动后,返回ioc容器
            return context;
        } catch (Throwable var9) {
            this.handleRunFailure(context, var9, exceptionReporters, (SpringApplicationRunListeners)null);
            throw new IllegalStateException(var9);
        }
    }
事件监听机制的测试
ApplicationContextInitializer
public class MyApplicationContextInitializer implements ApplicationContextInitializer<ConfigurableApplicationContext> {
    @Override
    public void initialize(ConfigurableApplicationContext configurableApplicationContext) {
        System.out.println("ApplicationContextInitializer的initialize方法运行了.....");
    }
}
ApplicationRunner
@Component
public class MyApplicationRunner implements ApplicationRunner {
    @Override
    public void run(ApplicationArguments args) throws Exception {
        System.out.println("MyApplicationRunner的run方法调用了");
    }
}
CommandLineRunner
@Component
public class MyCommandLineRunner implements CommandLineRunner {
    @Override
    public void run(String... args) throws Exception {
        System.out.println("MyCommandLineRunner的run方法运行了.....");
    }
}
SpringApplicationRunListener
public class MySpringApplicationListener implements SpringApplicationRunListener {

    public MySpringApplicationListener(SpringApplication application,String[] args) {
    }

    @Override
    public void starting() {
        System.out.println("MySpringApplicationListener的starting方法调用了");
    }

    @Override
    public void environmentPrepared(ConfigurableEnvironment environment) {
        System.out.println("environment.getSystemProperties().get(\"os.name\") = " + environment.getSystemProperties().get("os.name"));
        System.out.println("MySpringApplicationListener的environmentPrepared方法调用了");
    }

    @Override
    public void contextPrepared(ConfigurableApplicationContext context) {
        System.out.println("MySpringApplicationListener的contextPrepared方法调用了");
    }

    @Override
    public void contextLoaded(ConfigurableApplicationContext context) {
        System.out.println("MySpringApplicationListener的contextLoaded方法调用了");
    }

    @Override
    public void started(ConfigurableApplicationContext context) {
        System.out.println("MySpringApplicationListener的started方法调用了");
    }

    @Override
    public void running(ConfigurableApplicationContext context) {
        System.out.println("MySpringApplicationListener的running方法调用了");
    }

}
配置spring的factories
org.springframework.context.ApplicationContextInitializer=\
  com.example.mybatis.listener.MyApplicationContextInitializer
org.springframework.boot.SpringApplicationRunListener=\
  com.example.mybatis.listener.MySpringApplicationListener

九、自定义Starter
starter:场景启动器
场景依赖
自动配置
启动器模块是一个空的jar文件,仅提供辅助依赖管理,这些依赖可能用于自动装配或者其他类库
启动器依赖自动配置
命名规则:
自定义启动器名-spring-boot-starter
......以后回来补,干毕设去了


 1090
1090

 被折叠的 条评论
为什么被折叠?
被折叠的 条评论
为什么被折叠?
 到【灌水乐园】发言


