


文章目录
前言
JavaScript组件思维总结
对于一个前端工作者来说,创建一个独属于自己的组件库是一个必不可少的过程与历程,小结一下!
一、JavaScript组件思维
直接文档流的前端开发,在制作某些页面功能件,比如页头、页尾、轮播图等重复高频反复使用的部分的时候,可以把这些制作成一个组件库,需要使用的时候用JavaScript直接调用生成即可,可大大加快工作效率!
可类比于java的面相对象编程开发,只不过JavaScript的这个对象(组件)大部分得需要我们自己制作!
目前大部分都框架比如jquery、vue等等的初步构建基础,即可认为是组件开发思维的开始!
二、组件基本组成
几乎比较完整的组建都会包括3个方面:
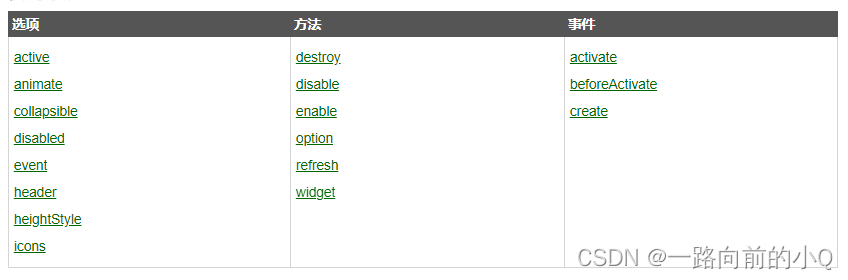
1、组件属性选项
2、组件方法
3、组件事件
Jquery UI小部件–折叠面板部件(Accordion Widget)
三、组件基本工作流程
基本上完整的组建都会有一个生命周期,主要会经过:
1、组件构造new()、初始化init()
2、事件绑定bind()
3、组件渲染render()
4、其他
1、初步闭包结构的组件
闭包结构的组件能尽量少的对主文档造成变量污染,是一个自执行的函数,绑定在window下可以直接使用,方便,但劣势,不易拓展,有一些不适用于大规模的具有同一属性、样式、渲染方式的组件库!
轻度使用组件时比较好!
 (function(x, y) {
     function JsClassName(cfg) {
          var config = cfg || {};
          x.get = function(n) {
             return config[n];
         }
         x.set = function(n, v) {
            config[n] = v;
         }
         x.init();
     }
     //对外的函数体部分
     JsClassName.prototype = {
         init: function(){},
         otherMethod: function(){}
    };
    window.JsClassName = window.JsClassName || JsClassName;
 })(this,document);
2、利用JavaScript的类与类的继承创建组件
1)组件基类
构建组件时,需要对组件库进行分析总结归纳出基类
初步测试的组建基类如下,包括构建、初始化、事件监听、渲染、组件事件与属性基类等
该基类会自动渲染组件
class aBase {

   //组件的构造函数与初始化,组件一但new()直接运行;
   //config作为组件的配置参数,作为对象输入
    constructor(config) {
        //组件内的引用都需要对象指向this代表组件体引用
        //保存组件配置参数,后面参数用this.config来引用
        this.config = config;
        //初始化函数引用
        this.init();
        //部分配置参数缺省处理
        this.id = config.id||'body';
        this.style = config.style || '0';
        this.obj = document.querySelector(config.id) ;

        //组件插入位置用元素的insertAdjacentElement或者insertAdjacentHTML方法插入
        //ele.insertAdjacentHTML('afterend', "<a>111</a>")节点插入位置
        //beforebegin:ele元素前;
        //afterend:ele元素后;
        //afterbegin:ele内部首位;
        //befoerend:ele内部末尾;
        this.positon = config.positon || 'afterend';
        //初始化函数
        this.styleSet();
        this.bind();//事件绑定初始化
        this.render();//组件构造第一次渲染
        return this;//返回组件对象以便进行链式编程
    }
    //初始化设置,根据自己需要设置,因为构造函数不能再引用构造,所以用这个函数设置
    init() {
        this.type = this.config.type || '';
    }

    //构造参数的设置获取与更改
    get(x) {
        return this.config[x];
    }
    set(x, y) {
            this.config[x] = y;
            //参数更改后立即实时渲染
            this.styleSet();
            this.render();
        }

        //设置内部监听函数部分------------------
        //对象属性对应索引号
    _indexOf(array, key) {
        var i = -1;
        for (var x in array) {
            i += 1
            if (x == key) return i
            return -1
        }
    }

    //绑定触发的key与对应执行的事件
    on(_key, _listener) {
            //this._events存储所有的处理函数
            if (!this._events) {
                this._events = {}
            }
            if (!this._events[_key]) {
                this._events[_key] = null;
            }
           //判断,如果存在触发函数,并且_listener是一个函数时
           //存储对象:_key:_listener
            if (this._indexOf(this._events, _listener) === -1 && typeof _listener === 'function') {
                this._events[_key] = _listener;
            }
            return this
        }

        //发送通知on的函数,与on的_key一一对应
        //监听对象为fire的_key后面的参数
    fire(_key) {
            //如果fire与on没有一一对应的_key,直接退出,没有监听对象
            if (!this._events || !this._events[_key]) return
            //获取fire函数的第2个以及之后的参数,返回数组array对象
            var args = Array.prototype.slice.call(arguments, 1) || []
            //提取出on中对应的_key的函数,并执行对应函数
            var _listeners = this._events[_key]
            //执行函数,fn.apply(null,传人函数的参数数组)并执行
            _listeners.apply(null, args)
            return this
        }
        //取消监听
    off(_key, _listener) {
            if (!_key && !_listener) {
                this._events = {}
            }
            //不传监听函数,就去掉当前_key下面的所有的监听函数
            if (_key && !_listener) {
                delete this._events[_key]
            }
            if (_key && _listener) {
                //删除特定属性
                Reflect.deleteProperty(this._events, _key)
            }
            return this;
        }

        //绑定事件与监听
    bind(event, fn) {
            try {
                var e0 = this;
                //增加当前组件对象的事件函数
                e0.obj.addEventListener(event, () => {
                    this.render();//要先渲染再监听
                    fn ? fn() : '';//监听函数
                }, false);
            } catch (error) {
                console.log(error)
            }

        }
        //渲染函数
    render() {
        //获取组件类型对应的组建模板
        var eg = this.example(this.type);
        //同一对象组件重复性判断
        var jst = false;
        //获取当前选定类型的所有已创建的组件集合
        var egs = document.querySelectorAll('[class^=' + this.type + ']');
        for (var ele of egs) {
            if (ele.className.indexOf(this.id) != -1) {
       //如果组件集合里面的class名包含当前对象id,说明已经创建过当前组件
       //标记已经创建
                jst = true;
                break;
            }
        }
        // console.log(egs.length)

      //获取当前即将插入组件的位置是否已经有同类型组件
      //如果没有,就新建组件
      //如果已经创建了,就让cEle=this.nowEle当前组件
        var cEle = null;
        switch (this.positon) {
            case 'afterend':
                if (!this.obj.nextElementSibling) break;
                cEle = this.obj.nextElementSibling.className.indexOf(this.type) != -1 ? this.obj.nextElementSibling : null;
                break;
            case 'beforebegin':
                if (!this.obj.previousElementSibling) break;

                cEle = this.obj.previousElementSibling.className.indexOf(this.type) != -1 ? this.obj.nextElementSibling : null;
                break;
            case 'afterbegin':
                if (!this.obj.parentElement.firstChild) break;
                cEle = this.obj.parentElement.firstElementChild.className.indexOf(this.type) != -1 ? this.obj.nextElementSibling : null;
                break;
            case 'beforeend':
                if (!this.obj.parentElement.lastChild) break;
                cEle = this.obj.parentElement.lastElementChild.className.indexOf(this.type) != -1 ? this.obj.nextElementSibling : null;
                break;
        }
        // console.log(cEle)
        //如果已经创建了同类型组件,就不新建组件
        if (cEle && jst == true) {
            this.nowEle = cEle;
        } else if (jst == false) {
            //如果标记到,就直接新建组件
            //如果组件模板是字符,就用先转换成元素再插入
            if (typeof eg == 'string') {
                this.nowEle = document.createElement('div');
                this.nowEle.className = this.type + (egs.length + 1);
                this.nowEle.innerHTML = eg;
            } else {
            //如果是函数创建的元素,就直接插入
                this.nowEle = eg();
            }
            //开始插入组件,并重命名组件的className
            this.obj.insertAdjacentElement(this.positon, this.nowEle);
            this.nowEle.className = this.type + egs.length + '_' + this.id;
            //配置组件的默认样式
            this.nowEle.style = this.defaultStyle;
        }

        let self = this;
        //加载当前类型组件对应的特定事件,必须用self代替this传入函数
        //注意尾部加括号表示执行函数
        self.egEvent(self.type, self.nowEle, self)();
    }
    //销毁所有组件绑定的事件监听
    destroy() {
            this.off();
        }


    //设置组件样式模板,后面继承的特定部件再写
    styleSet() {
        switch (this.style) {
        }
    }
    //设置组件内容模板,后面继承的特定部件再写
    example(type) {
        var pre = {}
        return pre[type]
    }
     //设置组件事件模板,后面继承的特定部件再写
    egEvent(type, nowEle, self) {
            var pre = {}
            return pre[type]
        }
        //
    //设置返回对象,内部对象的外部接口
    getObj() {
        //返回数组,0表示目标对象,1表示创建的组建
        return [this.obj, this.nowEle];
    }
}
2)下拉菜单的例子
基类写好之后,可以开始写特定的组件了,用类的继承续写
//下拉菜单meunDrop继承aBase基类
class meunDrop extends aBase {
    //重写初始化参数,自动传入组件类型,标记组件特定的数据
    //数据的引用用this.config,见基类的构造函数部分
    init() {
        this.type = 'meunDrop'
        this.data = this.config.data;
    }

    //重写基类的组建模板
    //meun的模板数据,先设计好主体,再转换成字符变量,传入基类的render中自动渲染
    example(type) {
        var meun = "";
        meun += "<div class=\"meun\">";
        meun += "";
        meun += "            <style>";
        meun += "                div[class^='meun'] * {";
        meun += "                    padding: 0;";
        meun += "                    margin: 0;";
        meun += "                    list-style: none;";
        meun += "                }";
        meun += "                ";
        meun += "                div[class^='meun'] li {";
        meun += "                    background-color: rgba(255, 255, 255);";
        meun += "                    margin: 4px 0;";
        meun += "                    box-shadow: 1px 1px 1px 2px rgba(241, 241, 241, 0.5);";
        meun += "                }";
        meun += "                ";
        meun += "                div[class^='meun'] li .title,";
        meun += "                div[class^='meun'] li .title.active {";
        meun += "                    position: relative;";
        meun += "                    display: inline-block;";
        meun += "                    width: 100%;";
        meun += "                    height: 40px;";
        meun += "                    font-size: 18px;";
        meun += "                    line-height: 40px;";
        meun += "                    text-transform: capitalize;";
        meun += "                    font-style: italic;";
        meun += "                    color: white;";
        meun += "                    background-color: rgb(0, 195, 126);";
        meun += "                    box-sizing: border-box;";
        meun += "                    padding: 0 20px;";
        meun += "                }";
        meun += "                ";
        meun += "                div[class^='meun'] li .title::before,";
        meun += "                div[class^='meun'] li .title.active::before {";
        meun += "                    display: block;";
        meun += "                    width: 20px;";
        meun += "                    height: 20px;";
        meun += "                    position: absolute;";
        meun += "                    font-size: 16px;";
        meun += "                    font-style: normal;";
        meun += "                    top: 0;";
        meun += "                    right: 5px;";
        meun += "                    z-index: 4;";
        meun += "                    color: #fff";
        meun += "                }";
        meun += "                ";
        meun += "                div[class^='meun'] li .title::before {";
        meun += "                    content: '▼';";
        meun += "                }";
        meun += "                ";
        meun += "                div[class^='meun'] li .title.active::before {";
        meun += "                    content: '▲';";
        meun += "                }";
        meun += "                ";
        meun += "                div[class^='meun'] li section {";
        meun += "                    height: 0;";
        meun += "                    position: relative;";
        meun += "                    width: 80%;";
        meun += "                    margin: 0 auto;";
        meun += "                    overflow: hidden;";
        meun += "                    transition: height .45s ease;";
        meun += "                }";
        meun += "                ";
        meun += "                div[class^='meun'] li section.active {";
        meun += "                    height: 120px;";
        meun += "                }";
        meun += "                ";
        meun += "                div[class^='meun'] li header {";
        meun += "                    font-size: 20px;";
        meun += "                    margin: 6px 0 2px;";
        meun += "                }";
        meun += "                ";
        meun += "                div[class^='meun'] li header::before {";
        meun += "                    content: '■';";
        meun += "                    position: relative;";
        meun += "                    top: -4px;";
        meun += "                    font-size: 16px;";
        meun += "                    width: 20px;";
        meun += "                    height: 20px;";
        meun += "                    color: rgb(0, 195, 126);";
        meun += "                    \/* line-height: 20px;";
        meun += "                    \/* vertical-align: middle; *\/";
        meun += "                }";
        meun += "                ";
        meun += "                div[class^='meun'] li p {";
        meun += "                    font-size: 12px;";
        meun += "                    margin-bottom: 5px;";
        meun += "                }";
        meun += "            <\/style>";
        meun += "         </div>";

        //非常重要,返回字符化的组建主体,包括样式表部分,可自己测试后在浏览器查看
        return meun;
    }

    //重写组件对应的特定事件即组件自动生成的JavaScript代码部分
    //从提前的设计里面改过来到组件里面
    //包括3个参数:(组件类型,当前组件,组件的对应引用self)
    egEvent(type, nowEle, self) {
        var pre = {
           //这里是可以写多个方法,必须要有组件的生成方法函数
           //其他方法自己添加
           //meunDrop组建对应的JavaScript方法
           //这个生成方法是根据构造函数参数自动生成组件的内容
            meunDrop: function() {
                console.log(data)
                var data = self.data;

                if (data.length == 0) {
                    alert('请输入菜单数据')
                    return;
                }
                var iOl = document.createElement('ul');
                for (let i = 0; i < data.length; i++) {
                    var iLi = document.createElement('li');
                    var iTitle = document.createElement('p');
                    iTitle.className = 'title'
                    var iSection = document.createElement('Section');
                    var iHeader = document.createElement('header');
                    var iCont = document.createElement('p');
                    iSection.appendChild(iHeader).appendChild(iCont);
                    iSection.appendChild(iCont);
                    iLi.appendChild(iTitle).appendChild(iSection);
                    iLi.appendChild(iSection);
                    iTitle.innerHTML = data[i][0];
                    iHeader.innerHTML = data[i][1];
                    iCont.innerHTML = data[i][2];
                    iOl.appendChild(iLi);
                }
                nowEle.querySelector("div[class^='meun']").appendChild(iOl)
                var titles = nowEle
                    .querySelectorAll("div[class^='meun'] li .title");
                for (let i = 0; i < titles.length; i++) {
                    titles[i].onclick = () => {
                        for (let k = 0; k < titles.length; k++) {
                            if (k == i) {
                                continue;
                            } else {
                                titles[k].parentElement.children[1].className = '';
                                titles[k].className = 'title';
                            }
                        }
                        titles[i].parentElement.children[1].classList.toggle('active');
                        titles[i].classList.toggle('active');
                    }
                }
            }

        }
        return pre[type]
    }

    //外部访问组件对象更改样式的接口
    styleX(sty) {
        //样式用对象方式传入
        //菜单项
        if (sty['title']) {
            var titles = this.getObj()[1].querySelectorAll('.title');
            for (let x of titles) {
                x.style = sty['title']
            }
        }
        //内容标题
        if (sty['header']) {
            var headers = this.getObj()[1].querySelectorAll('header');
            for (let x of headers) {
                x.style = sty['header']
            }
        }
        //菜单项容器/背景
        if (sty['bg']) {
            var bg = this.getObj()[1].querySelectorAll('li');
            for (let x of bg) {
                x.style = sty['bg']
            }
        }
        //主体文字样式
        if (sty['txt']) {
            var txt = this.getObj()[1].querySelectorAll('section p');
            for (let x of txt) {
                x.style = sty['txt']
            }
        }
    }
}
3)新建菜单组件
a、新建组件
let m = new meunDrop({
    id: 'body',//组件插入的对象,默认为body对象,是css3选择器,不是id
    positon: 'afterbegin',//在对象的内部首位创建组建
    //自定义菜单对象[[title,header,txt内容],[菜单2],[菜单3],...]
    //根据data内容自动创建菜单个数
    data: [
        ['菜单 1', 'Just look at the arrow above', 'Lorem ipsum dolor sit amet, consectetuer adipiscing elit, sed diam nonummy nibh euismod tincidunt ut laoreet dolore magna aliquam erat volutpat.'],
        ['菜单 2', 'Just look at the arrow above', 'Lorem ipsum dolor sit amet, consectetuer adipiscing elit, sed diam nonummy nibh euismod tincidunt ut laoreet dolore magna aliquam erat volutpat.'],
        ['菜单 3', '这是一个测试', 'Lorem ipsum dolor sit amet, consectetuer adipiscing elit, sed diam nonummy nibh euismod tincidunt ut laoreet dolore magna aliquam erat volutpat.']
    ],

});
b、自定义更改样式,css3写法
m.styleX({
    title: 'background-color:lightgray;color:rgba(45,45,45,.8)',
    bg: 'background-color:rgba(45,45,45,.2);color:white',
    header: 'color:rgb(236, 78, 32)',
    txt: 'text-shadow: 1px 2px 3px rgba(45,45,45,.5)'
})
c、动图演示
d、组件事件的监听
监听组件的菜单个数,当点击键盘时alert菜单个数,这个例子不太好,如果监听输入框的字符个数会好一些
这个主要是自定义的内部监听,外部监听事件也可以,但有些内容访问不了
这个监听可以把对象的字符变动当成监听事件,也可以把其他自定义事件当成监听对象,不一定是浏览器标准事件
m.bind('keyup', () => {
    m.fire('num', m.getObj()[1].querySelectorAll('li').length)
});
m.on('num', e => alert(e))
四、总结
组件库的创建可能一开始比较麻烦,内容较多,但一单基类做好,组件的添加也比较快速方便!
因为是原生js,部分内容可能偏复杂,如有勘误请大佬指点交流!


 586
586


 被折叠的 条评论
为什么被折叠?
被折叠的 条评论
为什么被折叠?
 到【灌水乐园】发言


