


画外音
本文使用的是 4.1.20 版本的 netty 源码。netty 源码包的总体结构如下,在 io.netty.example 中,官方给我们提供了很多的实例供我们参考。有项目实战需求的读者在了解了 Netty 的工作原理和常用 API 之后,可以参考这个包中的案例构建自己的网络 IO 程序。
因为这篇文章是对netty的源码进行分析,所以篇幅可能会较长,博主尽量 用通俗易懂的语言以及较易理解的分析图为大家呈现,如果能坚持到阅读到最后,就足以说明你已经很棒了 ✌️ ✌️ ✌️ !!!

一、Netty 服务端启动过程源码剖析
我们使用 io.netty.example 中的 echo 案例来作为我们分析源码的起点。创建一个 maven 项目,将源码包中的 echo 案例拷贝到项目的源码目录,在 pom 中引入 netty 依赖,即可启动 echo 中的 Server 和 Client 程序。

<!-- netty maven 依赖 -->
<dependency>
    <groupId>io.netty</groupId>
    <artifactId>netty-all</artifactId>
    <version>4.1.54.Final</version>
</dependency>
EchoServer 代码
package com.netty.echo;

import io.netty.bootstrap.ServerBootstrap;
import io.netty.channel.*;
import io.netty.channel.nio.NioEventLoopGroup;
import io.netty.channel.socket.SocketChannel;
import io.netty.channel.socket.nio.NioServerSocketChannel;
import io.netty.handler.logging.LogLevel;
import io.netty.handler.logging.LoggingHandler;
import io.netty.handler.ssl.SslContext;
import io.netty.handler.ssl.SslContextBuilder;
import io.netty.handler.ssl.util.SelfSignedCertificate;


public final class EchoServer {
    static final boolean SSL = System.getProperty("ssl") != null;
    static final int PORT = Integer.parseInt(
        System.getProperty("port", "8007")
    );

    public static void main(String[] args) throws Exception {
        // 通过 SslContext 构建安全套接字(Secure Socket),
        // 这是 Netty 提供的安全特性
        final SslContext sslCtx;
        if (SSL) {
            SelfSignedCertificate ssc = new SelfSignedCertificate();
            sslCtx = SslContextBuilder.forServer(
                ssc.certificate(),
                ssc.privateKey()
            ).build();
        } else {
            sslCtx = null;
        }

        EventLoopGroup bossGroup = new NioEventLoopGroup(1);
        EventLoopGroup workerGroup = new NioEventLoopGroup();
        final EchoServerHandler serverHandler = new EchoServerHandler();
        try {
            ServerBootstrap b = new ServerBootstrap();
            // 设置线程组
            b.group(bossGroup, workerGroup)
             // 说明服务器端通道的实现类(便于 Netty 做反射处理)
             .channel(NioServerSocketChannel.class)
             .option(ChannelOption.SO_BACKLOG, 100)
             // 对服务端的 NioServerSocketChannel 添加 Handler
             // LoggingHandler 是 netty 内置的一种 ChannelDuplexHandler,
             // 既可以处理出站事件,又可以处理入站事件,即 LoggingHandler
             // 既记录出站日志又记录入站日志。
             .handler(new LoggingHandler(LogLevel.INFO))
             // 对服务端接收到的、与客户端之间建立的 SocketChannel 添加 Handler
             .childHandler(new ChannelInitializer<SocketChannel>() {
                 @Override
                 public void initChannel(SocketChannel ch) throws Exception {
                     ChannelPipeline p = ch.pipeline();
                     if (sslCtx != null) {
                         // sslCtx.newHandler(ch.alloc())对传输的内容
                         // 做安全加密处理
                         p.addLast(sslCtx.newHandler(ch.alloc()));
                     }
                     // 如果需要的话,可以用 LoggingHandler 记录与客户端之
                     // 间的通信日志
                     // p.addLast(new LoggingHandler(LogLevel.INFO));

                     // serverHandler 用来实现 echo
                     p.addLast(serverHandler);
                 }
             });

            // 启动服务器
            ChannelFuture f = b.bind(PORT).sync();

            // 等待服务端 NioServerSocketChannel 关闭
            f.channel().closeFuture().sync();
        } finally {
            bossGroup.shutdownGracefully();
            workerGroup.shutdownGracefully();
        }
    }
}
EchoServerHandler 代码
package com.netty.echo;

import io.netty.channel.ChannelHandler;
import io.netty.channel.ChannelHandlerContext;
import io.netty.channel.ChannelInboundHandlerAdapter;

/**
 * ServerHandler 用来实现 echo(回声,即原样返回 EchoClient 发来的任何消息)
 */
@ChannelHandler.Sharable
public class EchoServerHandler extends ChannelInboundHandlerAdapter {
    /**
     * 当通道有数据可读时执行
     *
     * @param ctx 上下文对象,可以从中取得相关联的 Pipeline、Channel 等
     * @param msg 客户端发送的数据
     * @throws Exception
     */
    @Override
    public void channelRead(ChannelHandlerContext ctx, Object msg) {
        // 原样写回 EchoClient 发来的任何消息
        ctx.write(msg);
    }

    /**
    * 上面 channelRead()执行完成后,触发本函数的执行
    */
    @Override
    public void channelReadComplete(ChannelHandlerContext ctx) {
        ctx.flush();
    }

    @Override
    public void exceptionCaught(ChannelHandlerContext ctx, Throwable cause) {
        // 出现异常的时候,关闭当前 SocketChannel
        cause.printStackTrace();
        ctx.close();
    }
}
二、服务器启动前的准备
我们首先要研究下服务器启动前都做了哪些准备
 // 启动服务器
ChannelFuture f = b.bind(PORT).sync();
下面这块代码是服务器启动前的准备,下面将详细的对他进行分析
        //1、创建两个线程池组
        EventLoopGroup bossGroup = new NioEventLoopGroup(1);
        EventLoopGroup workerGroup = new NioEventLoopGroup();
        final EchoServerHandler serverHandler = new EchoServerHandler();
        try {
            ServerBootstrap b = new ServerBootstrap(); //2
            //2、配置启动类
            b.group(bossGroup, workerGroup)   //2.1
             .channel(NioServerSocketChannel.class)// 2.2
             .option(ChannelOption.SO_BACKLOG, 100)//2.3
             .handler(new LoggingHandler(LogLevel.INFO))//2.4
             .childHandler(new ChannelInitializer<SocketChannel>() {//2.5
                 @Override
                 public void initChannel(SocketChannel ch) throws Exception {
                     ChannelPipeline p = ch.pipeline();
                     if (sslCtx != null) {
                         p.addLast(sslCtx.newHandler(ch.alloc())); //2.6
                     }
                     // 如果需要的话,可以用 LoggingHandler 记录与客户端之
                     // 间的通信日志
                     // p.addLast(new LoggingHandler(LogLevel.INFO));//2.7

                     // serverHandler 用来实现 echo
                     p.addLast(serverHandler);  //2.8
                 }
             });
2.1 线程组的创建过程
对标注部分进行解析说明
      // 1、创建两个线程池组
        EventLoopGroup bossGroup = new NioEventLoopGroup(1);
        EventLoopGroup workerGroup = new NioEventLoopGroup();
1、创建两个线程池组,bossGroup(NioEventLoopGroup(1))常用来管理监听客户端的连接时间,里面有很多eventLoop,是个死循环线程不断的处理监听客户端连接事件,(1)参数1指创建几个线程,不传默认的为cpu核数*2,下面进行debug验证
在此处打上断电点,debug 启动main方法
 1)进入断点后,首先进入MultithreadEventLoopGroup (字面义:多线程事件循环组)类,在这个类的下面这个方法中,会创建并返回一个DefaultThreadFactory类,优先级为10

DefaultThreadFactory 实现了 ThreadFactory 接口。这一个线程创建工厂类,用于线程的创建
成员变量
private static final AtomicInteger poolId = new AtomicInteger();
// 下一个线程id
private final AtomicInteger nextId = new AtomicInteger();
// 线程名前缀(包含线程池id)
private final String prefix;
// 是否守护线程
private final boolean daemon;
// 优先级
private final int priority;
//jdk线程组
protected final ThreadGroup threadGroup;
构造器
public DefaultThreadFactory(Class<?> poolType, int priority) {
    this(poolType, false, priority);
}
public DefaultThreadFactory(String poolName, boolean daemon, int priority) {
    this(poolName, daemon, priority, System.getSecurityManager() == null ?
            Thread.currentThread().getThreadGroup() : System.getSecurityManager().getThreadGroup());
}
核心构造器
public DefaultThreadFactory(String poolName, boolean daemon, int priority, ThreadGroup threadGroup) {
    if (poolName == null) {
        throw new NullPointerException("poolName");
    }
    if (priority < Thread.MIN_PRIORITY || priority > Thread.MAX_PRIORITY) {
        throw new IllegalArgumentException(
                "priority: " + priority + " (expected: Thread.MIN_PRIORITY <= priority <= Thread.MAX_PRIORITY)");
    }
    // 构造线程名前缀
    prefix = poolName + '-' + poolId.incrementAndGet() + '-';
    this.daemon = daemon;
    this.priority = priority;
    this.threadGroup = threadGroup;
}
newThread 方法
Thread newThread(Runnable r) 方法是 ThreadFactory 接口中定义用于生产线程。
public Thread newThread(Runnable r) {
    // 调用下面的newThread方法构建线程对象
    Thread t = newThread(FastThreadLocalRunnable.wrap(r), prefix + nextId.incrementAndGet());
    try {
        // 设置守护线程和优先级
        if (t.isDaemon() != daemon) {
            t.setDaemon(daemon);
        }

        if (t.getPriority() != priority) {
            t.setPriority(priority);
        }
    } catch (Exception ignored) {
        // Doesn't matter even if failed to set.
    }
    return t;
}
DefaultThreadFactory 中返回的是 FastThreadLocalThread,FastThreadLocalThread
对于 ThreadLocal 做了优化,速度更快
protected Thread newThread(Runnable r, String name) {
    return new FastThreadLocalThread(threadGroup, r, name);
}
2)继续点击进入debug方法,可以看到进入了InternalLoggerFactory(字面义:工厂内部日志记录器)类的下面这个getInstance()方法,用于返回一个名为 MultithreadEventLoopGroup的类,也就是第一步中的第一个参数
 protected ThreadFactory newDefaultThreadFactory() {
        return new DefaultThreadFactory(this.getClass(), 10);
    }

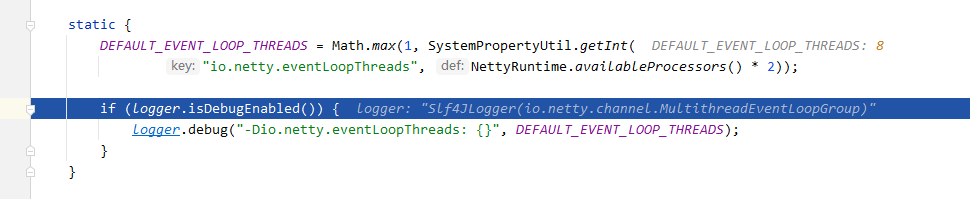
3)一直点debug进入方法键,直到进入到MultithreadEventLoopGroup.class类中的static静态代码块中 availableProcessors(字面义:可用处理器,得到系统的可用处理器核数并返回,可以看到博主的是4 ,所以2*4=8
4)、继续执行,到MultithreadEventExecutorGroup 的protected MultithreadEventExecutorGroup(int nThreads, Executor executor,
EventExecutorChooserFactory chooserFactory, Object… args) 构造方法 💥
重点来了
这个构造方法会创建相应数量的执行器(每个执行器都是一个线程),如果传入的线程数为null,就会按cpu的核数*2,执行器如果为null,就会使用默认的执行器,并对每个执行器进行监听
构造方法代码
  /**
     * Create a new instance.
     *
     * @param nThreads    这个实例将使用的线程数(前面传入的为1,所以此处也为1,默认cpu的核数*2)
     * @param executor   执行器,如果为null,则会使用默认的执行器
     * @param chooserFactory    选择器工厂
     * @param args             其他参数
     */
    protected MultithreadEventExecutorGroup(int nThreads, Executor executor,
                                            EventExecutorChooserFactory chooserFactory, Object... args) {
        if (nThreads <= 0) { //如果传入的nThreads <0 抛出异常
            throw new IllegalArgumentException(String.format("nThreads: %d (expected: > 0)", nThreads));
        }

        if (executor == null) { //如果执行器为null,就会使用默认的执行器
            executor = new ThreadPerTaskExecutor(newDefaultThreadFactory());
        }

        children = new EventExecutor[nThreads]; //创建 EventExecutor 数组

        for (int i = 0; i < nThreads; i ++) {
            boolean success = false;
            try {
                children[i] = newChild(executor, args); //为每个子线程(eventloop)的构造方法传入执行器和其他参数
                success = true;   //成功设为true
            } catch (Exception e) {   //创建失败则抛出异常
                // TODO: Think about if this is a good exception type
                throw new IllegalStateException("failed to create a child event loop", e);
            } finally {
                if (!success) { //如果失败,则关闭这个通道
                    for (int j = 0; j < i; j ++) {
                        children[j].shutdownGracefully();
                    }

                    for (int j = 0; j < i; j ++) {
                        EventExecutor e = children[j];
                        try {
                            while (!e.isTerminated()) {
                                e.awaitTermination(Integer.MAX_VALUE, TimeUnit.SECONDS);
                            }
                        } catch (InterruptedException interrupted) {
                            // Let the caller handle the interruption.
                            Thread.currentThread().interrupt();
                            break;
                        }
                    }
                }
            }
        }

        chooser = chooserFactory.newChooser(children);  //将执行器数组传入,生成一个选择器

        final FutureListener<Object> terminationListener = new FutureListener<Object>() {     // 终止监听器
            @Override
            public void operationComplete(Future<Object> future) throws Exception {
                if (terminatedChildren.incrementAndGet() == children.length) {
                    terminationFuture.setSuccess(null);
                }
            }
        };

        for (EventExecutor e: children) {   //遍历每个执行器数组中的每个执行器进行监听
            e.terminationFuture().addListener(terminationListener);
        }

        Set<EventExecutor> childrenSet = new LinkedHashSet<EventExecutor>(children.length);
        Collections.addAll(childrenSet, children);
        readonlyChildren = Collections.unmodifiableSet(childrenSet);
    }
5)对比初始化后的bossGroup 和workGroup

可以看到bossGroup因为我们传入的参数是1,所以children(执行器数组)下面有一个eventLoop执行器,也就是一个子线程
workerGroup因为是默认的,我的cpu核数是4 所以生成了8个eventLoop执行器,也就是八个子线程
6)观察初始化后的执行器

2.2 ServerBootstrap 启动类的配置
ServerBootstrap 他是一个引导类,用于启动服务器和引导整个程序的初始化,它和 ServerChannel 关联, 而 ServerChannel 继承了 Channel ,有一些方法 remoteAddress 等
   //2、配置启动类
   ServerBootstrap  serverBootstrap  =new ServerBootstrap  ();
            serverBootstrap.group(bossGroup, workerGroup)   //2.1
             .channel(NioServerSocketChannel.class)// 2.2
             .option(ChannelOption.SO_BACKLOG, 100)//2.3
             .handler(new LoggingHandler(LogLevel.INFO))//2.4
             .childHandler(new ChannelInitializer<SocketChannel>() {//2.5
                 @Override
                 public void initChannel(SocketChannel ch) throws Exception {
                     ChannelPipeline p = ch.pipeline();
                     if (sslCtx != null) {
                         p.addLast(sslCtx.newHandler(ch.alloc())); //2.6
                     }
                     p.addLast(serverHandler);  //2.7
                 }
             });
下面对标注进行解析说明
-
2.1 serverBootstrap.group(bossGroup, workerGroup)
将初始化后的两个线程池组传入 -
2.2 channel(NioServerSocketChannel.class)
配置channel通道采用NIO模式的NioServerSocketChannel,客户端相应为NioSocketChannel -
2.3 option(ChannelOption.SO_BACKLOG, 100)
backlog 用于构造服务端套接字ServerSocket对象,标识当服务器请求处理线程全满时,用于临时存放已完成三次握手的请求的队列的最大长度。 -
2.4 handler(new LoggingHandler(LogLevel.INFO))
handler中传入的handler类,会加入到bossgroup中pipeLine的handler处理类链中(尾部)LoggingHandler 加入后Netty就会以给定的日志级别打印出LoggingHandler中的日志。可以对入站\出站事件进行日志记录,从而方便我们进行问题排查。 -
2.5 childHandler(new ChannelInitializer())
handler中传入的handler类,会加入到workgroup中pipeLine的handler处理类链中(尾部)可以通过pipeline对象来将handler处理类加入到workGroup中的pipeline中 -
2.6 p.addLast(sslCtx.newHandler(ch.alloc()))
通过pipeline对象的addLast方法来将handler处理类加入到workGroup中的pipeline中的handler类链中(尾部) -
2.7 p.addLast(serverHandler)
也可以将自己实现的handler处理类加入到workGroup中的pipeline中的handler类链中(尾部)
2.3 启动类绑定端口及关闭连接
   // 启动服务器
            ChannelFuture f = serverBootStrap.bind(PORT).sync();  //1
            f.channel().closeFuture().sync(); //2
        } finally {
            bossGroup.shutdownGracefully();  //3
            workerGroup.shutdownGracefully();
        }
下面是对标准进行解析和说明
- 1、ChannelFuture f = serverBootStrap.bind(PORT).sync();
引导类绑定监听端口,并通过异步的方式返回一个ChannelFuture 对象
ChannelFuture的作用是用来保存Channel异步操作的结果。我们知道,在Netty中所有的I/O操作都是异步的。这意味着任何的I/O调用都将立即返回,而不保证这些被请求的I/O操作在调用结束的时候已经完成。取而代之地,你会得到一个返回的ChannelFuture实例,这个实例将给你一些关于I/O操作结果或者状态的信息
- 2、 f.channel().closeFuture().sync();
等待服务端 NioServerSocketChannel 关闭 - 3、优雅的关闭线程池组
2.3.1 执行 ServerBootstrap.bind(PORT)时发了什么
EchoServer 中启动服务器的代码 b.bind(PORT)调用了 AbstractBootstrap 中的 doBind()方法。该方法的源码如下(对代码的解说写在了注释中):
private ChannelFuture doBind(final SocketAddress localAddress) {
    // 初始化 NioServerSocketChannel 的实例,并且将其注册到
    // bossGroup 中的 EvenLoop 中的 Selector 中,initAndRegister()
    // 方法中有如下两句关键代码,分别完成 NioServerSocketChannel
    // 实例的初始化和注册:
    // (1) channel = channelFactory.newChannel();
    // (2) ChannelFuture regFuture = config().group().register(channel);
    final ChannelFuture regFuture = initAndRegister();
    final Channel channel = regFuture.channel();
    if (regFuture.cause() != null) {
        return regFuture;
    }

    if (regFuture.isDone()) {
        // 若异步过程 initAndRegister()已经执行完毕,则进入该分支
        ChannelPromise promise = channel.newPromise();
        doBind0(regFuture, channel, localAddress, promise);
        return promise;
    } else {
        // 若异步过程 initAndRegister()还未执行完毕,则进入该分支
        final PendingRegistrationPromise promise
            = new PendingRegistrationPromise(channel);

        regFuture.addListener(new ChannelFutureListener() {
            // 监听 regFuture 的完成事件,完成之后再调用
            // doBind0(regFuture, channel, localAddress, promise);
            @Override
            public void operationComplete(ChannelFuture future) throws Exception {
                Throwable cause = future.cause();
                if (cause != null) {
                    // Registration on the EventLoop failed so fail
                    // the ChannelPromise directly to not cause an
                    // IllegalStateException once we try to access
                    // the EventLoop of the Channel.
                    promise.setFailure(cause);
                } else {
                    // Registration was successful, so set the correct executor to use.
                    // See https://github.com/netty/netty/issues/2586
                    promise.registered();
                    doBind0(regFuture, channel, localAddress, promise);
                }
            }
        });
        return promise;
    }
}
对上面代码中的 doBind0(regFuture, channel, localAddress, promise)继续追踪,发现 doBind0(regFuture, channel, localAddress, promise)接着调用了 channel 的 bind()方法,最终调用了一个 Native 方法把.bind(PORT)最终托管给了 JVM,然后 JVM 进行系统调用。追踪过程如下:
在 NioServerSocketChannel 中的 javaChannel().bind(localAddress, config.getBacklog())调用底层 JDK 接口完成端口绑定和监听之后,继续追踪,会发现代码进入到了 NioEventLoop 中 run 方法的死循环里:
@Override
protected void run() {
    int selectCnt = 0;
    for (;;) {
        try {
            int strategy;
            try {
                strategy = selectStrategy
                    .calculateStrategy(selectNowSupplier, hasTasks());
                switch (strategy) {
                case SelectStrategy.CONTINUE:
                    continue;

                case SelectStrategy.BUSY_WAIT:
                    // fall-through to SELECT since the busy-wait
                    // is not supported with NIO
                case SelectStrategy.SELECT:
                    long curDeadlineNanos = nextScheduledTaskDeadlineNanos();
                    if (curDeadlineNanos == -1L) {
                        // nothing on the calendar
                        curDeadlineNanos = NONE;
                    }
                    nextWakeupNanos.set(curDeadlineNanos);
                    try {
                        if (!hasTasks()) {
                            strategy = select(curDeadlineNanos);
                        }
                    } finally {
                        // This update is just to help block unnecessary
                        // selector wakeups so use of lazySet is ok
                        // (no race condition)
                        nextWakeupNanos.lazySet(AWAKE);
                    }
                    // fall through
                default:
                }
            } catch (IOException e) {
                // If we receive an IOException here its because the
                // Selector is messed up. Let's rebuild the selector
                // and retry. https://github.com/netty/netty/issues/8566
                rebuildSelector0();
                selectCnt = 0;
                handleLoopException(e);
                continue;
            }

            selectCnt++;
            cancelledKeys = 0;
            needsToSelectAgain = false;
            final int ioRatio = this.ioRatio;
            boolean ranTasks;
            if (ioRatio == 100) {
                try {
                    if (strategy > 0) {
                        processSelectedKeys();
                    }
                } finally {
                    // Ensure we always run tasks.
                    ranTasks = runAllTasks();
                }
            } else if (strategy > 0) {
                final long ioStartTime = System.nanoTime();
                try {
                    processSelectedKeys();
                } finally {
                    // Ensure we always run tasks.
                    final long ioTime
                        = System.nanoTime() - ioStartTime;
                    ranTasks
                        = runAllTasks(ioTime * (100 - ioRatio) / ioRatio);
                }
            } else {
                // This will run the minimum number of tasks
                ranTasks = runAllTasks(0);
            }

            if (ranTasks || strategy > 0) {
                if (selectCnt > MIN_PREMATURE_SELECTOR_RETURNS
                    && logger.isDebugEnabled()) {
                    logger.debug(
                        "Selector.select() returned prematurely {} "
                        + "times in a row for Selector {}.",
                            selectCnt - 1, selector
                    );
                }
                selectCnt = 0;
            } else if (unexpectedSelectorWakeup(selectCnt)) {
                // Unexpected wakeup (unusual case)
                selectCnt = 0;
            }
        } catch (CancelledKeyException e) {
            // Harmless exception - log anyway
            if (logger.isDebugEnabled()) {
                logger.debug(
                    CancelledKeyException.class.getSimpleName()
                    + " raised by a Selector {} - JDK bug?",
                    selector,
                    e
                );
            }
        } catch (Error e) {
            throw (Error) e;
        } catch (Throwable t) {
            handleLoopException(t);
        } finally {
            // Always handle shutdown even if the loop
            // processing threw an exception.
            try {
                if (isShuttingDown()) {
                    closeAll();
                    if (confirmShutdown()) {
                        return;
                    }
                }
            } catch (Error e) {
                throw (Error) e;
            } catch (Throwable t) {
                handleLoopException(t);
            }
        }
    }
}
这段死循环就是在做下图(图片来源于网络)中红色框圈住的事情,这个过程我在上一篇文章中已经做了详细的描述:

至此,对 ServerBootstrap 实例的.bind(PORT)背后的 Netty 源码运作细节已经讲清楚了。总结如下:
1)首先调用 AbstractBootstrap 中的 doBind()方法完成 NioServerSocketChannel 实例的初始化和注册。
2)然后调用 NioServerSocketChannel 实例的 bind()方法。
3)NioServerSocketChannel 实例的 bind()方法最终调用 sun.nio.ch.Net 中的 bind()和 listen()完成端口绑定和客户端连接监听。
4)sun.nio.ch.Net 中的 bind()和 listen()底层都是 JVM 进行的系统调用。
5)bind 完成后会进入 NioEventLoop 中的死循环,不断执行以下三个过程
-
select:轮训注册在其中的 Selector 上的 Channel 的 IO 事件
-
processSelectedKeys:在对应的 Channel 上处理 IO 事件
-
runAllTasks:再去以此循环处理任务队列中的其他任务
💥推荐阅读💥


 1055
1055


 被折叠的 条评论
为什么被折叠?
被折叠的 条评论
为什么被折叠?
 到【灌水乐园】发言


