


目录
maven
简介:Maven主要用于解决导入依赖于Java类的jar和编译Java项目的主要问题,其使用pom文件将自动管理下载的jar包
创建maven工程
1.

groupid:包名
artifactid:工程名
location:存放位置
2.结构
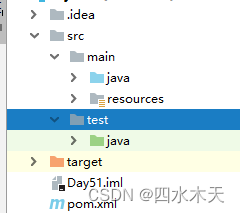
工程目录结构:
    src
        main主程序区
            java后端代码
                com包
                    类
            resources类路径---配置文件
                db.properties
        test测试程序区
    pom.xml ====project工程 object对象 model模型
        依赖的管理,例:***.jar文件
        插件管理
3. 在idea中关联maven
解压maven压缩文件;
在idea中settings-->build execution deployment-->build tools-->maven
    设置三项:
        maven的安装根目录;
        配置文件:maven的安装根目录/conf/settings.xml
关联本地仓库的目录: 
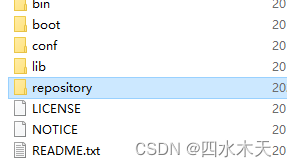
在安装的地方创建repository,存放maven工程下载的依赖
4.修改配置
配置文件:maven的安装根目录/conf/settings.xml

    本地文件夹:<localRepository>C:\tools\maven\repository</localRepository>
    设置国内镜像地址:从国内仓库下载资源
        <mirror>
          <id>alimaven</id>
          <name>aliyun maven</name>
          <url>https://maven.aliyun.com/repository/public</url>
          <mirrorOf>central</mirrorOf>
        </mirror>
    编译环境:设置为jdk8
        <profile>
            <id>jdk88</id>
            <activation>
                  <activeByDefault>true</activeByDefault>
                  <jdk>1.8</jdk>
             </activation>
             <properties>
                  <maven.compiler.source>1.8</maven.compiler.source>
                  <maven.compiler.target>1.8</maven.compiler.target>
                  <maven.compiler.compilerVersion>1.8</maven.compiler.compilerVersion>
             </properties>
         </profile>
     设置有效的编译环境:
         <activeProfiles>
            <activeProfile>jdk88</activeProfile>  ---设置profile的id
          </activeProfiles>
junit单元测试
添加依赖:pom.xml
<dependency>
    <groupId>junit</groupId>
    <artifactId>junit</artifactId>
    <version>4.13.2</version>
    <scope>test</scope>
</dependency>
添加注解:
公共类/公共方法/无参/无返回值
public class 类{
    @Test
    public void teest(){

    }
}
使用时在其左边点启动就行
简化实体类的lombok
idea插件
在idea中安装插件:settings-->plugin
搜索 lombok
install
重启idea
pom.xml引入依赖:
<dependency>
    <groupId>org.projectlombok</groupId>
    <artifactId>lombok</artifactId>
    <version>1.18.22</version>
</dependency>
使用:生成实体类中的相关方法/构造
getter/setter
toString
equals
无参/有参构造

@Data //生成get/set equals 、 hashCode 、toString 方法。
@AllArgsConstructor //全参构造
@NoArgsConstructor //无参构造
@RequiredArgsConstructor //个别参数构造,与@NonNull注解对应
public class User {
     @NonNull
    private String name; //属性
}
这样使用时,需要添加属性,直接写就行,省区了更改get,set,构造函数...更改
常用依赖:
 <dependency>
            <groupId>mysql</groupId>
            <artifactId>mysql-connector-java</artifactId>
            <version>5.1.48</version>
        </dependency>

//mysql引入
<dependency>
<groupId>junit</groupId>
<artifactId>junit</artifactId>
<version>4.13.2</version>
<scope>test</scope>
</dependency> //测试<dependency>
<groupId>org.projectlombok</groupId>
<artifactId>lombok</artifactId>
<version>1.18.22</version>
</dependency>
//简化实体类的
        <dependency>
            <groupId>org.mybatis</groupId>
            <artifactId>mybatis</artifactId>
            <version>3.4.6</version>
        </dependency>

//mybatis
<dependency>
<groupId>com.github.pagehelper</groupId>
<artifactId>pagehelper</artifactId>
<version>5.1.2</version>
</dependency>
//分页插件<dependency>
<groupId>javax.servlet</groupId>
<artifactId>javax.servlet-api</artifactId>
<version>3.1.0</version>
</dependency>
//java service<packaging>war</packaging>
打war包的mybatis
框架:半成品
实现了与数据库的交互
免除了jdbc的代码,但是可以实现CRUD,并且可以实现映射(数据--类),使用XML配置和注解两种方式实现;
使用步骤
配置
在pom.xml里导入mysql依赖
   <dependency>
            <groupId>mysql</groupId>
            <artifactId>mysql-connector-java</artifactId>
            <version>5.1.48</version>
        </dependency>
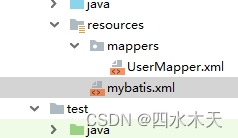
核心文件在resources下创建mybatis.xml,使用其管理映射元文件
<?xml version="1.0" encoding="UTF-8" ?>
<!DOCTYPE configuration
        PUBLIC "-//mybatis.org//DTD Config 3.0//EN"
        "http://mybatis.org/dtd/mybatis-3-config.dtd">
<configuration>
    <environments default="development">
        <environment id="development">
            <transactionManager type="JDBC"/>
            <dataSource type="POOLED">
                <property name="driver" value="com.mysql.jdbc.Driver"/>
                <property name="url" value="jdbc:mysql:///e_commerce?characterEncoding=utf8"/>

(<property name="url" value="jdbc:mysql:///数据库名?characterEncoding=utf8"/>)
                <property name="username" value="root"/>      //数据库账号
                <property name="password" value="123456"/>    //数据库密码
            </dataSource>
        </environment>
    </environments>
    <mappers>
        <mapper resource="mappers/UserMapper.xml"/>    //从resources路径下读取到的映射元文件的路径
    </mappers>
</configuration>
配置映射元文件 **Mapper.xml,例如UserMapper.xml
resources/mapper目录/ **Mapper.xml
<?xml version="1.0" encoding="UTF-8" ?>
<!DOCTYPE mapper
        PUBLIC "-//mybatis.org//DTD Mapper 3.0//EN"
        "http://mybatis.org/dtd/mybatis-3-mapper.dtd">
<mapper namespace="com.Users">     //接口所在地
    <delete id="delete">       //sql语句书写
        DELETE FROM users WHERE u_id=6;
    </delete>
</mapper>
mybatis核心文件的配置信息
1.加入properties文件:
作用类似于:原来的工具类properties所填写的配置文件

在mybatis.xml中配置
<!--加载properties配置文件-->
    <properties resource="db.properties"/>
注:在数据源的值里直接使用${properties中的键值名}
<environments default="development">
<environment id="development">
<transactionManager type="JDBC"/>
<dataSource type="POOLED">
<property name="driver" value="com.mysql.jdbc.Driver"/>
<property name="url" value="jdbc:mysql:///e_commerce?characterEncoding=utf8"/>
<property name="username" value="root"/>
<property name="password" value="123456"/>
</dataSource>
</environment>
</environments>首先读取在 properties 元素体内指定的属性。
然后根据 properties 元素中的 resource 属性读取类路径下属性文件,或根据 url 属性指定的路径读取属性文件,并覆盖之前读取过的同名属性。
最后读取作为方法参数传递的属性,并覆盖之前读取过的同名属性。settings设置
第一种:给类定义别名,别名自行定义
    <typeAlias type="com.entity.User" alias="u"/>
第二种:引入包名,此时别名默认为类的首字母小写方式
    <package name="com.entity"/>,例:com.entity.User-->user
第三种:java内建类型的别名,查表;
    例:java.util.Map;-->map
设定日志:
 <settings>
        <!--log4j(SSM)/slf4j(springboot)STDOUT_LOGGING-->
        <setting name="logImpl" value="STDOUT_LOGGING"/>
    </settings>
SQL使用
Java程序中步骤
1. 将类路径下的xml文件以输入流形式读入到程序中:
Inputstream is=Resources.getResourceAsStream("mybatis.xml");
2. 创建SqlSessionFactoryBuilder对象
SqlSessionFactoryBuilder builder=new SqlSessionFactoryBuilder();
3.创建SqlSessionFactory对象:创建mybatis实例的核心
SqlSessionFactory factory=builder.build();使用接口与接口结合
代替了原本的dao层

4.执行
SqlSession:会话对象:
Sqlsession sqlSession=factory.openSession();


.openSession(true)为自动提交
获得接口对象:通过mybatis实例获得
Users mapper = sqlSession.getMapper(Users.class);执行接口中的方法:
int delete = mapper.delete();//删除一条数据
提交:
sqlSession.commit();关闭:
sqlSession.close();sql参数的传递
语法:
#{参数名}

<insert>
    insert into tb_user values(null,#{参数名},#{参数名},#{参数名})
</insert>
序号传参
arg0,arg1,arg2....
param1,param2,param3.....

接口:
    public interface UserMapper{
        int insert(String name,String pass,String tel,String mail);
    }
映射元文件:xml文件
    <insert id="insert方法名">
        insert into tb_user values(null,#{arg0},#{arg1},#{arg2},#{arg3})
    </insert>


     <insert id="insert方法名">
        insert into tb_user values(null,#{param1},#{param2},#{param3},#{param4})
    </insert>

注:不能混用两种序号;必须从起始序号开始顺序递增;必须与接口中的参数一一对应;
实体传参
用实体类的属性名作为参数名;

实体类:
    public class User{
        //属性,例:name--u_name
        private String name;
        private String tel;
        private String mail;
        private String pass;
    }

接口:
    public interface UserMapper{
        int insert(User user);
    }

映射元文件:xml文件
    <insert id="insert方法名" parameterType="com.pojo.User">
        insert into tb_user values(null,#{name},#{pass},#{tel},#{mail})
    </insert>
传一个参数:
当参数只有一个值时,可任何命名参数名
接口:int deleteById(int id);
    User selectOne(String name);

sql: delete from tb_user where u_id=#{uid}
    select * from tb_user where u_name like concat('%',#{username},'%')
注解传参:
@Param---mybatis提供的
// name表示方法的形参名
// uname表示传给mybatis的sql里的参数名
接口:User selectOne(@Param("uname")String name,@Param("upass")String pass);
sql: select * from tb_user where u_name=#{uname} and u_pass=#{upass}map传参
将#{key},传入
   @Test
    public void test10() throws IOException {//排序
        Users mapper = sqlSession.getMapper(Users.class);
        HashMap<String, String> map = new HashMap<>();

        map.put("name","巴尔");
        map.put("password","123");

        User user = mapper.selectpassword(map);
        System.out.println(user);
    }


    @Before
    public void before()throws Exception{
        SqlSessionFactory factory = new SqlSessionFactoryBuilder().build(Resources.getResourceAsStream("mybatis.xml"));
        sqlSession=factory.openSession(true);//自动提交
    }
    //在执行单元测试之后执行的方法
    @After
    public void after(){
        sqlSession.close();
    }
User selectpassword(Map map); <select id="selectpassword" resultType="com.entity.User" parameterType="map">
select * from users where u_name = #{name} and u_password = #{password} ;
</select>xml文件中
在resources下创建一个一个使用sql的xml文件

*Mapper。xml文件配置
<?xml version="1.0" encoding="UTF-8" ?>
<!DOCTYPE mapper
  PUBLIC "-//mybatis.org//DTD Mapper 3.0//EN"
  "http://mybatis.org/dtd/mybatis-3-mapper.dtd">
<mapper namespace="dao接口的全类名">
  <select id="方法名" resultType="Blog">
    select * from Blog where id = #{id}
  </select>
  <insert id="方法名insert"></insert>
  <delete id="方法名"></delete>
  <update id="方法名"></update>
</mapper>

注:名空间namespace----与对应接口全类名称一致;
    id----与接口中方法名相同
查询的结果如何封装?
查询结果的字段名必须与实体类的属性名相同:
    select u_id ,u_name ,u_pass from tb_user;

    public class User{
        private Integer uid;
        private String uname;
        private String upass;
    }

    可通过字段别名的方式将结果集的字段名与实体类的属性名定义一致;
        select u_id uid ,u_name uname,u_pass upass from tb_user;
<select id="方法名" resultType/resultMap>
    select。。。语句
</select>
resultType 代表返回类型
parameterType 传入类型 ,一般实体传参会用
基本数据类型:int,string,long,Date;
复杂数据类型:类和Map
#{参数} 获取参数中的值
#{属性名} ,map中则是#{key}
 <sql id="basesql">
        u_id uid,u_name uname,u_pass upass,u_tel tel,u_mail mail
         //将上面的部分包裹
    </sql>
<!--CRUD相关方法-->
    <!--查询方法:查询结果集中使用resultType实现实体的映射;表字段名和实体属性名一致-->
    <select id="selectOne" resultType="user">

        select <include refid="basesql"/>  //将上面包裹的部分在这使用

                    //等于    u_id uid,u_name uname,u_pass upass,u_tel tel,u_mail mail

        from tb_user where u_name=#{param1} and u_pass=#{param2}
    </select>
mybatis实现增删改查
增,主键回填
主键回填一般用于增加操作中,把插入数据时插入为null的主键id数据填回去,存入到java对象和主键对应的属性中(数据库主键字段为id则回填的是实体类的id属性),实现添加+查询主键一步到位。
自增主键中
select LAST_INSERT_ID() :mysql 中的函数,获取最后插入的自增id值
 <selectKey keyProperty="uid实体属性名" keyColumn="u_id表字段名称" resultType="int主键值类型" order="AFTER主键生成的顺序">
            select LAST_INSERT_ID()
        </selectKey>
2. < selectKey > sql语句 < /selectKey >:选择主键的标签,嵌套在插入语句中属性:
order:sql语句在插入中的执行顺序,order="AFTER",表示先执行插入再执行查询
resultType:sql语句执行的结果,在此处也是主键的结果
keyProperty:sql语句执行后回填到哪个属性,在此处为用户id,因为插入时它是null
例:
实体类:
@Data
@AllArgsConstructor
@NoArgsConstructor
public class Users {
    private int u_id;
    private String u_name;
    private String u_password;
    private String u_age;
}
dao包
Integer insertUser(Users users);UsersMapper.xml
<insert id="insertUser" parameterType="com.entity.Users">
            <selectKey order="AFTER" resultType="int" keyProperty="u_id">
                    select last_insert_id()
            </selectKey>
            insert into users values (null,#{u_name},#{u_password},#{u_age})
    </insert>
测试类
    @Test
    public void test() throws IOException {
        InputStream is = Resources.getResourceAsStream("mybatis.xml");
        SqlSessionFactory build = new SqlSessionFactoryBuilder().build(is);
        SqlSession sqlSession = build.openSession();
        Userdaolmpl mapper = sqlSession.getMapper(Userdaolmpl.class);
        Users users = new Users(-1,"巴尔","123","女");
        Integer integer = mapper.insertUser(users);
        System.out.println(integer);

        sqlSession.commit();
        sqlSession.rollback();
        sqlSession.close();
    }
可以看到先进行了插入操作,再进行了查询操作,
2. 非自增主键
测试类:
 InputStream is = Resources.getResourceAsStream("mybatis.xml");
        SqlSessionFactory build = new SqlSessionFactoryBuilder().build(is);
        SqlSession sqlSession = build.openSession();
        Ordgslmpl mapper = sqlSession.getMapper(Ordgslmpl.class);
        Ordgs ordgs = new Ordgs("-1",2,3);
        Integer ordgs1 = mapper.insertOrdgs(ordgs);
        System.out.println(ordgs1);

        sqlSession.commit();
        sqlSession.rollback();
        sqlSession.close();
接口类
public interface Ordgslmpl {
    Integer insertOrdgs(Ordgs ordgs);//添加订单
}
xml中
<mapper namespace="com.dao.Ordgslmpl">

        <insert id="insertOrdgs" parameterType="com.entity.Ordgs">
                <selectKey order="BEFORE" resultType="String" keyProperty="o_id">
                    select REPLACE(uuid(),'-','')
                </selectKey>
                                  --     添加订单表
                insert into ordgs values (#{o_id},#{o_u_name},#{o_goods})
        </insert>

</mapper> 上面的order=“before”表示mybatis将取得序列的下一个值作为主键值,并且在执行insert sql语句之前将值设置到studId属性上。
resultMap
标签建立SQL查询结果字段与实体属性的映射关系信息
可加extends,简化步骤
 <resultMap id="唯一base" type="返回数据对应的封装的实体类型">

<!--
        自定义映射规则
        id 唯一表示符 用于外部引用
        type 指定哪个实体的引用规则
    -->


        <id column="列名称" property="属性名" /> //表示主键字段
  <!--
            主键映射  使用id标签
            propetry java中的类型名称
            column  数据库中的字段名
        -->


        <result  column="列名称" property="属性名" /> //表示非主键字段

  <!--
            普通字段映射  使用id标签
            propetry java中的类型名称
            column  数据库中的字段名
        -->


    </resultMap>
对多 用 <collection property="ordereList对多属性名" ofType="orders集合属性的泛型类型">
 用户实体类:User
        private Integer uid;
        private String uname;
        ...用户基本信息

        private List<Orders> ordereList;//用于表示一对多的关系;表示一个用户有多个订单信息;
  订单实体类:Orders
        private String oid;
        private String oname;
        .....订单基本信息;
resultMap标签:
<resultMap id="base" type="user">
<id column="主键字段" property="实体属性名"/>
<result column="非主键字段" property="实体属性名"/>
....
<collection property="ordereList对多属性名" ofType="orders集合属性的泛型类型">
...订单c表和订单实体类之间的映射关系
</collection>
</resultMap>用户的映射元文件:UserMapper.xml-->以用户表为主,返回实体是User类
//多表联合查询:左外/右外/内连接/等值连接。。。
<select id="select" resultMap="base">
select * from sys_user u,sys_order o where u.u_id=o.u_id where u.u_name=#{} and u.u_pass=#{}
</select>对一 <association property="user" javaType="对一属性的类型">
用户实体类:User
        private Integer uid;
        private String uname;
        ...用户基本信息
用户实体类:User
private Integer uid;
private String uname;
...用户基本信息resultMap标签:
<resultMap id="base" type="orders">
<id column="主键字段" property="实体属性名"/>
<result column="非主键字段" property="实体属性名"/>
....
<association property="user" javaType="对一属性的类型">
..用户基本信息的映射
</association>
</resultMap>resultMap标签:
<resultMap id="base" type="orders">
<id column="主键字段" property="实体属性名"/>
<result column="非主键字段" property="实体属性名"/>
....
<association property="user" javaType="对一属性的类型">
..用户基本信息的映射
</association>
</resultMap>如果多表查,中间表没有主键,则id column="主键字段" 要改。。。。
动态sql
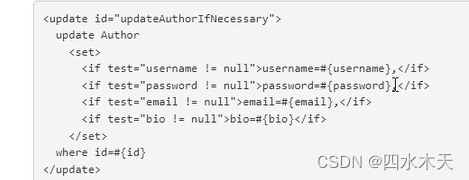
1. <if test =" ">
</if>
if标签,如果里面的条件不成立,则执行下一个if,这里面的,每个if都会判断一次,
应用场景:

这种的,不知道有几个查询条件,可以用if标签
实例:
    <select id="find" resultMap="base" resultType="com.qf.zhou.po.Type">
        select * from filminfo left JOIN filmtype on filminfo.typeID = filmtype.typeID
            <where>
        <if test="name != null and name!='' ">
                AND filmName = #{name}
        </if>
        <if test="type != null and type!=''">
            AND filminfo.typeID = #{type}
        </if>

        <if test="actor != null and actor!=''">
            AND actor = concat('%',#{actor},'%')
        </if>

        <if test="director != null and director!=''">
            AND director = #{director}
        </if>

        <if test="num1 != null and num2!=null " >
            AND ticketPrice between #{num1} And #{num2}
        </if>
    </where>

</select>
2. 多条件判断
<choose>
<when test=" ">
</when>
<when test=" ">
</when>
</choose>
这个标签是,多个里面选一个,谁先条件成立,谁就先走了,其余的不执行,有一点点像switch
3.
<where>
</where>标签
如果这样写:
select * from filminfo left JOIN filmtype on filminfo.typeID = filmtype.typeID
where
    <if test="name != null and name!='' ">
        AND filmName = #{name}
    </if>


    <if test="num1 != null and num2!=null " >
        AND ticketPrice between #{num1} And #{num2}
    </if>
当if里条件都不成立,那语句执行就会失败,变为
select * from filminfo left JOIN filmtype on filminfo.typeID = filmtype.typeID
where
这时候加个where标签,完美解决问题 ,例如之前的if标签sql写法
3.
<trim prefix = "WHERE" prefixOverrides = "AND | OR">

...
</trim>
例:prefix: 前缀为where时,去除AND或者or,prefixOverrides注意:在语句前面
例:
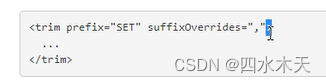
prefixOverrides
图来自mybatis官方, 例如不为空就修改,有的逗号去除不了,就可以用<trim>标签了
suffixOverrides 去除的在后面
4.set 标签,修改时用的
5.foreach:
场景:对一个集合进行变历,使用枚举查询in
collection="集合参数名list/array/collection"
 item="变量名"  传传过来就是 集合或者数组
open="(" close=")" separator=","

传过来的就是个数组

select * from sys_user where u_id in (1,3,5)

<select id="" parameterType="">
    select * from sys_user where u_id in
    <foreach item="item" index="index" collection="list" open="开始(" separator=",分隔符" close=")结束">
        #{item}
      </foreach>
</select>
<delete id="delete2">
delete from sys_user where u_id in
<foreach collection="list" item="id" open="(" close=")" separator=",">
#{id}
</foreach>
</delete>collection:要遍历的目标集合
open:循环开始时的字符;
close:循环结束时的字符 *
item:遍历出的集合成员,自己定义的变量 *
separator:结合成员之间的分隔符 *
#{item}:注意与item="item"中的的值相同
mybatis的分页插件
1.导入依赖
<dependency>
            <groupId>com.github.pagehelper</groupId>
            <artifactId>pagehelper-spring-boot-starter</artifactId>
            <version>1.4.2</version>
        </dependency>
分页插件会包裹全查:
 PageHelper.startPage(page,pageSize);
参数
page:页码,初始为1,
pageSize:一页显示多少个
之后写查询的全查:
List<Fiml> select = fimlService.select();
最后包装一下
PageInfo<Fiml> fimlPageInfo = new PageInfo<Fiml>(select);这三个要按顺序写

看看fimlPageInfo的结构
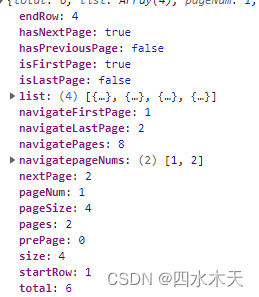
      int pageNum; //当前页
        int pageSize;//每页的数量
        int size;//当前页的数量
        int startRow;//当前页面第一个元素在数据库中的行号
        int endRow;//当前页面最后一个元素在数据库中的行号
        long total;//总记录数
        int pages;//总页数
        List<T> list;//查出来的数据
        int prePage; //前一页
        int nextPage; //下一页
        boolean isFirstPage;//是否为第一页
        boolean isLastPage ;//是否为最后一页
        boolean hasPreviousPage ;  //是否有前一页
        boolean hasNextPage ;//是否有下一页
        int navigatePages;//导航页码数
        int[] navigatepageNums;//所有导航页号
        int navigateFirstPage;//导航条上的第一页
        int navigateLastPage; //导航条上的最后一页
效果:
后台+js


mybatis缓存
缓存:
从数据库中加载的数据缓存到内存中,是不少应用程序为了提升性能而采起的一向
作法。MyBatis对经过映射的SELECT语句加载的查询结果提供了内建的缓存支持。
默认状况下,启用一级缓存
优点:为下次的同构查询(相同查询)提供查询结果,降低与数据库的交互
缺点:可能因为缓存查询不到自己需要的结果
一级缓存:SqlSession
两次同构查询之间,进行一次提交操作(增删改),也会清空缓存;重新创建SqlSession对象,也会清空缓存;
 SqlSessionFactory factory=new SqlSessionFactoryBuilder().build(Resources.getResourceAsStream("mybatis.xml"));
        SqlSession sqlSession=factory.openSession();

        UserMapper userMapper=sqlSession.getMapper(UserMapper.class);
        User user1=userMapper.selectOne(1);//test1

        User user1=userMapper.selectOne(1);

两次查询,查看日志只有一次连接数据库,
          sqlSession.commit();//清空缓存后会重新连接
二级缓存:SqlSessionFactory
是全局缓存,能够被全部SqlSession共享
<settings>
    <setting name="cacheEnabled" value="false|true" />  默认开启为true
</settings>
在 xxxmapper.xml文件中 配置<cache/> 标签
<cache/> 开启缓存开启二级缓存
Spring
存在的部分问题:
1.传统web开发,存在硬解码过度耦合,功能较单一,例:在Service层中有一个属性为dao对象
解决:使用工厂模式可以减少硬编码,不用new,spring只需要声明一个接口就行,其它的交给spring
2.javaee 的API较为复杂,使用效率低下,比如jdbc
3.移植性较差,
Spring简介
Spring是个项目管理框架,也是一套JAVAEE解决方案
Spring是众多优秀设计模式的组合(单例,工厂,代理....)
Spring没有替代已有的框架,而是把众多框架进行整合,简化开发,所以它也被称为胶水框架
核心:IoC控制反转,简单点:Spring来创建管理对象
AOP面向切面编程,简单点:不改变原代码,给程序添加一些功能
DL:依赖注入,需要调用另一个对象协助时,无须在代码中创建被调用者,而是依赖于外部的注入
使用准备工作
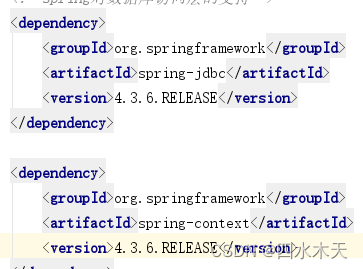
1.在maven项目中,pom.xml中导入核心依赖:记得要版本适配
<dependency>
        <groupId>org.springframework</groupId>
        <artifactId>spring-context</artifactId>
        <version>5.1.6.RELEASE</version>
    </dependency>
例:
编辑
2.还是存到resources文件夹下
创建配置文件:spring.xml
    <?xml version="1.0" encoding="UTF-8"?>
    <beans xmlns="http://www.springframework.org/schema/beans"
           xmlns:xsi="http://www.w3.org/2001/XMLSchema-instance"
           xsi:schemaLocation="http://www.springframework.org/schema/beans http://www.springframework.org/schema/beans/spring-beans.xsd">


    </beans>
Spring创建工厂
控制反转
完成准备阶段后在spring.xml文件夹下配置管理对象
<!-- 加入对象的管理-->
    <bean id="这里加入唯一id" class="这里加入对象的路径"/> <!--不能添加接口 -->
ApplicationContext接口---加载spring.xml文件
将需要由spring管理的对明定义在spring工厂中;
<bean id="唯一" class="全类名1"/>
获得spring中的对象:
getBean("id名称");//获得Object
getBean(类对象);//获得的是真实类型;但是要求工厂中不能有相同类型的对象
getBean("id名称",类对象); //获得的是真实类型例:
<bean id="testDaoImplA" class="com.my.factory.TestDaoImplB"/> ApplicationContext ac = new ClassPathXmlApplicationContext("spring.xml");
Users getlogin = ac.getBean("getlogin", Userslmpl.class);
//Userslmpl getlogin2 = ac.getBean("getlogin", Userslmpl.class);
可以声名类接收,也可以声名其接口接收


可以调用其方法了
反转控制IOC
初始化工厂后,spring工厂将管理的对象创建好,用时取出
依赖注入DI
使用Spring管理mybatis
1.导入依赖
<dependency>
<groupId>org.mybatis</groupId>
<artifactId>mybatis-spring</artifactId>
<version>1.3.2</version>
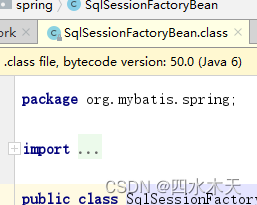
</dependency>双击Shift查询,成功找到SqlSessionFactoryBean对象
编辑
2.Spring文件设置
导入数据源druid依赖
 <dependency>
            <groupId>com.alibaba</groupId>
            <artifactId>druid</artifactId>
            <version>1.2.8</version>
        </dependency>
druid设置
<!--创建数据源 druid数据源  id不固定-->
    <bean id="dataSource" class="com.alibaba.druid.pool.DruidDataSource">
        <property name="driverClassName" value="com.mysql.jdbc.Driver"/>
        <property name="url" value="jdbc:mysql://localhost:3306/a_mywork52?characterEncoding=utf8"/>
        <property name="username" value="root"/>
        <property name="password" value="123456"/>
    </bean>
spring管理整合mybatis对象
<!--    spring管理整合mybatis对象-->
    <bean class="org.mybatis.spring.SqlSessionFactoryBean">

<!--        数据源-->
        <property name="dataSource" ref="dataSource"/>

<!--        mybatis核心文件  内路径,会在resources 文件夹下寻找-->
        <property name="configLocation" value="classpath:mybatis.xml"/>

<!--        mapper映射文件-->
        <property name="mapperLocations" value="classpath:mappers/*.xml"/>
    </bean>
扫描mapper接口的包
<bean class="org.mybatis.spring.mapper.MapperScannerConfigurer">
        <property name="basePackage" value="dao"/> <!--mybatis 生成的代理对象默认名是首字母小写的类名  此处为users-->
<!--        关联mybatis-->
        <property name="sqlSessionFactoryBeanName" value="sqlSessionFactoryBean"/>   <!--上面的id -->
    </bean>
修改业务层:增加set方法
    UserMapper userMapper;

    public void setMapper(UserMapper userMapper) {
        this.userMapper = userMapper;
    }

    {
//        try {
//            SqlSessionFactory factory = new SqlSessionFactoryBuilder().build(Resources.getResourceAsStream("mybatis.xml"));
//            SqlSession sqlSession = factory.openSession(true);
//            userMapper = sqlSession.getMapper(Users.class);
//        }catch(Exception e){
//            e.printStackTrace();
//        }
    }
<bean class="com.my.service.servicelmpl.UserServicelmpl">
<property name="userMapper" ref="userMapper"/> <!--管理一下对象 -->
</bean>


 334
334


 被折叠的 条评论
为什么被折叠?
被折叠的 条评论
为什么被折叠?
 到【灌水乐园】发言


