


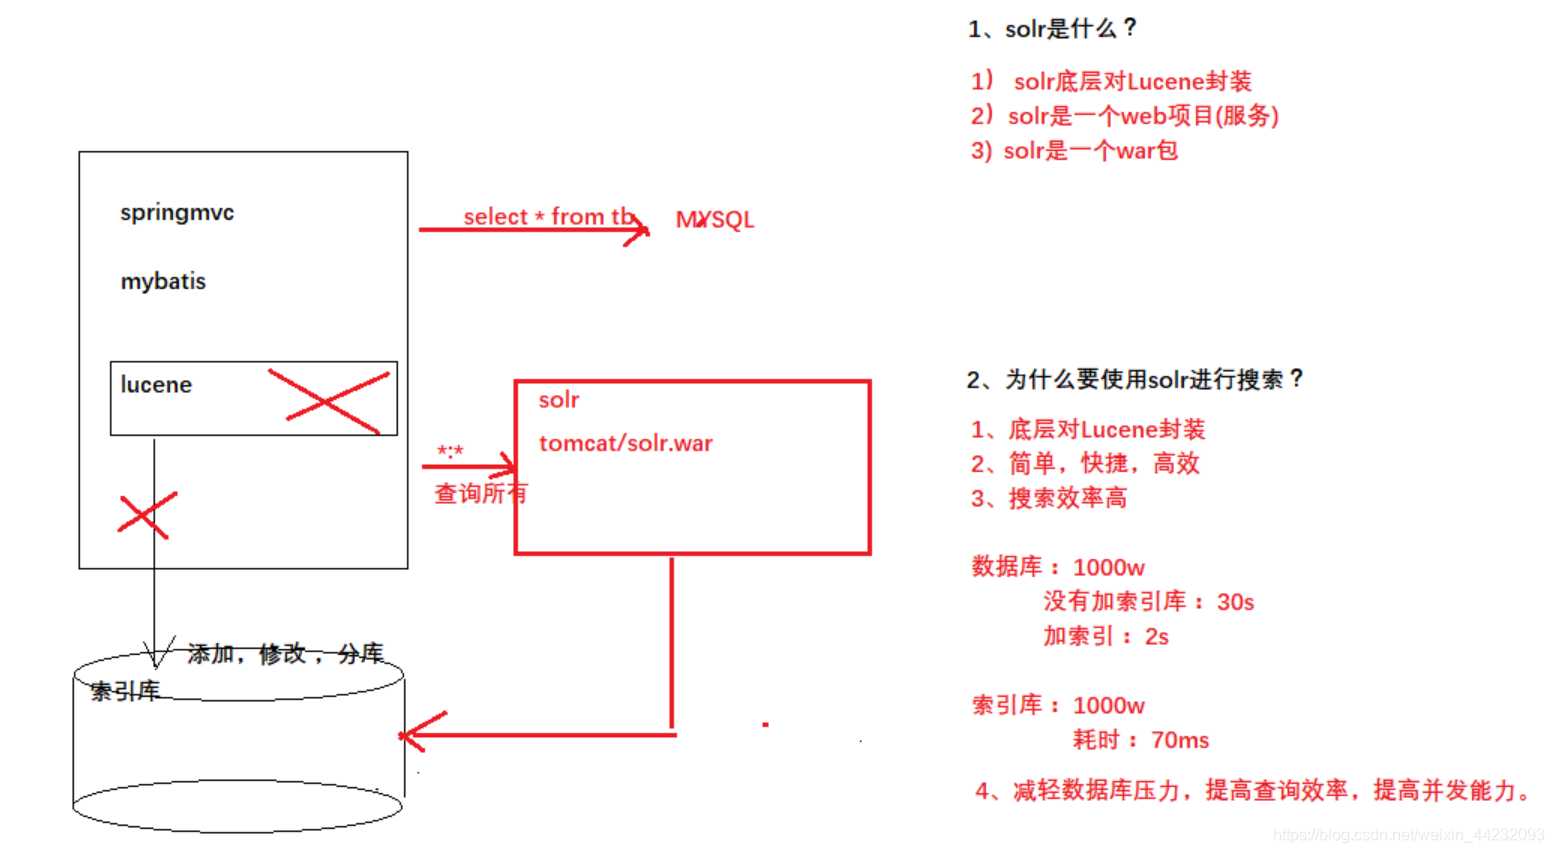
大多数搜索引擎应用都必须具有某种搜索功能,问题是搜索功能往往是巨大的资源消耗并且它们由于沉重的数据库加载而拖垮你的应用的性能,这就是为什么转移负载到一个外部的搜索服务器是一个不错的主意,Apache Solr 是一个流行的开源搜索服务器,它通过使用类似 REST 的 HTTP API,这就确保你能从几乎任何编程语言来使用 solr
1. 什么是solr
Solr 是一个开源搜索平台,用于构建搜索应用程序。 它建立在 Lucene(全文搜索引擎)之上, Solr 是企业级的,快速的和高度可扩展的, 使用 Solr 构建的应用程序非常复杂,可提供高性能,为了在 CNET 网络的公司网站上添加搜索功能,Yonik Seely 于 2004 年创建了Solr,并在2006 年 1 月,它成为 Apache 软件基金会下的一个开源项目,并于 2016 年发布最新版本 Solr 6.0,支持并行 SQL 查询的执行
Solr 可以和 Hadoop 一起使用由于 Hadoop 处理大量数据,Solr 帮助我们从这么大的源中找到所需的信息。不仅限于搜索,Solr 也可以用于存储目的,像其他 NoSQL 数据库一样,它是一种非关系数据存储和处理技术
总之,Solr 是一个可扩展的,可部署,搜索/存储引擎,优化搜索大量以文本为中心的数据
2. java-ssm中整合solr
- pom.xml文件中导入Solr依赖
 		<dependency>
            <groupId>org.springframework.data</groupId>
            <artifactId>spring-data-solr</artifactId>
            <version>1.5.5.RELEASE</version>
        </dependency>
- 在resource/spring/application-solr.xml 文件中添加以下内容
<?xml version="1.0" encoding="UTF-8"?>
<beans xmlns="http://www.springframework.org/schema/beans"
       xmlns:xsi="http://www.w3.org/2001/XMLSchema-instance"
       xmlns:p="http://www.springframework.org/schema/p"
       xmlns:context="http://www.springframework.org/schema/context"
       xmlns:solr="http://www.springframework.org/schema/data/solr"
       xsi:schemaLocation="http://www.springframework.org/schema/data/solr
 	   http://www.springframework.org/schema/data/solr/spring-solr-1.0.xsd
	   http://www.springframework.org/schema/beans
	   http://www.springframework.org/schema/beans/spring-beans.xsd
	   http://www.springframework.org/schema/context
	   http://www.springframework.org/schema/context/spring-context.xsd">

	<!-- 指定solr服务器地址 -->
	<!-- 未使用默认索引库需要指定索引库名称 这里solr/item就是指定了名称-->
	<solr:solr-server id="solrServer" url="http://192.168.25.120:8080/solr/item"></solr:solr-server>

	<!-- 创建spring框架整合solr的模板对象 -->
	<bean id="solrTemplate" class="org.springframework.data.solr.core.SolrTemplate">
		<constructor-arg ref="solrServer"></constructor-arg>
	</bean>
</beans>
3. 使用SolrTemplate进行CRUD操作
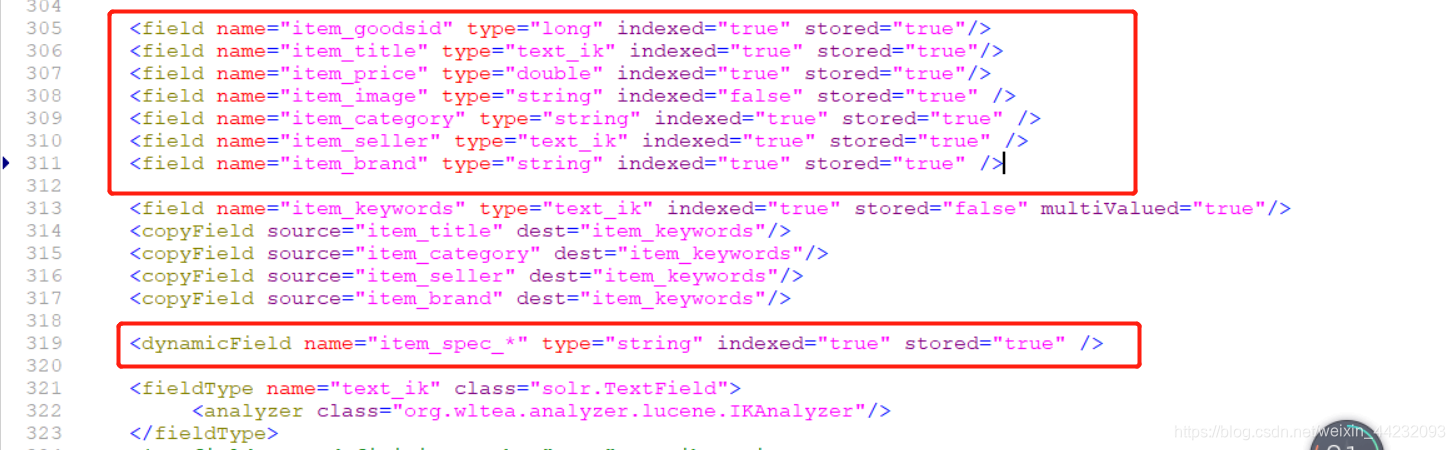
- 向索引库中添加数据,建立对象和索引库配置文件/conf/schema.xml的映射关系
- 对象中添加注解,使名字和动态域名字保持一致
public class TbItem implements Serializable {
    @Field
    private Long id;

    @Field("item_title")
    private String title;

    private String sellPoint;

    @Field("item_price")
    private BigDecimal price;

    private Integer stockCount;

    private Integer num;

    private String barcode;

    @Field("item_image")
    private String image;

    private Long categoryid;

    private String status;

    private Date createTime;

    private Date updateTime;

    private String itemSn;

    private BigDecimal costPirce;

    private BigDecimal marketPrice;

    private String isDefault;

    @Field("item_goodsid")
    private Long goodsId;

    private String sellerId;

    private String cartThumbnail;

    @Field("item_category")
    private String category;

    @Field("item_brand")
    private String brand;

    private String spec;

    @Field("item_seller")
    private String seller;

    // 定义Map集合对象 动态域配置
    @Dynamic
    @Field("item_spec_*")
    private Map<String,Object> specMap;

    // {网络:联通4G} 通过动态域变成 item_spec_网络:联通4G
    public Map getSpecMap() {
        return specMap;
    }

    public void setSpecMap(Map specMap) {
        this.specMap = specMap;
    }
	// 省略下面 get set方法
}
3.1 添加数据到索引库
/**
* @ Description
* @ auther 宁宁小可爱
* @ create 2020-02-03 15:39
*/
@RunWith(SpringJUnit4ClassRunner.class)
@ContextConfiguration(locations = "classpath*:spring/applicationContext-solr.xml")
public class MySolrJ {
// 注入solr模板对象
@Autowired
private SolrTemplate solrTemplate;
/*
* 向索引库中添加数据
* */
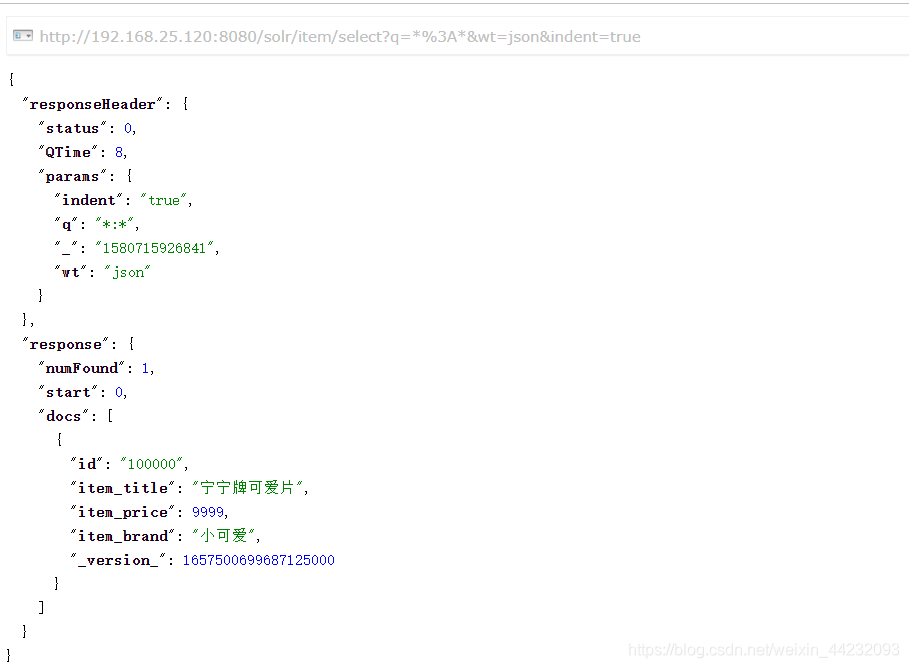
@Test
public void addSolrData(){
// 创建 tb_item对象 向对象中添加数据
TbItem item = new TbItem();
item.setId(100000L);
item.setTitle("宁宁牌可爱片");
item.setBrand("小可爱");
item.setPrice(new BigDecimal(9999));
solrTemplate.saveBean(item);
//saveBeans 批量保存 只需要创建list集合 把对象放进去就可以
// 提交
solrTemplate.commit();
}
}
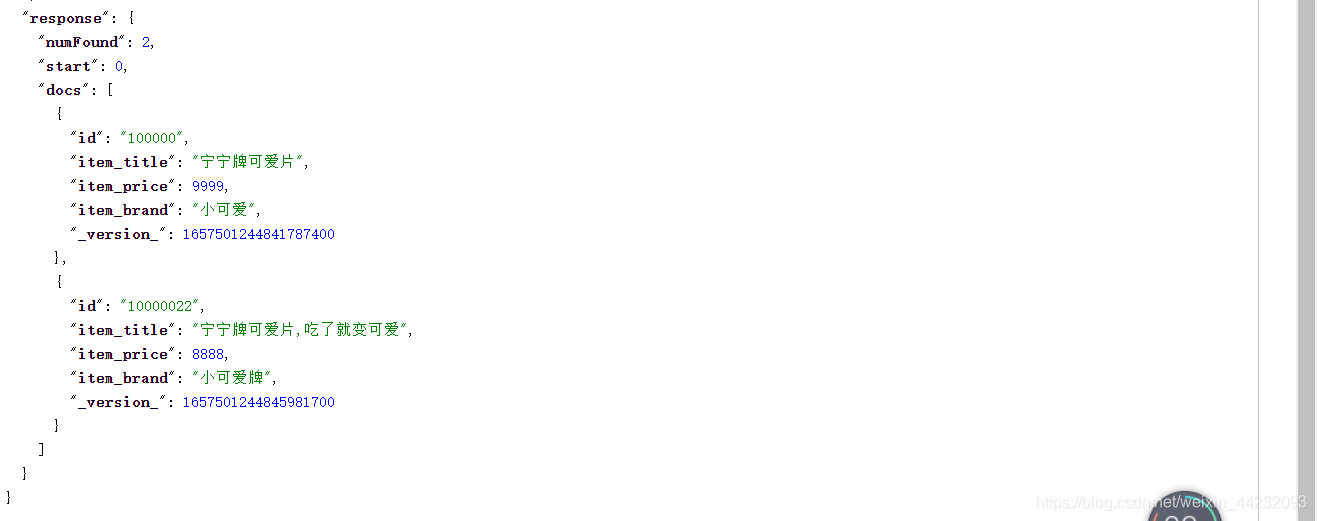
- 保存成功后查看索引库,保存成功
3.2 修改数据
/**
* @ Description
* @ auther 宁宁小可爱
* @ create 2020-02-03 15:39
*/
@RunWith(SpringJUnit4ClassRunner.class)
@ContextConfiguration(locations = "classpath*:spring/applicationContext-solr.xml")
public class MySolrJ {
// 注入solr模板对象
@Autowired
private SolrTemplate solrTemplate;
/*
* 向索引库中添加数据
* */
@Test
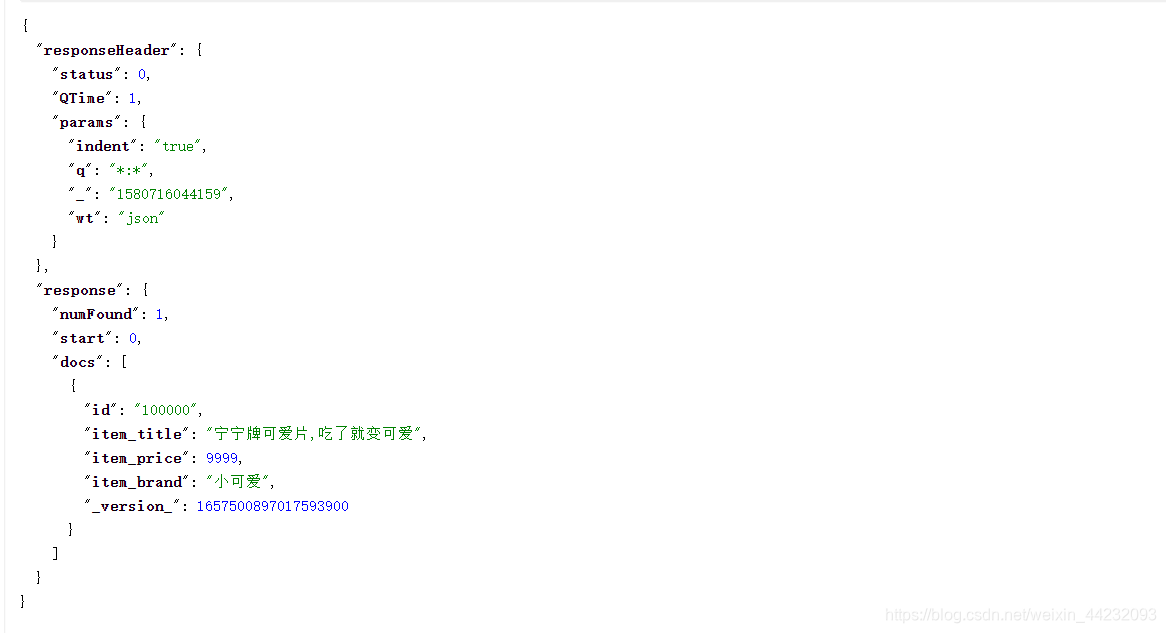
public void updateSolrData(){
// 创建 tb_item对象 向对象中添加数据
TbItem item = new TbItem();
// 如果ID存在 那么就是修改 可以理解成覆盖
item.setId(100000L);
item.setTitle("宁宁牌可爱片,吃了就变可爱");
item.setBrand("小可爱");
item.setPrice(new BigDecimal(9999));
solrTemplate.saveBean(item); //saveBeans 批量保存
// 提交
solrTemplate.commit();
}
}
- 修改后结果
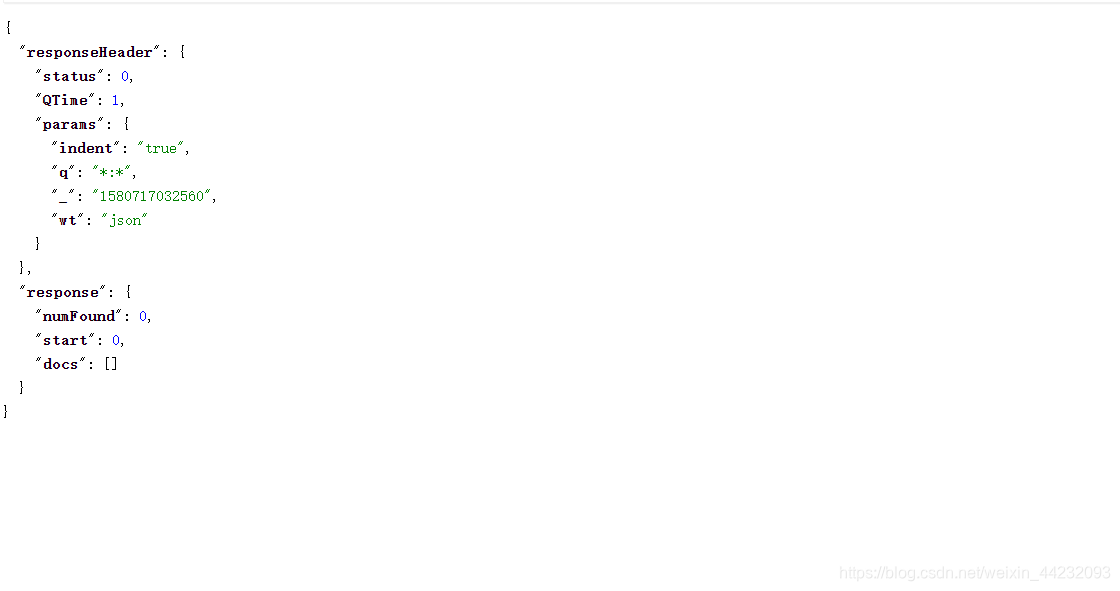
3.3 删除数据
- 未删除之前数据
- 删除代码
/**
 * @ Description
 * @ auther          宁宁小可爱
 * @ create          2020-02-03 15:39
 */
@RunWith(SpringJUnit4ClassRunner.class)
@ContextConfiguration(locations = "classpath*:spring/applicationContext-solr.xml")
public class MySolrJ {
    // 注入solr模板对象
    @Autowired
    private SolrTemplate solrTemplate;

    /*
    * 删除索引库数据
    * */

    @Test
    public void deleteSolrData(){
        // 根据ID删除
        solrTemplate.deleteById("100000");
        solrTemplate.commit();

        // 批量删除 只需要创建List list里面添加要删除的id即可 deleteById(List)
        /*  查询删除 */
        // 创建查询对象
        Query queue = new SimpleQuery("id:10000022");
        solrTemplate.delete(queue);
        solrTemplate.commit();

        /* 删除所有 */
        Query queue1 = new SimpleQuery("*:*");
        solrTemplate.delete(queue1);
        solrTemplate.commit();
    }
}
- 删除后数据
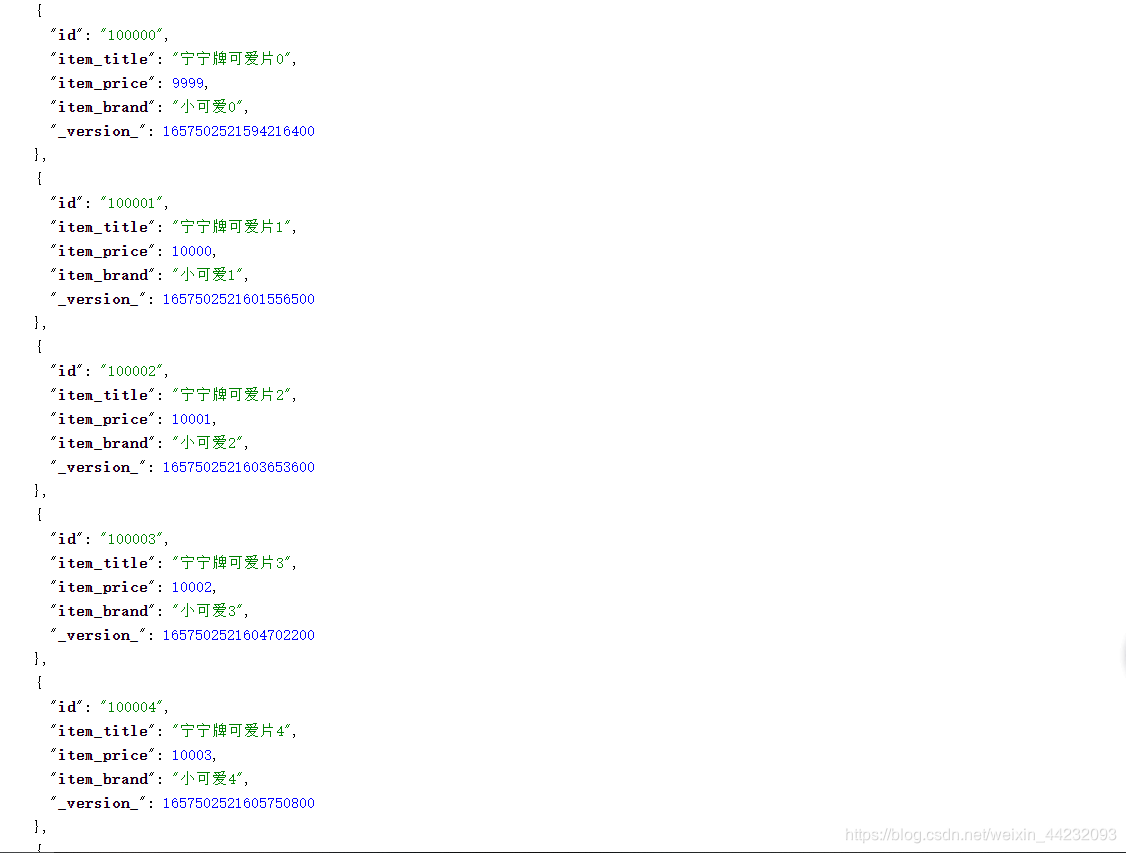
4. 使用SolrTemplate进行分页查询
/**
 * @ Description
 * @ auther          宁宁小可爱
 * @ create          2020-02-03 15:39
 */
@RunWith(SpringJUnit4ClassRunner.class)
@ContextConfiguration(locations = "classpath*:spring/applicationContext-solr.xml")
public class MySolrJ {
    // 注入solr模板对象
    @Autowired
    private SolrTemplate solrTemplate;

	/*
    * 批量添加数据
    * */
    @Test
    public void addSolrData(){
        List<TbItem> list = new ArrayList<>();
        // 创建 tb_item对象 向对象中添加数据
        for (int i = 0; i < 20; i++) {
            TbItem item = new TbItem();
            item.setId(100000L+i);
            item.setTitle("宁宁牌可爱片"+i);
            item.setBrand("小可爱"+i);
            item.setPrice(new BigDecimal(9999+i));
            list.add(item);
        }
        solrTemplate.saveBeans(list);
        //saveBeans 批量保存 只需要创建list集合 把对象放进去就可以
        // 提交
        solrTemplate.commit();
    }

	/*
    * 分页查询索引库数据
    * */
    @Test
    public void queryByPagewithSolrIndex(){
        // 创建查询对象
        Query query = new SimpleQuery("*:*");
        // 设置查询起始位置
        query.setOffset(0);
        // 设置每页显示的记录数
        query.setRows(2);
        // 查询
        ScoredPage<TbItem> scoredPage = solrTemplate.queryForPage(query, TbItem.class);
        // 获取查询结果总记录数
        long totalElements = scoredPage.getTotalElements();
        System.out.println("总记录数为: " +totalElements);

        // 获取查询结果
        List<TbItem> content = scoredPage.getContent();
        System.out.println("查询结果为: "+content);
    }
}
- 结果展示,总记录20条,每页显示两条

5. 使用SolrTemplate进行条件查询
- 索引库中数据

- 条件查询代码,这里使用is,还有很多使用方法都差不多,可以在criteria中添加条件
/**
 * @ Description
 * @ auther          宁宁小可爱
 * @ create          2020-02-03 15:39
 */
@RunWith(SpringJUnit4ClassRunner.class)
@ContextConfiguration(locations = "classpath*:spring/applicationContext-solr.xml")
public class MySolrJ {
    // 注入solr模板对象
    @Autowired
    private SolrTemplate solrTemplate;

   /*
   * 条件查询
   * */
    @Test
    public void queryByConditionWithSolrIndex(){
        // 创建查询对象
        Query query = new SimpleQuery("*:*");
        // 创建Criteria 对象 指定域字段
        Criteria criteria = new Criteria("item_price").is("9999");
        // 把条件添加到查询对象中
        query.setOffset(0);
        // 每页显示十条数据
        query.setRows(10);
        query.addCriteria(criteria);

        ScoredPage<TbItem> scoredPage = solrTemplate.queryForPage(query, TbItem.class);
        System.out.println("总记录数: "+scoredPage.getTotalElements());
        System.out.println("查询结果: "+scoredPage.getContent());
    }
}
- 查询结果

6. 使用SolrTemplate进行高亮查询
- 索引库中数据,总共20条
- 高亮查询代码
package com.pyg;

import com.pyg.pojo.TbItem;
import org.junit.Test;
import org.junit.runner.RunWith;
import org.springframework.beans.factory.annotation.Autowired;
import org.springframework.data.solr.core.SolrTemplate;
import org.springframework.data.solr.core.query.Criteria;
import org.springframework.data.solr.core.query.HighlightOptions;
import org.springframework.data.solr.core.query.HighlightQuery;
import org.springframework.data.solr.core.query.SimpleHighlightQuery;
import org.springframework.data.solr.core.query.result.HighlightEntry;
import org.springframework.data.solr.core.query.result.HighlightPage;
import org.springframework.data.solr.core.query.result.ScoredPage;
import org.springframework.test.context.ContextConfiguration;
import org.springframework.test.context.junit4.SpringJUnit4ClassRunner;

import java.util.List;

/**
 * @ Description
 * @ auther          宁宁小可爱
 * @ create          2020-02-03 15:39
 */
@RunWith(SpringJUnit4ClassRunner.class)
@ContextConfiguration(locations = "classpath*:spring/applicationContext-solr.xml")
public class MySolrJ {
    // 注入solr模板对象
    @Autowired
    private SolrTemplate solrTemplate;

   /*
   * 条件+高亮查询
   * */
    @Test
    public void queryByHighlightWithSolrIndex(){
        // 创建高亮查询对象
        SimpleHighlightQuery query = new SimpleHighlightQuery();
        // 创建Criteria 对象 指定域字段
        Criteria criteria = new Criteria("item_title");
        // 包含可爱
        criteria.contains("可爱");
        // 创建高亮对象
        HighlightOptions highlightOptions = new HighlightOptions();
        // 添加高亮字段
        highlightOptions.addField("item_title");
        // 添加高亮标签前缀
        highlightOptions.setSimplePrefix("<font color='red'>");
        // 添加高亮标签后缀
        highlightOptions.setSimplePostfix("</font>");
        // 把高亮对象添加到查询中
        query.setHighlightOptions(highlightOptions);

        // 添加条件到查询对象中
        query.setOffset(0);
        query.setRows(5);
        query.addCriteria(criteria);

        // 使用高亮查询
        HighlightPage<TbItem> highlightPage = solrTemplate.queryForHighlightPage(query, TbItem.class);
        System.out.println("总记录数: "+highlightPage.getTotalElements());
        List<TbItem> content = highlightPage.getContent();

        for (TbItem item : content) {
            // 获取高亮对象
            List<HighlightEntry.Highlight> highlights = highlightPage.getHighlights(item);
            HighlightEntry.Highlight highlight = highlights.get(0);
            // 获取高亮集合
            List<String> snipplets = highlight.getSnipplets();
            // 获取高亮字段
            String s = snipplets.get(0);
            System.out.println(s);
        }
    }
}
- 执行结果 ,可以看到内容都是带高亮标签的

7. 使用AngularJs显示高亮字段
我们测试后发现高亮显示的html代码原样输出,这是angularJS为了防止html攻击采取的安全机制。我们如何在页面上显示html的结果呢?我们会用到$sce服务的trustAsHtml方法来实现转换
- 代码具有公用性,建议写在公共controller中
- 定义过滤器
// 定义过滤器
app.filter('trustHtml',['$sce',function($sce){
    return function(data){
        return $sce.trustAsHtml(data);
    }
}]);
- html页面中写法
在显示字段的位置添加 ng-bind-html = "参数 | 过滤器名字"
<em ng-bind-html="pojo.title | trustHtml"></em>


 1397
1397


 被折叠的 条评论
为什么被折叠?
被折叠的 条评论
为什么被折叠?
 到【灌水乐园】发言


