


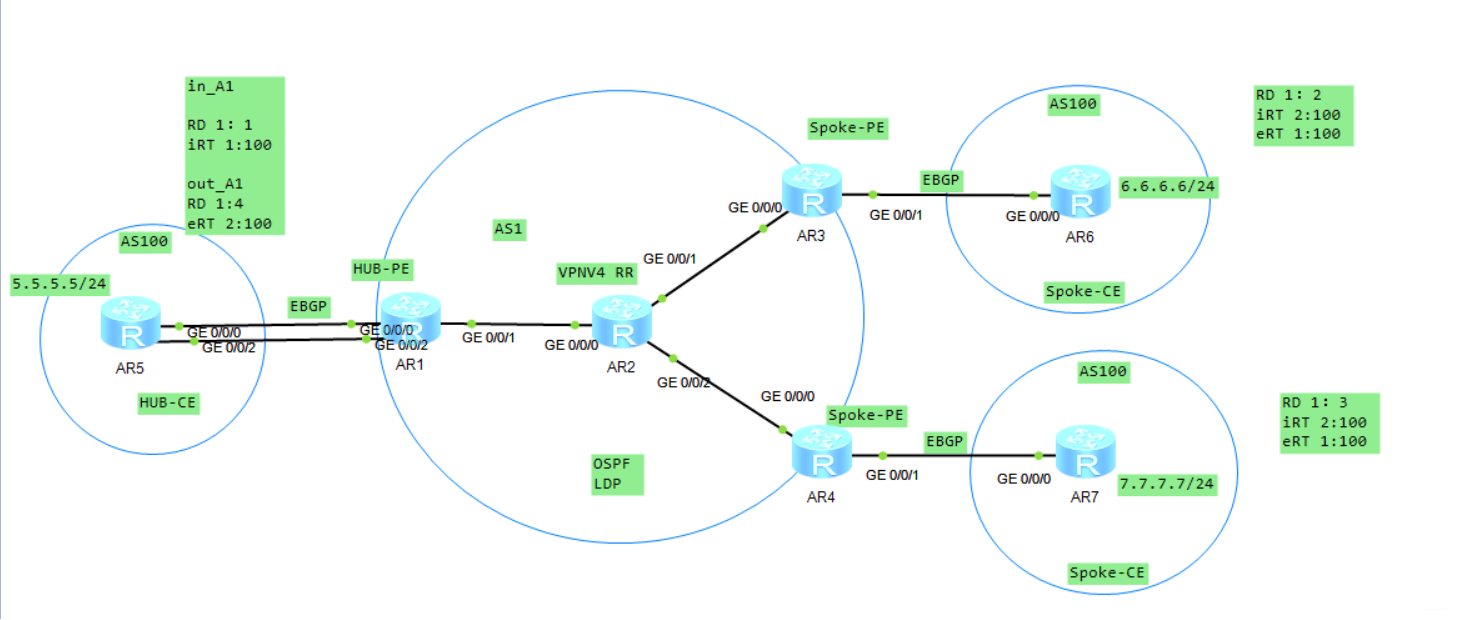
一、配置分支机构与总部之间部署BGP/MPLS 实现互通,并通过总部实现分支之间互通的示例
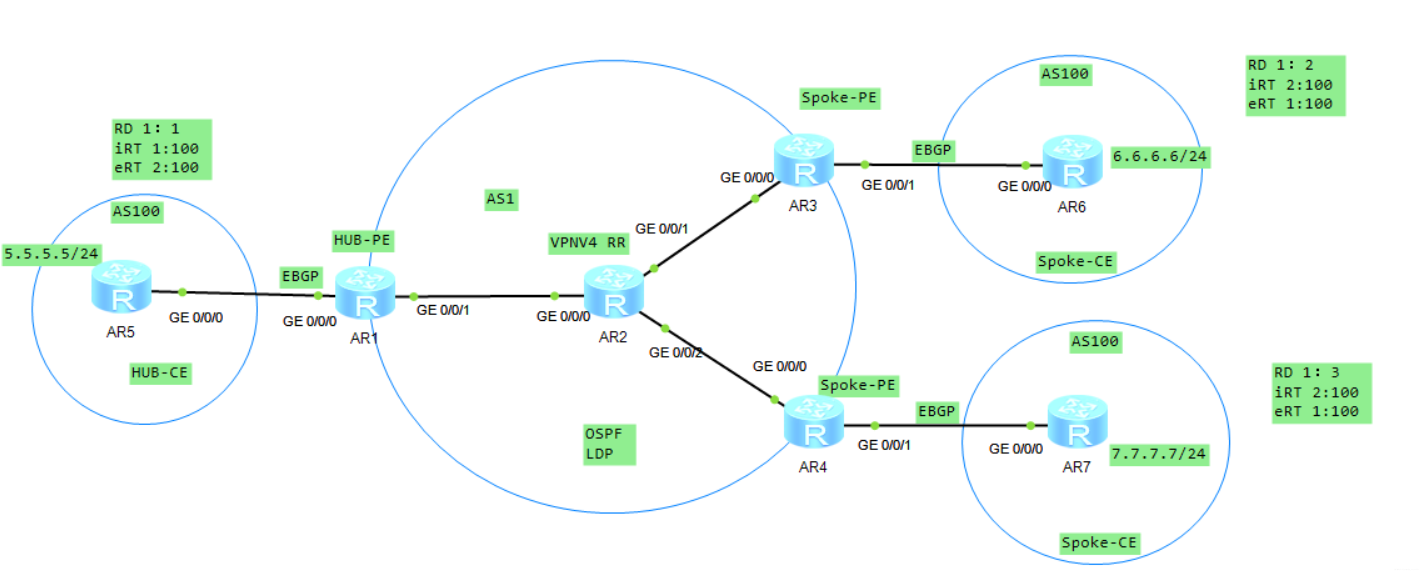
配置步骤:
1、骨干网络做通IGP打通
2、配置公网的LSP隧道,PE,P设备的loopack的主机路由建立LSP
3、PE之间配置MP-IBGP邻居关系(可以通过RR简化MP——IBGP全互联邻居关系)
4、VPN业务接入配置,在PE上创建VPN实例(VRF空间)
1、骨干底层使用OSPF打通
R1:
ospf 1 router-id 1.1.1.1
 area 0.0.0.0
  network 1.1.1.1 0.0.0.0
  network 10.1.12.1 0.0.0.0

R2:
ospf 1 router-id 2.2.2.2
 area 0.0.0.0
  network 2.2.2.2 0.0.0.0
  network 10.1.12.2 0.0.0.0
  network 10.1.23.2 0.0.0.0
  network 10.1.24.2 0.0.0.0

R3:
ospf 1 router-id 3.3.3.3
 area 0.0.0.0
  network 3.3.3.3 0.0.0.0
  network 10.1.23.3 0.0.0.0

R4:
ospf 1 router-id 4.4.4.4
 area 0.0.0.0
  network 4.4.4.4 0.0.0.0
  network 10.1.24.4 0.0.0.0
查看邻居ospf邻居关系表

2、配置公网的LSP隧道(全局和接口都需配置)
[R1]mpls lsr-id 1.1.1.1
[R1]mpls
Info: Mpls starting, please wait... OK!
[R1-mpls]mpls ldp
[R1-mpls-ldp]int g0/0/1
[R1-GigabitEthernet0/0/1]mpls
[R1-GigabitEthernet0/0/1]mpls ldp

[R2]mpls lsr-id 2.2.2.2
[R2]mpls
Info: Mpls starting, please wait... OK!
[R2-mpls]mpls ldp
[R2-mpls-ldp]int g0/0/0
[R2-GigabitEthernet0/0/0]mpls
[R2-GigabitEthernet0/0/0]mpls ldp
[R2-GigabitEthernet0/0/0]int g0/0/1
[R2-GigabitEthernet0/0/1]mpls
[R2-GigabitEthernet0/0/1]mpls ldp
[R2-GigabitEthernet0/0/1]int g0/0/2
[R2-GigabitEthernet0/0/2]mpls
[R2-GigabitEthernet0/0/2]mpls ldp

[R3]mpls lsr-id 3.3.3.3
[R3]mpls
Info: Mpls starting, please wait... OK!
[R3-mpls]mpls ldp
[R3-mpls-ldp]int g0/0/0
[R3-GigabitEthernet0/0/0]mpls
[R3-GigabitEthernet0/0/0]mpls ldp

[R4]mpls lsr-id 4.4.4.4
[R4]mpls
Info: Mpls starting, please wait... OK!
[R4-mpls]mpls ldp
[R4-mpls-ldp]int g0/0/0
[R4-GigabitEthernet0/0/0]mpls
[R4-GigabitEthernet0/0/0]mpls ldp
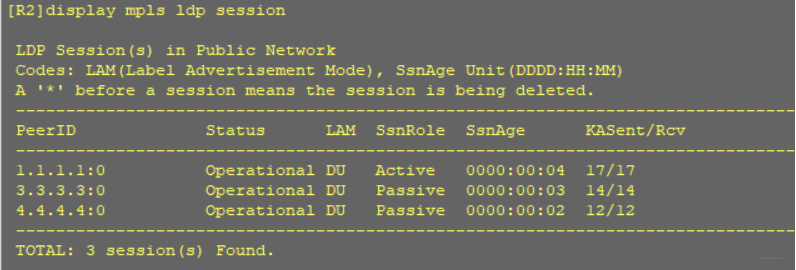
查看LDP隧道建立状态
3、配置MP-BGP
R1:
bgp 1
 peer 2.2.2.2 as-number 1
 peer 2.2.2.2 connect-interface LoopBack0
 #
 ipv4-family unicast
  undo synchronization
  peer 2.2.2.2 enable
 #
 ipv4-family vpnv4    # 开启VPNV4路由
  policy vpn-target
  peer 2.2.2.2 enable    #建立VPNV4邻居关系

R2:
#
bgp 1
 peer 1.1.1.1 as-number 1
 peer 1.1.1.1 connect-interface LoopBack0
 peer 3.3.3.3 as-number 1
 peer 3.3.3.3 connect-interface LoopBack0
 peer 4.4.4.4 as-number 1
 peer 4.4.4.4 connect-interface LoopBack0
 #
 ipv4-family unicast
  undo synchronization
  peer 1.1.1.1 enable
  peer 3.3.3.3 enable
  peer 4.4.4.4 enable
 #
 ipv4-family vpnv4
  undo policy vpn-target     #关闭基于RT的路由过滤,默认开启
  peer 1.1.1.1 enable
  peer 1.1.1.1 reflect-client
  peer 3.3.3.3 enable
  peer 3.3.3.3 reflect-client
  peer 4.4.4.4 enable
  peer 4.4.4.4 reflect-client


R3:
#
bgp 1
 peer 2.2.2.2 as-number 1
 peer 2.2.2.2 connect-interface LoopBack0
 #
 ipv4-family unicast
  undo synchronization
  peer 2.2.2.2 enable
 #
 ipv4-family vpnv4
  policy vpn-target
  peer 2.2.2.2 enable


R4:
#
bgp 1
 peer 2.2.2.2 as-number 1
 peer 2.2.2.2 connect-interface LoopBack0
 #
 ipv4-family unicast
  undo synchronization
  peer 2.2.2.2 enable
 #
 ipv4-family vpnv4
  policy vpn-target
  peer 2.2.2.2 enable
#
查看BGP的VPNV4邻居关系

4、创建实例(VRF空间)
[R1]ip vpn-instance A1
[R1-vpn-instance-A1]route-distinguisher 1:1
[R1-vpn-instance-A1-af-ipv4]vpn-target 1:100 import-extcommunity
 IVT Assignment result:
Info: VPN-Target assignment is successful.
[R1-vpn-instance-A1-af-ipv4]vpn-target 2:100 export-extcommunity
 EVT Assignment result:
Info: VPN-Target assignment is successful.
[R1-vpn-instance-A1-af-ipv4]int g0/0/0
[R1-GigabitEthernet0/0/0]ip binding vpn-instance A1
Info: All IPv4 related configurations on this interface are removed!
Info: All IPv6 related configurations on this interface are removed!
[R1-GigabitEthernet0/0/0]ip add 10.1.15.1 24


[R3]ip vpn-instance A2
[R3-vpn-instance-A2]route-distinguisher 1:2
[R3-vpn-instance-A2-af-ipv4]vpn-target 2:100 import-extcommunity
 IVT Assignment result:
Info: VPN-Target assignment is successful.
[R3-vpn-instance-A2-af-ipv4]vpn-target 1:100 export-extcommunity
 EVT Assignment result:
Info: VPN-Target assignment is successful.
[R3-vpn-instance-A2-af-ipv4]int g0/0/1
[R3-GigabitEthernet0/0/1]ip binding vpn-instance A2
Info: All IPv4 related configurations on this interface are removed!
Info: All IPv6 related configurations on this interface are removed!
[R3-GigabitEthernet0/0/1]ip address 10.1.36.3 24


[R4]ip vpn-instance A3
[R4-vpn-instance-A3]route-distinguisher 1:3
[R4-vpn-instance-A3-af-ipv4]vpn-target 2:100 import-extcommunity
 IVT Assignment result:
Info: VPN-Target assignment is successful.
[R4-vpn-instance-A3-af-ipv4]vpn-target 1:100 export-extcommunity
 EVT Assignment result:
Info: VPN-Target assignment is successful.
[R4-vpn-instance-A3-af-ipv4]int g0/0/1
[R4-GigabitEthernet0/0/1]ip binding vpn-instance A3
Info: All IPv4 related configurations on this interface are removed!
Info: All IPv6 related configurations on this interface are removed!
[R4-GigabitEthernet0/0/1]ip add 10.1.47.4 24
注:将接口划入实例中后,该接口地址默认被清除,需重新配置IP地址。
5、指定EBGP邻居关系并宣告路由(其他EBGP邻居关系配置思路一致)
[R1]bgp 1
[R1-bgp]ipv4-family vpn-instance A1
[R1-bgp-A1]peer 10.1.15.5 as 100


[R5]bgp 100
[R5-bgp]peer 10.1.15.1 as 1
[R5-bgp]network 5.5.5.0 24  #宣告路由
查看邻居关系状态

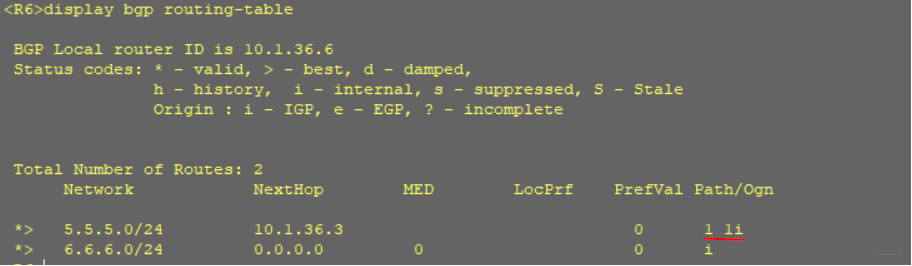
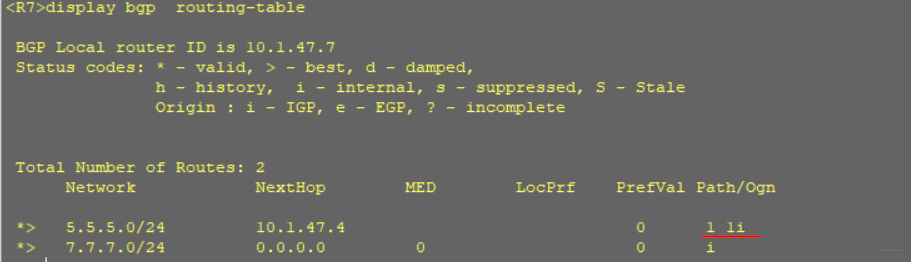
查看BGP VPNV4路由信息

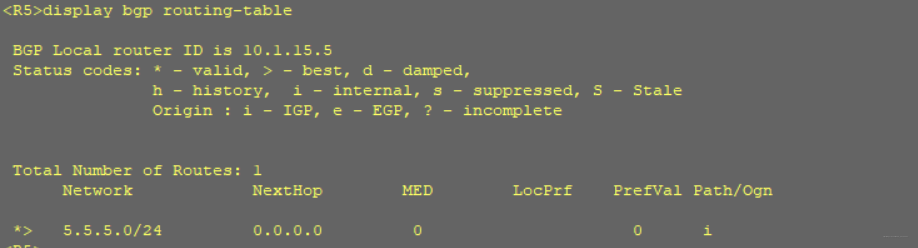
存在问题:因为as-path属性,EBGP水平分割机制,故R5/R6/R7上均只有自己宣告的路由,没有收到其他的路由
解决方案:
1、peer x.x.x.x allow-as-loop 从邻居接收到的路由中 允许as重复的次数,默认为1
2、peer x.x.x.x substitute-as 发送给邻居的路由中含有邻居的AS号的替代为本AS 号
[R5]bgp 100
[R5-bgp]peer 10.1.15.1 allow-as-loop


[R3]bgp  1
[R3-bgp]ipv4-family vpn-instance A2
[R3-bgp-A2]peer 10.1.36.6 substitute-as


[R4]bgp  1
[R4-bgp]ipv4-family vpn-instance A3
[R4-bgp-A3]peer 10.1.47.7 substitute-as
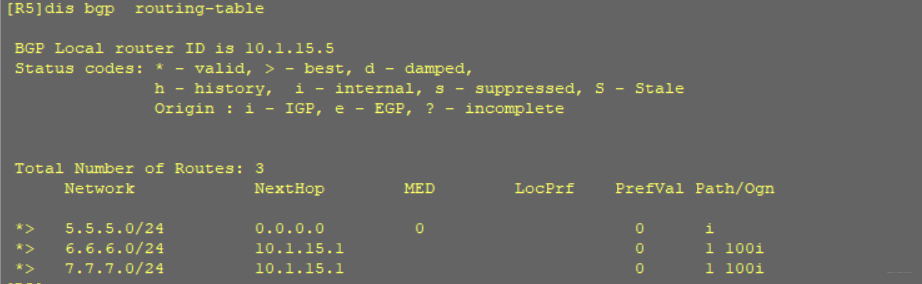
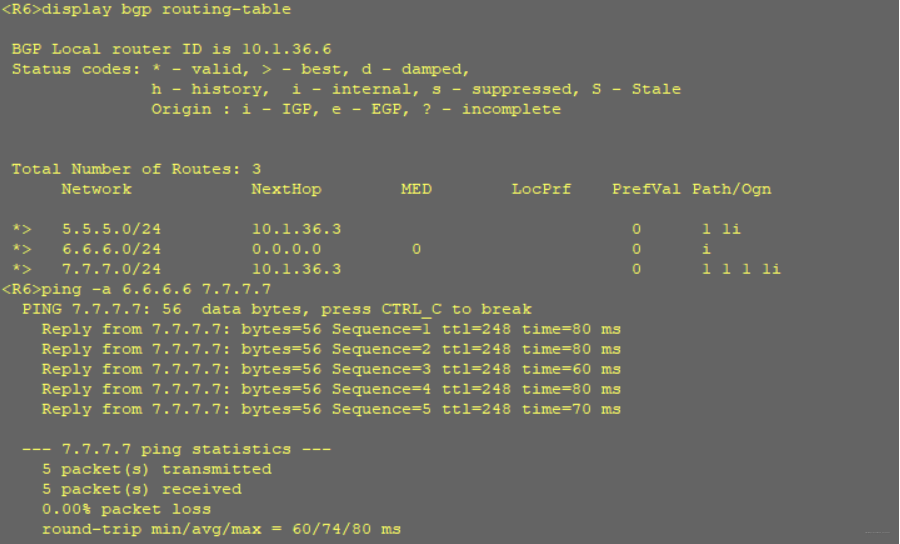
查看路由表,路由显示正常
测试:
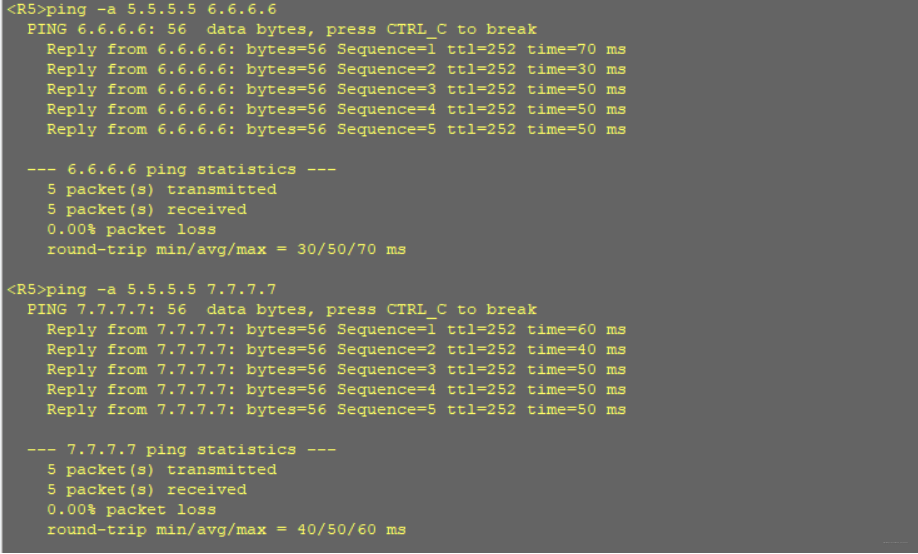
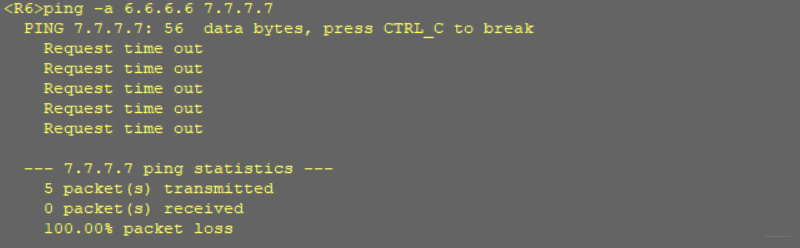
结果显示:分部之间可以和总部互访,但分部之间不能单独互访。
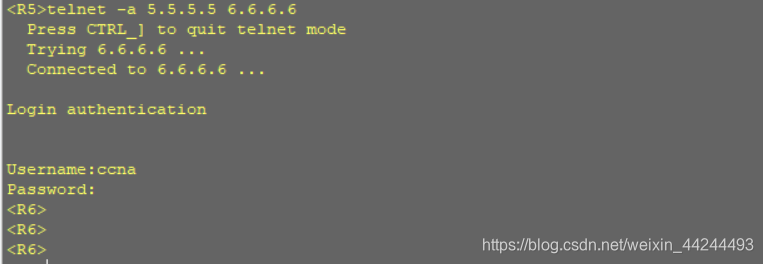
6、 总部可以Telnet分部
[R6]aaa
[R6-aaa]local-user ccna password cipher huawei@123
Info: Add a new user.
[R6-aaa]local-user ccna service-type telnet
[R6-aaa]q
[R6]user-interface vty 0 4
[R6-ui-vty0-4]user privilege level 15
[R6-ui-vty0-4]authentication-mode aaa

[R7]aaa
[R7-aaa]local-user ccnp password cipher cisco123
Info: Add a new user.
[R7-aaa]local-user ccnp service-type telnet
[R7-aaa]q
[R7]user-interface vty 0 4
[R7-ui-vty0-4]user privilege level 15
[R7-ui-vty0-4]authentication-mode aaa
测试:

7、 扩展:分部之间可以通过总部实现互访
实验思路:在HUB-PE和HUB-CE之间拉两条线,即设置两个实例,一条收路由。一条发路由。
R1]ip vpn-instance in-A1
[R1-vpn-instance-in-A1]route-distinguisher 1:1
[R1-vpn-instance-in-A1-af-ipv4]vpn-target 1:100 import-extcommunity
 IVT Assignment result:
Info: VPN-Target assignment is successful.
[R1-vpn-instance-in-A1-af-ipv4]int g0/0/0
[R1-GigabitEthernet0/0/0]ip binding vpn-instance in-A1
Info: All IPv4 related configurations on this interface are removed!
Info: All IPv6 related configurations on this interface are removed!
[R1-GigabitEthernet0/0/0]ip add 10.1.15.1 24


[R1]ip vpn-instance  out-A1
[R1-vpn-instance-out-A1]route-distinguisher 1:4
[R1-vpn-instance-out-A1-af-ipv4]vpn-target 2:100 export-extcommunity
 EVT Assignment result:
Info: VPN-Target assignment is successful.
[R1-vpn-instance-out-A1-af-ipv4]int g0/0/2
[R1-GigabitEthernet0/0/2]ip binding vpn-instance out-A1
Info: All IPv4 related configurations on this interface are removed!
Info: All IPv6 related configurations on this interface are removed!
[R1-GigabitEthernet0/0/2]ip add 10.1.51.1 24
建立EBGP邻居关系
R1:
 ipv4-family vpn-instance in-A1
  peer 10.1.15.5 as-number 100
 #
 ipv4-family vpn-instance out-A1
  peer 10.1.51.5 as-number 100
  peer 10.1.51.5 allow-as-loop

R5:
[R5]bgp  100
[R5-bgp]pee
[R5-bgp]peer 10.1.51.1 as 1
测试:


 711
711


 被折叠的 条评论
为什么被折叠?
被折叠的 条评论
为什么被折叠?
 到【灌水乐园】发言


