


MyBatis入门笔记
一:简介
- MyBatis是一个工具,是一个持久层框架(SQL映射框架)。
- 用于和数据库进行交互(Spring是用来和容器进行交互、SpringMVC用来和页面进行交互)。
- 写过JavaWeb的都知道,使用原生的jdbc操作数据库是在java代码中进行的,因此对数据库的操作与java代码过于耦合,代码量太大时维护不便。
。
二:环境准备
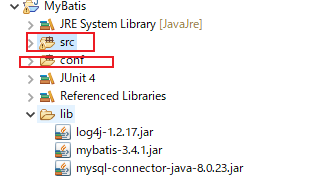
- 需要的jar包:
//日志包,可以不用,后面两个必须。
log4j-1.2.17.jar
mybatis-3.4.1.jar
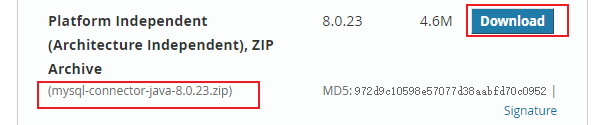
//数据库驱动
mysql-connector-java-8.0.23.jar
- 数据库驱动下载网址:
https://dev.mysql.com/downloads/connector/j/
- mybatis jar包下载地址
https://github.com/mybatis/mybatis-3/releases/tag/mybatis-3.4.3
2. eclipse工具
3. MySql数据库
三:使用MyBatis配置文件操作数据库(入门程序)
1.环境搭建
1)新建conf源文件
右击src->新建source floder,命名随意(此处conf),在conf下书写众多配置文件。
2)jar包加入环境
选中三个jar包,右击->Build Path->Add To Build Path。
3)新建数据库student
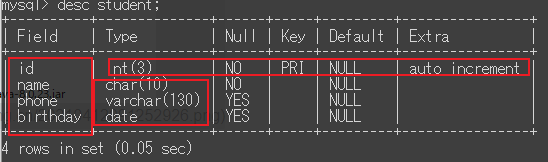
4)新建实体类
- 在src下新建com.minGe.test01包(名字随便),再新建StudentBean实体类。
- 说明:
- 在这里只是测试笔记,所以并未对实体类、dao接口、service等进行分层,所有的java类都写在com.minGe.test01包下。
package com.minGe.test01;
import java.sql.Date;
public class StudentBean {

	private int id;

	private String name;

	private String phone;

	private Date birthday;

	public int getId() {
		return id;
	}
	public void setId(int id) {
		this.id = id;
	}
	public String getName() {
		return name;
	}
	public void setName(String name) {
		this.name = name;
	}
	public String getPhone() {
		return phone;
	}
	public void setPhone(String phone) {
		this.phone = phone;
	}
	public Date getBirthday() {
		return birthday;
	}
	public void setBirthday(Date birthday) {
		this.birthday = birthday;
	}
	@Override
	public String toString() {
		return "StudentBean [id=" + id + ", name=" + name + ", phone=" + phone + ", birthday=" + birthday + "]";
	}
	public StudentBean(int id, String name, String phone, Date birthday) {
		super();
		this.id = id;
		this.name = name;
		this.phone = phone;
		this.birthday = birthday;
	}
	public StudentBean(String name, String phone, Date birthday) {
		this.name = name;
		this.phone = phone;
		this.birthday = birthday;
	}
	public StudentBean() {
		super();
		// TODO Auto-generated constructor stub
	}
}
5)新建StudentDao接口
/*
 *再次声明:真正分层的时候严格按照分层思想写在包路径下,测试随便写在哪个包下都可以(所有类都在com.minGe.test01包下)。
 */
package com.minGe.test01;

import java.util.List;
import java.util.Map;

import org.apache.ibatis.annotations.Insert;
import org.apache.ibatis.annotations.Param;

public interface StudentDao {
	//查
	public StudentBean getStudent(int id);
	//增
	public int insertStudent(StudentBean stu);
	//改
	public int updateStudent(StudentBean stu);
	//删
	public int deleteStudent(int id);

}
6)新建log4j.xml配置文件并粘贴
如果没有引入log4j-1.2.17.jar包则不需要此配置文件;只是不能查看代码日志而已。
<?xml version="1.0" encoding="UTF-8" ?>
<!DOCTYPE log4j:configuration SYSTEM "log4j.dtd">

<log4j:configuration xmlns:log4j="http://jakarta.apache.org/log4j/">

 <appender name="STDOUT" class="org.apache.log4j.ConsoleAppender">
   <param name="Encoding" value="UTF-8" />
   <layout class="org.apache.log4j.PatternLayout">
    <param name="ConversionPattern" value="%-5p %d{MM-dd HH:mm:ss,SSS} %m  (%F:%L) \n" />
   </layout>
 </appender>
 <logger name="java.sql">
   <level value="debug" />
 </logger>
 <logger name="org.apache.ibatis">
   <level value="info" />
 </logger>
 <root>
   <level value="debug" />
   <appender-ref ref="STDOUT" />
 </root>
</log4j:configuration>
2. 配置mybatis全局配置文件
- 在conf下新建mybatis-config.xml配置文件,依据官方文档在其中写入内容,并指导MySQL如何正常运行。
- 官方文档:https://github.com/mybatis/mybatis-3/
	<?xml version="1.0" encoding="UTF-8" ?>
	<!DOCTYPE configuration
	  PUBLIC "-//mybatis.org//DTD Config 3.0//EN"
	  "http://mybatis.org/dtd/mybatis-3-config.dtd">
	<configuration>
	  <environments default="development">
	    <environment id="development">
	      <transactionManager type="JDBC"/>
	      <!-- 配置连接池 -->
	      <dataSource type="POOLED">
	      	<!-- 数据库驱动类 -->
	        <property name="driver" value="com.mysql.jdbc.Driver"/>
	        <!-- 要连接的数据库名(此处是mybatistest)  -->
	        <property name="url" value="jdbc:mysql://localhost:3306/mybatistest"/>
	        <!-- 数据库登录名 -->
	        <property name="username" value="root"/>
	        <!-- 数据库登陆密码 -->
	        <property name="password" value="123456"/>
	      </dataSource>
	    </environment>
	  </environments>
	   <!-- 写好的映射文件需要通过mappers注册进来 -->
	  <mappers>
	  	 <!--
	  	 	mapper有三个属性:
			resource:在类路径下找sql映射文件
			class:直接写类路径的接口全类名(能正常使用的前提是xml和dao接口在同一个包下并且名称一摸一样)
			url:在磁盘或者网络路径引用。
			注意:使用resource时xml配置文件可以随意命名,批量注册时不可以随意命名。
		 -->
	    <mapper resource="StudentDao.xml"/>
	  </mappers>
	</configuration>
3. 配置映射文件(即MySQL增删改查语句)
在conf下新建StudentDao.xml配置文件(在上面全局配置文件下已经注册过此文件;mappers标签那一句就是注册)。
<?xml version="1.0" encoding="UTF-8" ?>
<!DOCTYPE mapper
  PUBLIC "-//mybatis.org//DTD Mapper 3.0//EN"
  <!-- 全局配置dtd约束,与mybatis配置文件提示有关 -->
  "http://mybatis.org/dtd/mybatis-3-mapper.dtd">
<!-- namespace名称空间:告诉mybatis这个配置文件是实现实现实现哪一个接口的 -->
<mapper namespace="com.minGe.test01.StudentDao">

  <!-- resultType:指定方法运行后的返回值类型 -->
  <select id="getStudent" resultType="com.minGe.test01.StudentBean">
   	//隐藏式知识点,使用jdbcType可以指定传输的id类型必须为整形,可以不写。
	select * from student where id=#{id,jdbcType=INTEGER}
  </select>

  <!--
  	将MyBatis自动的将自增id赋值给传入的Student对象的id属性。
  	useGeneratedKeys:原生jdbc获取自增主键的方法。
  	keyProperty:将刚才的自增id赋值给哪一个属性。
   -->
  <insert id="insertStudent" useGeneratedKeys="true" keyProperty="id">
  	insert into student(name,phone,birthday) values(#{name},#{phone},#{birthday})
  </insert>

  <update id="updateStudent">
  	update student set name=#{name},phone=#{phone},birthday=#{birthday} where id=#{id}
  </update>

  <delete id="deleteStudent">
  	delete from student where id=#{id}
  </delete>
</mapper>
4.JUnit测试
1)如何新建JUnit测试文件

2)代码
package com.minGe.test01;

import static org.junit.Assert.*;

import java.io.IOException;
import java.io.InputStream;
import java.sql.Date;

import org.apache.ibatis.io.Resources;
import org.apache.ibatis.session.SqlSession;
import org.apache.ibatis.session.SqlSessionFactory;
import org.apache.ibatis.session.SqlSessionFactoryBuilder;
import org.junit.Before;
import org.junit.Test;

public class StudentTest02 {

	private String resource;

	private InputStream inputStream;

	private SqlSessionFactory sqlSessionFactory;

	private SqlSession session;

	private StudentBean stu;

	/**
	 * XML 中构建 SqlSessionFactory
	 * Before面向切面的注解,前置通知, 在方法执行之前执行。
	 * @throws IOException
	 */
	@Before
	public void initMybatis() throws IOException {
		resource = "mybatis-config.xml";
		inputStream = Resources.getResourceAsStream(resource);
		sqlSessionFactory = new SqlSessionFactoryBuilder().build(inputStream);
	}
	//查
	@Test
	public void showStudent() {
		/*
		 *从SqlSessionFactory中获取SqlSession(理解成和数据库的一次会话,类似getConnection)
		 *SqlSession完全包含了面向数据库执行SQL命令所需的所有方法
		 *openSession(true);可以设置为自动提交
	     */
		session = sqlSessionFactory.openSession();
		try {
			StudentDao dao = session.getMapper(StudentDao.class);
			System.out.println(dao.getStudent(4));
			/**
			 * class com.sun.proxy.$Proxy4
			 * *获取到的是接口的代理对象,mybatis自动创建的
			 * *SqlSessionFactory是创建SqlSession对象的,工厂只需要创建一次
			 * *SqlSession相当于connection,用于和数据库交互,代表和数据库的一次会话。
			 */
			System.out.println(dao.getClass());
		} finally {
		  session.close();
		}
	}
	//改
	@Test
	public void updateStudent() {
		session = sqlSessionFactory.openSession();
		try {
			StudentDao dao = session.getMapper(StudentDao.class);
			stu = new StudentBean(4, "hahaha", "12345678941", new Date(0));
			int a = dao.updateStudent(stu);
			System.out.println(a);
		} finally {
		  session.close();
		}
	}
	//增
	@Test
	public void insertStudent() {
		session = sqlSessionFactory.openSession();
		try {
			StudentDao dao = session.getMapper(StudentDao.class);
			stu = new StudentBean(10086, "hehehe", "12345678941", new Date(0));
			int a = dao.insertStudent(stu);
			System.out.println(a);
		} finally {
		  session.close();
		}
	}
	//删
	@Test
	public void delStudent() {
		session = sqlSessionFactory.openSession();
		try {
			StudentDao dao = session.getMapper(StudentDao.class);
			int a = dao.deleteStudent(8);
			System.out.println(a);
		} finally {
		  session.close();
		}
	}
}
3)运行
–双击showStudent选中,右击->run As->JUnit Test运行。

–注意:增删改打印出来时受影响的行数(打印为1表示正确)。
四:使用MyBatis注解操作数据库
- 首先,不需要上述StudentDao.xml配置文件(比如:删除掉配置文件照样可以查询)。
- 其次,不需要在mysql-config.xml中进行配置(即不需要注册)。
- 此处未对配置文件做任何改动,而是新写了4个接口,不去做配置恰好说明了使用注解操作数据库不需要配置文件也可以。
StudentDao接口:
在上面的StudentDao类中加入以下代码:

@Select(" select * from student where id = #{id}")
public StudentBean getStudentAnnotation(int id);
@Insert("insert into student(name,phone,birthday) values(#{name},#{phone},#{birthday})")
public int insertStudentAnnotation(StudentBean stu);
@Update("update student set name=#{name},phone=#{phone},birthday=#{birthday} where id=#{id}")
public int updateStudentAnnotation(StudentBean stu);
@Delete("delete from student where id=#{id}")
public int deleteStudentAnnotation(int id);
测试代码:
 说明:查 增删改同不加注解的操作一致。
@Test
public void getStudentAnnotation() {
	session = sqlSessionFactory.openSession();
	try {
		StudentDao dao = session.getMapper(StudentDao.class);
		System.out.println(dao.getStudentAnnotation(4));
	} finally {
		 session.close();
	}
}
五:全局配置文件属性
各种属性之间要按照顺序书写,否则会出错。
比方说:settings不能出现在properties之前。
1.properties
作用:引用外部文件(数据库连接池的配置写入外部文件)等。
使用:在mybatis-config.xml加入properties 。

<?xml version="1.0" encoding="UTF-8" ?>
<!DOCTYPE configuration
PUBLIC "-//mybatis.org//DTD Config 3.0//EN"
"http://mybatis.org/dtd/mybatis-3-config.dtd">
<configuration>

  <!-- resource是jdbc配置文件,若加此句则需要配置properties文件 -->
	<properties resource="sql.properties"></properties>
  	<environments default="development">
  		 <environment id="development">
  			<transactionManager type="JDBC"/>
  			 <!-- 配置连接池 -->
  			 <dataSource type="POOLED">
  			  <property name="driver" value="${driver}"/>			//com.mysql.jdbc.Driver
  			  <property name="url" value="${url}"/>					//jdbc:mysql://localhost:3306/mybatistest
  			   <property name="username" value="${username}"/>		//root
  			   <property name="password" value="${password}"/>		//123456
  			 </dataSource>
  		</environment>
  </environments>
  <mappers>
  		<mapper resource="org/mybatis/example/BlogMapper.xml"/>
  </mappers>
</configuration>
在mybatis-config同级目录下新建sql.properties  文件并写入如下:

//数据库的配置属性
sql_username=root
sql_password=root
sql_driver=com.mysql.jdbc.Driver
sql_url=jdbc:mysql://localhost:3306/mybatistest
2.settings
- 介绍
- 作用:这是 MyBatis 中极为重要的调整设置,它们会改变 MyBatis 的运行时行为。
- mapUnderscoreToCamelCase:是否开启自动驼峰命名规则(camel case)映射,即从经典数据库列名 A_COLUMN 到经典 Java 属性名 aColumn 的类似映射。
- 其参数众多,mapUnderscoreToCamelCase最有可能遇到。
- 应用场景
举例讲解:
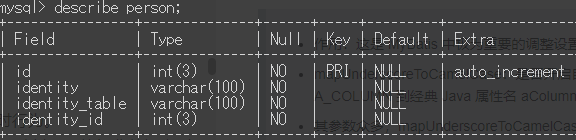
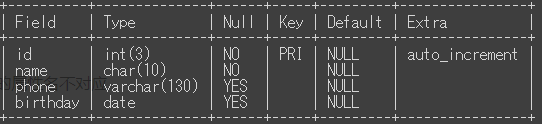
- 数据库中新建一person表其结构如下
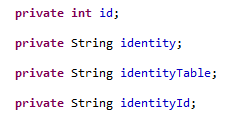
- 实体类封装person表对应属性如下
- MyBatis查询出数据默认是按照字段名和属性名一一对应;上例字段名和属性名不一样,MaBatis对应不上,于是对应不上的字段查询结果为null(不会报错)。

解决:在mybatis-config中加入settings配置

<!--
  作用:这是 MyBatis 中极为重要的调整设置,它们会改变 MyBatis 的运行时行为。
  		mapUnderscoreToCamelCase:是否开启自动驼峰命名规则(camel case)映射,即从经典数据库列名 A_COLUMN 到经典 Java 属性名 aColumn 的类似映射。
  		其参数众多,mapUnderscoreToCamelCase最有可能遇到。
-->
<settings>
  <setting name="mapUnderscoreToCamelCase" value="true"/>
</settings>
再次查询便有了结果,如下图:

- 代码实例
Person.java

package com.minGe.test02;

public class Person {

	private int id;

	private String identity;

	private String identityTable;

	private String identityId;

	public int getId() {
		return id;
	}

	public void setId(int id) {
		this.id = id;
	}

	public String getIdentity() {
		return identity;
	}

	public void setIdentity(String identity) {
		this.identity = identity;
	}

	public String getIdentityTable() {
		return identityTable;
	}

	public void setIdentityTable(String identityTable) {
		this.identityTable = identityTable;
	}

	public String getIdentityId() {
		return identityId;
	}

	public void setIdentityId(String identityId) {
		this.identityId = identityId;
	}

	@Override
	public String toString() {
		return "Person [id=" + id + ", identity=" + identity + ", identityTable=" + identityTable + ", identityId="
				+ identityId + "]";
	}
}
PersonDao.java

package com.minGe.test02;

import java.util.List;

public interface PersonDao {

	public List<Person> getAllPersonList();

}
mybatis-config.xml

<?xml version="1.0" encoding="UTF-8" ?>
<!DOCTYPE configuration
  PUBLIC "-//mybatis.org//DTD Config 3.0//EN"
  "http://mybatis.org/dtd/mybatis-3-config.dtd">
<configuration>
  	<properties resource="sql.properties"></properties>
  	<!--
  		作用:这是 MyBatis 中极为重要的调整设置,它们会改变 MyBatis 的运行时行为。
  		mapUnderscoreToCamelCase:是否开启自动驼峰命名规则(camel case)映射,即从经典数据库列名 A_COLUMN 到经典 Java 属性名 aColumn 的类似映射。
  		其参数众多,mapUnderscoreToCamelCase最有可能遇到。
  	 -->
  	<settings>
  		<setting name="mapUnderscoreToCamelCase" value="true"/>
  	</settings>
  	<environments default="development">
	   <environment id="development">
	      <transactionManager type="JDBC"/>
	      <dataSource type="POOLED">
	        <property name="driver" value="${sql_driver}"/>
	        <property name="url" value="${sql_url}"/>
	        <property name="username" value="${sql_username}"/>
	        <property name="password" value="${sql_password}"/>
	      </dataSource>
	    </environment>
	  </environments>
  <mappers>
    <package name="com.minGe"/>
  </mappers>
</configuration>
PersonDao.xml

<?xml version="1.0" encoding="UTF-8"?>
<!DOCTYPE mapper
  PUBLIC "-//mybatis.org//DTD Mapper 3.0//EN"
  "http://mybatis.org/dtd/mybatis-3-mapper.dtd">

  <mapper namespace="com.minGe.test02.PersonDao">
  		<select id="getAllPersonList" resultType="com.minGe.test02.Person">
  			select * from person
  		</select>
  </mapper>
JUnitTest

@Test
public void getAllPersonList() {
	session = sqlSessionFactory.openSession();
	PersonDao dao = session.getMapper(PersonDao.class);
	System.out.println(dao.getAllPersonList());
	session.close();
}
3.environments(环境配置)
知道是用来做什么的就好
<!-- 默认的环境 ID,即默认使用mybatistest数据库环境还是使用springmvctest数据库环境 -->
<environments default="mybatistest">
  <!-- 每个 environment 元素定义的环境 ID -->
  <environment id="mybatistest">
    <!-- 事务管理器的配置(比如:type=”JDBC”) -->
    <transactionManager type="JDBC">
      <property name="..." value="..."/>
    </transactionManager>
    <!-- 数据源的配置(比如:type=”POOLED”) -->
    <dataSource type="POOLED">
      <property name="driver" value="com.mysql.jdbc.Driver"/>
      <property name="url" value="jdbc:mysql://localhost:3306/mybatistest"/>
      <property name="username" value="root"/>
      <property name="password" value="root"/>
    </dataSource>
  </environment>

<environment id="springmvctest">
    <transactionManager type="JDBC">
      <property name="..." value="..."/>
    </transactionManager>
    <dataSource type="POOLED">
      <property name="driver" value="com.mysql.jdbc.Driver"/>
      <property name="url" value="jdbc:mysql://localhost:3306/springmvctest"/>
      <property name="username" value="root"/>
      <property name="password" value="root"/>
    </dataSource>
  </environment>
</environments>
4.databaseIdProvider
mybatis用来考虑数据库移植性的。
比方说同一条查询语句要在Oracle、MySQL和SQL Server三种环境下成功执行。
mybatis-config.xml下配置:

  <databaseIdProvider type="DB_VENDOR">
  	<!--
  		name:数据库厂商标识,
  		value:为此数据库厂商起别名,
  		MySQL,Oracle,SQL server
  	 -->
  	<property name="MySQL" value="mysql"/>
  	<property name="Oracle" value="orcl"/>
  	<property name="SQL server" value="sqlserver"/>
  </databaseIdProvider>
StudentDao.xml下配置:
  <!--
  	resultType:指定方法运行后的返回值类型
  	默认不区分环境的查询
  -->
  <select id="getStudent" resultType="com.minGe.helloWorld.StudentBean">
    select * from student where id = #{id}
  </select>
  <!-- 在Oracle环境下的执行语句 -->
  <select id="getStudent" resultType="com.minGe.helloWorld.StudentBean" databaseId="orcl">
    select * from student where id = #{id}
  </select>
  <!-- 在sqlserver环境下的执行语句 -->
  <select id="getStudent" resultType="com.minGe.helloWorld.StudentBean" databaseId="sqlserver">
    select * from student where id = #{id}
  </select>
5.mappers
下有mapper和package两个属性。
- mapper:单个注册映射文件。
- package:批量注册。
建议使用package注册映射文件。
作用:单个注册、批量注册xml映射配置文件
mybatis-config.xml

<?xml version="1.0" encoding="UTF-8" ?>
<!DOCTYPE configuration
PUBLIC "-//mybatis.org//DTD Config 3.0//EN"
"http://mybatis.org/dtd/mybatis-3-config.dtd">
<configuration>
<properties resource="sql.properties"></properties>
 <environments default="development">
		 <environment id="development">
			<transactionManager type="JDBC"/>
	        <!-- 配置连接池 -->
				<dataSource type="POOLED">
					<property name="driver" value="${driver}"/>			//com.mysql.jdbc.Driver
					<property name="url" value="${url}"/>				//jdbc:mysql://localhost:3306/mybatistest
					<property name="username" value="${username}"/>		//root
					<property name="password" value="${password}"/>		//123456
				</dataSource>
			</environment>
		</environments>
		 <!-- 写好的映射文件需要通过mappers注册进来 -->
	<mappers>
			<!--
			resource:在类路径下找sql映射文件
			class:直接写类路径的接口全类名(能正常使用的前提是xml映射配置文件和dao接口在同一个包下并且名称一摸一样)
			url:在磁盘或者网络路径引用
			-->
			<mapper resource="StudentDao.xml"/>
			<!--
			批量注册 :
			特点:有配置文件的必须将配置文件放在接口所在包下并且接口名称和配置文件名称一致,没有配置文件的(例如使用注解)将会自动注册。
			 -->
			<package name="com.minGe.dao"/>
	</mappers>
</configuration>
- 说明:当mapper中使用class注册接口配置时,接口名必须和接口配置文件名一致并且在同一包下,过多时不便。
- 优化:可以在conf下新建一个同目标接口所在包一样的包名,将配置文件写在下边,虽然视觉上看上去是有两个相同名称的>>包,但是jvm编译之后接口和映射配置文件都是在一个文件夹下。如下图。
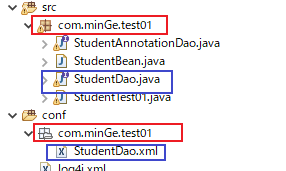
编译之后

其余属性官网查看
六:映射配置文件属性
insert、update、delete只有个别属性;在实际项目中大多为查询操作,所以select尤为重要,属性最多。
1.useGeneratedKeys、keyProperty
- 描述:在往数据库中插入一条数据之后,如果马上需要使用新数据,就不得不重新对数据库进行一次查询得到新插入的数据;
- 使用 useGeneratedKeys、keyProperty属性,MyBatis可以在新数据插入完成之的同时将新的一条数据的主键赋值给实体类保存下来。
<!--
	使用情景:有自增主键!!!
	MyBatis自动的将自增主键id赋值给传入的Student对象的id属性。
	useGeneratedKeys:原生jdbc获取自增主键的方法。
	keyProperty:将刚才的自增id赋值给哪一个属性。
-->
<insert id="insertStudent" useGeneratedKeys="true" keyProperty="id">
	insert into student(name,phone,birthday) values(#{name},#{phone},#{birthday})
</insert>

<!--
	使用情景:没有自增主键!!!
	 order="BEFORE":在核心语句运行前先执行一个查询操作。
	resultType="integer":执行完操作返回的值是一个整数,受影响的行数。
	keyProperty="id":查询出来的值赋值给javabean的哪个属性。
-->
<insert id="insertStudent" keyProperty="id">
	<selectKey order="BEFORE" resultType="integer" keyProperty="id">
		select max(id)+1 from student
	</selectKey>
		  	insert into student(name,phone,birthday) values(#{name},#{phone},#{birthday})
</insert>

打印:System.out.println("插入后的id:"+stu.getId());
test测试:
//从 XML 中构建 SqlSessionFactory
//从 SqlSessionFactory 中获取 SqlSession
//代码省略
StudentBean stu = new StudentBean("minGe011","1983489345",new Date(10));
System.out.println("受影响行数:"+dao.insertStudent(stu));
//插入完成后StudentBean实体类的id属性中已经被赋值。值为新增的一条信息的id。
System.out.println("插入后的id:"+stu.getId());
session.close();
打印结果:

2.restultType
执行完sql语句之后返回值的类型;
MyBatis对查询出的数据使用默认的规则进行封装,即属性名和数据库列名(查询出的)一一对应
3.retultMap
- 简介:
作用:
- MyBatis内部对查询出的数据结果进行封装的时候,不在按照resultType的默认规则封装(即字段名和属性名一一对应),而是自定义规则(指定数据库字段封装到哪一个实体类属性上)。
场景:
- 数据库中的列名和实体类的属性名不对应
使用:
- 新建test02包并且新建Student、StudentDao、test类以及配置文件。
- 新的项目结构示意图如下:

- 数据库:
-
新实体类(Student.java):
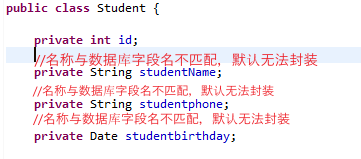
-
Dao接口:
StudentDao.java
com.minGe.test02下:
@MapKey("id")
//使用map接收返回的map值,详情见【九:映射配置文件返回各种类型参数->2)】
public Map<String, Student> resultMapTest(@Param("table")String table);
- 错误映射文件(使用resultType):
 <mapper namespace="com.minGe.test02.StudentDao">
  <!-- 返回结果是resultType时MyBatis默认装配,所以查询出来的结果找不到的都为null,如下图 -->
  <select id="resultMapTest" resultType="com.minGe.test02.Student">
  	select * from ${table}
  </select>
 </mapper>
- 打印:

如上打印所示,当属性名和数据库字段名不匹配时,MyBatis按照默认方法封装将返回null
- 正确映射文件:
  <mapper namespace="com.minGe.test02.StudentDao">
  	<!-- resultMap:指定使用哪一个自定义规则 -->
  	<select id="resultMapTest" resultMap="MyStudent">
  		select * from ${table}
  	</select>

  	<!-- resultMap:
  		自定义结果集,自己定义每一列数据和javaBean的映射规则。
  		type=“”:指定为哪一个javaBean(实体类)指定自定义的封装映射规则,需使用全类名
  		id=“”:唯一标志,让别名在后面被引用时用到。
  	 -->
  	<resultMap type="com.minGe.test02.Student" id="MyStudent">
  		<!--
  			主键列的对应规则:
  			column:指定那一列时主键列。
  			property:指定Student的哪一个属性封装id这一列的数据。
  		 -->
  		<id property="id" column="id"/>
  		<!-- 普通列的对应规则 -->
  		<result property="studentName" column="name"/>
  		<result property="studentphone" column="phone"/>
  		<result property="studentbirthday" column="birthday"/>
  	</resultMap>
  </mapper>
再次打印结果便是数据库中查询出来的值。如图所示:

- 使用resultMap进行级联查询(一对一)
- Student对象是Person实体类的一个属性,查询结果返回一条数据
- 一对一关系的查询
Person.java
package com.minGe.test02;

public class Person {

	private int id;

	private String identity;

	private String identityTable;

	private String identityId;
	//上面写到的student实体类。
	private Student stu;


	public Student getStu() {
		return stu;
	}

	public void setStu(Student stu) {
		this.stu = stu;
	}

	public int getId() {
		return id;
	}

	public void setId(int id) {
		this.id = id;
	}

	public String getIdentity() {
		return identity;
	}

	public void setIdentity(String identity) {
		this.identity = identity;
	}

	public String getIdentityTable() {
		return identityTable;
	}

	public void setIdentityTable(String identityTable) {
		this.identityTable = identityTable;
	}

	public String getIdentityId() {
		return identityId;
	}

	public void setIdentityId(String identityId) {
		this.identityId = identityId;
	}

	@Override
	public String toString() {
		return "Person [id=" + id + ", identity=" + identity + ", identityTable=" + identityTable + ", identityId="
				+ identityId + ", stu=" + stu + "]";
	}
}
PersonDao.java
package com.minGe.test02;
import java.util.List;
import org.apache.ibatis.annotations.Param;
public interface PersonDao {
	public Person getPersonById(@Param("id")int id);
}
PersonDao.xml
<?xml version="1.0" encoding="UTF-8"?>
<!DOCTYPE mapper
  PUBLIC "-//mybatis.org//DTD Mapper 3.0//EN"
  "http://mybatis.org/dtd/mybatis-3-mapper.dtd">

  <mapper namespace="com.minGe.test02.PersonDao">
  	<select id="getAllPersonList" resultType="com.minGe.test02.Person">
  		select * from person
  	</select>
  	<!-- resultMap:自定义封装规则,使用级联属性封装联合查询出的结果 -->
  	<select id="getPersonById" resultMap="personResultMapAss">
  	 select
  	 	p.id pid,
  	 	p.identity_id,
  	 	p.identity,
  	 	s.id sid,
  	 	s.name,
  	 	s.phone
  	 	from
  	 	person p
  	 	left join
  	 	student s
  	 	on
  	 	p.identity_id=s.id
  	 	where
  	 	p.id=#{id}
  	</select>
  	<!-- 方法一 -->
  	<resultMap type="com.minGe.test02.Person" id="personResultMap">
  		<id property="id" column="pid"/>
  		<!--
  			property:类的属性,
  			column:查询出来的字段名。
  			通过resultMap将MyBaits查询出来的数据和实体类的字段名一一对应。
  		 -->
  		<result property="identity" column="identity"/>
  		<result property="identityId" column="identity_id"/>
  		<result property="stu.id" column="sid"/>
  		<result property="stu.studentName" column="name"/>
  		<result property="stu.studentphone" column="phone"/>
  	</resultMap>

  	<!-- 方法二,推荐使用 -->
  	<resultMap type="com.minGe.test02.Person" id="personResultMapAss">
  		<id property="id" column="pid"/>
  		<!--  -->
  		<result property="identity" column="identity"/>
  		<result property="identityId" column="identity_id"/>
  		<!--
  			association表示将两个对象联合起来,使MyBatis能够知道谁是谁的对象,谁该怎样封装谁!!!
  			property:表示Person下边的哪一个属性。
  			javaType:表示Person下边的stu属性要封装com.minGe.test02.Student类。
  		 -->
  		<association property="stu" javaType="com.minGe.test02.Student">
	  		<result property="id" column="sid"/>
	  		<result property="studentName" column="name"/>
	  		<result property="studentphone" column="phone"/>
  		</association>
  	</resultMap>

  </mapper>
JUnitTest
@Test
public void getPersonById() {
	session = sqlSessionFactory.openSession();
	PersonDao dao = session.getMapper(PersonDao.class);
	System.out.println(dao.getPersonById(1));
	session.close();
}
执行顺序:
- MyBatis通过select标签查询数据库,查询出结果以后通过resultMap找到要匹配的自定义封装规则;
- 在自定义resultMap中将数据库查询出的字段和实体类的属性通过自己书写的规则一一对应并赋值保存。
- MyBatis是先查询,后封装。有封装规则就去按照规则封装,没有的话就按照默认。
- 级联查询结果

- 使用resultMap进行级联查询(一对多)
七:映射配置文件接收各种类型参数
1.传入单个参数
1)基本类型参数:
接收:#{随便写}
接口方法:
	public StudentBean getStudent(int id);
JUnit传入参数:
	dao.getStudent(1);
配置文件:
	select * from student where id = #{id}

说明:
	通过JUnit传入一参数id;key为id,值为1。正常来看应是使用id接收,实际MyBaits对接收的参数id进行了处理,当传入单个参数时,不管传入的参数key是什么,接收之时参数key可以随便写!!!
	即配置文件也可以这样写:
	select * from student where id = #{suibian}
2)Pojo
2.传入多个参数
1.不使用注解(参数过多十分不便)
接收:#{0},#{1}…或者#{param1},#{param2}…
接口方法:
	public int method01(String name,int id);
此时#{随便写}的接收方法不在奏效;正确接收方法是:
- select * from student where id = #{1} and name=#{0}
或者- select * from student where id = #{param2} and name=#{param1}
- 注意:以上参数必须严格按照传入的时候的参数顺序写。
此时使用select * from student where id = #{id} and name=#{name}查询会报错。
说明:
传入多个参数之时,MyBatis底层会自动将这些参数封装在一个map中(底层原理),
封装时使用的key就是参数的索引和参数的第几个。
例如:
Map<String,Object> map = new HashMap<>();
map.put(“0”,传入的值)
map.put(“1”,传入的值)
2.使用注解(使用此方法便可)
接收:#{自定义名称1},#{自定义名称2}…
在接口的方法中加入注解,
如下代码所示:
如此便可以在映射文件中使用自定义参数名称查询:
select * from student where id = #{id} and name=#{name}
public int method02(@Param("name")String name,@Param("id")int id);
3.传入Pojo
接收:#{实体类属性名}…
接口方法:
	public int insertStudent(StudentBean stu);
JUnit传参:
	stu = new StudentBean(10086, "hehehe", "12345678941", new Date(0));
	dao.insertStudent(stu);
配置文件:
	insert into student(name,phone,birthday) values(#{name},#{phone},#{birthday})
4.传入Map
接收:#{key}…
接口方法:
	public StudentBean getStudentMap(Map<Object, String> map);
JUnit传参:
	Map<Object, String> map = new HashMap<Object, String>();
	map.put("id", "1");
	map.put("name","minGe001");
	map.put("table", "student");
	System.out.println(dao.getStudentMap(map));
配置文件:
	select * from student where id=#{id} and name=#{name}
例:
	public int method03(@Param("name")String name,int id,Student student);
接收:
	#{name}
	#{param2}
	#{student.email}
当然,我们为了让用户更加便捷,我们增加了图片拖拽功能。
八:映射配置文件中MyBatis两种取值方式
- $符号
<select id="getStudentMap" resultType="com.minGe.test01.StudentBean">
   	select * from student where id=${id} and name='${name}'
</select>

- #符号(使用此方式)
<select id="getStudentMap" resultType="com.minGe.test01.StudentBean">
   	select * from student where id=#{id} and name=#{name}
</select>

#{} 为参数占位符 ?,即sql 预编译。
${} 为字符串替换,即 sql 拼接。
变量替换后,#{} 对应的变量自动加上单引号 。
变量替换后, 对饮的变量不会加上单引号,所以上面的查询时接收 n a m e 时要 用 ′ {}对饮的变量不会加上单引号,所以上面的查询时接收name时要用' 对饮的变量不会加上单引号,所以上面的查询时接收name时要用′{name}'的形式,否则会报错(Error querying database. Cause: java.sql.SQLSyntaxErrorException: Unknown column ‘minGe001’ in ‘where clause’)。
使用${}接收参数时虽然不会预编译,容易发生sql注入的危险,但是此方法可以用来接收表名。
应用场景:某数据库有众多日志表(Mst_log),日志表数据按月份保存,要查询日志时表名发生变化,可用${table}代替表名。
select * from ${table} where id=#{id} and name=#{name}
九:映射配置文件接收返回的参数
1.接收返回的基本类型
-略
2.接收返回的引用类型
-略
3.接收返回的List类型
//接口类
import java.util.List;
import java.util.Map;
public interface StudentDao {
	public List<StudentBean> getAllStudent(@Param("table")String table);
}

//JUnit测试类
StudentDao dao = (StudentDao) session.getMapper(StudentDao.class);
List<StudentBean> list = dao.getAllStudent("student");
System.out.println(list);

//sql映射配置文件
<select id="getAllStudent" resultType="com.minGe.test01.StudentBean">
   select * from ${table}
</select>
4.接收返回的Map类型
1)查询并返回单条数据
//接口类
/**
 * 查询一条数据并返回给一个map集合。
 * 默认返回一条数据的时候,数据库字段名作为key,值作为value(变相说明此方法只能返沪一条数据)
 * @param table
 * @param id
 * @return Map
 */
public Map<Object,StudentBean> getStudentMap(@Param("table")String table,@Param("id")int id);

//JUnit测试类
@Test
public void getStudentMap() {
	session = sqlSessionFactory.openSession();
	StudentDao dao = session.getMapper(StudentDao.class);
	System.out.println(dao.getAllStudentMap("student", 5));
	session.close();
}

//sql映射配置文件
<select id="getStudentMap" resultType="map">
	//查询单条数据,返回的结果可以是map,也可以是实体类,没影响。
  	select * from ${table} where id=#{id}
</select>


 1320
1320


 被折叠的 条评论
为什么被折叠?
被折叠的 条评论
为什么被折叠?
 到【灌水乐园】发言


