


1 基础语法
Python的八种数据类型
八种数据类型分别是:
number(数字)、string(字符串)、Boolean(布尔值)、None(空值)
list(列表)、tuple(元组)、dict(字典)、set(集合)。
##  可变类型:列表,字典,集合————》 在内存中是以链表的形式存储,每个元素都有独立的地址和地址指向,可以直接修改

##  不可变类型:数字,字符串,元祖
## 有序:字符串,列表,元组
## 无序:集合
字典dict在python3.6之前是无序的,到了python3.7变成了有序,可变
集合set无序可变(还有个不可变集合frozenset)
1.1列表
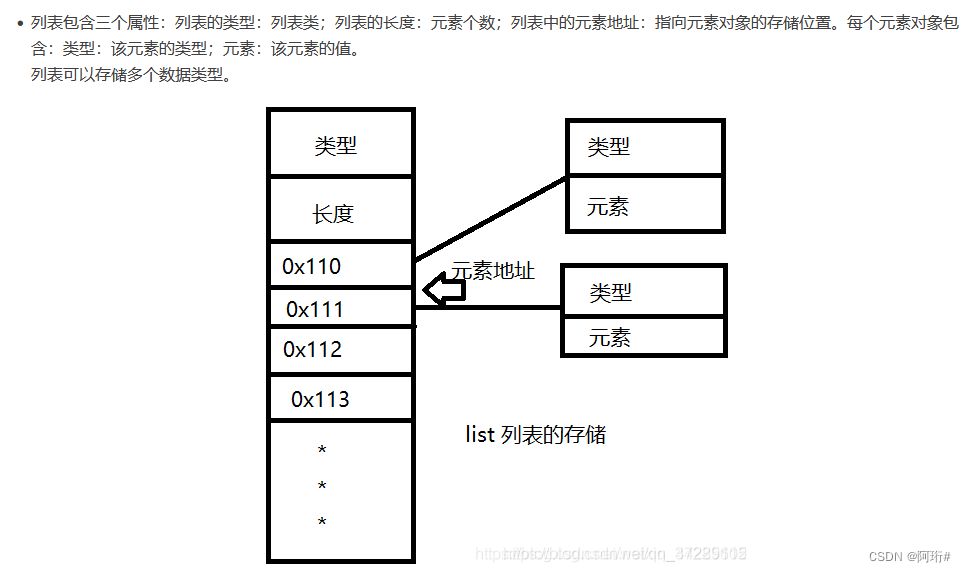
1.1.0 列表的存储方式(数据结构)
即整个列表包括三部分:列表类型、列表长度、列表元素的地址
地址指向每个元素对象,每个元素对象包括:类型、元素
列表中的元素在内存中是不连续的。
1.1.1 列表常用函数及方法
1.1.1.1常用函数
cmp(list1, list2)
# 比较两个列表的元素
len(list)
# 列表元素个数
max(list)
# 返回列表元素最大值
min(list)
# 返回列表元素最小值
list(seq)
# 将元组转换为列表
1.1.1.2常用方法
list.append(obj)
# 在列表末尾添加新的对象
list.count(obj)
# 统计某个元素在列表中出现的次数
list.extend(seq)
# 在列表末尾一次性追加另一个序列中的多个值(用新列表扩展原来的列表)
list.index(obj)
# 从列表中找出某个值第一个匹配项的索引位置
list.insert(index, obj)
# 将对象插入列表
list.pop([index=-1])
# 移除列表中的一个元素(默认最后一个元素),并且返回该元素的值
list.remove(obj)
# 移除列表中某个值的第一个匹配项
list.reverse()
# 反向列表中元素
list.sort(cmp=None, key=None, reverse=False)
# 对原列表进行排序
示例:列表筛选小于指定值
def filter_element(items, bound):
    res = [item for item in items if item < bound]
    return res
示例:列表推导式
if __name__ == '__main__':
    obj_list = [
        {"key": "day1", "value": "大雨哗啦啦啦啦下", 'tags': ["不热"]},
        {"key": "day2", "value": "很热很热,一个人旅行", 'tags': ["热"]},
        {"key": "day3", "value": "阴天有时下雨", 'tags': ["不热"]}
    ]

    print('')
    print("# 过滤出不热的日子")

    #!!!!!!!!!!!
    non_hot_days = [d for d in obj_list if '不热' in d['tags']]

    for day in non_hot_days:
        print("* [{}]: {}".format(day['key'], day['value']))

    print('')
1.1.1.3切片
str = 'abcdefg'
# 索引为 0表示第一个,1表示第二个,-1表示最后一个,-2表示倒数第二个

print(str[1:])  #  从下标1到最后,包括最后一个元素
print(str[:-1])  #  从头到-1左闭右开区间,即不包括-1最后一个元素
print(str[-1:])  #  从-1到最后,即获取最后一个元素
print(str[::-1])  #  从头到尾,但是逆序,步长为1
print(str[::-2])  #  从头到尾,但是逆序,步长为2
print(str[:])  #  从头到尾
print(str[:1:-1]) # 从头到下标1结束,但是逆序,即头是最后一个,从最后到下标1左闭右开
print(str[1::-1]) # 从下标1到尾,但是逆序,即尾是第一个,从下标1到最左左闭右闭
print(str[2:0:-1]) # 逆序,尾下标一定要小于头下标,即下标仍按照从左往右,但是输出是右往左
print(str[:-2:-1]) # 逆序,-1到-2左闭右开
print(str[-1:])  #  从下标-1到最后

-------------------------------------------------------------------------------------------

结果
bcdefg
abcdef
g
gfedcba
geca
abcdefg
gfedc
ba
cb
g
g
1.1.2 list实现栈——先进后出
“后进先出”(Last-In-First-Out,LIFO)
【Python】一文带你学会数据结构中的堆、栈_python stack-CSDN博客
# 初始化栈
stack = []

# 压栈(入栈)
stack.append(1)
stack.append(2)
stack.append(3)

# 弹栈(出栈)
element = stack.pop()
print(element)  # 输出:3

# 获取栈顶元素
top_element = stack[-1]
print(top_element)  # 输出:2

# 判断栈是否为空
is_empty = len(stack) == 0
print(is_empty)  # 输出:False

# 显示栈的元素
for element in stack:
    print(element)
# 输出:
# 1
# 2
1.1.3字符串
# python 三引号允许一个字符串跨多行,字符串中可以包含换行符、制表符以及其他特殊字符。
string = '''abd
efgd'''

print("双引号字符串里的单引号: 'hello world!'")
print('单引号字符串里的双引号: "hello world!"')
1.1.3.1字符串拼接
#用list索引拼接
str_list = ["Hello,","World!"]
print(str_list[0]+str_list[1])

#字符串拼接
str1 = "Hello,"
str2 = "World!"
print(str1+str2)
1.1.3.2字符串拆分
split()方法返回一个列表,其中包含分割后的子字符串。
string.split(separator, maxsplit)separator:可选参数,指定分隔符,默认为空格。可以是一个字符或字符串,用于指定在哪里分割字符串。
maxsplit:可选参数,指定最大分割次数。如果提供了该参数,则最多分割成maxsplit+1个子字符串。如果没有提供该参数或者为-1,则分割次数没有限制
字符串拆分示例示例:
creators = ["约翰·巴科斯(JohnWarnerBackus), 创建了Fortran语言", "阿兰·库珀(Alan Cooper), 开发了Visual Basic语言"]

def parse_parts(creator):
    #  .find()  找字符串中的指定元素,返回该元素的下标
    index = str_list.find(',')
    #  list列表切片左开右闭,第一个元素下标0,最后一个元素是-1
    name, achievement = creator[0:index], creator[index+1:]
    name_cn, name_en = name[0:index], name[index:]
    name_en = name_en[1:len(name_en)-1]
    #  .strip()  移除字符串首尾的指定字符,默认空格和换行符
    return name_cn, name_en, achievement.strip()

#parse_creators的第一种写法
def parse_profile(creator):
    name, achievement = parse_parts(creator)
    name_cn, name_en = parse_name(name)
    #组成字典{}
    return { 'name_cn': name_cn, 'name_en': name_en, 'achievement': achievement }
def parse_creators(creators):
    #每次函数回调都会给[]列表添加一个元素,元素是字典类型
    return [ parse_profile(creator) for  creator in creators]

#parse_creators的第二种写法
def parse_creators(creators):
    profiles = []
    for creator in creators:
        name_cn, name_en, achievement = parse_parts(creator)
        # .append()  给list末尾添加元素
        profiles.append({ 'name_cn': name_cn, 'name_en': name_en, 'achievement': achievement })
    return profiles


if __name__ == '__main__':
    creators = ["约翰·巴科斯(JohnWarnerBackus), 创建了Fortran语言", "阿兰·库珀(Alan Cooper), 开发了Visual Basic语言"]
    profiles = parse_creators(creators)
    print(profiles)
示例:字符串转列表
str="1,2,34"
print(list(str.split(',')))
# ['1', '2', '34']
string = "Hello, world! How are you?"
result = string.split()
print(result)
# ['Hello,', 'world!', 'How', 'are', 'you?']示例:字符串列表转数值列表
Python列表字符转为数值_如何将列表中的字符串转化为数字的形式输出-CSDN博客
num_list_new = list(map(lambda x : int(x),new_list)) 1.1.3.3拼接字符串
8种Python字符串拼接的方法,你知道几种?-CSDN博客
.format拼接字符串:
text1 = 'hello'
text2 = 'world'
print("{}{}".format(text1, text2))
1.1.3.4f字符串
在字符串中嵌入变量,基本用法:
name = "Tom"
age = 20
print(f"My name is {name}, and I am {age} years old.")
详解如何理解并正确使用Python中的f字符串_python_脚本之家
1.1.3.5字符串排序
字符串排序(Python)_python 字符串排序-CSDN博客
str1 = "shd"

print(sorted(str1))# 升序

print(str1)

print("".join(sorted(str1)))# 串成字符串

print(sorted(str1,reverse=True))# 降序

___________________________________________
['d', 'h', 's']
shd
dhs
['s', 'h', 'd']
1.1.4一些函数
1.1.4.1replace
Python replace()函数使用详解,Python替换字符串_python string replace-CSDN博客
#将string字符串中的‘old’替换为‘new’,count指定替换次数
string.replace( old, new, count )

# 去除空格
string.replace(" ","")
1.1.4.2lower
# 将字符串中的所有大写字母转换为小写字母
# lower()方法不会改变原始字符串,而是返回一个新的字符串。
a = "HELLO"
print(a.lower())
1.1.4.3split
Python 中的字符串分割函数 split() 详解_python split-CSDN博客
# split() 通过指定分隔符对字符串进行切片,并以列表的形式返回这些子字符串。
text = "Hello,World,Python"
words = text.split(",")  # 使用逗号作为分隔符
print(words)  # 输出:['Hello', 'World', 'Python']
1.1.4.4list
Python:list()函数(列表[ ])、dict()函数(字典{ })_list()返回什么-CSDN博客
# 将字典的所有value转换成列表
word_list = list(word_dict.values())
1.1.4.5join
详解Python中的join()函数的用法_python_脚本之家
# 将char列表内的字母拼成小写字符串
word = ''.join(chars).lower()

#对序列进行操作(分别使用' '与':'作为分隔符)
seq1 = ['hello','good','boy','doiido']
print(' '.join(seq1))
#hello good boy doiido
print(':'.join(seq1)
#hello:good:boy:doiido

#合并目录
import os
os.path.join('/hello/','good/boy/','doiido')
#'/hello/good/boy/doiido'
1.1.4.6sort
lambda的一些说明:
vowels = ['e', 'a', 'u', 'o', 'i']

# 降序
vowels.sort(reverse=True)
#['u', 'o', 'i', 'e', 'a']

#升序
vowels.sort()

# lambda指定按照x的哪个元素进行比较排序
x = [
        ('john', 'A', 15),
        ('jane', 'B', 12),
        ('dave', 'B', 10),
        ('dave', 'B', 8),
]
x.sort(key=lambda i:i[2])
print(x)
# [('dave', 'B', 8), ('dave', 'B', 10), ('jane', 'B', 12), ('john', 'A', 15)]
1.1.4.7 find
Python中find函数的详细使用方法_python_脚本之家
s = "abcdefg"
print(s.find("def"))# 3
1.1.4.8 index查下标
python的index是什么意思-Python教程-PHP中文网
找到返回索引,找不到引发异常
def find_index():
    s = "abcdefg"
    try:
        return print(s.index("def"))
    except ValueError:
        return print(-1)

find_index()
# 3
——————————————————————————————————

def find_index():
    s = "abcdefg"
    try:
        return print(s.index("fc"))
    except ValueError:
        return print(-1)

find_index()
# -1
1.1.5 lambda匿名函数
Python中lambda 函数详解与运用_key=lamdba x: x[n]-CSDN博客
lambda x, y: x+y			# 函数输入是x和y,输出是它们的和x+y
lambda:None					# 函数没有输入参数,输出是None
lambda *args: sum(args)		# 输入是任意个数参数,输出是它们的和(隐性要求输入参数必须能进行算术运算)
lambda **kwargs: 6			# 输入是任意键值对参数,输出是6
lambda item: item['age']    # 输入字典item,输出字典中kay=age对应的value
1.2字典
1.2.1字典的key
python中的类型分可以分为两类,可变类型和不可变类型
可变类型:dict、list、set
不可变类型:int、long、float、complex、string、bool、tuple
其中可变类型不能作为字典的key,因为它们没有__hash__()方法。
1.2.2遍历字典
Python 遍历字典的8种方法总结_python_脚本之家
# 创建一个示例字典
student_grades = {"Alice": 95, "Bob": 88, "Charlie": 92, "David": 78}
# 创建空字典
dic = dict()

# 遍历字典的键
for name in student_grades:
    print(name)

# 遍历字典的值
for grade in student_grades.values():
    print(grade)

# 遍历字典的键值对
for name, grade in student_grades.items():
    print(f"{name}: {grade}")

# 字典的比较
dict1 = {'a':1, 'b':1}
dict2 = {'a':1, 'b':1}
# dict字典只能比较相等
if dict1 == dict2:
    print("yes")
字典的使用示例:
if __name__ == '__main__':
    install = {
        "Windows": "请下载 Windows 安装包安装:https://www.python.org/downloads/windows/",
        "CentOS": "使用yum包管理器,执行命令:yum install -y python3",
        "Ubuntu": "使用apt-get包管理器,执行命令:apt-get install -y python3",
        "MacOS": "安装brew包管理器,然后执行命令: brew install python3",
    }

    shortcut_keys = {}
    # 遍历install字典的key
    for platform in install:
        # 将install的每一个key的第一个字母变成小写,作为shortcut_keys字典的key
        key = platform[0].lower()
        # shortcut_keys字典的value是install字典的key
        shortcut_keys[key] = platform

    while True:
        ret = input("请选择安装平台[w/c/u/m, 按q退出]:")
        if ret == 'q':
            break
        platform = shortcut_keys.get(ret)
        if platform is None:
            print("不支持的平台")
        else:
            doc = install.get(platform)
            print(f"{platform}: {doc}")
字典的嵌套示例:
if __name__ == '__main__':
    run = {
        "repl": {
            "title": "交互式编程( Interactive )",
            "desc": [
                "打开终端,输入 python 回车",
                "进入 Python 交互式命令行",
                "输入 print('monkey king is coding!')"
            ]
        },
        "source": {
            "title": "Python 源代源文件( File )",
            "desc": [
                "使用你喜欢的编辑器拷贝本练习的代码, 保存为run.py",
                "打开终端,cd 到 run.py 保存的目录",
                "输入 python run.py"
            ]
        }
    }

    print("有两种基本的方式运行 Python")
    for s in run: # 遍历run字典的key:i  f
        # item是i和f对应的value,本身是一个字典
        item = run.get(s)
        # item['title'],获取i和f的value字典中,key为title的value
        print("* {}: {}".format(s, item['title']))

    shortcut_keys = {}
    # 遍历install字典的key
    for r in run:
        # 将install的每一个key的第一个字母变成小写,作为shortcut_keys字典的key
        key = r[0].lower()
        # shortcut_keys字典的value是install字典的key
        shortcut_keys[key] = r

    has_learn_repl = False
    has_learn_source = False

    while True:
        ret = input("请选择你想了解的 Python 运行方式(输入:r/s选择,输入 q 退出):")

        if ret == 'q':
            break

        elif ret == 'r':

            has_learn_repl = True

        elif ret == 's':

            has_learn_source = True

        name = shortcut_keys.get(ret)
        if name is None:
            print("[错误] 不支持的运行方式")
        else:
            item = run.get(name)
            desc = item['desc']
            for i in range(0, len(desc)):
                print("{}. {}".format(i, desc[i]))

    if has_learn_repl and has_learn_source:
        print("[2/2]您已完成两种 Python 运行方式的学习")
    elif has_learn_source:
        print("[1/2]您已完成 Python 源代码方式运行学习")
    elif has_learn_repl:
        print("[1/2]您已完成 Python 交互式命令行运行学习")
    else:
print("[0/2]您似乎跳过了运行方式的学习?期待下次光临!") 最低0.47元/天 解锁文章


 被折叠的 条评论
为什么被折叠?
被折叠的 条评论
为什么被折叠?
 到【灌水乐园】发言


