大数据【企业级360°全方位用户画像】基于RFM模型的挖掘型标签开发

        在前面的几篇博客中,博主不仅为大家介绍了匹配型标签和统计型标签的开发流程,还为大家科普了关于机器学习的一些"干货",包括但不限于KMeans算法等…本篇博客,我们将正式开发一个基于RFM模型的挖掘型标签,对RFM不了解的朋友可以👉大数据【企业级360°全方位用户画像】之RFM模型和KMeans聚类算法~
在这里插入图片描述


        我们本次需要开发的标签是用户价值。相信光听这个标签名,大家就应该清楚这种比较抽象的标签,只能通过挖掘型算法去进行开发。

        话不多说,我们来看看开发一个这样的标签需要经历哪些步骤?

添加标签

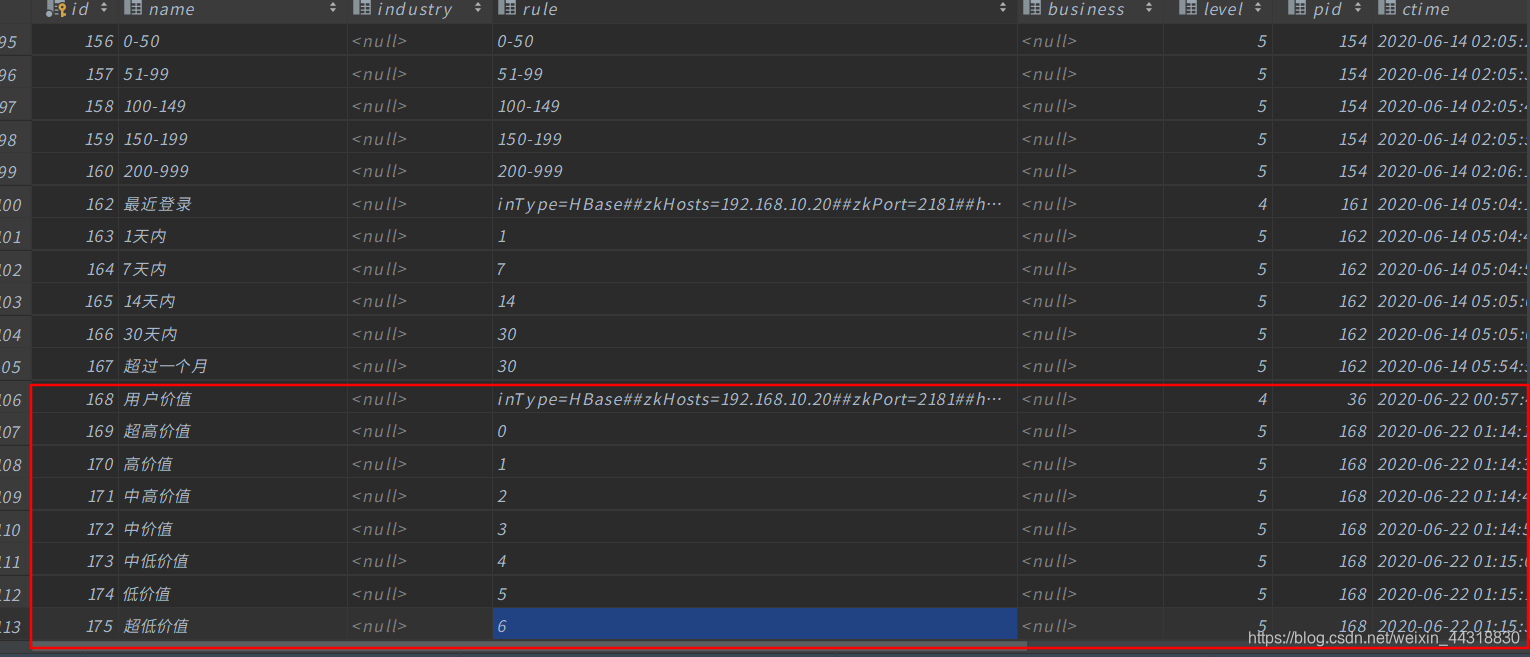
        首先我们需要在用户画像项目中的web页面添加这个需求所需要的四级标签(标签名)和五级标签(标签值)。
在这里插入图片描述
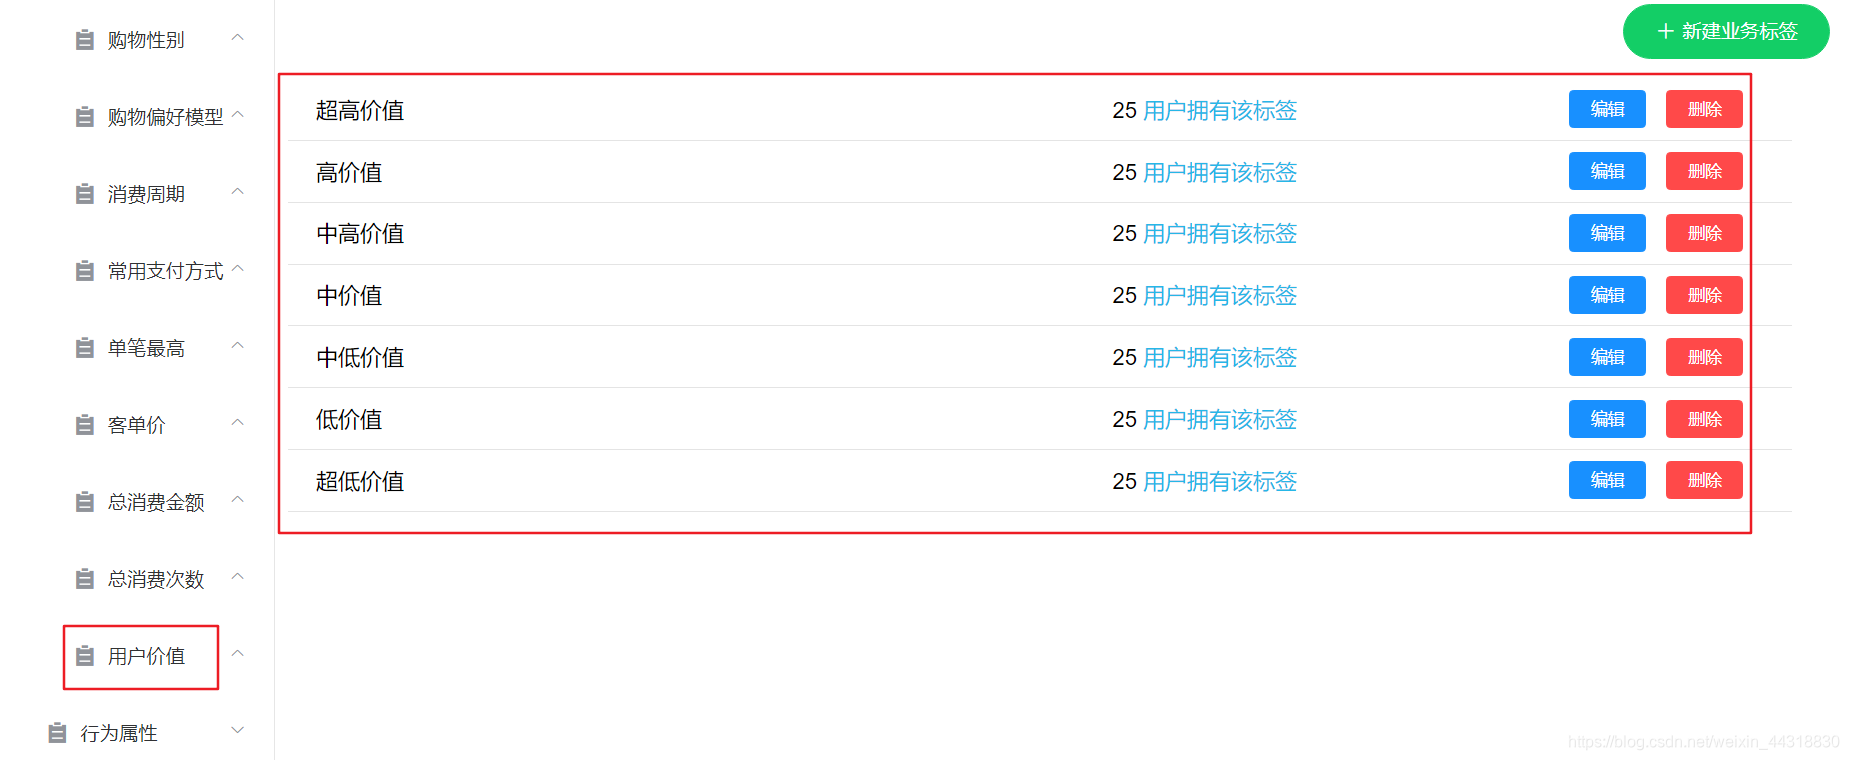
        添加成功之后,我们可以在后台数据库中看到数据。
在这里插入图片描述

开发

        页面所需标签和标签值已经准备好了,剩下的就该我们撸代码了。

准备pom

<?xml version="1.0" encoding="UTF-8"?>
<project xmlns="http://maven.apache.org/POM/4.0.0"
         xmlns:xsi="http://www.w3.org/2001/XMLSchema-instance"
         xsi:schemaLocation="http://maven.apache.org/POM/4.0.0 http://maven.apache.org/xsd/maven-4.0.0.xsd">
    <parent>
        <artifactId>userprofile29</artifactId>
        <groupId>cn.itcast.up</groupId>
        <version>1.0-SNAPSHOT</version>
    </parent>
    <modelVersion>4.0.0</modelVersion>

    <artifactId>Job</artifactId>

    <properties>
        <scala.version>2.11.8</scala.version>
        <spark.version>2.2.0</spark.version>
        <hbase.version>1.2.0-cdh5.14.0</hbase.version>
        <solr.version>4.10.3-cdh5.14.0</solr.version>
        <mysql.version>8.0.17</mysql.version>
        <slf4j.version>1.7.21</slf4j.version>

        <maven-compiler-plugin.version>3.1</maven-compiler-plugin.version>
        <build-helper-plugin.version>3.0.0</build-helper-plugin.version>
        <scala-compiler-plugin.version>3.2.0</scala-compiler-plugin.version>
        <maven-shade-plugin.version>3.2.1</maven-shade-plugin.version>
    </properties>

    <dependencies>
        <!-- Spark -->
        <dependency>
            <groupId>org.apache.spark</groupId>
            <artifactId>spark-core_2.11</artifactId>
            <version>${spark.version}</version>
        </dependency>
        <dependency>
            <groupId>org.apache.spark</groupId>
            <artifactId>spark-sql_2.11</artifactId>
            <version>${spark.version}</version>
        </dependency>
        <dependency>
            <groupId>org.apache.spark</groupId>
            <artifactId>spark-mllib_2.11</artifactId>
            <version>${spark.version}</version>
        </dependency>
        <dependency>
            <groupId>org.scalanlp</groupId>
            <artifactId>breeze_2.11</artifactId>
            <version>0.13</version>
        </dependency>

        <!-- HBase -->
        <dependency>
            <groupId>org.apache.hbase</groupId>
            <artifactId>hbase-client</artifactId>
            <version>${hbase.version}</version>
        </dependency>

        <dependency>
            <groupId>org.apache.hbase</groupId>
            <artifactId>hbase-common</artifactId>
            <version>${hbase.version}</version>
        </dependency>
        <dependency>
            <groupId>org.apache.hbase</groupId>
            <artifactId>hbase-server</artifactId>
            <version>${hbase.version}</version>
        </dependency>

        <!-- Solr -->
        <dependency>
            <groupId>org.apache.solr</groupId>
            <artifactId>solr-core</artifactId>
            <version>${solr.version}</version>
        </dependency>
        <dependency>
            <groupId>org.apache.solr</groupId>
            <artifactId>solr-solrj</artifactId>
            <version>${solr.version}</version>
        </dependency>

        <!-- MySQL -->
        <dependency>
            <groupId>mysql</groupId>
            <artifactId>mysql-connector-java</artifactId>
            <version>${mysql.version}</version>
        </dependency>

        <!-- Logging -->
        <dependency>
            <groupId>org.slf4j</groupId>
            <artifactId>slf4j-api</artifactId>
            <version>${slf4j.version}</version>
        </dependency>
        <dependency>
            <groupId>org.slf4j</groupId>
            <artifactId>slf4j-simple</artifactId>
            <version>${slf4j.version}</version>
        </dependency>

        <dependency>
            <groupId>cn.itcast.up29</groupId>
            <artifactId>common</artifactId>
            <version>1.0-SNAPSHOT</version>
        </dependency>
    </dependencies>

    <build>
        <plugins>
            <plugin>
                <groupId>org.codehaus.mojo</groupId>
                <artifactId>build-helper-maven-plugin</artifactId>
                <version>${build-helper-plugin.version}</version>
                <executions>
                    <execution>
                        <phase>generate-sources</phase>
                        <goals>
                            <goal>add-source</goal>
                        </goals>
                        <configuration>
                            <sources>
                                <source>src/main/java</source>
                                <source>src/main/scala</source>
                            </sources>
                        </configuration>
                    </execution>
                </executions>
            </plugin>

            <plugin>
                <groupId>org.apache.maven.plugins</groupId>
                <artifactId>maven-compiler-plugin</artifactId>
                <version>${maven-compiler-plugin.version}</version>
                <configuration>
                    <encoding>UTF-8</encoding>
                    <source>1.8</source>
                    <target>1.8</target>
                    <verbose>true</verbose>
                    <fork>true</fork>
                </configuration>
            </plugin>

            <plugin>
                <groupId>net.alchim31.maven</groupId>
                <artifactId>scala-maven-plugin</artifactId>
                <version>${scala-compiler-plugin.version}</version>
                <executions>
                    <execution>
                        <goals>
                            <goal>compile</goal>
                            <goal>testCompile</goal>
                        </goals>
                        <configuration>
                            <args>
                                <arg>-dependencyfile</arg>
                                <arg>${project.build.directory}/.scala_dependencies</arg>
                            </args>
                        </configuration>
                    </execution>
                </executions>
            </plugin>
            <plugin>
                <artifactId>maven-assembly-plugin</artifactId>
                <configuration>
                    <archive>
                        <manifest>
                            <!--这里要替换成jar包main方法所在类 -->
                            <mainClass>cn.itcast.up29.TestTag</mainClass>
                        </manifest>
                        <manifestEntries>
                            <Class-Path>.</Class-Path>
                        </manifestEntries>
                    </archive>
                    <descriptorRefs>
                        <descriptorRef>jar-with-dependencies</descriptorRef>
                    </descriptorRefs>
                </configuration>
                <executions>
                    <execution>
                        <id>make-assembly</id> <!-- this is used for inheritance merges -->
                        <phase>package</phase> <!-- 指定在打包节点执行jar包合并操作 -->
                        <goals>
                            <goal>single</goal>
                        </goals>
                    </execution>
                </executions>
            </plugin>
        </plugins>
    </build>
    <repositories>
        <repository>
            <id>cloudera</id>
            <url>https://repository.cloudera.com/artifactory/cloudera-repos/</url>
        </repository>
    </repositories>

</project>

代码开发

        这里需要提及一点,因为在之前写的一篇介绍👉RFM模型和KMeans聚类算法的博客。最后在代码演示阶段,为大家展示了利用KMeans算法计算鸢尾花所属分类的一个小Demo,那一篇虽说每一步的注释和实现的最终效果都在代码中体现出来了,但没有详细地为大家介绍代码流程。所以,借着本篇同样为挖掘型算法的一个经典案例,下面将好好为大家介绍一下挖掘型标签的开发流程。
        
在这里插入图片描述

1、继承BaseModel,设置任务名称,设置自己标签的ID,调用exec,重写getNewTag方法,getNewTag实现新标签的制作

        对于不清楚什么是BaseModel类的朋友,可以先去看看博主的这一篇博客👉标签开发代码抽取。因为在开发不同类型的标签过程中,存在着大量的代码重复性冗余,所以博主就在那一篇博客中,介绍了如何抽取标签的过程,并将其命名为BaseModel。我们往后还想基于这个项目进行标签的开发,只需要创建一个类,实现这个特质,然后就只需要编写较少的核心部分代码即可,可谓是十分的便捷了~

object TestModel  extends BaseModel {


  // 设置任务名称
  override def setAppName: String = "RFMModel"

  // 设置用户价值id
  override def setFourTagId: String = "168"

  override def getNewTag(spark: SparkSession, fiveTagDF: DataFrame, hbaseDF: DataFrame): DataFrame = {


  }
  
}

2、根据传入的hbase数据的DF,获取出RFM三个数据

        因为我们计算的是用户价值,符合我们之前提到的RFM模型,所以我们需要分别针对这三个角度,将各自的数据求取出来。

   //RFM三个单词
    val recencyStr: String = "recency"
    val frequencyStr: String = "frequency"
    val monetaryStr: String = "monetary"

    // 特征单词
    val featureStr: String = "feature"
    val predictStr: String = "predict"

    // 计算业务数据
    // R(最后的交易时间到当前时间的距离)
    // F(交易数量【半年/一年/所有】)
    // M(交易总金额【半年/一年/所有】)

    // 引入隐式转换
    import spark.implicits._
    //引入java 和scala相互转换
    import scala.collection.JavaConverters._
    //引入sparkSQL的内置函数
    import org.apache.spark.sql.functions._

    // 用于计算 R 数值
    // 与当前时间的时间差 - 当前时间用于求订单中最大的时间
    val getRecency: Column = functions.datediff(current_timestamp(),from_unixtime(max("finishTime")))-300 as recencyStr

    // 计算F的值
    val getFrequency: Column = functions.count("orderSn") as frequencyStr

    // 计算M数值  sum
    val getMonetary: Column = functions.sum("orderAmount") as monetaryStr


    // 由于每个用户有多个订单,所以计算一个用户的RFM,需要使用用户id进行分组
    val getRFMDF: DataFrame = hbaseDF.groupBy("memberId")
      .agg(getRecency, getFrequency, getMonetary)

    getRFMDF.show(false)
    /*
    +---------+-------+---------+------------------+
    |memberId |recency|frequency|monetary          |
    +---------+-------+---------+------------------+
    |13822725 |10     |116      |179298.34         |
    |13823083 |10     |132      |233524.17         |
    |138230919|10     |125      |240061.56999999998|
     */

        这里,体贴的博主还将答案以注释的形式标记在了上边。大家可以参考一下哟~

3、归一化【打分】

        这里需要解释下,为什么需要进行数据的归一化。由于三个数据的量纲(单位)不统一,所以无法直接计算,需要进行数据的归一化。

        这里归一化的方法,我们采用的是自定义方法,与之前鸢尾花的案例所直接调用的MinMaxScaler还有是有差异的。

    //现有的RFM 量纲不统一,需要执行归一化   为RFM打分
    //R: 1-3天=5分,4-6天=4分,7-9天=3分,10-15天=2分,大于16天=1分
    //F: ≥200=5分,150-199=4分,100-149=3分,50-99=2分,1-49=1分
    //M: ≥20w=5分,10-19w=4分,5-9w=3分,1-4w=2分,<1w=1分

    //计算R的分数
    var getRecencyScore: Column =functions.when((col(recencyStr)>=1)&&(col(recencyStr)<=3),5)
      .when((col(recencyStr)>=4)&&(col(recencyStr)<=6),4)
      .when((col(recencyStr)>=7)&&(col(recencyStr)<=9),3)
      .when((col(recencyStr)>=10)&&(col(recencyStr)<=15),2)
      .when(col(recencyStr)>=16,1)
      .as(recencyStr)

    //计算F的分数
    var getFrequencyScore: Column =functions.when(col(frequencyStr) >= 200, 5)
      .when((col(frequencyStr) >= 150) && (col(frequencyStr) <= 199), 4)
      .when((col(frequencyStr) >= 100) && (col(frequencyStr) <= 149), 3)
      .when((col(frequencyStr) >= 50) && (col(frequencyStr) <= 99), 2)
      .when((col(frequencyStr) >= 1) && (col(frequencyStr) <= 49), 1)
      .as(frequencyStr)

    //计算M的分数
    var getMonetaryScore: Column =functions.when(col(monetaryStr) >= 200000, 5)
      .when(col(monetaryStr).between(100000, 199999), 4)
      .when(col(monetaryStr).between(50000, 99999), 3)
      .when(col(monetaryStr).between(10000, 49999), 2)
      .when(col(monetaryStr) <= 9999, 1)
      .as(monetaryStr)

    //计算RFM的分数
    val getRFMScoreDF: DataFrame = getRFMDF.select('memberId ,getRecencyScore,getFrequencyScore,getMonetaryScore)

    println("--------------------------------------------------")
    //getRENScoreDF.show()

/* +---------+-------+---------+--------+
| memberId|recency|frequency|monetary|
+---------+-------+---------+--------+
| 13822725|      2|        3|       4|
| 13823083|      2|        3|       5|
|138230919|      2|        3|       5|
| 13823681|      2|        3|       4|
*/


4、将RFM的分数进行向量化

        因为我们接下来就要对RFM的数据就行KMeans聚类计算,为了将RFM的数据转换成与KMeans计算所要求数据格式相同,我们这里还需要多一个操作,便是将上边归一化后的分数结果进行向量化。

    val RFMFeature: DataFrame = new VectorAssembler()
      .setInputCols(Array(recencyStr, frequencyStr, monetaryStr))
      .setOutputCol(featureStr)
      .transform(getRFMScoreDF)

    RFMFeature.show()
/* +---------+-------+---------+--------+-------------+
| memberId|recency|frequency|monetary|      feature|
+---------+-------+---------+--------+-------------+
| 13822725|      2|        3|       4|[2.0,3.0,4.0]|
| 13823083|      2|        3|       5|[2.0,3.0,5.0]|
|138230919|      2|        3|       5|[2.0,3.0,5.0]|
| 13823681|      2|        3|       4|[2.0,3.0,4.0]|
|  4033473|      2|        3|       5|[2.0,3.0,5.0]| */

5、数据分类

        这里我们终于调用上了KMeans聚类算法,对数据进行分类。

    val model: KMeansModel = new KMeans()
      .setK(7) // 设置7类
      .setMaxIter(5) // 迭代计算5次
      .setFeaturesCol(featureStr) // 设置特征数据
      .setPredictionCol("featureOut") // 计算完毕后的标签结果
      .fit(RFMFeature)

    // 将其转换成 DF
    val modelDF: DataFrame = model.transform(RFMFeature)

    modelDF.show()
/*+---------+-------+---------+--------+-------------+----------+
| memberId|recency|frequency|monetary|      feature|featureOut|
+---------+-------+---------+--------+-------------+----------+
| 13822725|      2|        3|       4|[2.0,3.0,4.0]|         1|
| 13823083|      2|        3|       5|[2.0,3.0,5.0]|         0|
|138230919|      2|        3|       5|[2.0,3.0,5.0]|         0|
| 13823681|      2|        3|       4|[2.0,3.0,4.0]|         1|*/

6、计算每个类别的价值,针对价值进行倒叙排序

        这里所谓的每种类别的价值,指的是每一个中心点,也就是质心包含所有点的总和。

        至于为什么需要倒序排序,是因为我们不同的价值标签值在数据库中的rule是从0开始的,而将价值分类按照价值高低倒序排序后,之后我们获取到分类索引时,从高到底的索引也是从0开始的,这样我们后续进行关联的时候就轻松很多。

    //6、分类排序  遍历所有的分类(0-6)
    //获取每个类别内的价值()中心点包含的所有点的总和就是这个类的价值
    //model.clusterCenters.indices   据类中心角标
    //model.clusterCenters(i)  具体的某一个类别(簇)

    val clusterCentersSum: immutable.IndexedSeq[(Int, Double)] = for(i <- model.clusterCenters.indices) yield (i,model.clusterCenters(i).toArray.sum)
    val clusterCentersSumSort: immutable.IndexedSeq[(Int, Double)] = clusterCentersSum.sortBy(_._2).reverse


    clusterCentersSumSort.foreach(println)
 /*
(4,11.038461538461538)
(0,10.0)
(1,9.0)
(3,8.0)
(6,6.0)
(5,4.4)
(2,3.0)
*/

7、对排序后的分类数据获取角标

        正如我们第六步所说的,我们这里获取到分类数据的角标,方便后续的关联查询。

   // 获取到每种分类及其对应的索引
    val clusterCenterIndex: immutable.IndexedSeq[(Int, Int)] = for(a <- clusterCentersSumSort.indices) yield (clusterCentersSumSort(a)._1,a)
    clusterCenterIndex.foreach(println)
    /*
    类别的价值从高到底
    角标是从0-6
    (4,0)
    (0,1)
    (1,2)
    (3,3)
    (6,4)
    (5,5)
    (2,6)
     */

8、排序后的数据与标签系统内的五级标签数据进行join

        这里我们在获取到了排序后的数据后,将其与标签系统内的五级标签数据进行join。为了后续我们方便查找调用,我们将join后的数据,封装到了List集合。

 val clusterCenterIndexDF: DataFrame = clusterCenterIndex.toDF("type","index")

    // 开始join
    val JoinDF: DataFrame = fiveTagDF.join(clusterCenterIndexDF,fiveTagDF.col("rule") ===  clusterCenterIndexDF.col("index"))

    println("- - - - - - - -")
    JoinDF.show()
/*+---+----+----+-----+
| id|rule|type|index|
+---+----+----+-----+
|169|   0|   4|    0|
|170|   1|   0|    1|
|171|   2|   1|    2|
|172|   3|   3|    3|
|173|   4|   6|    4|
|174|   5|   5|    5|
|175|   6|   2|    6|
+---+----+----+-----+*/
    val fiveTageList: List[TagRule] = JoinDF.map(row => {

      val id: String = row.getAs("id").toString
      val types: String = row.getAs("type").toString

      TagRule(id.toInt, types)
    }).collectAsList() // 将DataSet转换成util.List[TagRule]   这个类型遍历时无法获取id,rule数据
      .asScala.toList

    println("- - - - - - - -")

9、编写UDF,实现标签的开发计算

        到了这一步,我们就可以编写UDF函数,在函数中调用第八步所封装的List集合对传入参数进行一个匹配。然后我们在对KMeans聚合计算后的数据进行一个查询的过程中,就可以调用UDF,实现用户id和用户价值分类id进行一个匹配。

// 需要自定义UDF函数
    val getRFMTags: UserDefinedFunction = udf((featureOut: String) => {
      // 设置标签的默认值
      var tagId: Int = 0
      // 遍历每一个五级标签的rule
      for (tagRule <- fiveTageList) {
        if (tagRule.rule == featureOut) {
          tagId = tagRule.id
        }
      }
      tagId
    })

    val CustomerValueTag: DataFrame = modelDF.select('memberId .as("userId"),getRFMTags('featureOut).as("tagsId"))


    CustomerValueTag.show(false)

10、返回最新计算的标签

        到了最后一步,就比较简单了,我们只需要将第九步得到的结果返回即可。

    CustomerValueTag

        为了方便大家阅读,这里我再贴上完整的源码。

        对代码中有任何的疑问,欢迎在评论区留言或者后台私信我都可以哟~

完整源码

import com.czxy.base.BaseModel
import com.czxy.bean.TagRule
import org.apache.spark.ml.clustering.{KMeans, KMeansModel}
import org.apache.spark.ml.feature.VectorAssembler
import org.apache.spark.sql.expressions.UserDefinedFunction
import org.apache.spark.sql.{Column, DataFrame, SparkSession, functions}

import scala.collection.immutable

/*
 * @Author: Alice菌
 * @Date: 2020/6/22 09:18
 * @Description: 

    此代码用于计算 用户画像价值模型

 */
object RFMModel extends BaseModel{

  // 设置任务名称
  override def setAppName: String = "RFMModel"

  // 设置用户价值id
  override def setFourTagId: String = "168"

  override def getNewTag(spark: SparkSession, fiveTagDF: DataFrame, hbaseDF: DataFrame): DataFrame = {

    //fiveTagDF.show()
    /*
    +---+----+
    | id|rule|
    +---+----+
    |169|   0|
    |170|   1|
    |171|   2|
    |172|   3|
    |173|   4|
    |174|   5|
    |175|   6|
+---+----+
     */
    //hbaseDF.show()
    /*
    +---------+----------+--------------------+-----------+
    | memberId|finishTime|             orderSn|orderAmount|
    +---------+----------+--------------------+-----------+
    | 13823431|1564415022|gome_792756751164275|    2479.45|
    |  4035167|1565687310|jd_14090106121770839|    2449.00|
    |  4035291|1564681801|jd_14090112394810659|    1099.42|
    |  4035041|1565799378|amazon_7877495617...|    1999.00|
     */

    //RFM三个单词
    val recencyStr: String = "recency"
    val frequencyStr: String = "frequency"
    val monetaryStr: String = "monetary"

    // 特征单词
    val featureStr: String = "feature"
    val predictStr: String = "predict"

    // 计算业务数据
    // R(最后的交易时间到当前时间的距离)
    // F(交易数量【半年/一年/所有】)
    // M(交易总金额【半年/一年/所有】)

    // 引入隐式转换
    import spark.implicits._
    //引入java 和scala相互转换
    import scala.collection.JavaConverters._
    //引入sparkSQL的内置函数
    import org.apache.spark.sql.functions._

    // 用于计算 R 数值
    // 与当前时间的时间差 - 当前时间用于求订单中最大的时间
    val getRecency: Column = functions.datediff(current_timestamp(),from_unixtime(max("finishTime")))-300 as recencyStr

    // 计算F的值
    val getFrequency: Column = functions.count("orderSn") as frequencyStr

    // 计算M数值  sum
    val getMonetary: Column = functions.sum("orderAmount") as monetaryStr


    // 由于每个用户有多个订单,所以计算一个用户的RFM,需要使用用户id进行分组
    val getRFMDF: DataFrame = hbaseDF.groupBy("memberId")
      .agg(getRecency, getFrequency, getMonetary)

    getRFMDF.show(false)
    /*
    +---------+-------+---------+------------------+
    |memberId |recency|frequency|monetary          |
    +---------+-------+---------+------------------+
    |13822725 |10     |116      |179298.34         |
    |13823083 |10     |132      |233524.17         |
    |138230919|10     |125      |240061.56999999998|
     */

    //现有的RFM 量纲不统一,需要执行归一化   为RFM打分
    //R: 1-3天=5分,4-6天=4分,7-9天=3分,10-15天=2分,大于16天=1分
    //F: ≥200=5分,150-199=4分,100-149=3分,50-99=2分,1-49=1分
    //M: ≥20w=5分,10-19w=4分,5-9w=3分,1-4w=2分,<1w=1分

    //计算R的分数
    var getRecencyScore: Column =functions.when((col(recencyStr)>=1)&&(col(recencyStr)<=3),5)
      .when((col(recencyStr)>=4)&&(col(recencyStr)<=6),4)
      .when((col(recencyStr)>=7)&&(col(recencyStr)<=9),3)
      .when((col(recencyStr)>=10)&&(col(recencyStr)<=15),2)
      .when(col(recencyStr)>=16,1)
      .as(recencyStr)

    //计算F的分数
    var getFrequencyScore: Column =functions.when(col(frequencyStr) >= 200, 5)
      .when((col(frequencyStr) >= 150) && (col(frequencyStr) <= 199), 4)
      .when((col(frequencyStr) >= 100) && (col(frequencyStr) <= 149), 3)
      .when((col(frequencyStr) >= 50) && (col(frequencyStr) <= 99), 2)
      .when((col(frequencyStr) >= 1) && (col(frequencyStr) <= 49), 1)
      .as(frequencyStr)

    //计算M的分数
    var getMonetaryScore: Column =functions.when(col(monetaryStr) >= 200000, 5)
      .when(col(monetaryStr).between(100000, 199999), 4)
      .when(col(monetaryStr).between(50000, 99999), 3)
      .when(col(monetaryStr).between(10000, 49999), 2)
      .when(col(monetaryStr) <= 9999, 1)
      .as(monetaryStr)

    // 2、计算RFM的分数
    val getRFMScoreDF: DataFrame = getRFMDF.select('memberId ,getRecencyScore,getFrequencyScore,getMonetaryScore)

    println("--------------------------------------------------")
    //getRENScoreDF.show()

/* +---------+-------+---------+--------+
| memberId|recency|frequency|monetary|
+---------+-------+---------+--------+
| 13822725|      2|        3|       4|
| 13823083|      2|        3|       5|
|138230919|      2|        3|       5|
| 13823681|      2|        3|       4|
*/
    // 3、将数据转换成向量

    val RFMFeature: DataFrame = new VectorAssembler()
      .setInputCols(Array(recencyStr, frequencyStr, monetaryStr))
      .setOutputCol(featureStr)
      .transform(getRFMScoreDF)

    RFMFeature.show()
/* +---------+-------+---------+--------+-------------+
| memberId|recency|frequency|monetary|      feature|
+---------+-------+---------+--------+-------------+
| 13822725|      2|        3|       4|[2.0,3.0,4.0]|
| 13823083|      2|        3|       5|[2.0,3.0,5.0]|
|138230919|      2|        3|       5|[2.0,3.0,5.0]|
| 13823681|      2|        3|       4|[2.0,3.0,4.0]|
|  4033473|      2|        3|       5|[2.0,3.0,5.0]| */

    // 4、数据分类
    val model: KMeansModel = new KMeans()
      .setK(7) // 设置7类
      .setMaxIter(5) // 迭代计算5次
      .setFeaturesCol(featureStr) // 设置特征数据
      .setPredictionCol("featureOut") // 计算完毕后的标签结果
      .fit(RFMFeature)

    // 将其转换成 DF
    val modelDF: DataFrame = model.transform(RFMFeature)

    modelDF.show()
/*+---------+-------+---------+--------+-------------+----------+
| memberId|recency|frequency|monetary|      feature|featureOut|
+---------+-------+---------+--------+-------------+----------+
| 13822725|      2|        3|       4|[2.0,3.0,4.0]|         1|
| 13823083|      2|        3|       5|[2.0,3.0,5.0]|         0|
|138230919|      2|        3|       5|[2.0,3.0,5.0]|         0|
| 13823681|      2|        3|       4|[2.0,3.0,4.0]|         1|

截止到目前,用户的分类已经完毕,用户和对应的类别已经有了
缺少类别与标签ID的对应关系
这个分类完之后,featureOut的 0-6 只表示7个不同的类别,并不是标签中的 0-6 的级别
*/
    modelDF.groupBy("featureOut")
        .agg(max(col("recency")+col("frequency")+col("monetary")) as "max",
          min(col("recency")+col("frequency")+col("monetary")) as "min").show()

/*
+----------+---+---+
|featureOut|max|min|
+----------+---+---+
|         1|  9|  9|
|         6|  6|  6|
|         3|  9|  7|
|         5|  5|  4|
|         4| 12| 11|
|         2|  3|  3|
|         0| 10| 10|
+----------+---+---+
*/

    println("===========================================")

    //5、分类排序  遍历所有的分类(0-6)
    //获取每个类别内的价值()中心点包含的所有点的总和就是这个类的价值
    //model.clusterCenters.indices   据类中心角标
    //model.clusterCenters(i)  具体的某一个类别(簇)

    val clusterCentersSum: immutable.IndexedSeq[(Int, Double)] = for(i <- model.clusterCenters.indices) yield (i,model.clusterCenters(i).toArray.sum)
    val clusterCentersSumSort: immutable.IndexedSeq[(Int, Double)] = clusterCentersSum.sortBy(_._2).reverse


    clusterCentersSumSort.foreach(println)
 /*
(4,11.038461538461538)
(0,10.0)
(1,9.0)
(3,8.0)
(6,6.0)
(5,4.4)
(2,3.0)
*/

    // 获取到每种分类及其对应的索引
    val clusterCenterIndex: immutable.IndexedSeq[(Int, Int)] = for(a <- clusterCentersSumSort.indices) yield (clusterCentersSumSort(a)._1,a)
    clusterCenterIndex.foreach(println)
    /*
    类别的价值从高到底
    角标是从0-6
    (4,0)
    (0,1)
    (1,2)
    (3,3)
    (6,4)
    (5,5)
    (2,6)
     */

    //6、分类数据和标签数据join
    // 将其转换成DF
    val clusterCenterIndexDF: DataFrame = clusterCenterIndex.toDF("type","index")

    // 开始join
    val JoinDF: DataFrame = fiveTagDF.join(clusterCenterIndexDF,fiveTagDF.col("rule") ===  clusterCenterIndexDF.col("index"))

    println("- - - - - - - -")
    JoinDF.show()
/*+---+----+----+-----+
| id|rule|type|index|
+---+----+----+-----+
|169|   0|   4|    0|
|170|   1|   0|    1|
|171|   2|   1|    2|
|172|   3|   3|    3|
|173|   4|   6|    4|
|174|   5|   5|    5|
|175|   6|   2|    6|
+---+----+----+-----+*/
    val fiveTageList: List[TagRule] = JoinDF.map(row => {

      val id: String = row.getAs("id").toString
      val types: String = row.getAs("type").toString

      TagRule(id.toInt, types)
    }).collectAsList() // 将DataSet转换成util.List[TagRule]   这个类型遍历时无法获取id,rule数据
      .asScala.toList

    println("- - - - - - - -")

    //7、获得数据标签(udf)
    // 需要自定义UDF函数
    val getRFMTags: UserDefinedFunction = udf((featureOut: String) => {
      // 设置标签的默认值
      var tagId: Int = 0
      // 遍历每一个五级标签的rule
      for (tagRule <- fiveTageList) {
        if (tagRule.rule == featureOut) {
          tagId = tagRule.id
        }
      }
      tagId
    })

    val CustomerValueTag: DataFrame = modelDF.select('memberId .as("userId"),getRFMTags('featureOut).as("tagsId"))

    println("*****************************************")

    CustomerValueTag.show(false)

    println("*****************************************")


    //8、表现写入hbase
    CustomerValueTag
  }


  def main(args: Array[String]): Unit = {

    exec()

  }
}

        如果程序运行完毕无误,我们可以去Hbase中查看我们标签是否写入到test表中。

        scan "test",{LIMIT => 10}

        发现有用户已经有了用户价值的标签值后,说明我们的标签开发工作就完成了~~

在这里插入图片描述


结语

        本篇博客,主要为大家简单介绍了用户画像项目中挖掘型标签的开发流程,相信大家在看完这篇博客之后,对机器学习算法会更感兴趣。博主后续呢,会为大家带来关于机器学习的面试题,各位小伙伴们,敬请期待😎

        如果以上过程中出现了任何的纰漏错误,烦请大佬们指正😅

        受益的朋友或对大数据技术感兴趣的伙伴记得点赞关注支持一波🙏

        希望我们都能在学习的道路上越走越远😉

在这里插入图片描述

  • 29
    点赞
  • 12
    收藏
    觉得还不错? 一键收藏
  • 打赏
    打赏
  • 24
    评论

“相关推荐”对你有帮助么?

  • 非常没帮助
  • 没帮助
  • 一般
  • 有帮助
  • 非常有帮助
提交
评论 24
添加红包

请填写红包祝福语或标题

红包个数最小为10个

红包金额最低5元

当前余额3.43前往充值 >
需支付:10.00
成就一亿技术人!
领取后你会自动成为博主和红包主的粉丝 规则
hope_wisdom
发出的红包

打赏作者

大数据梦想家

你的鼓励将是我创作的最大动力

¥1 ¥2 ¥4 ¥6 ¥10 ¥20
扫码支付:¥1
获取中
扫码支付

您的余额不足,请更换扫码支付或充值

打赏作者

实付
使用余额支付
点击重新获取
扫码支付
钱包余额 0

抵扣说明:

1.余额是钱包充值的虚拟货币,按照1:1的比例进行支付金额的抵扣。
2.余额无法直接购买下载,可以购买VIP、付费专栏及课程。

余额充值