延时性(过期/超时)和周期性的定时任务的实现方式
一、延时性的定时任务(例如订单超时30分钟后自动取消该订单)
任务在发出后的一定时间后进行逻辑处理,例如订单超时30分钟后自动取消该订单
1.使用DelayQueue实现任务即将到期提醒功能(非分布式)
import lombok.extern.slf4j.Slf4j;
import org.springframework.stereotype.Component;
import javax.annotation.PostConstruct;
import java.util.concurrent.DelayQueue;
import java.util.concurrent.Delayed;
import java.util.concurrent.TimeUnit;

@Component
@Slf4j
public class TaskTimeoutReminderUtil {
    private static DelayQueue<TimeoutTask> delayQueue = new DelayQueue<>();

    static class TimeoutTask implements Delayed {

        private String taskId;
        private long expireTime;

        public TimeoutTask(String taskId, long timeoutMillis) {
            this.taskId = taskId;
            this.expireTime = System.currentTimeMillis() + timeoutMillis;
        }

        @Override
        public long getDelay(TimeUnit unit) {
            return unit.convert(expireTime - System.currentTimeMillis(), TimeUnit.MILLISECONDS);
        }

        @Override
        public int compareTo(Delayed other) {
            if (other instanceof TimeoutTask) {
                TimeoutTask that = (TimeoutTask) other;
                return Long.compare(this.expireTime, that.expireTime);
            }
            return 0;
        }

        public String getTaskId() {
            return taskId;
        }
    }

    // 添加订单到延迟队列
    public static void addOrder(String taskId, long timeoutMillis) {
        delayQueue.offer(new TimeoutTask(taskId, timeoutMillis));
    }

    @PostConstruct
    public void init() {
        for (int i = 0; i < 10; i++) {
            TaskTimeoutReminderUtil.addOrder("task"+i, 1000*i);
        }
        // 启动一个单独的线程来处理超时任务
        new Thread(() -> {
            while (true) {
                try {
                    TimeoutTask task = delayQueue.take();
                    log.info("任务{}即将到期,请尽快处理", task.getTaskId());
                } catch (InterruptedException e) {
                    log.error("处理超时任务时发生异常");
                    e.printStackTrace();
                }
            }
        }).start();
    }
}
2.使用Redis实现任务即将到期提醒功能(分布式)
方式一:ZSet 实现方式
通过 ZSet 实现定时任务的思路是,将定时任务存放到 ZSet 集合中,并且将过期时间存储到 ZSet 的 Score 字段中,然后通过一个无线循环来判断当前时间内是否有需要执行的定时任务,如果有则进行执行,具体实现代码如下:
import redis.clients.jedis.Jedis;
import utils.JedisUtils;
import java.time.Instant;
import java.util.Set;

public class DelayQueueExample {
    // zset key
    private static final String _KEY = "myTaskQueue";

    public static void main(String[] args) throws InterruptedException {
        Jedis jedis = JedisUtils.getJedis();
        // 30s 后执行
        long delayTime = Instant.now().plusSeconds(30).getEpochSecond();
        jedis.zadd(_KEY, delayTime, "order_1");
        // 继续添加测试数据
        jedis.zadd(_KEY, Instant.now().plusSeconds(2).getEpochSecond(), "order_2");
        jedis.zadd(_KEY, Instant.now().plusSeconds(2).getEpochSecond(), "order_3");
        jedis.zadd(_KEY, Instant.now().plusSeconds(7).getEpochSecond(), "order_4");
        jedis.zadd(_KEY, Instant.now().plusSeconds(10).getEpochSecond(), "order_5");
        // 开启定时任务队列
        doDelayQueue(jedis);
    }

    /**
     * 定时任务队列消费
     * @param jedis Redis 客户端
     */
    public static void doDelayQueue(Jedis jedis) throws InterruptedException {
        while (true) {
            // 当前时间
            Instant nowInstant = Instant.now();
            long lastSecond = nowInstant.plusSeconds(-1).getEpochSecond(); // 上一秒时间
            long nowSecond = nowInstant.getEpochSecond();
            // 查询当前时间的所有任务
            Set<String> data = jedis.zrangeByScore(_KEY, lastSecond, nowSecond);
            for (String item : data) {
                // 消费任务
                System.out.println("消费:" + item);
            }
            // 删除已经执行的任务
            jedis.zremrangeByScore(_KEY, lastSecond, nowSecond);
            Thread.sleep(1000); // 每秒查询一次
        }
    }
}
方式二:键空间通知
我们可以通过 Redis 的键空间通知来实现定时任务,它的实现思路是给所有的定时任务设置一个过期时间,等到了过期之后,我们通过订阅过期消息就能感知到定时任务需要被执行了,此时我们执行定时任务即可。
默认情况下 Redis 是不开启键空间通知的,需要我们通过 config set notify-keyspace-events Ex 的命令手动开启(或在配置文件中修改),开启之后定时任务的代码如下:
import redis.clients.jedis.Jedis;
import redis.clients.jedis.JedisPubSub;
import utils.JedisUtils;

public class TaskExample {
    public static final String _TOPIC = "__keyevent@0__:expired"; // 订阅频道名称
    public static void main(String[] args) {
        Jedis jedis = JedisUtils.getJedis();
        // 执行定时任务
        doTask(jedis);
    }

    /**
     * 订阅过期消息,执行定时任务
     * @param jedis Redis 客户端
     */
    public static void doTask(Jedis jedis) {
        // 订阅过期消息
        jedis.psubscribe(new JedisPubSub() {
            @Override
            public void onPMessage(String pattern, String channel, String message) {
                // 接收到消息,执行定时任务
                System.out.println("收到消息:" + message);
            }
        }, _TOPIC);
    }
}
二、周期性的定时任务(例如每周五 23:59:59 例行执行巡视任务)
在某个时间点周期性执行任务,例如每周五 23:59:59 例行执行巡视任务
参考:https://blog.csdn.net/HackAzrael/article/details/122194645
1.开启定时任务
开启定时任务只需要在 Spring Boot 的启动类上声明 @EnableScheduling 即可,实现代码如下:
@SpringBootApplication
@EnableScheduling // 开启定时任务
public class DemoApplication {
    // do someing
}
2.添加定时任务
定时任务的添加只需要使用 @Scheduled 注解标注即可,如果有多个定时任务可以创建多个 @Scheduled 注解标注的方法,示例代码如下:
import org.springframework.scheduling.annotation.Scheduled;
import org.springframework.stereotype.Component;

@Component // 把此类托管给 Spring,不能省略
public class TaskUtils {
    // 添加定时任务
    @Scheduled(cron = "59 59 23 0 0 5") // cron 表达式,每周五 23:59:59 执行
    public void doTask(){
        System.out.println("我是定时任务~");
    }
}
Cron 表达式介绍
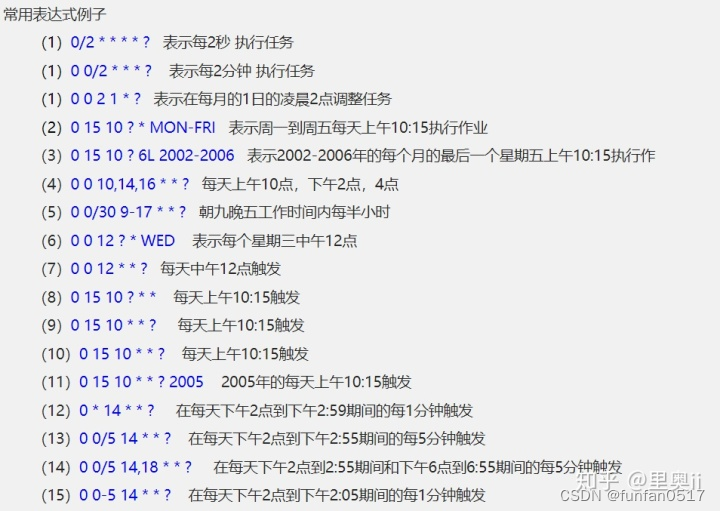
Spring Task 的实现需要使用 cron 表达式来声明执行的频率和规则,cron 表达式是由 6 位或者 7 位组成的(最后一位可以省略),每位之间以空格分隔,每位从左到右代表的含义如下:


cron 表达式在线生成地址:https://cron.qqe2.com/


 705
705


 被折叠的 条评论
为什么被折叠?


