


搭建方式有两种,一种是基于docker容器,一种是用代码库。
使用docker进行部署感觉方便很多。
一、使用docker部署
1 准备条件:
- Docker
- Docker Compose
2 启动fabric网络
官方指导:Hyperledger Fabric official tutorial
这里默认你已经配置好了fabric测试网络。
3 配置文件
3.1 从仓库获取配置文件
我这里直接在test-network 文件夹下面建立explorer文件夹:
mkdir explorer

- 有三个配置文件:
可通过这三个命令获得,也可直接复制我粘贴的。
wget https://raw.githubusercontent.com/hyperledger/blockchain-explorer/master/examples/net1/config.json
wget https://raw.githubusercontent.com/hyperledger/blockchain-explorer/master/examples/net1/connection-profile/test-network.json -P connection-profile
wget https://raw.githubusercontent.com/hyperledger/blockchain-explorer/master/docker-compose.yaml
docker-compose.yaml
# SPDX-License-Identifier: Apache-2.0
version: '2.1'

volumes:
  pgdata:
  walletstore:

networks:
  mynetwork.com:
    external:
      name: net_test

services:

  explorerdb.mynetwork.com:
    image: hyperledger/explorer-db:latest
    container_name: explorerdb.mynetwork.com
    hostname: explorerdb.mynetwork.com
    environment:
      - DATABASE_DATABASE=fabricexplorer
      - DATABASE_USERNAME=hppoc
      - DATABASE_PASSWORD=password
    healthcheck:
      test: "pg_isready -h localhost -p 5432 -q -U postgres"
      interval: 30s
      timeout: 10s
      retries: 5
    volumes:
      - pgdata:/var/lib/postgresql/data
    networks:
      - mynetwork.com

  explorer.mynetwork.com:
    image: hyperledger/explorer:latest
    container_name: explorer.mynetwork.com
    hostname: explorer.mynetwork.com
    environment:
      - DATABASE_HOST=explorerdb.mynetwork.com
      - DATABASE_DATABASE=fabricexplorer
      - DATABASE_USERNAME=hppoc
      - DATABASE_PASSWD=password
      - LOG_LEVEL_APP=debug
      - LOG_LEVEL_DB=debug
      - LOG_LEVEL_CONSOLE=info
      - LOG_CONSOLE_STDOUT=true
      - DISCOVERY_AS_LOCALHOST=false
    volumes:
      - ./examples/net1/config.json:/opt/explorer/app/platform/fabric/config.json
      - ./examples/net1/connection-profile:/opt/explorer/app/platform/fabric/connection-profile
      - /fabric-path/fabric-samples/test-network/organizations:/tmp/crypto
      - walletstore:/opt/explorer/wallet
    ports:
      - 8080:8080
    depends_on:
      explorerdb.mynetwork.com:
        condition: service_healthy
    networks:
      - mynetwork.com
examples/net1/connection-profile/test-network.json
{
	"name": "test-network",
	"version": "1.0.0",
	"client": {
		"tlsEnable": true,
		"adminCredential": {
			"id": "exploreradmin",
			"password": "exploreradminpw"
		},
		"enableAuthentication": true,
		"organization": "Org1MSP",
		"connection": {
			"timeout": {
				"peer": {
					"endorser": "300"
				},
				"orderer": "300"
			}
		}
	},
	"channels": {
		"mychannel": {
			"peers": {
				"peer0.org1.example.com": {}
			}
		}
	},
	"organizations": {
		"Org1MSP": {
			"mspid": "Org1MSP",
			"adminPrivateKey": {
				"path": "/tmp/crypto/peerOrganizations/org1.example.com/users/Admin@org1.example.com/msp/keystore/priv_sk"
			},
			"peers": ["peer0.org1.example.com"],
			"signedCert": {
				"path": "/tmp/crypto/peerOrganizations/org1.example.com/users/Admin@org1.example.com/msp/signcerts/Admin@org1.example.com-cert.pem"
			}
		}
	},
	"peers": {
		"peer0.org1.example.com": {
			"tlsCACerts": {
				"path": "/tmp/crypto/peerOrganizations/org1.example.com/peers/peer0.org1.example.com/tls/ca.crt"
			},
			"url": "grpcs://peer0.org1.example.com:7051"
		}
	}
}
blockchain-explorer/examples/net1/config.json
{
	"network-configs": {
		"test-network": {
			"name": "Test Network",
			"profile": "./connection-profile/test-network.json"
		}
	},
	"license": "Apache-2.0"
}
3.2 将整个crypto 和artifact文件夹从test-network拷贝到explorer文件夹下
cp -rf organizetions explorer
此时explorer目录结构为这样(因为我启动网络的时候使用了ca和couchdb,所以会多ca文件夹):

3.3 修改docker-compose.yaml
    networks:
    mynetwork.com:
        external:
            name: net_test

    ...

    services:
      explorer.mynetwork.com:

        ...

        volumes:
          - ./config.json:/opt/explorer/app/platform/fabric/config.json
          - ./connection-profile:/opt/explorer/app/platform/fabric/connection-profile
          - ./organizations:/tmp/crypto
          - walletstore:/opt/wallet
这里注意一点,一个小坑,如果你的网络默认是net_test,则不需要修改。
(查看docker网络命令:docker network ls)

因为我的默认为docker_test,所以这里跟这改一下。

如果explorer链接到fabric网络是通过bridge network(桥接模式),在environment中,DISCOVERY_AS_LOCALHOST=false
如果在后面遇到了端口冲突,也将8080:8080改为8090:8080,或者其他的与其对应即可。
修改后的docker- compose.yaml文件
# SPDX-License-Identifier: Apache-2.0
version: '2.1'

volumes:
  pgdata:
  walletstore:

networks:
  mynetwork.com:
    external:
      name: docker_test

services:

  explorerdb.mynetwork.com:
    image: hyperledger/explorer-db:latest
    container_name: explorerdb.mynetwork.com
    hostname: explorerdb.mynetwork.com
    environment:
      - DATABASE_DATABASE=fabricexplorer
      - DATABASE_USERNAME=hppoc
      - DATABASE_PASSWORD=password
    healthcheck:
      test: "pg_isready -h localhost -p 5432 -q -U postgres"
      interval: 30s
      timeout: 10s
      retries: 5
    volumes:
      - pgdata:/var/lib/postgresql/data
    networks:
      - mynetwork.com

  explorer.mynetwork.com:
    image: hyperledger/explorer:latest
    container_name: explorer.mynetwork.com
    hostname: explorer.mynetwork.com
    environment:
      - DATABASE_HOST=explorerdb.mynetwork.com
      - DATABASE_DATABASE=fabricexplorer
      - DATABASE_USERNAME=hppoc
      - DATABASE_PASSWD=password
      - LOG_LEVEL_APP=debug
      - LOG_LEVEL_DB=debug
      - LOG_LEVEL_CONSOLE=info
      - LOG_CONSOLE_STDOUT=true
      - DISCOVERY_AS_LOCALHOST=false
    volumes:
      - ./config.json:/opt/explorer/app/platform/fabric/config.json
      - ./connection-profile:/opt/explorer/app/platform/fabric/connection-profile
      - ./organizations:/tmp/crypto
      - walletstore:/opt/explorer/wallet
    ports:
      - 8090:8080
    depends_on:
      explorerdb.mynetwork.com:
        condition: service_healthy
    networks:
      - mynetwork.com
3.4 修改connection profile
  "organizations": {
    "Org1MSP": {
      "adminPrivateKey": {
        "path": "/tmp/crypto/peerOrganizations/org1.example.com/users/Admin@org1.example.com/msp/keystore/priv_sk"
注意priv_sk的名字,记得修改为和你对应文件夹的名字一样。如果你也是使用的ca证书,则不需要修改,直接使用原配置文件即可。
3.5 修改config.json文件
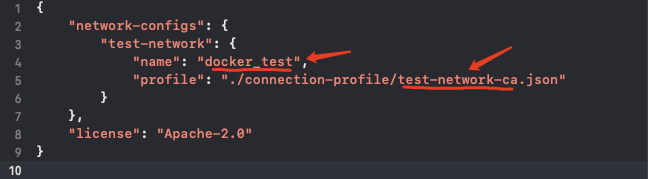
记得修改为和你使用的网络名和文件名一致。
4 启动容器服务
docker-compose up -d
如果需要清除容器,则使用命令
docker-compose down
如果需要清除容器和本地挂载的数据
docker-compose down -v
5 访问使用explorer
在地址栏输入:http://localhost:8080/
如果你修改了本地与容器的映射端口,像我,映射为 8090:8080。则需要输入:http://localhost:8090/

输入账号密码,即可登录访问。账号密码在connection profile里面设置。
账号:exploreradmin
密码:exploreradminpw


 1万+
1万+


 被折叠的 条评论
为什么被折叠?
被折叠的 条评论
为什么被折叠?
 到【灌水乐园】发言


