


一、编写HTML和CSS。
<ion-header [translucent]="true">
<ion-toolbar>
<ion-title>
分类
</ion-title>
</ion-toolbar>
</ion-header>
<ion-content class="content" >
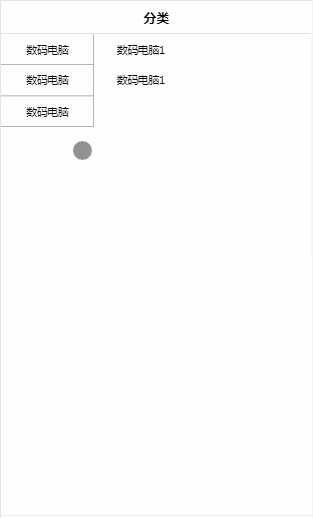
<div class="content_1" >
<!-- 此处添加 #ul 以便@ViewChild查询到该DOM节点-->
<ul #ul (click)="change()">
数码电脑
</ul>
<ul>
数码电脑
</ul>
<ul>
数码电脑
</ul>
</div>
<div class="content_2">
<ul>
数码电脑1
</ul>
<ul>
数码电脑1
</ul>
</div>
</ion-content>
.content>div{
    float: left;
}

.content_1{
    width: 30vw;
}
.content_1>ul{
    width: 30vw;
    height: 10vw;
    line-height: 10vw;
    text-align: center;
    border-right: 1px #9e9e9e solid;
    border-bottom: 1px #9e9e9e solid;
}
.content_2{
    width: 70vw;

}
.content_2>ul{
    width: 30vw;
    height: 10vw;
    line-height: 10vw;
    text-align: center;
}
在需要获取的DOM节点添加#XX,以便通过@ViewChild(“XX”)获取该节点,当多个元素标识的#XX相同时,可以使用@ViewChildren(“XX”)获取以多个同样的#XX标识的元素组成的数组。
二、编写TS代码。
//导入ViewChild,ElementRef,Renderer2,
//通过ViewChild获取DOM元素节点,通过Renderer2操作DOM元素节点
import { Component,ViewChild,ElementRef,Renderer2 } from '@angular/core';


@Component({
  selector: 'app-tab2',
  templateUrl: 'tab2.page.html',
  styleUrls: ['tab2.page.scss'],

})
export class Tab2Page {
  //通过@ViewChild(XX)传入DOM节点标识(即HTML里标识了#XX的标签)即可获取该DOM节点,这里取ul别名
  @ViewChild("ul") ul:ElementRef;
  //通过构造函数注入Renderer2对象即可通过API操作指定DOM节点
  constructor(private renderer2:Renderer2) {}

  change(){

    //通过@ViewChild获取到的DOM节点获取该元素高度,给高度+20
    var h = this.ul.nativeElement.clientHeight+20;
    //通过Renderer2 API操作DOM
    //设置或改变字体颜色
    this.renderer2.setStyle(this.ul.nativeElement,"color","red");
    //设置或改变高度
    this.renderer2.setStyle(this.ul.nativeElement,"height",h+"vw");
    //设置或改变行高
    this.renderer2.setStyle(this.ul.nativeElement,"line-height",h+"vw");
    //设置过渡效果,这里颜色改变过渡2S,高度改变过渡2S,行高改变过渡2S 实现动画改变效果
    this.renderer2.setStyle(this.ul.nativeElement,"transition","color 2s,height 2s,line-height 2s");

  }

}
三、查看效果。
点击第一个ul元素节点2S改变字体颜色、元素节点高度、和行高(保证高度改变的同时文本上下垂直居中)
四、使用@ViewChildren(“XX”)获取具有相同标识的元素组成的数组。
1、将之前的HTML里所有ul标签全部加上#ul标识。
<ion-header [translucent]="true">
  <ion-toolbar>
    <ion-title>
      分类
    </ion-title>
  </ion-toolbar>
</ion-header>

<ion-content class="content"  >
  <div class="content_1" >
    <!-- 此处添加  #ul  以便@ViewChild查询到该DOM节点-->
    <ul #ul (click)="change()">
      数码电脑
    </ul>
    <ul #ul>
      数码电脑
    </ul>
    <ul #ul>
      数码电脑
    </ul>
  </div>
  <div class="content_2">
    <ul #ul>
      数码电脑1
    </ul>
    <ul #ul>
      数码电脑1
    </ul>

  </div>
  <div #ul></div>
</ion-content>
多加了一个div标签以区分之前的ul标签,只要是标识了同样的#XX标识的元素都可以获取,这里可以看到一共有6个#ul标识的元素,通过@ViewChildren("ul")可以获取到6个元素组成的数组。
2、导入ViewChildren,注释掉之前通过@ViewChild()获取元素的代码,通过@ViewChildren()获取元素数组。
//导入ViewChild,ElementRef,Renderer2,
//通过ViewChild获取DOM元素节点,通过Renderer2操作DOM元素节点
import { Component,ViewChild,ElementRef,Renderer2,ViewChildren } from '@angular/core';


@Component({
  selector: 'app-tab2',
  templateUrl: 'tab2.page.html',
  styleUrls: ['tab2.page.scss'],

})
export class Tab2Page {
  //通过@ViewChild(XX)传入DOM节点标识(即HTML里标识了#XX的标签)即可获取该DOM节点,这里取ul别名
  //@ViewChild("ul") ul:ElementRef;
 @ViewChildren("ul") ul:any;
  //通过构造函数注入Renderer2对象即可通过API操作指定DOM节点
  constructor(private renderer2:Renderer2) {}

 ngAfterViewInit(){
  console.log(this.ul.toArray());
  for(var i=0;i<this.ul.toArray().length;i++){
   console.log(this.ul.toArray()[i]);

  }
 }

  change(){

     //通过@ViewChild获取到的DOM节点获取该元素高度,给高度+20
  //  var h = this.ul.nativeElement.clientHeight+20;
   //通过Renderer2 API操作DOM
   //设置或改变字体颜色
  //  this.renderer2.setStyle(this.ul.nativeElement,"color","red");
  //  //设置或改变高度
  //  this.renderer2.setStyle(this.ul.nativeElement,"height",h+"vw");
  //  //设置或改变行高
  //  this.renderer2.setStyle(this.ul.nativeElement,"line-height",h+"vw");
  //  //设置过渡效果,这里颜色改变过渡2S,高度改变过渡2S,行高改变过渡2S 实现动画改变效果
  //  this.renderer2.setStyle(this.ul.nativeElement,"transition","color 2s,height 2s,line-height 2s");

  }

}
通过@ViewChild或者@ViewChildren获取元素一定要在ngAfterViewInit()生命周期函数中获取,即页面组件加载完成之后,或者设置@ViewChild("XX",{static:true})和@ViewChildren("XX",{static:true}),否则无法获取。

一共获取到6个元素,其中第六个元素为div。


 713
713


 被折叠的 条评论
为什么被折叠?
被折叠的 条评论
为什么被折叠?
 到【灌水乐园】发言


