


SRS流媒体服务器提供了强大的API,供开发者根据自己的业务场景定制自己的流媒体服务。
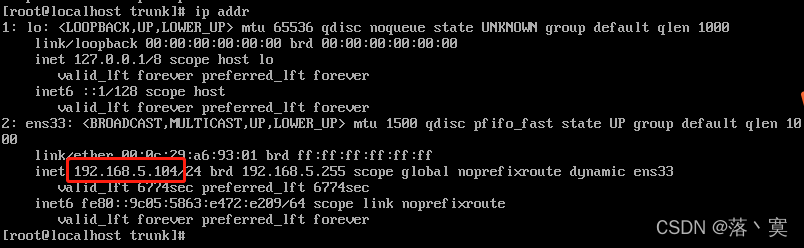
本机环境:
虚拟机VMPRO15安装Linux系统:CentOS7
SRS服务版本:SRSv4-b2-4.0.215(SRSv4已于2021年12月正式发布稳定版本)
![]()
Linux开启端口与服务:

Linux网络环境:192.168.5.104
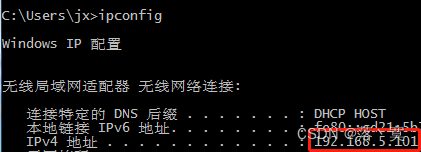
物理机本地网络环境:192.168.5.101
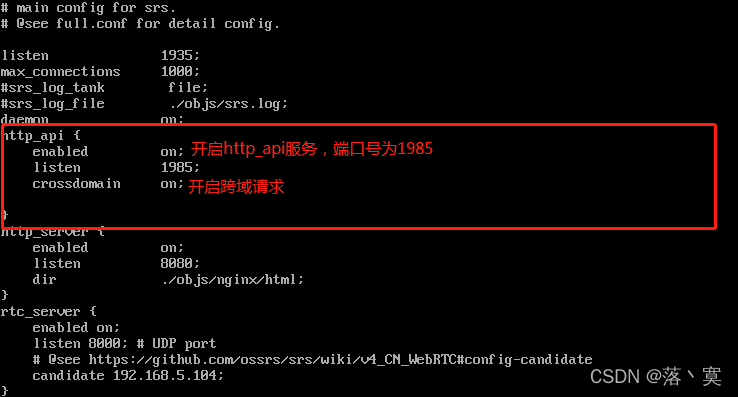
一、 测试SRS服务提供的http api首先需要在SRS配置文件中开启对应服务:
二、访问API:
2.1、SRS提供了api的面包屑,可以从根目录开始导航,不需要任何记忆。一般的字段包括:
- code表示错误码,按照linux惯例,0表示成功。
- urls表示是面包屑导航,该api下面的子api(链接)。
- data表示最后一级提供服务的api,返回的数据。
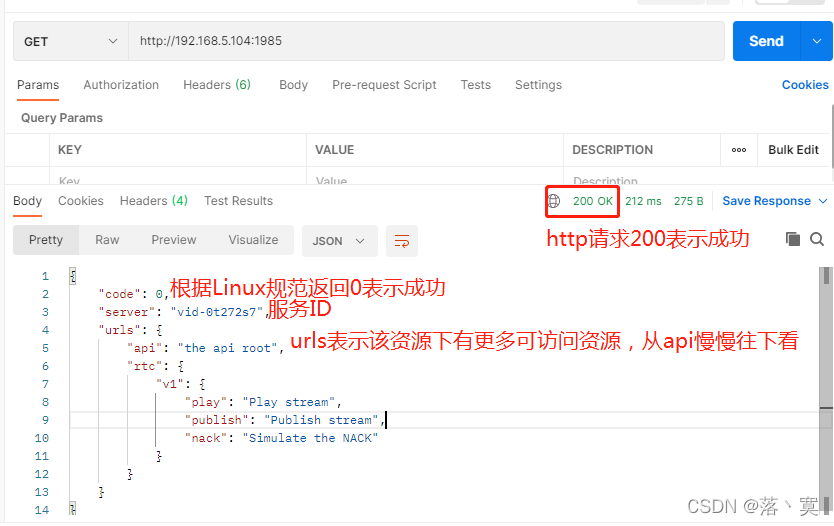
2.2、使用Postman请求SRS提供的最顶级API(http://192.168.5.104:1985):
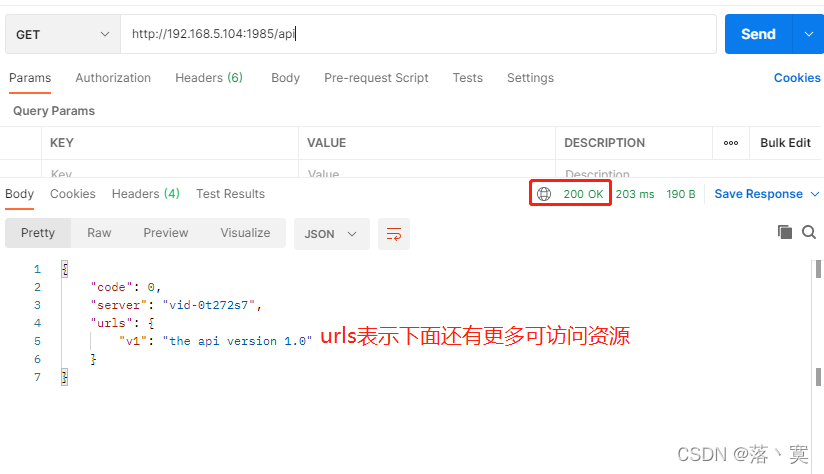
2.3、再次访问下一级API(http://192.168.5.104:1985/api):
2.4、继续看(http://192.168.5.104:1985/api/v1):

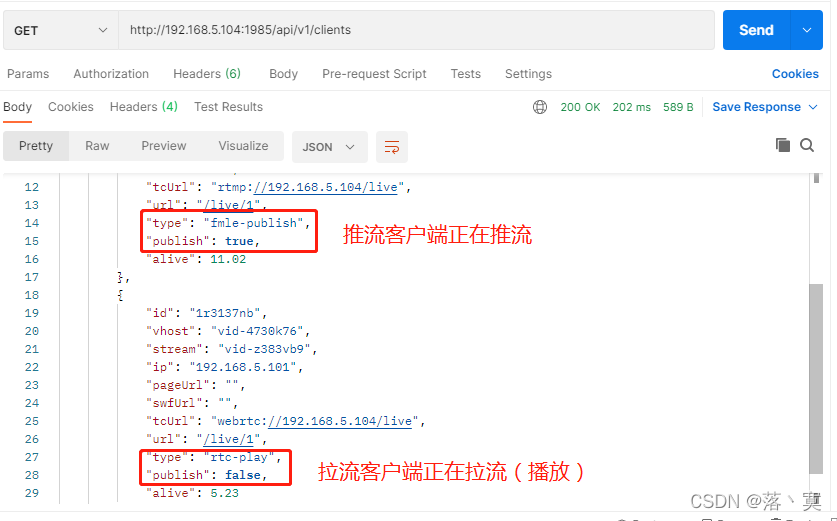
2.5、尝试获取SRS服务器已连接的客户端信息(http://192.168.5.104:1985/api/v1/clients):
2.6、SRS HTTP API支持跨域,js可以直接调用srs的http api。
SRS支持两种跨域方式:
- OPTIONS: jquery可以直接跨域请求API,浏览器会发送一个OPTIONS跨域请求,SRS允许跨域后,浏览器再次发起API请求。
- JSONP: jquery/angularjs可以发起JSONP跨域请求,服务器会将响应作为js文件,内容是调用一个函数,函数名由QueryString中的callback指定。
- JSONP-DELETE: JSONP只能GET,因此DELETE方法是由QueryString的method指定的。
2.7、SRS内置支持https_api,只需要在配置开启https(将证书换成自己的证书)
http_api {
enabled on;
listen 1985;
https {
#是否开启https
enabled on;
#监听端口号
listen 1990;
#SSL私钥文件
# openssl genrsa -out server.key 2048
# default: ./conf/server.key
key ./conf/server.key;
# SSL公共证书
# openssl req -new -x509 -key server.key -out server.crt -days 3650 -subj "/C=CN/ST=Beijing/L=Beijing/O=Me/OU=Me/CN=ossrs.net"
# default: ./conf/server.crt
cert ./conf/server.crt;
}
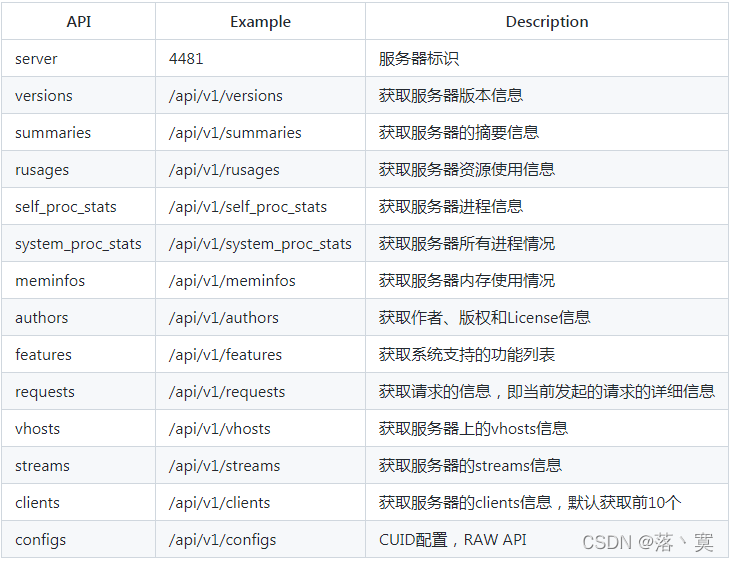
}2.8、SRS提供的所有API及描述(由于版本持续更新,可能不准确):
三、接口测试踢掉连接到SRS服务器的客户端
测试通过SRS提供的API踢掉连接到SRS的客户端,首先需要GET请求(http://192.168.5.104:1985/api/v1/clients)获取所有客户端信息,拿到客户端ID,再通过DELETE请求(http://192.168.5.104:1985/api/v1/clients/clientID)踢掉客户端,如果只踢推流客户端可通过API获取推流端(http://192.168.5.104:1985/api/v1/streams),其中streams.publish.cid即是推流客户端ID号。
3.1、使用HBuilderX创建一个uniapp项目,新建index和live2个页面,使用了uniapp官方UI组件uni-table和uni-popop,直接通过HBuilderX插件商城安装即可直接使用,使用uniapp官方推流插件live-pusher实现视频采集和推流
UI组件如下:

index.vue
<template>
    <view>
        <live-pusher class="livePusher-top" id="livePusher" @statechange="statechange"  :beauty="beauty" :whiteness="whiteness"  :url="url" :enable-camera="enableCamera" mode="FHD"></live-pusher>
        <button v-if="flag" @click="startLive">开始直播</button>
        <button v-if="!flag" @click="stopLive">结束直播</button>
		<button  @click="pauseLive">暂停直播</button>
		<button  @click="resumeLive">恢复直播</button>
		<view class="uni-title">美颜</view>
		<slider min="0" max="9" value="0" @change="sliderChangeBeauty" activeColor="#FFCC33" backgroundColor="#000000" block-color="#8A6DE9" block-size="20" show-value />
		<view class="uni-title">美白</view>
		<slider min="0" max="9" value="0" @change="sliderChangeWhiteness" activeColor="#FFCC33" backgroundColor="#000000" block-color="#8A6DE9" block-size="20" show-value />

		<uni-popup ref="popup" :mask-click="false" type="message">
			<uni-popup-message  type="warn" :message="message" :duration="0"></uni-popup-message>
		</uni-popup>
	</view>
</template>

<script>
	export default {
        data() {
            return {
                url: 'rtmp://192.168.5.104/live/1',//推流地址
                enableCamera: true,//开启摄像头
                context: null,
				beauty : 0,//美颜值
				whiteness : 0 ,//美白值
				flag : true,
				message : null,//提示消息
				date : null,//定义时间
				dateStr : null
            };
        },
        onReady() {
            this.context = uni.createLivePusherContext('livePusher', this);
            // this.context.switchCamera() // 摄像头切换(切换为后置)
			setTimeout(()=>{
				this.context.startPreview() // 摄像头预览 (不加会黑屏)
			},1000);

        },
        methods: {
			//开始推流
            startLive() {
                this.context.start({
                    success: (res) => {
						this.flag=!this.flag;
                        console.log('livePusher.start:' + JSON.stringify(res));
                    },
					fail: (err)=>{
						console.log("livePusher失败:"+JSON.stringify(err));
					},
					complete:(res)=>{
						console.log("livePusher执行完成:"+JSON.stringify(res));
					}
                });
            },
			//停止推流
            stopLive() {
                this.context.stop({
                    success: (res) => {
						this.flag=!this.flag;
                        console.log('livePusher.stop:'+JSON.stringify(res));
						this.context.stopPreview(); // 关闭摄像头预览
                    }
                });
            },
			//暂停推流
			pauseLive(){
				this.context.pause({
					success: (res)=>{
						console.log('livePusher.pause:'+JSON.stringify(res));
					}
				});

			},
			//恢复推流
			resumeLive(){
				this.context.resume({
					success: (res)=>{
						console.log('livePusher.resume:'+JSON.stringify(res));
					}
				});
			},
			//设置美颜
			sliderChangeBeauty(e){
				this.beauty = e.detail.value;
				console.log("美颜值改变"+e.detail.value);
			},
			//设置美白
			sliderChangeWhiteness(e){
				this.whiteness = e.detail.value;
				console.log("美白值改变"+e.detail.value);
			},
			//状态改变数据,部分状态码如下:
			//1001:连接RTMP服务器成功
			//1002:RTMP开始推流
			//1003:打开摄像头成功
			//1007:首帧画面采集完成
			//1008:启动硬编
			//1101:上行带宽不足,数据发送不及时
			//1102:启动网络重连
			//3004:UNKNOWN
			//3005:tcp通道发送失败 错误码[-4]
			//-1307:所有IP都已经尝试失败,可以放弃治疗
			statechange(e){
				console.log("状态"+e.detail.code+e.detail.message);
				if(e.detail.code==3005){//TCP通道断开
				this.date = new Date();
				this.dateStr = this.date.getFullYear()+":"
							+this.date.getMonth()+1+":"
							+this.date.getDate()+":"
							+this.date.getHours()+":"
							+this.date.getMinutes()+":"
							+this.date.getSeconds();
					this.flag = true;
					this.message = this.dateStr+"网络断开,正在重新连接";
					this.open();
				}if(e.detail.code==1102){//启动网络重连

				}if(e.detail.code==1001){//已经连接RTMO服务器
					// this.close();
					// this.message = "已连接服务器";
					// this.open();

				}if(e.detail.code==1002){//RTMP开始推流
					this.flag = false;
					this.close();
				}if(e.detail.code==-1307){//重连失败
					this.close();
					this.message = "重连失败";
					this.open();
				}
			},
			open() {
			        this.$refs.popup.open('top')
			},
			close() {
			        this.$refs.popup.close()
			}

        }
	}

</script>

<style>
.livePusher-top{
	background-color:white;

}
</style>
live.vue
<template>
	<view>
		<uni-table border stripe emptyText="暂无更多数据" >
		    <!-- 表头行 -->
		    <uni-tr>
		        <uni-th  align="center">客户端ID</uni-th>
		        <uni-th  align="center">客户端IP</uni-th>
		        <uni-th  align="center">类型</uni-th>
				<uni-th  align="center">操作</uni-th>
		    </uni-tr>
		    <!-- 表格数据行 -->
		    <uni-tr v-for="(list,index) in liveList">
		        <uni-td align="center">{{list.id}}</uni-td>
		        <uni-td align="center">{{list.ip}}</uni-td>
		        <uni-td align="center">{{list.type}}</uni-td>
				<uni-td align="center">
					<button @click="tichu(list.id,index)" class="mini-btn" type="warn" size="mini">踢出</button>
				</uni-td>
		    </uni-tr>


		</uni-table>

	</view>
</template>

<script>

	export default {
		data() {
			return {
				//定义客户端列表
				liveList : null,
			}
		},
		onReady() {
			// 每秒更新客户端列表数据
			setInterval(()=>{
				uni.request({
					url:"http://192.168.5.104:1985/api/v1/clients",
					success: (res) => {
							this.liveList = res.data.clients;
					    },
					fail: (err) =>{
						console.log(err.data);
						console.log("失败");
					}
				})
			},1000)

		},
		methods: {
			tichu(clientID,index){
				uni.request({
					url:"http://192.168.5.104:1985/api/v1/clients/"+clientID,
					method:'DELETE',
					success: (res) => {
							if(res.data.code==0){
								this.liveList.splice(index,1);
							}
					    },
					fail: (err) =>{
						console.log(err.data);
						console.log("失败");
					}
				})
			}
		}
	}
</script>

<style>

</style>
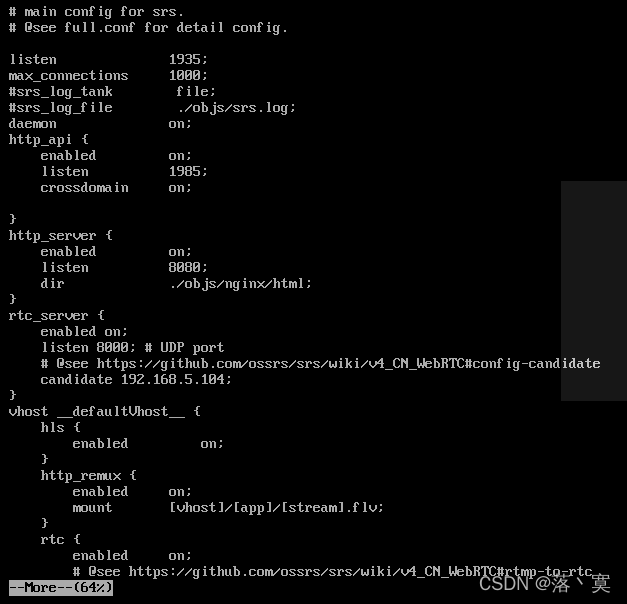
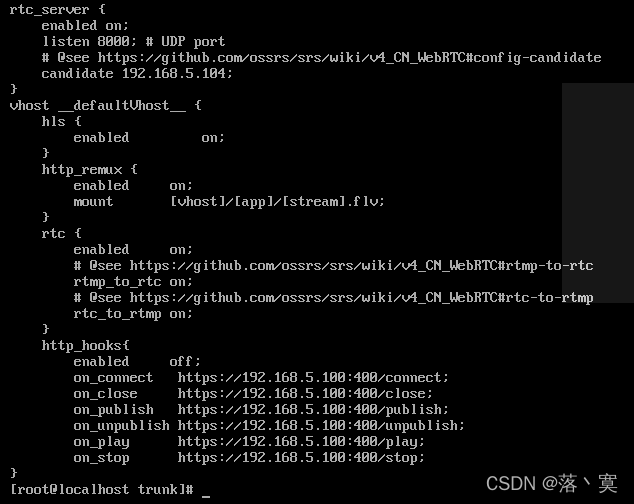
3.2、SRS服务配置,开启了http_api服务,开启了RTC服务,开启RTMP转RTC流,稍后使用RTMP协议推流,RTC协议拉流(播放)
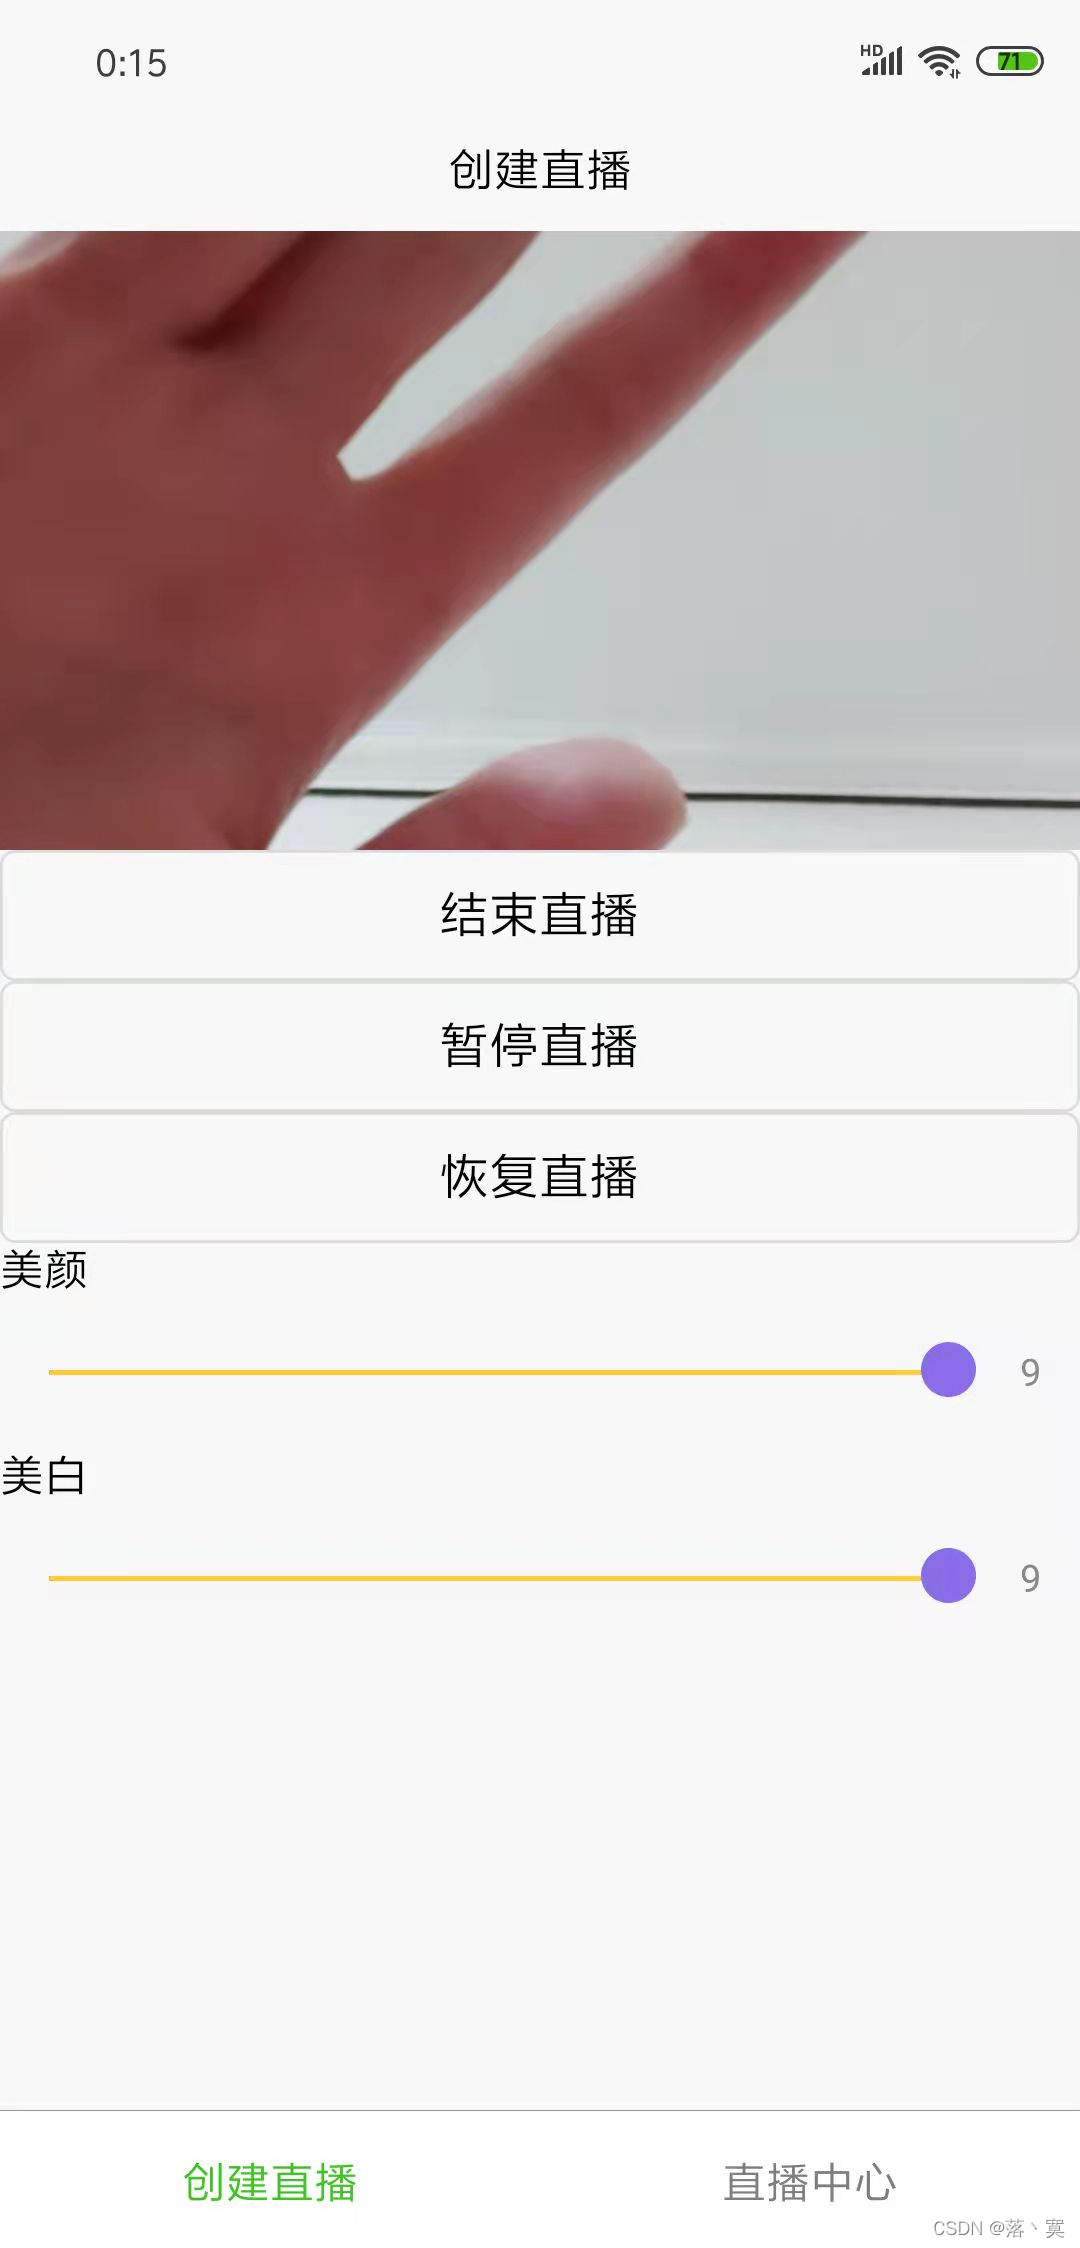
3.3、页面编写完可直接运行,打开HBuilderX 连接手机,真机运行,开始直播(推流)。
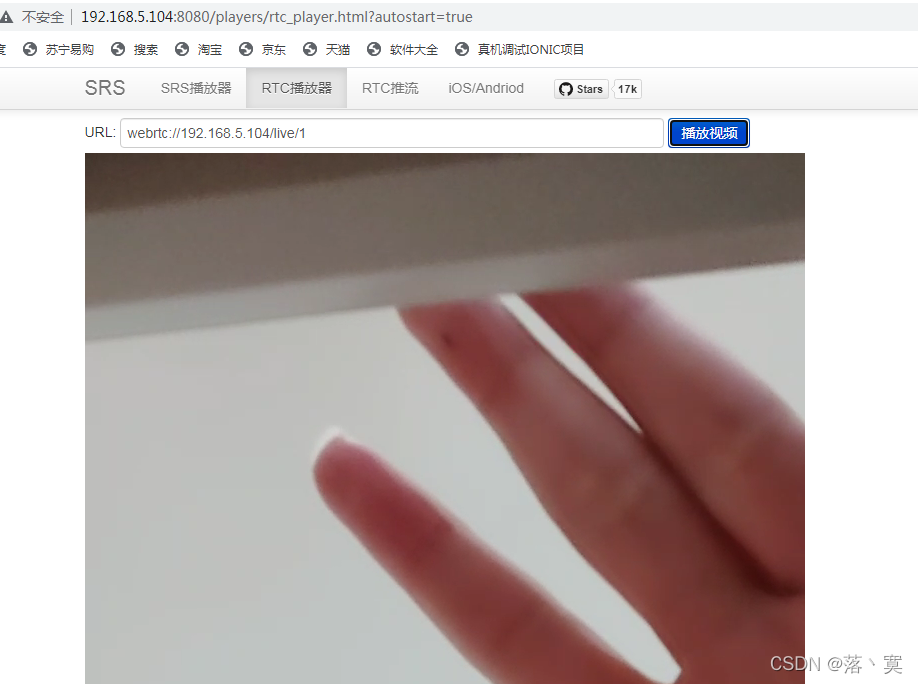
3.4、使用谷歌浏览器打开http://192.168.5.104:8080使用RTC播放器拉流(RTC协议播放延迟低)
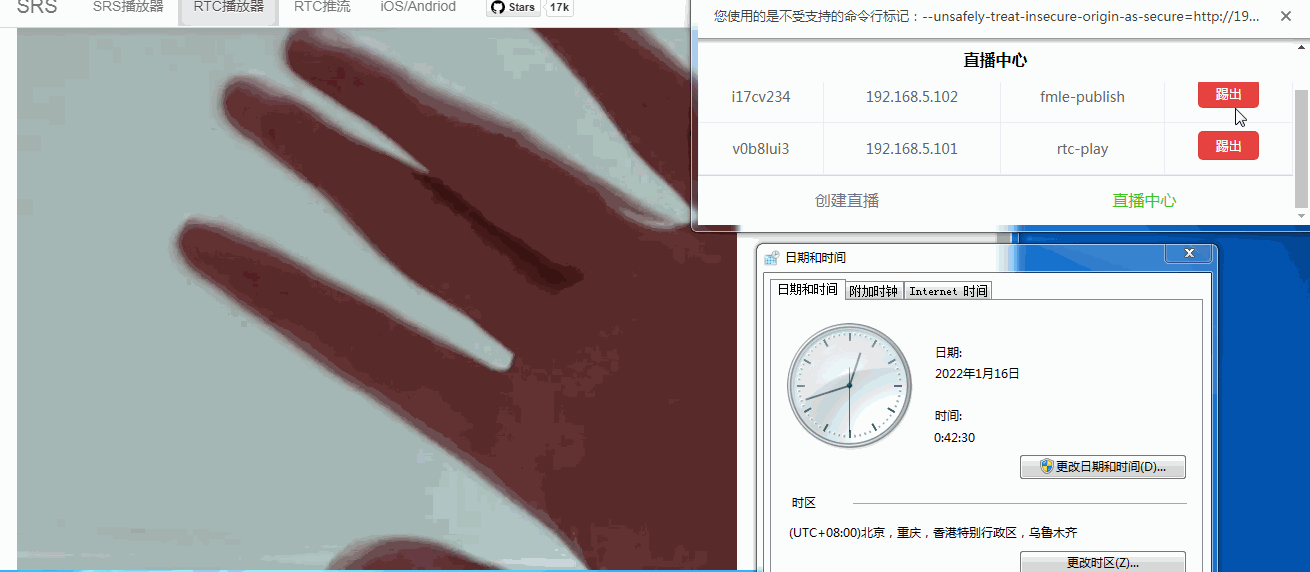
3.5、使用HBuilderX运行到浏览器--Chrome,打开直播中心,踢出客户端。
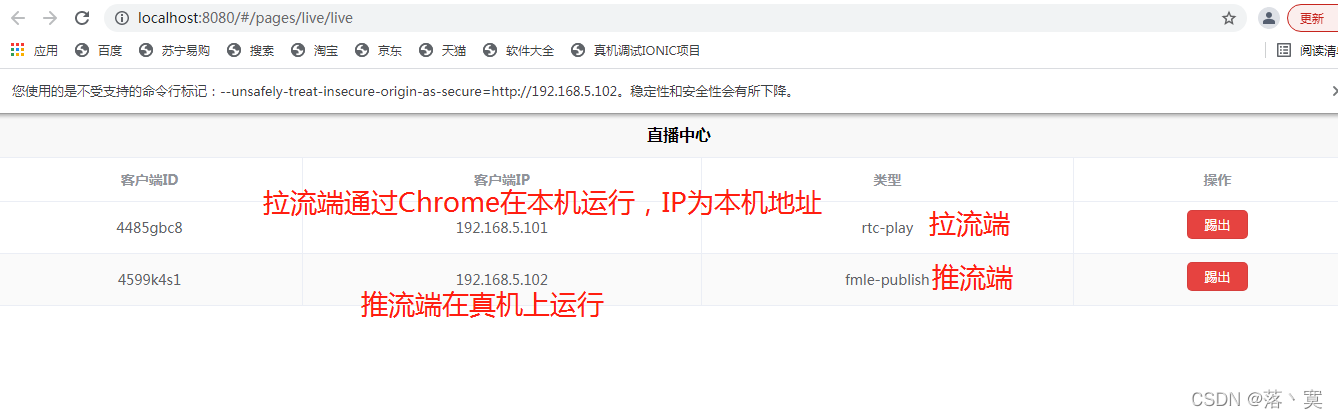
页面展示了2个客户端(GET请求 http://192.168.5.104:1985/api/v1/clients),一个推流端,一个拉流端。
PC端GIF截图(画质一言难尽,奈何CSDN不支持视频上传),在32秒左右踢流,手机端推流有断开重连,所以踢出推流端后会自动重新连接上,踢出推流端后画面静止,重连后再次动起来。
手机端截图
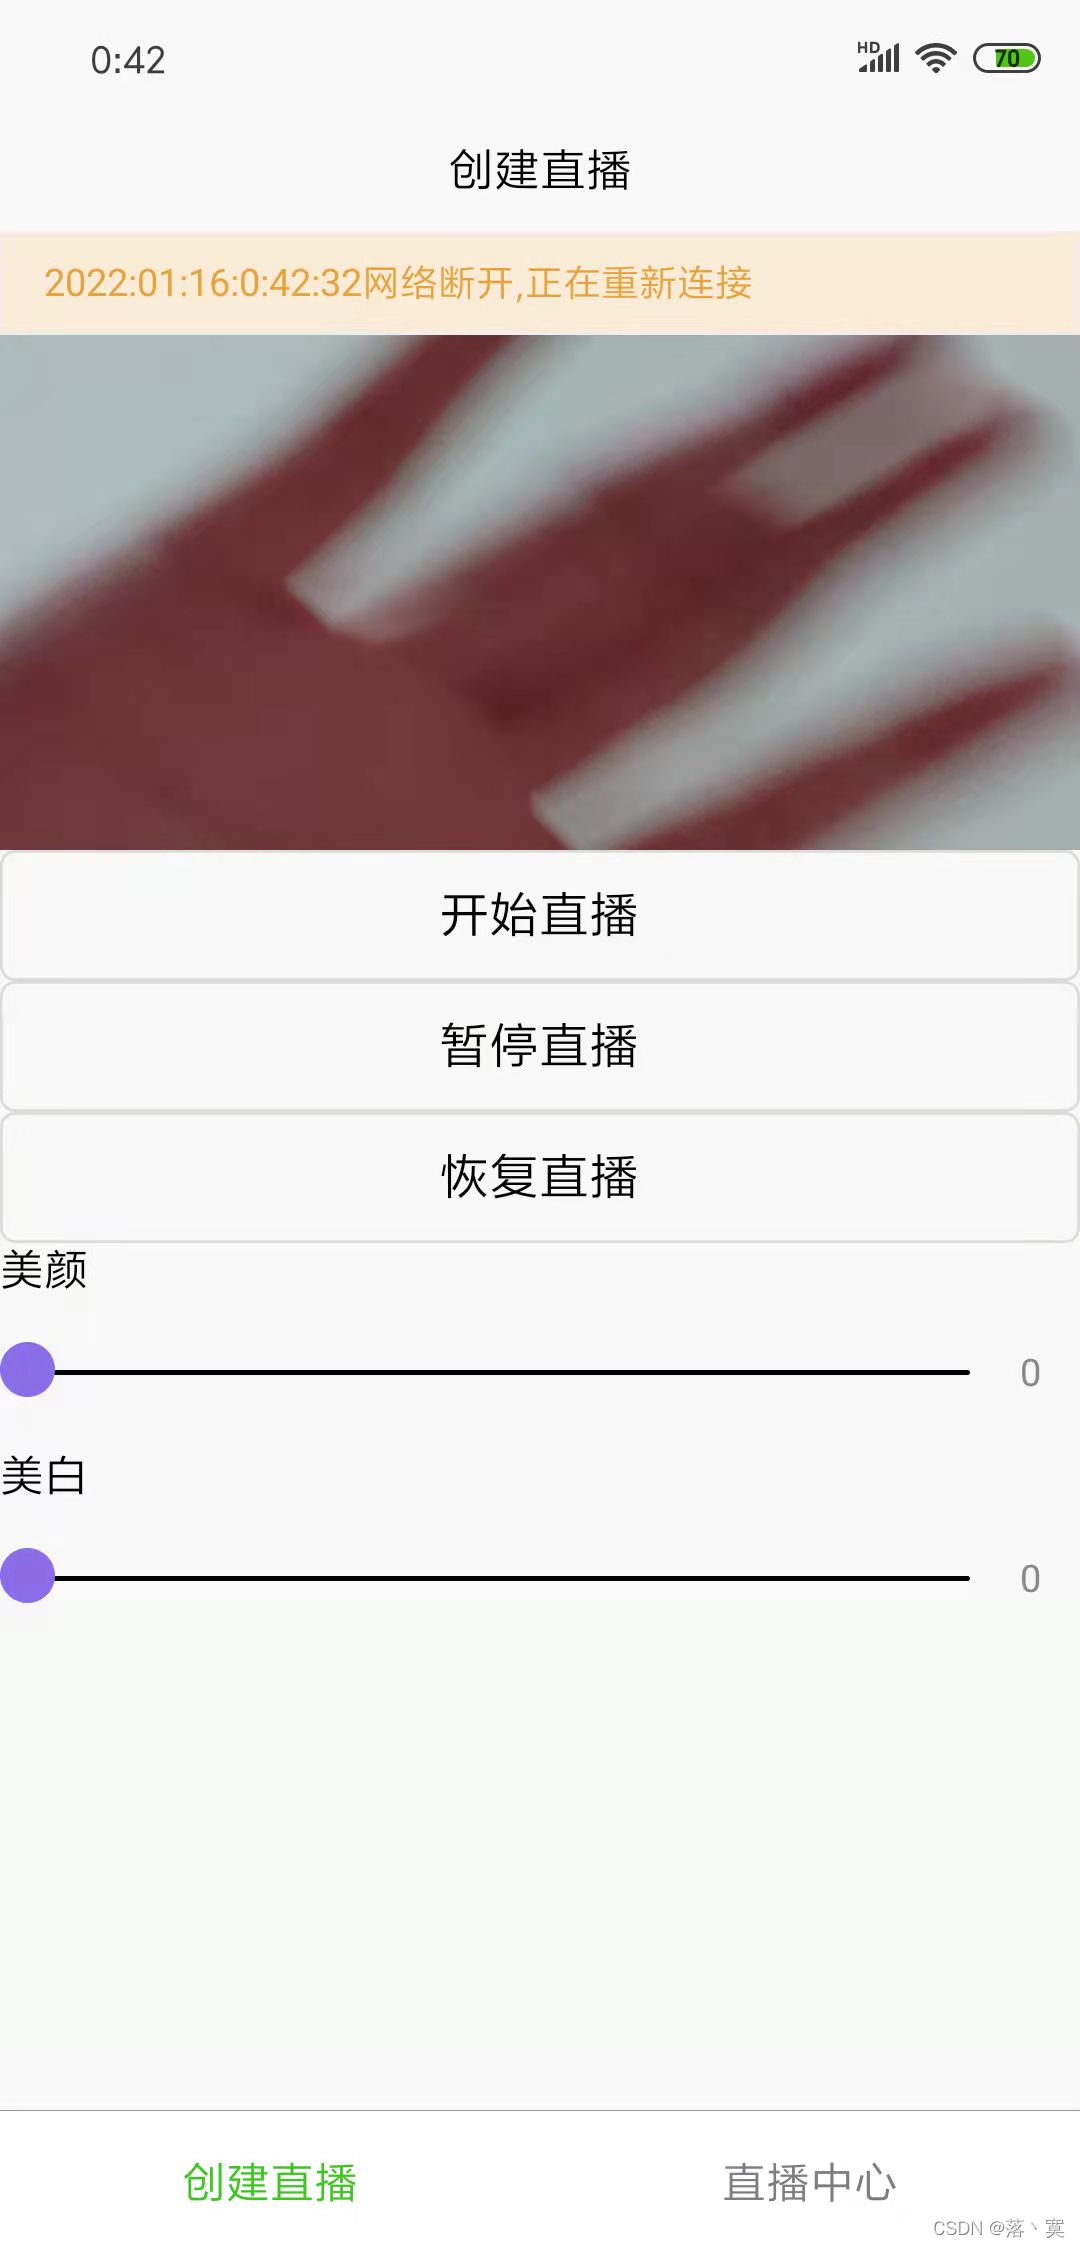
从上面可以看到通过http_api操作SRS服务踢出客户端成功。


 2359
2359

 被折叠的 条评论
为什么被折叠?
被折叠的 条评论
为什么被折叠?
 到【灌水乐园】发言


