


使用 RESTful 客户端操作 Elasticsearch
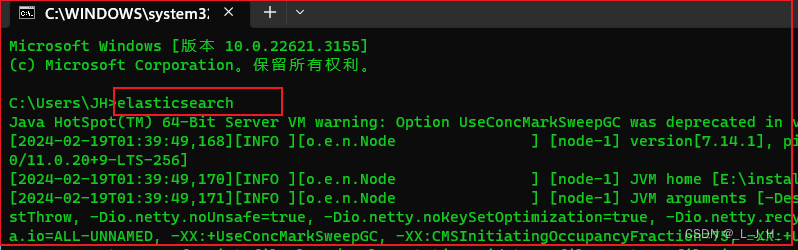
启动 Elasticsearch 服务器:
打开命令行窗口(小黑窗),输入命令: elasticsearch ;
即可启动 Elasticsearch 服务器
两种REST客户端介绍
Elasticsearch 官方提供的 RestClient 分为两种:高级 RestClient 和 低级 RestClient,它们的简单区别如下:
高级 RestClient(RestHighLevelClient):开发者面向 Index、文档等高层次的API编程,因此更加简单、方便。
低级 RestClient(RestLowLevelClient):开发者直接面向底层RESTful接口编程,发送最原始请求参数,Elasticsearch 服务器也返回最原始的响应,使用这种方式需要开发者自行处理请求、响应的序列化和反序列化,
比较麻烦,但灵活性最好(因为它拿到都是最原始的数据)。
自动配置的REST客户端
Spring Boot 只要检测到类路径下有 elasticsearch-rest-high-level-client 依赖(无需Spring Data Elasticsearch),Spring Boot 就会在容器中创建一个自动配置的 RestHighLevelClient,它就是Elasticsearch 的高级 RestClient。
若要使用低级 RestClient,只要调用 RestHighLevelClient 的 getLowLevelClient() 方法即可返回RestLowLevelClient,它就是Elasticsearch的低级RestClient。
归纳来说,就是两点:
-
自动配置的是 RestHighLevelClient。
-
RestLowLevelClient 可通过高级 RestClient 来获取。
6个自动配置类介绍:
Spring Boot 为 Elasticsearch 提供了6个自动配置类:
ElasticsearchRestClientAutoConfiguration: 它会负责配置RestClientBuilder、RestClientBuilderCustomizer、RestHighLevelClient
ElasticsearchDataAutoConfiguration: 它需要有Spring Data Elasticsearch的支持,它会自动配置ElasticsearchRestTemplate
ElasticsearchRepositoriesAutoConfiguration:用于启用 ElasticsearchRepository。
反应式版本:
ReactiveElasticsearchRestClientAutoConfiguration
ReactiveElasticsearchDataAutoConfiguration
ReactiveElasticsearchRepositoriesAutoConfiguration

RestHighLevelClient 的方法
有了自动配置的 RestHighLevelClient 之后,容器就可以将它注入到其他任何组件(主要是DAO组件),它提供了如下方法:
同步和异步的方法区别:
count(CountRequest countRequest, RequestOptions options):查询符合条件的文档数量。

countAsync(CountRequest countRequest, RequestOptions options, ActionListener<CountResponse> listener):
异步方式查询符合条件的文档数量,listener参数负责处理异步查询的结果。

---------------------------------------------------------------------------------

delete(DeleteRequest deleteRequest, RequestOptions options):根据ID删除文档。

deleteAsync(DeleteRequest deleteRequest, RequestOptions options, ActionListener<DeleteResponse> listener):
异步方式根据ID删除文档,listener参数负责处理异步删除的结果。

-------------------------------------------------------------------------------

deleteByQuery(DeleteByQueryRequest deleteByQueryRequest, RequestOptions options):删除符合查询条件的文档。

deleteByQueryAsync(DeleteByQueryRequest deleteByQueryRequest, RequestOptions options, ActionListener<BulkByScrollResponse> listener):
异步方式删除符合查询条件的文档,listener参数负责处理异步删除的结果。

--------------------------------------------------------------------------------

exists(GetRequest getRequest, RequestOptions options):判断指定ID对应的文档是否存在。

existsAsync(GetRequest getRequest, RequestOptions options, ActionListener<Boolean> listener):
异步方式判断指定ID对应的文档是否存在。

--------------------------------------------------------------------------------

get(GetRequest getRequest, RequestOptions options):根据ID获取文档。

getAsync(GetRequest getRequest, RequestOptions options, ActionListener<GetResponse> listener):异步方式根据ID获取文档。
--------------------------------------------------------------------------------

index(IndexRequest indexRequest, RequestOptions options):创建索引或文档。

indexAsync(IndexRequest indexRequest, RequestOptions options, ActionListener<IndexResponse> listener):
异步方式创建索引或文档。

--------------------------------------------------------------------------------

mget(MultiGetRequest multiGetRequest, RequestOptions options):根据多个ID获取多个文档。

mgetAsync(MultiGetRequest multiGetRequest, RequestOptions options, ActionListener<MultiGetResponse> listener):
异步方式根据多个ID获取多个文档。

--------------------------------------------------------------------------------

msearch(MultiSearchRequest multiSearchRequest, RequestOptions options):根据多个查询条件返回文档。

msearchAsync(MultiSearchRequest multiSearchRequest, RequestOptions options, ActionListener<MultiSearchResponse> listener):
异步方式根据多个查询条件返回文档。

--------------------------------------------------------------------------------

search(SearchRequest searchRequest, RequestOptions options):查询文档。

searchAsync(SearchRequest searchRequest, RequestOptions options, ActionListener<SearchResponse> listener):
异步方式查询文档。

--------------------------------------------------------------------------------

update(UpdateRequest updateRequest, RequestOptions options):根据ID更新文档。

updateAsync(UpdateRequest updateRequest, RequestOptions options, ActionListener<UpdateResponse> listener):
异步方式根据ID更新文档。

--------------------------------------------------------------------------------

updateByQuery(UpdateByQueryRequest updateByQueryRequest, RequestOptions options):更新符合条件的所有文档。

updateByQueryAsync(UpdateByQueryRequest updateByQueryRequest, RequestOptions options, ActionListener<BulkByScrollResponse> listener):
异步方式更新符合条件的所有文档。

----------------------------------------------------------------------------------
RestHighLevelClient方法的特征:
RestHighLevelClient 的方法所用的参数风格基本类似,都是使用一个 XxxRequest 封装主要的请求数据,使用 RequestOptions 封装一些额外的选项;
对于异步处理的方法,则使用 listener 监听服务器返回的结果。
此外 RestHighLevelClient 还提供了大量 xxx() 方法来返回对应的 XxxClient,
如 asyncSearch() 返回 AsyncSearchClient ,
cluster() 方法返回 ClusterClient ,
eql() 方法返回 EqlClient ,
indices() 方法返回 IndicesClient……,
这些XxxClient又提供了大量的方法来执行相应的操作。
该API的用法示例,完全可参考如下页面 : Search API
代码演示:让项目通过 HTTPS 连接 Elasticsearch 的配置:
演示的需求简述:
就是我要创建一个 SpringBoot 的项目,然后通过项目去访问 Elasticsearch 目标服务器的时候,使用的是 HTTPS 的协议。
而现在 Elasticsearch 目标服务器所使用的证书是我自己生成的自签名证书,前面我用自己生成的自签名证书,为 Elasticsearch 服务器启用 SSL 和 HTTPS 支持。
而这个自签名证书是不被 SpringBoot 等应用信任的,所以 SpringBoot 应用此时无法通过 https 协议访问 Elasticsearch 目标服务器。
所以为了让 SpringBoot 应用能信任 Elasticsearch 目标服务器的自签名证书并成功访问,所以才进行以下的操作。
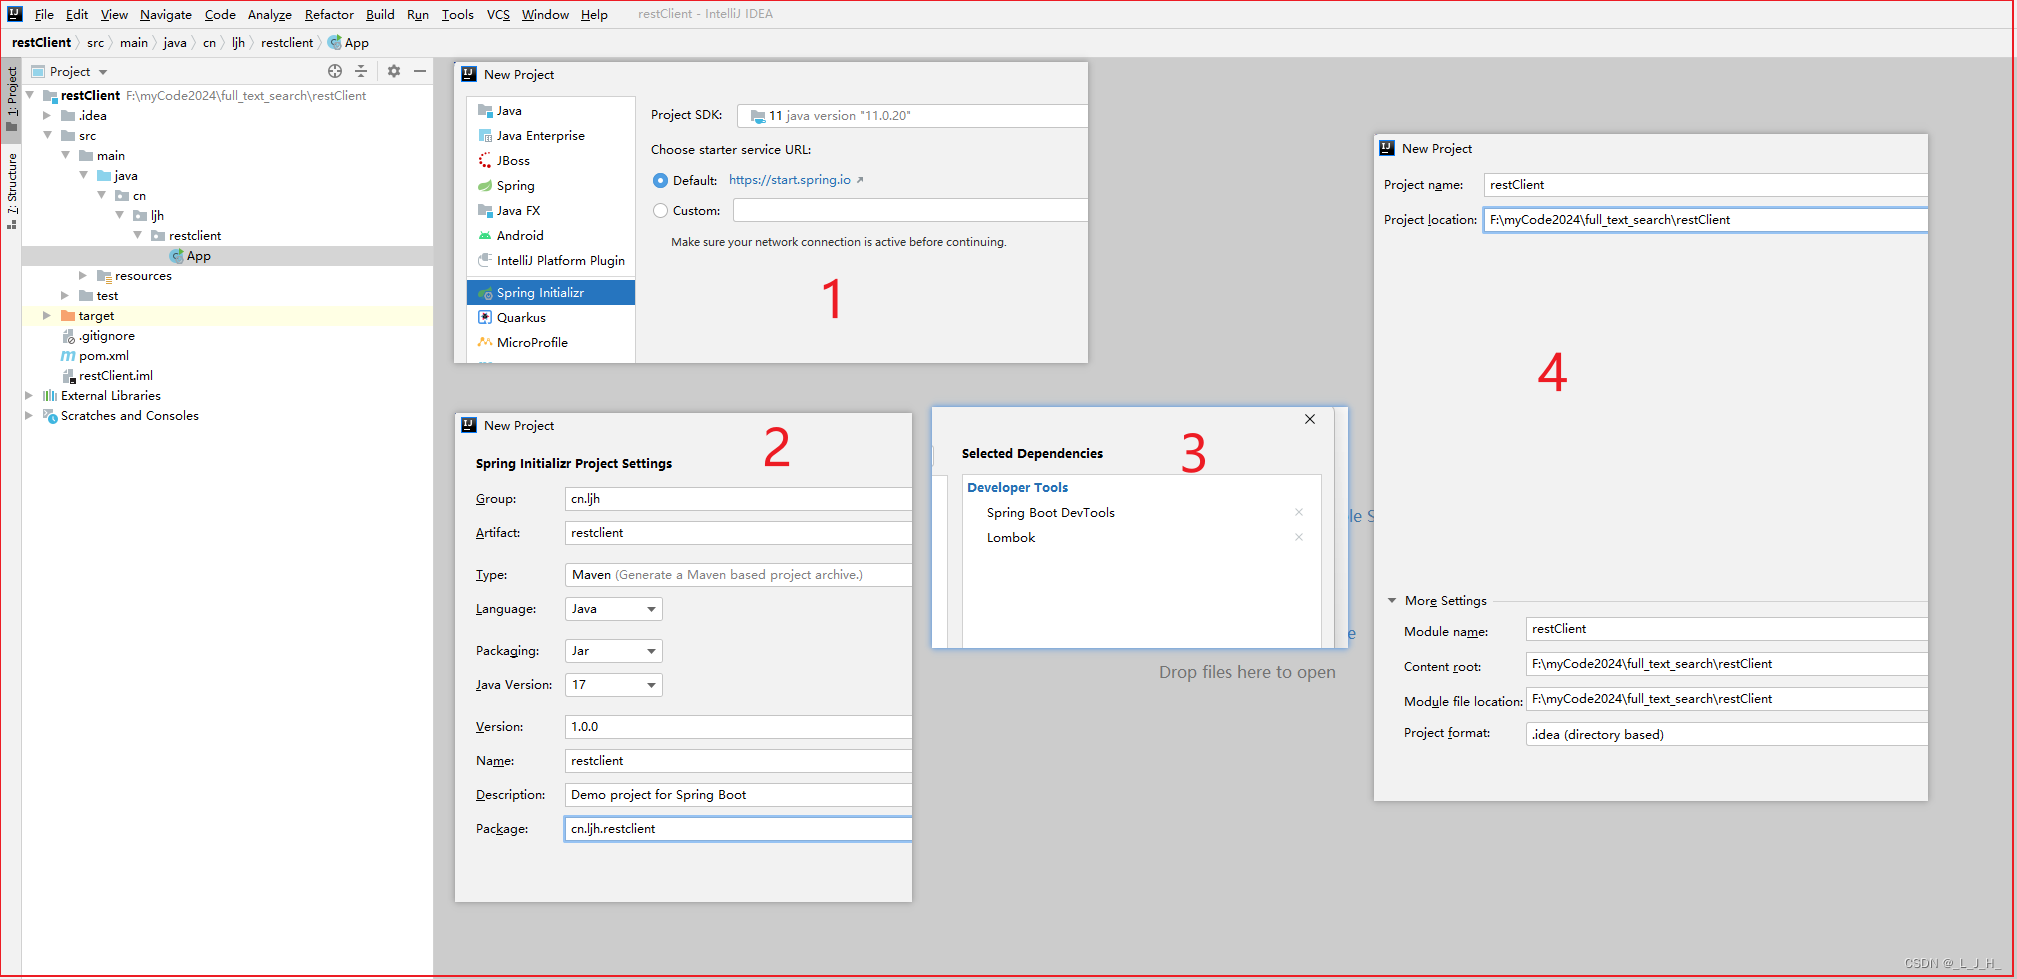
1、创建一个 SpringBoot 项目
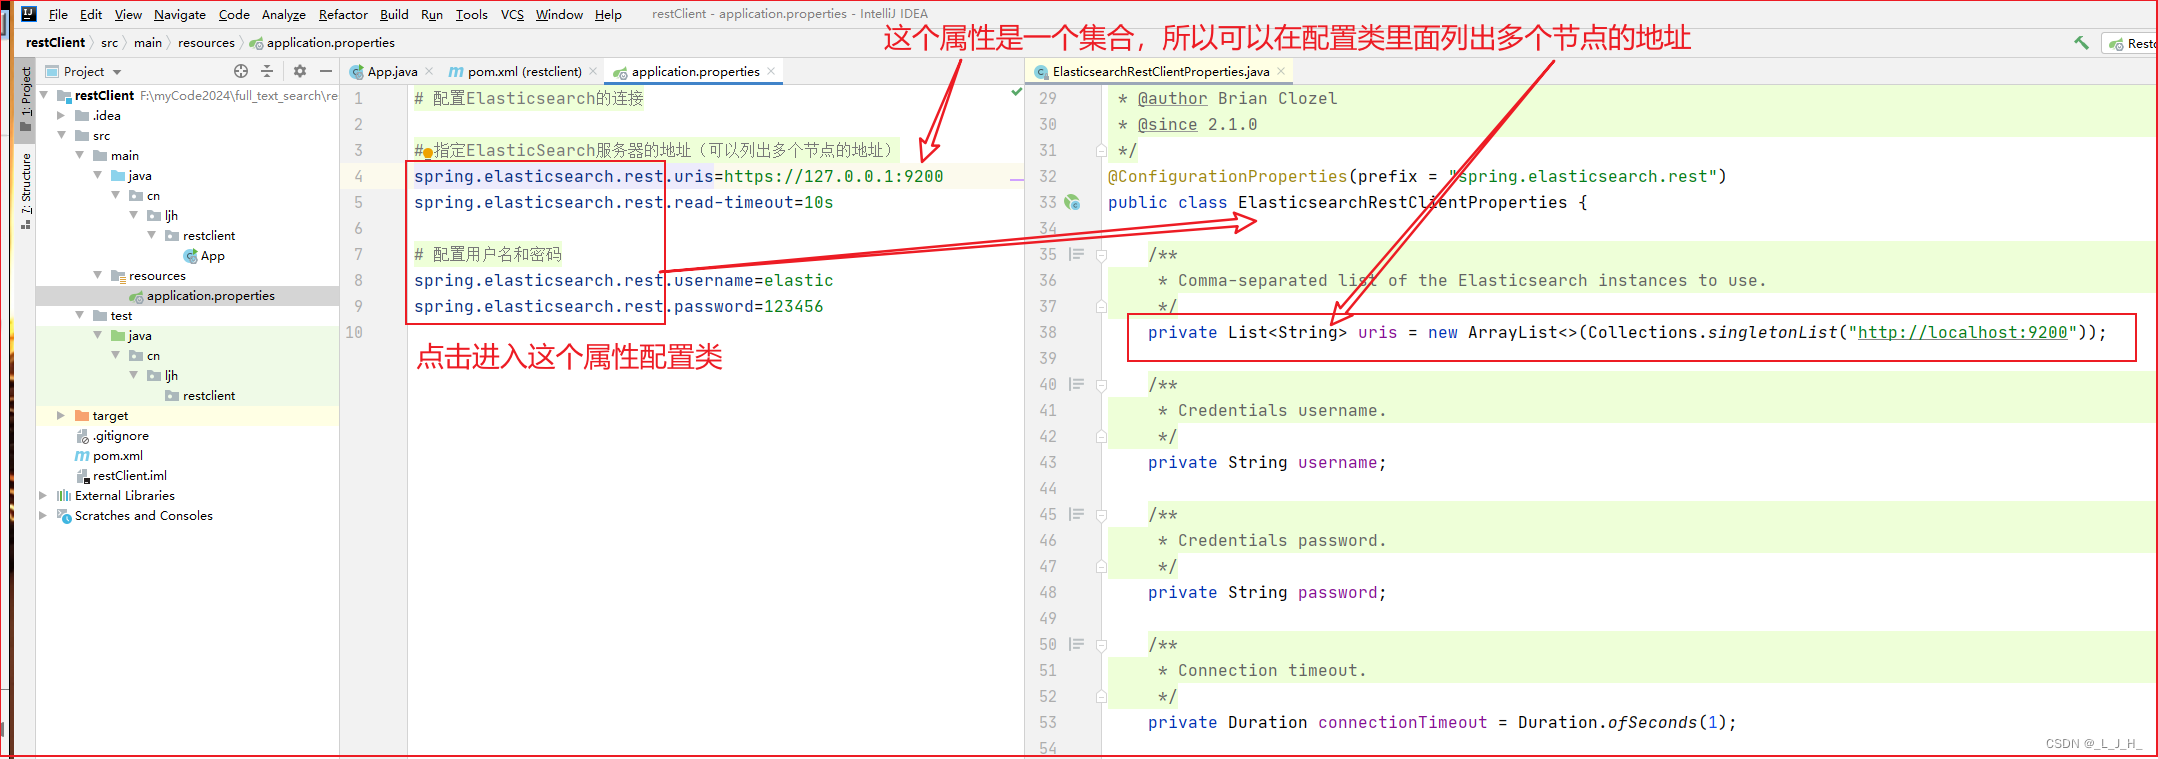
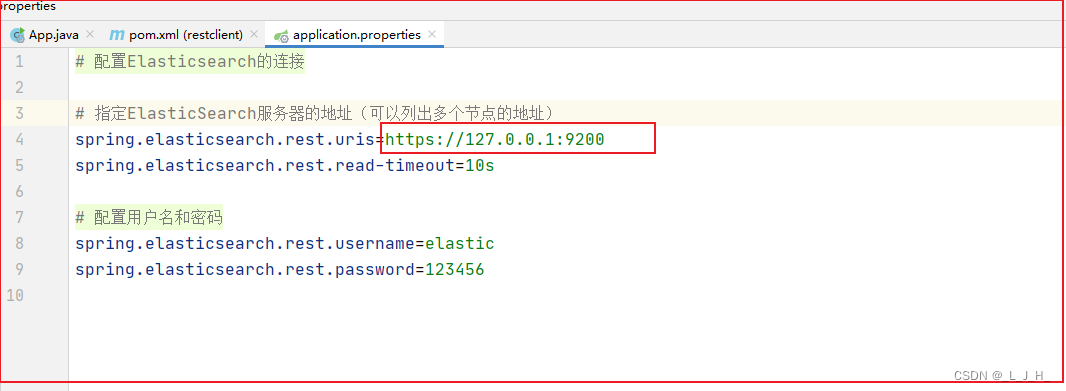
2、配置 Elasticsearch 的连接
配置文件中配置了以 spring.elasticsearch.rest.* 开头的各种属性,
这些属性由 ElasticsearchRestClientProperties 类负责加载、处理。
# 指定ElasticSearch服务器的地址(可以列出多个节点的地址)
spring.elasticsearch.rest.uris=https://127.0.0.1:9200
spring.elasticsearch.rest.read-timeout=10s

# 配置用户名和密码
spring.elasticsearch.rest.username=elastic
spring.elasticsearch.rest.password=e32147
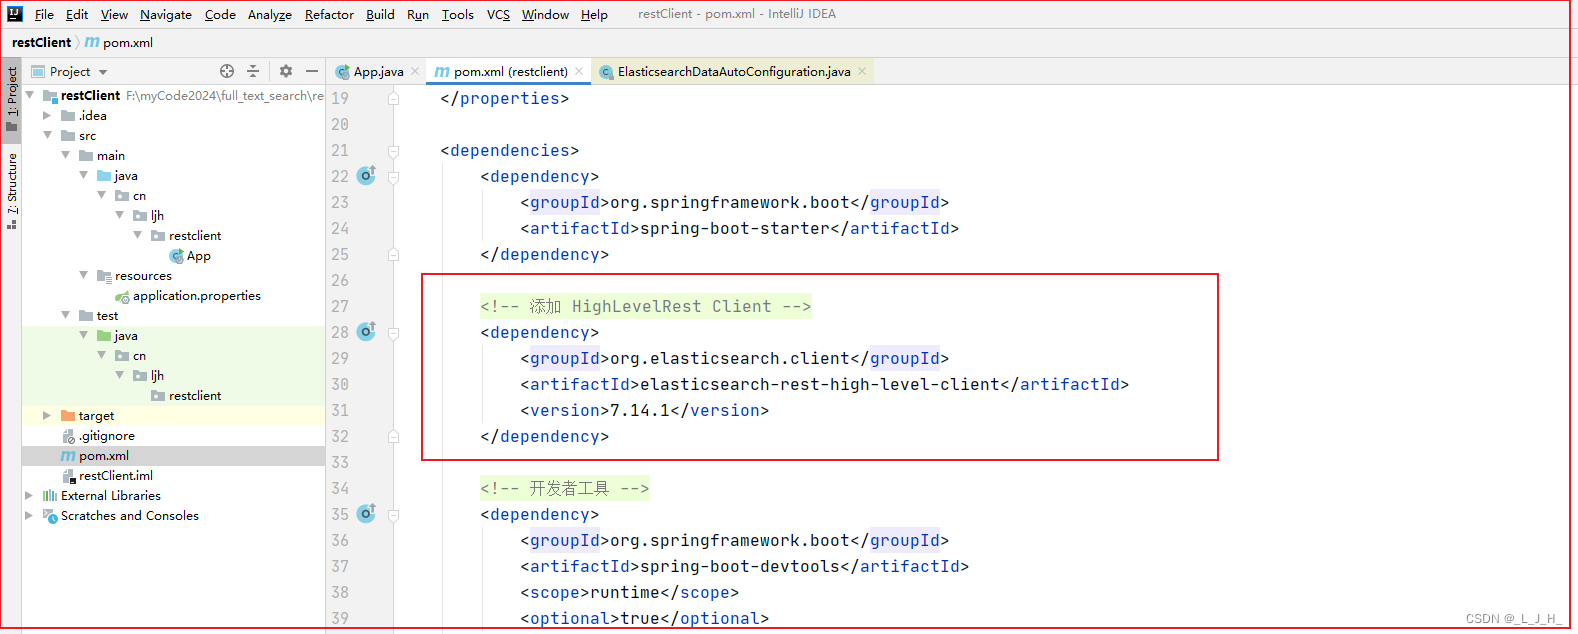
3、添加依赖
到 Maven官网 查 elasticsearch-rest-high-level-client 依赖,
有这个依赖才会有这个 RestHighLevelClient.class 类
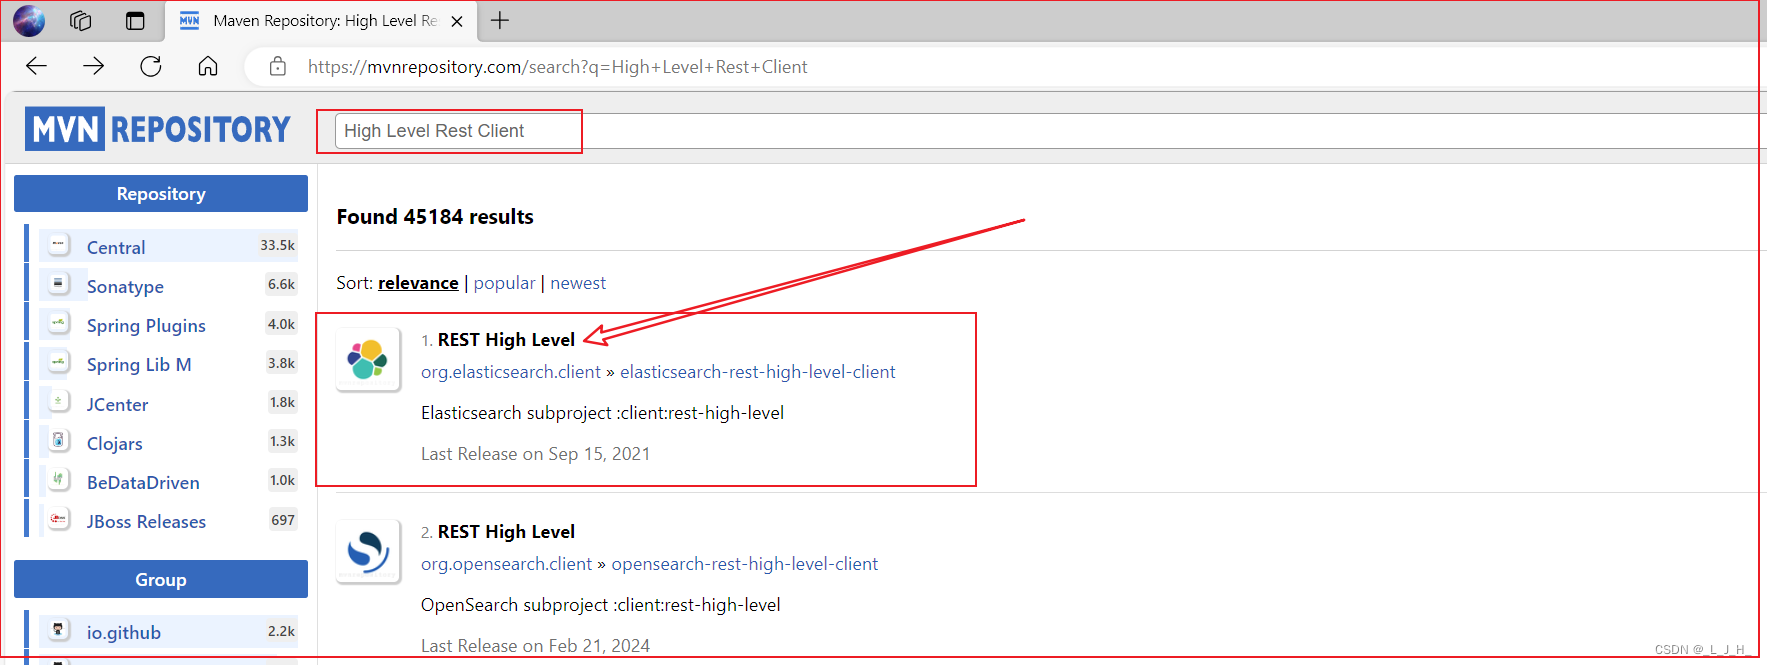
选择对应自己 Elasticsearch 版本的依赖,我的是 7.14.1
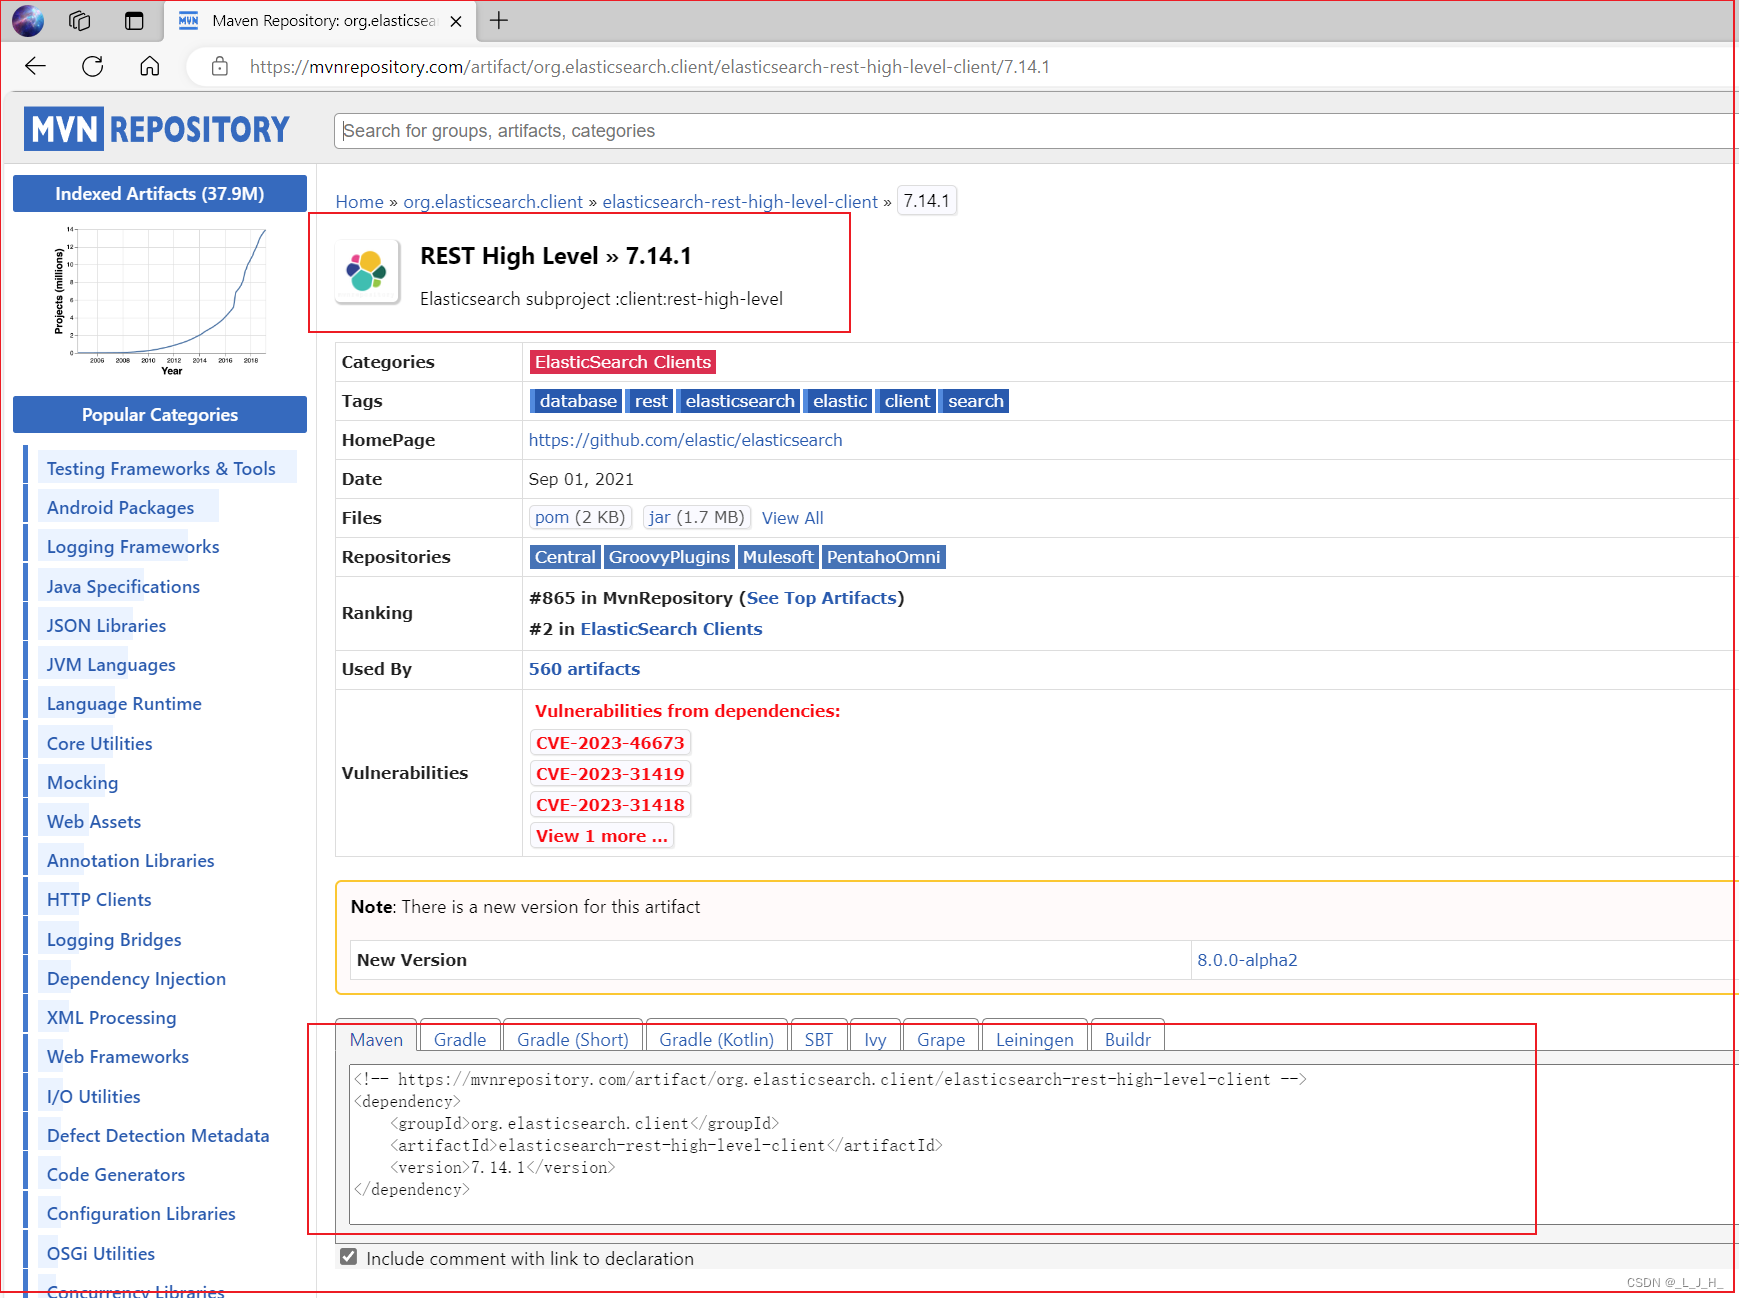
<dependency>
    <groupId>org.elasticsearch.client</groupId>
    <artifactId>elasticsearch-rest-high-level-client</artifactId>
    <version>7.14.1</version>
</dependency>
4、使用 HTTPS 协议
之前配置 Elasticsearch 服务器的地址时指定了 URI 是 https 开头的地址,这意味着本应用使用 HTTPS 协议连接 Elasticsearch 服务器 ,这就需要让 SpringBoot 应用信任该服务器的证书。
如图:因为配置类里面的节点地址是使用了 HTTPS 来连接 Elasticsearch ,这就表明是已经启用了 SSL 验证的。
如果要使用 HTTPS 来连接 Elasticsearch 服务器,要分成两种情况:
1、Elasticsearch 启用 SSL 所用的证书是第三方权威机构颁发的(购买),Spring Boot会自动信任该证书。
2、 Elasticsearch 启用 SSL 所用的证书是我们自己颁发的,Spring Boot 不会自动信任该证书(目前演示的就是使用自己生成的证书,就是自签名证书,这证书不被信任)
要让 SpringBoot 应用信任目标服务器的证书(此时 SSL 所用的证书是自行颁发的),则需要将目标服务器的证书添加到本应用的 trustStore 中,通过一些代码强制指定 Spring Boot 信任该证书。
1、让 Spring Boot 信任 Elasticsearch 的自签名证书的操作步骤:
1、导出 Elasticsearch 服务器所用证书的公钥证书:
(从私钥证书中导出公钥证书)
keytool -export -alias ca -file elastic.cer -keystore elastic-certificates.p12
2、将目标网站(Elasticsearch 服务器)的公钥证书添加到 trustStore(密钥库)中。执行如下命令:
keytool -import -alias ca -file elastic.cer -keystore elastic.store
3、将 elastic.store(密钥库)复制到项目的 resources 目录下。
4、通过 javax.net.ssl.trustStore 系统属性告诉 Spring Boot 到哪里去读取 trustStore(密钥库)文件,并通过 javax.net.ssl.trustStorePassword 属性说明读取 trustStore 的密码。
 // 获取elastic.store的保存位置
 String storePath = new File(ApplicationContext.class
	.getResource("/").getFile()).getParentFile()
	.getAbsolutePath() + "\\classes\\elastic.store";
 // 设置trustStore的位置
 System.setProperty("javax.net.ssl.trustStore",
	storePath);
 // 设置trustStore的读取密码
 System.setProperty("javax.net.ssl.trustStorePassword", "345678");
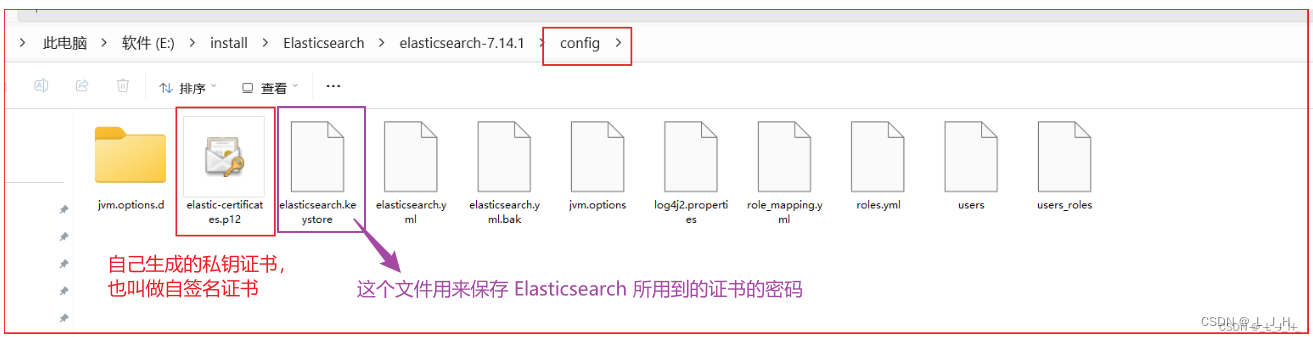
2、步骤演示及解析:
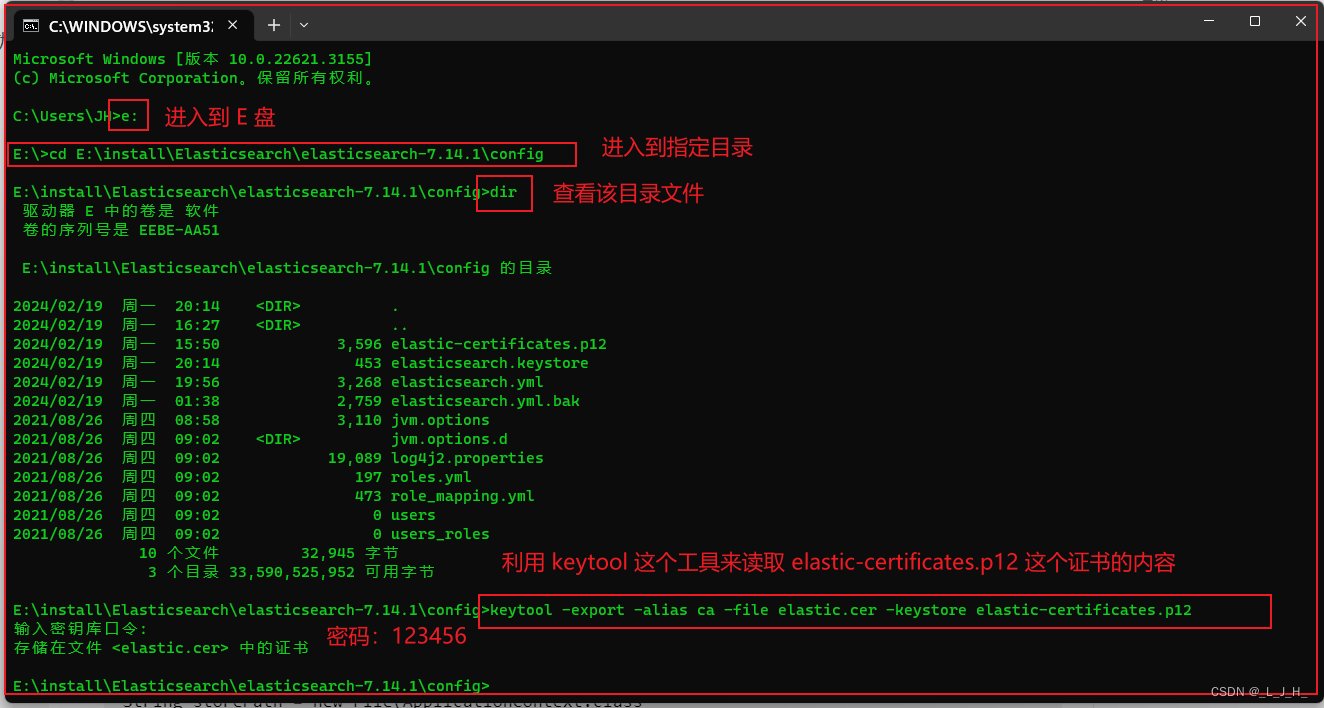
自己颁发的自签名证书,也就是私钥证书,是放在这个文件夹的,把路径拷贝出来:E:\install\Elasticsearch\elasticsearch-7.14.1\config
这篇文章演示如何生成这个私钥证书:为 Elasticsearch 启用 SSL 和 HTTPS 支持
之前启用 SSL 和 HTTPS 需要用到这个证书,密码是 123456
1、通过【私钥证书】导出【公钥证书】
打开命令行窗口,利用 keytool 工具读取 elastic-certificates.p12 证书的内容,导出【公钥证书】。
keytool -export -alias ca -file elastic.cer -keystore elastic-certificates.p12
证书密码是:123456
命令解释:
keytool:这个工具用来读取【elastic-certificates.p12】这个私钥证书的内容
-export:表示执行导出操作
-alias ca -file elastic.cer:表示导出来的文件叫 elastic.cer,也就是公钥证书。
-keystore :这个文件存了Elasticsearch 所用到的证书的密码
elastic-certificates.p12 :这个就是自己前面生成的私钥证书
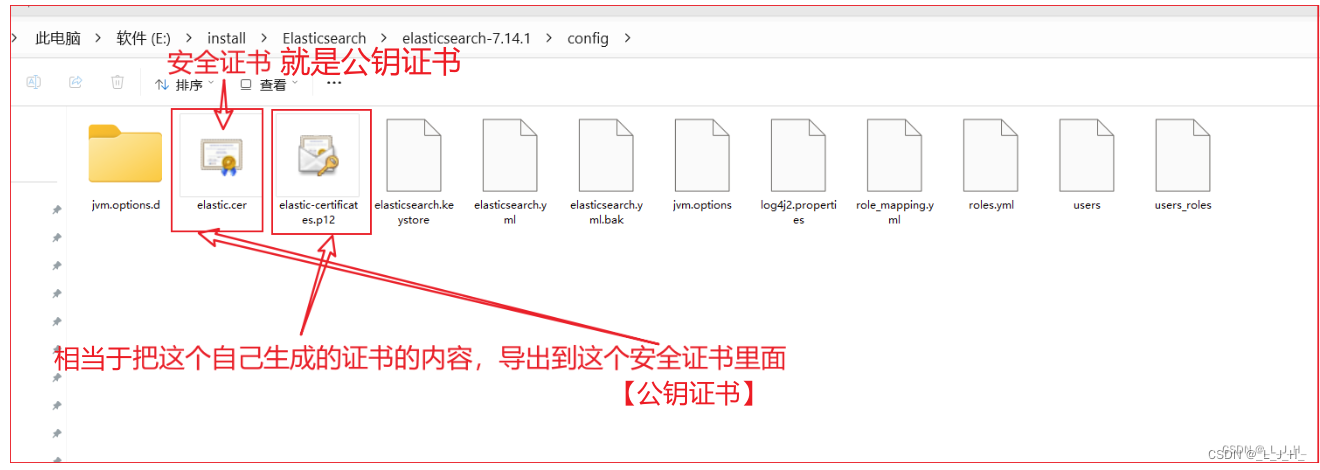
成功导出 Elasticsearch 所用证书(elastic-certificates.p12)的公钥证书(elastic.cer)
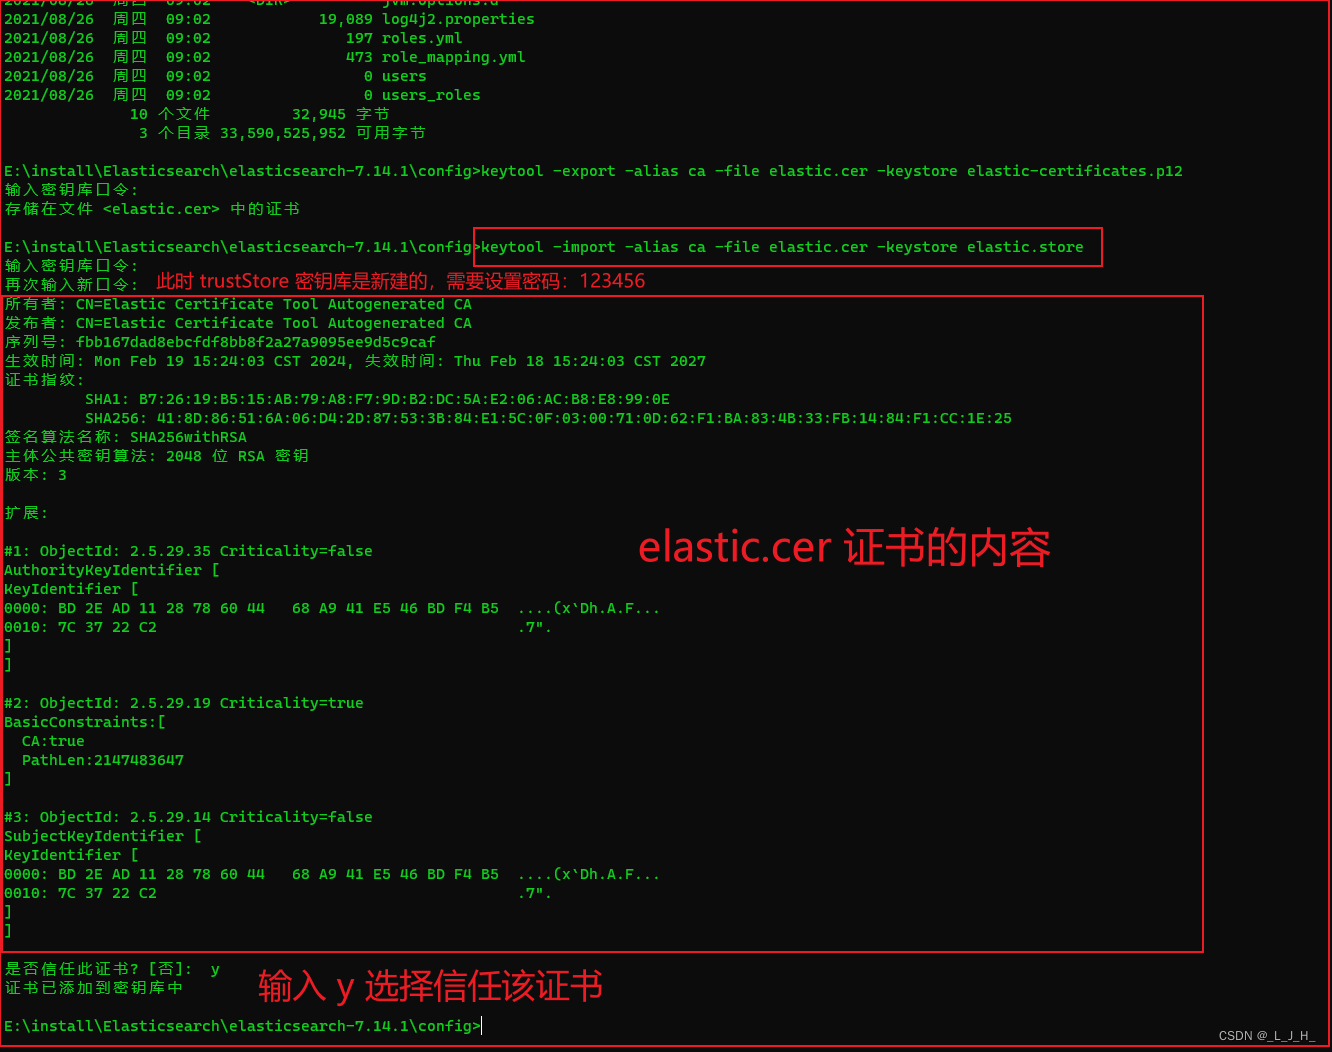
2、将【公钥证书】添加到 trustStore(密钥库)中
将目标网站(Elasticsearch 服务器)的公钥证书添加到 trustStore(密钥库)中。执行如下命令:
keytool -import -alias ca -file elastic.cer -keystore elastic.store
elastic.cer:Elasticsearch 服务器的公钥证书
elastic.store:证书存储库,也叫密钥库
运行该命令的解释:
运行该命令将会创建一个新的 trustStore :elastic.store,并将 elastic.cer 公钥证书添加到该 trustStore 中。
但如果 elastic.store 已经存在--------在实际项目中,往往要让 Spring Boot 应用信任多个目标服务器的证书,因此可能前面已经创建了 trustStore ,并在其中存储了其他服务器的证书--------该命令将只是向已有的 trustStore 中添加 elastic.cer 证书。
如果 elastic.store 不存在,该命令将会提示两次输入密码,用于为新建的 trustStore 设置密码,此处设置为 123456 ;
如果 elastic.store 已经存在,该命令将会提示输入读取已有 elastic.store 的密码,只有成功输入了对应的密码,才能将 elastic.cer 证书添加到已有的 trustStore :elastic.store 中.
此处是创建一个新的 elastic.store,因此运行上面命令将会看到如下过程:
如图:因为需要把这个公钥证书交给 SpringBoot 这个应用,让 springboot 应用信任这个公钥证书,
为了让 springboot 应用信任这个公钥证书,我们需要把【elastic.cer】这个公钥证书,导入到【elastic.store】这个证书存储库中
而这个 elastic.store 证书存储库也需要有个密码。
所以如下图,给 elastic.store 设置密码为 123456
经过上面两步,就成功地将 Elasticsearch 这个目标服务器的 SSL证书 添加到 tustStore :elastic.store 这个新建的密钥库中了。
( 可以理解为:trustStore 是一个专门存密钥的一个库 ,这里只用来存 Elasticsearch 的公钥证书,所以把这个密钥库叫: elastic.store )
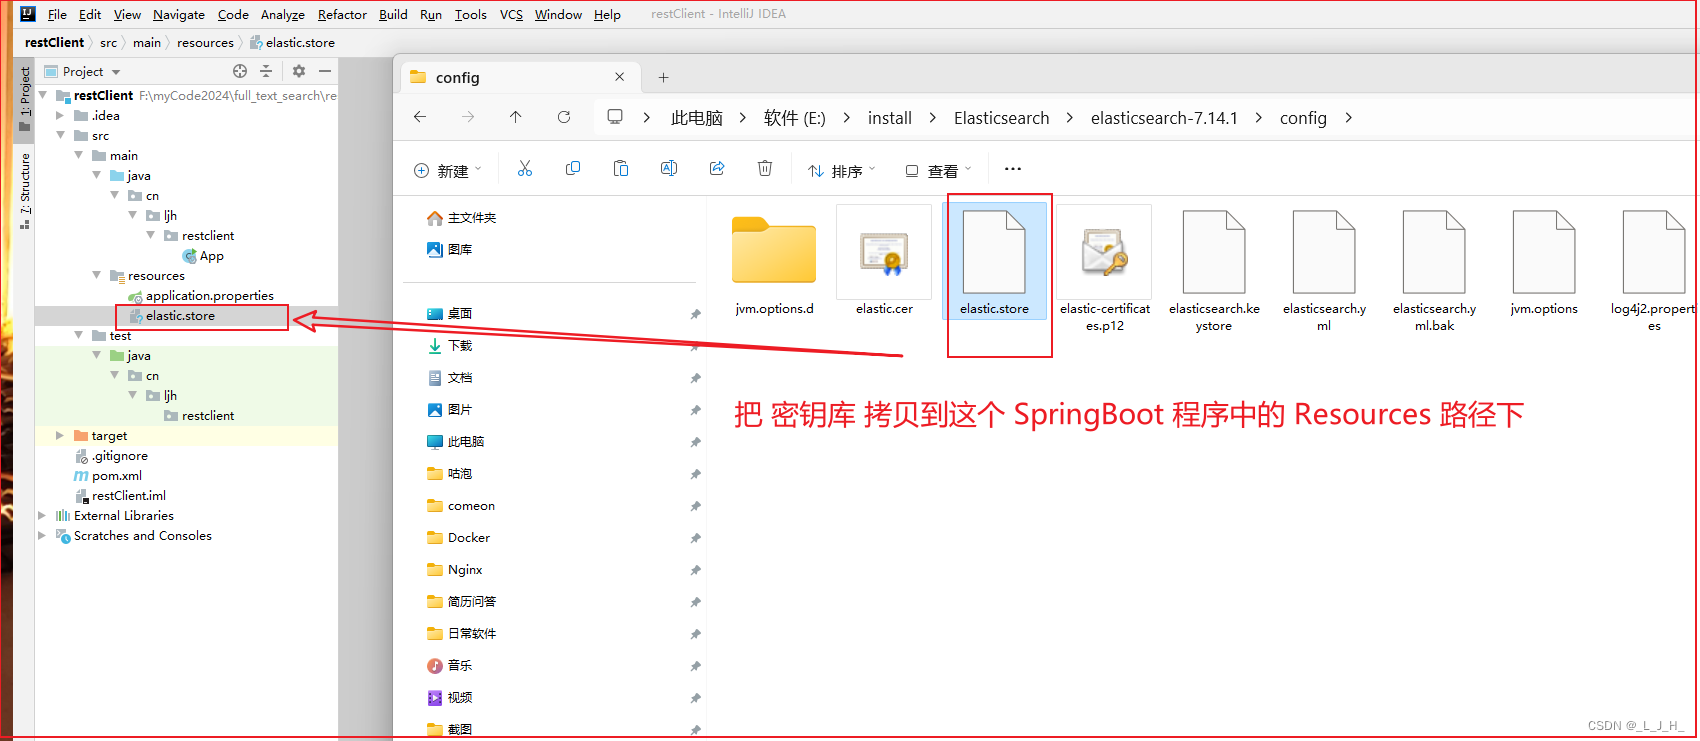
3、将 elastic.store(密钥库)复制到项目的 resources 目录下
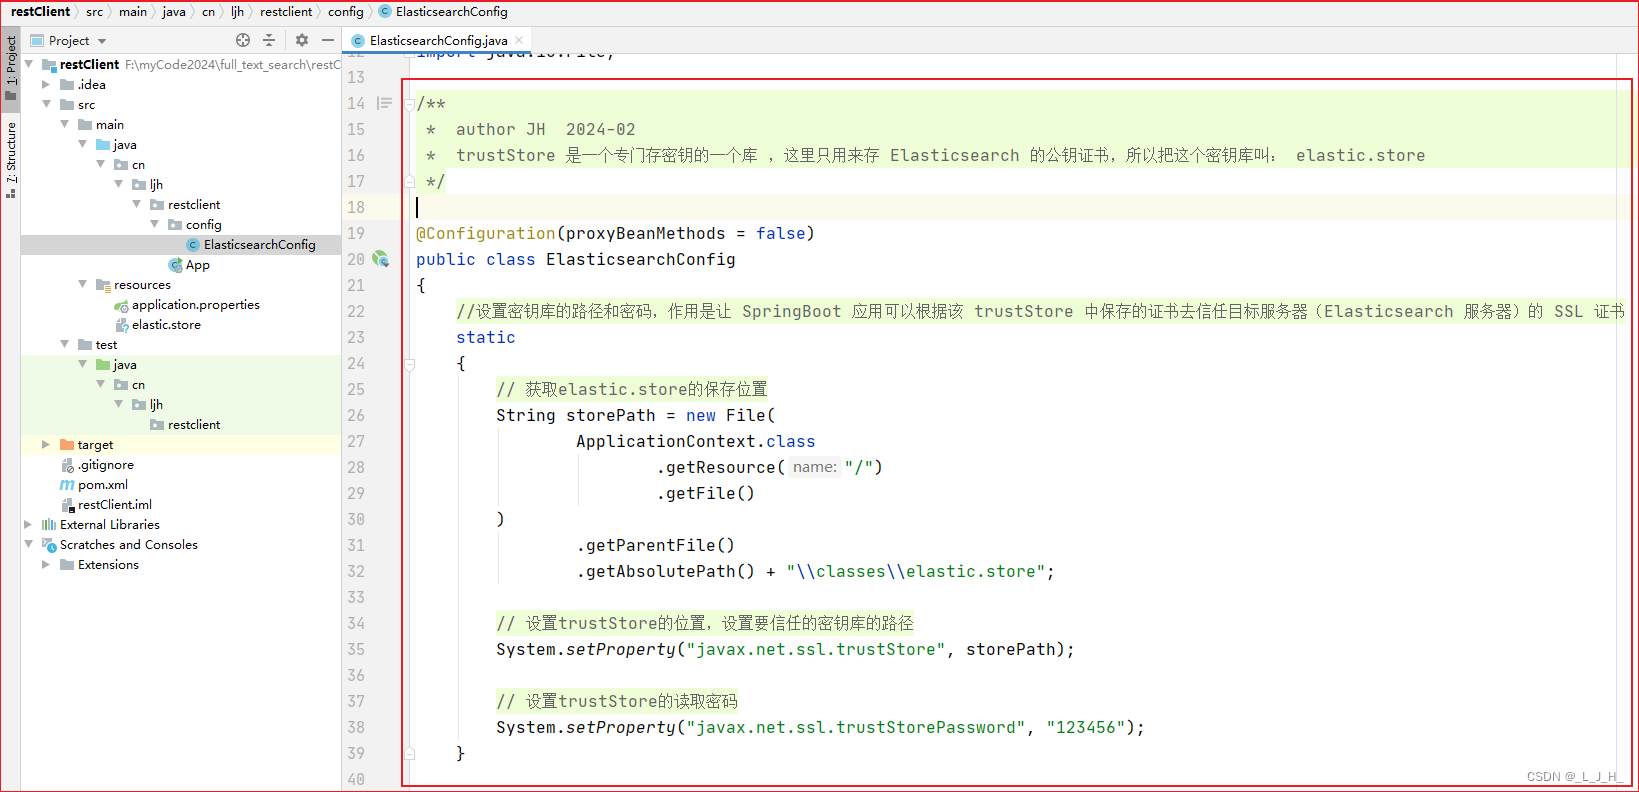
4、创建配置类进行定制
通过 javax.net.ssl.trustStore 系统属性告诉 Spring Boot 到哪里去读取 trustStore(密钥库)文件,并通过 javax.net.ssl.trustStorePassword 属性说明读取 trustStore 的密码。
static
{
    // 获取elastic.store的保存位置
    String storePath = new File(
            ApplicationContext.class
                    .getResource("/")
                    .getFile()
    )
            .getParentFile()
            .getAbsolutePath() + "\\classes\\elastic.store";

    // 设置trustStore的位置,设置要信任的密钥库的路径
    System.setProperty("javax.net.ssl.trustStore", storePath);

    // 设置trustStore的读取密码
    System.setProperty("javax.net.ssl.trustStorePassword", "123456");
}
通过这样的配置,RestClientBuilderCustomizer 就会对容器中的 RestClientBuilder 进行定制。
被我们定制后的 RestClientBuilder 就可以让 SpringBoot 应用去信任我们自签名的SSL证书
具体代码:
application.properties
# 配置Elasticsearch的连接

# 指定ElasticSearch服务器的地址(可以列出多个节点的地址)
spring.elasticsearch.rest.uris=https://127.0.0.1:9200
spring.elasticsearch.rest.read-timeout=10s

# 配置用户名和密码
spring.elasticsearch.rest.username=elastic
spring.elasticsearch.rest.password=123456
ElasticsearchConfig
package cn.ljh.restclient.config;
import org.apache.http.client.config.RequestConfig;
import org.apache.http.conn.ssl.NoopHostnameVerifier;
import org.apache.http.impl.nio.client.HttpAsyncClientBuilder;
import org.elasticsearch.client.RestClientBuilder;
import org.springframework.boot.autoconfigure.elasticsearch.RestClientBuilderCustomizer;
import org.springframework.context.ApplicationContext;
import org.springframework.context.annotation.Bean;
import org.springframework.context.annotation.Configuration;
import java.io.File;
/**
* author JH 2024-02
* trustStore 是一个专门存密钥的一个库 ,这里只用来存 Elasticsearch 的公钥证书,所以把这个密钥库叫: elastic.store
*/
@Configuration(proxyBeanMethods = false)
public class ElasticsearchConfig
{
//设置密钥库的路径和密码,作用是让 SpringBoot 应用可以根据该 trustStore 中保存的证书去信任目标服务器(Elasticsearch 服务器)的 SSL 证书
static
{
// 获取elastic.store的保存位置
String storePath = new File(
ApplicationContext.class
.getResource("/")
.getFile()
)
.getParentFile()
.getAbsolutePath() + "\\classes\\elastic.store";
// 设置trustStore的位置,设置要信任的密钥库的路径
System.setProperty("javax.net.ssl.trustStore", storePath);
// 设置trustStore的读取密码
System.setProperty("javax.net.ssl.trustStorePassword", "123456");
}
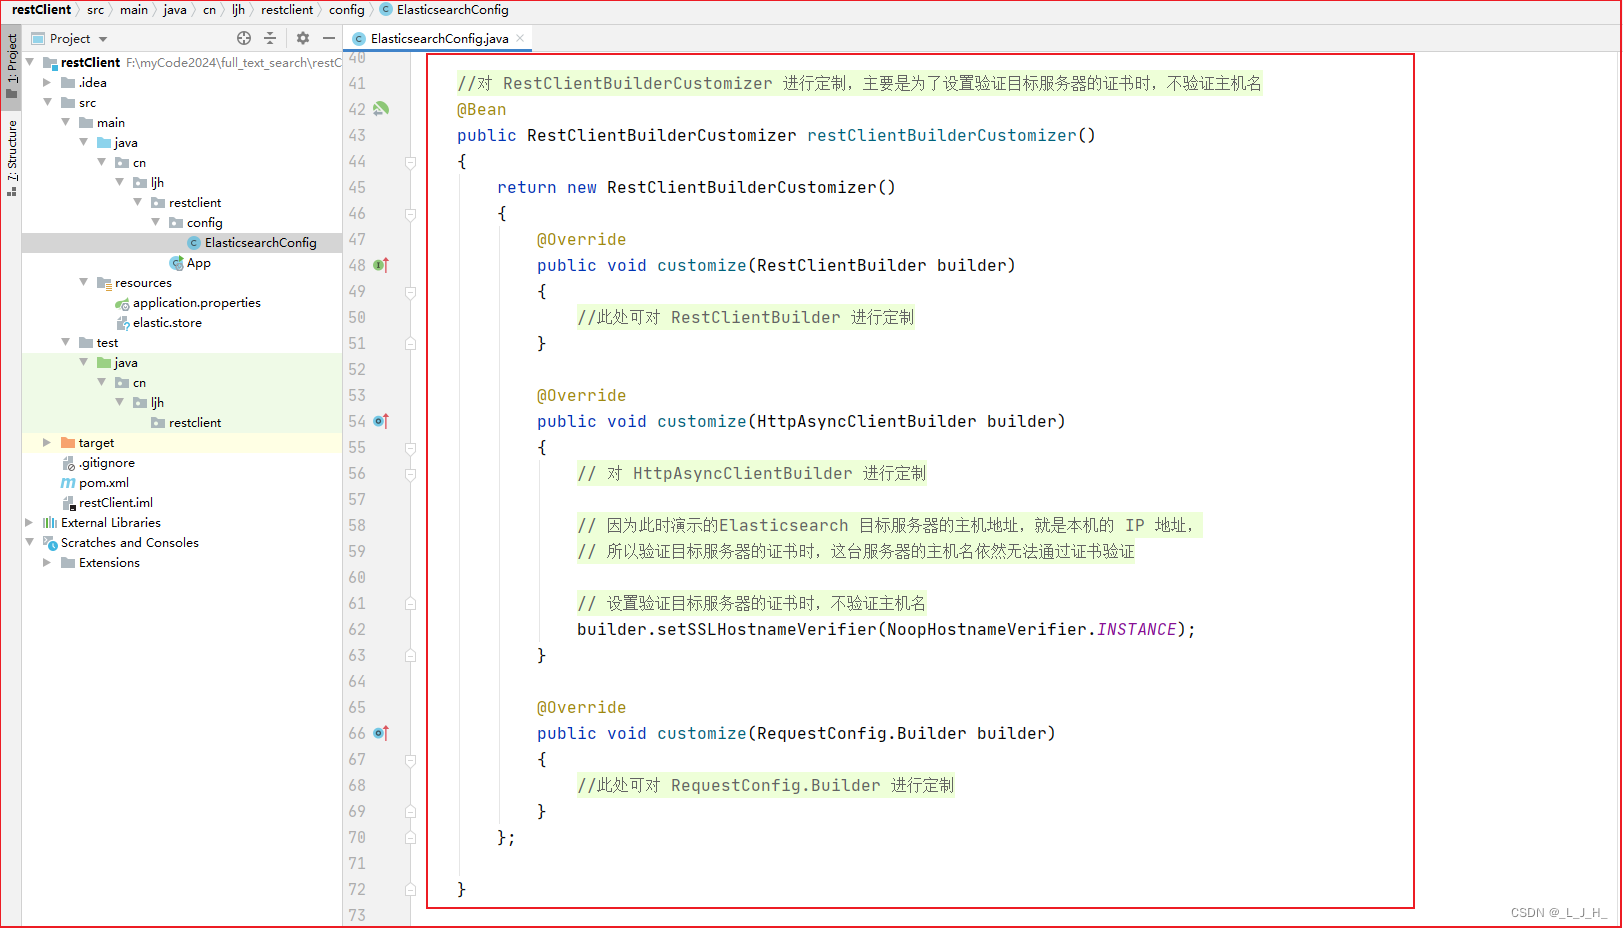
//对 RestClientBuilderCustomizer 进行定制,主要是为了设置验证目标服务器的证书时,不验证主机名
@Bean
public RestClientBuilderCustomizer restClientBuilderCustomizer()
{
return new RestClientBuilderCustomizer()
{
@Override
public void customize(RestClientBuilder builder)
{
//此处可对 RestClientBuilder 进行定制
}
@Override
public void customize(HttpAsyncClientBuilder builder)
{
// 对 HttpAsyncClientBuilder 进行定制
// 因为此时演示的Elasticsearch 目标服务器的主机地址,就是本机的 IP 地址,
// 所以验证目标服务器的证书时,这台服务器的主机名依然无法通过证书验证
// 设置验证目标服务器的证书时,不验证主机名
builder.setSSLHostnameVerifier(NoopHostnameVerifier.INSTANCE);
}
@Override
public void customize(RequestConfig.Builder builder)
{
//此处可对 RequestConfig.Builder 进行定制
}
};
}
}
pom.xml
<?xml version="1.0" encoding="UTF-8"?>
<project xmlns="http://maven.apache.org/POM/4.0.0" xmlns:xsi="http://www.w3.org/2001/XMLSchema-instance"
         xsi:schemaLocation="http://maven.apache.org/POM/4.0.0 https://maven.apache.org/xsd/maven-4.0.0.xsd">
    <modelVersion>4.0.0</modelVersion>
    <parent>
        <groupId>org.springframework.boot</groupId>
        <artifactId>spring-boot-starter-parent</artifactId>
        <version>2.4.5</version>
    </parent>

    <groupId>cn.ljh</groupId>
    <artifactId>restclient</artifactId>
    <version>1.0.0</version>
    <name>restclient</name>

    <properties>
        <java.version>11</java.version>
        <project.build.sourceEncoding>UTF-8</project.build.sourceEncoding>
    </properties>

    <dependencies>
        <dependency>
            <groupId>org.springframework.boot</groupId>
            <artifactId>spring-boot-starter</artifactId>
        </dependency>

        <!-- 添加 HighLevelRest Client -->
        <dependency>
            <groupId>org.elasticsearch.client</groupId>
            <artifactId>elasticsearch-rest-high-level-client</artifactId>
            <version>7.14.1</version>
        </dependency>

        <!-- 开发者工具 -->
        <dependency>
            <groupId>org.springframework.boot</groupId>
            <artifactId>spring-boot-devtools</artifactId>
            <scope>runtime</scope>
            <optional>true</optional>
        </dependency>

        <dependency>
            <groupId>org.projectlombok</groupId>
            <artifactId>lombok</artifactId>
            <optional>true</optional>
        </dependency>

        <dependency>
            <groupId>org.springframework.boot</groupId>
            <artifactId>spring-boot-starter-test</artifactId>
            <scope>test</scope>
        </dependency>
    </dependencies>

    <build>
        <plugins>
            <plugin>
                <groupId>org.springframework.boot</groupId>
                <artifactId>spring-boot-maven-plugin</artifactId>
                <configuration>
                    <excludes>
                        <exclude>
                            <groupId>org.projectlombok</groupId>
                            <artifactId>lombok</artifactId>
                        </exclude>
                    </excludes>
                </configuration>
            </plugin>
        </plugins>
    </build>

</project>


 3913
3913


 被折叠的 条评论
为什么被折叠?
被折叠的 条评论
为什么被折叠?
 到【灌水乐园】发言


