


spring 的五种 增强 结合 责任链 设计模式浅析
本文主要从源码的角度来解析增强的执行顺序,其底层用到了责任链设计模式,之前只是了解责任链,看了一些浅显的解释,刚好在spring源码遇到,机会难得,所以写下这篇文章记录一下。
增强顺序的探究
spring的增强的注解有
- @Before
- @After
- @Around
- @AfterReturning
- @AfterThrowing
环境准备
首先我们要在pom文件引入aop
<!--添加aop-->
<dependency>
  <groupId>org.springframework.boot</groupId>
  <artifactId>spring-boot-starter-aop</artifactId>
</dependency>
Spring 5.2.7 是一个分水岭,期间有顺序的调整,但是其本质没有变化。下面会展示切换两个版本的环境的配置。
我们先使用 Spring 5.2.7 之前版本
Spring 5.2.7 之前的版本环境
<parent>
  <groupId>org.springframework.boot</groupId>
  <artifactId>spring-boot-starter-parent</artifactId>
  <!--2.3.0.RELEASE 2.6.2-->
  <version>2.3.0.RELEASE</version>
  <relativePath/> <!-- lookup parent from repository -->
</parent>
引入的是spring-boot 2.3.0.RELEASE,可以查看内部引用的是 spring 5.2.6
Spring 5.2.7 之后的版本环境
<parent>
  <groupId>org.springframework.boot</groupId>
  <artifactId>spring-boot-starter-parent</artifactId>
  <!--2.3.0.RELEASE 2.6.2-->
  <version>2.6.2</version>
  <relativePath/> <!-- lookup parent from repository -->
</parent>
引入的是spring-boot 2.6.2,可以查看内部引用的是 spring 5.3.14
代码展示
无论是那个版本代码是相同的,唯一变化的就是上面的 pom 文件
- 在启动类上添加
- @EnableAspectJAutoProxy 注解
- 切面类
后面在 debug 的时候,可以把每个增强的都打上断点,通过断点捋顺整体逻辑,后面就可以自己探索了,本文主要是将整体逻辑,详细的细节,大家掌握整体逻辑之后,再解析细节的时候就会简单点。
/**
 * 切面:切点和增强的结合类
 * @author cay
 */
@Aspect
@Slf4j
@Component
public class CayAspect {

    /**
     * 切点的表达式
     */
    @Pointcut("execution(* com.example.demo.aop.Recommendation.recommend(..))")
    public void pointcut(){};

    /**
     * 前置增强
     */
    @Before("pointcut()")
    public void before() {
      	//这里可以打上断点
        log.info("before ......");
    }

    /**
     * 后置增强
     */
    @After("pointcut()")
    public void after() {
      	//这里可以打上断点
        log.info("after ......");
    }

    /**
     * 环绕增强
     * @param joinPoint 连接点
     * @return 切点方法的返回值
     * @throws Throwable 异常
     */
    @Around("pointcut()")
    public Object around(ProceedingJoinPoint joinPoint) throws Throwable {
				//这里可以打上断点
        log.info("around before .......");
      	//这里可以打上断点
        Object proceed = joinPoint.proceed();
      	//这里可以打上断点
        log.info("around after .......");
        return proceed;
    }

    /**
     * 在返回之前
     */
    @AfterReturning("pointcut()")
    public void afterReturn() {
      	//这里可以打上断点
        log.info("afterReturning ......");
    }

    /**
     * 出现异常的时候,本次没有用到
     */
    @AfterThrowing("pointcut()")
    public void afterThrow() {
      	//这里可以打上断点
        log.info("afterThrowing ......");
    }
}
注解示意:
- @Aspect : 表明这是一个切面类,方便spring识别。
- @Slf4j : lombok的注解,主要是用来打印日志
- @Component :加入spring容器,交给spring管理
- 被增强的类
/**
 * 需要增强的类
 * @author cay
 */
@Slf4j
@Component
public class Recommendation {

    /**
     * 需要增强的方法
     */
    public void recommend() {
        //这里可以打上断点
        log.info("推荐动漫: 小妖怪的夏天");
    }
}
- 测试类
/**
 * aop 的测试类
 * @author cay
 */
@ExtendWith(SpringExtension.class)
@SpringBootTest
class RecommendationTest {

    @Autowired
    private Recommendation recommendation;

    @Test
    public void testRecommend() {
        recommendation.recommend();
    }
}
spring 5.2.7 之前版本结果
around before .......
before ......
推荐动漫: 小妖怪的夏天
around after .......
after ......
afterReturning ......
可以看到 around 把 before 和 增强 包围起来了,且 增强 紧随在 before 之后
spring 5.2.7 之后版本结果
around before .......
before ......
推荐动漫: 小妖怪的夏天
afterReturning ......
after ......
around after .......
可以看到 around 把 before 、增强、 afterReturning 和 after 包围起来了,和上面的 spring 5.2.7 一样,增强 紧跟着 before
注意:
后面分析源码可以看到,有个排序后的集合,只要在 around 的后面,则会 around 包围,所以上面就以 around 作为触点,展开介绍了。
源码分析 spring 5.2.7之前版本(责任链)
先使用 spring 5.2.6版本。
靶点:ReflectiveMethodInvocation
源码:
// ReflectiveMethodInvocation.java
@Override
@Nullable
public Object proceed() throws Throwable {
    // We start with an index of -1 and increment early.
    if (this.currentInterceptorIndex == this.interceptorsAndDynamicMethodMatchers.size() - 1) {
      	return invokeJoinpoint();
    }

    Object interceptorOrInterceptionAdvice =
      this.interceptorsAndDynamicMethodMatchers.get(++this.currentInterceptorIndex);
    if (interceptorOrInterceptionAdvice instanceof InterceptorAndDynamicMethodMatcher) {
      	//不属于本次相关的代码省略
      	......
    }
    else {
      	//这次分析的主要代码,在这里打上断点。
      	return ((MethodInterceptor) interceptorOrInterceptionAdvice).invoke(this);
    }
}
我们自己写的代码打上断点,加上源码的这个断点,就可以开启我们的源码旅程,后面边探索,边添加断点。
debug旅程
1. 进入 ReflectiveMethodInvocation
开启 debug 之后,我们没在测试单元打断点,则会直接进入 ReflectiveMethodInvocation ,到达我们在源码的打的断点。
断点截图如下:
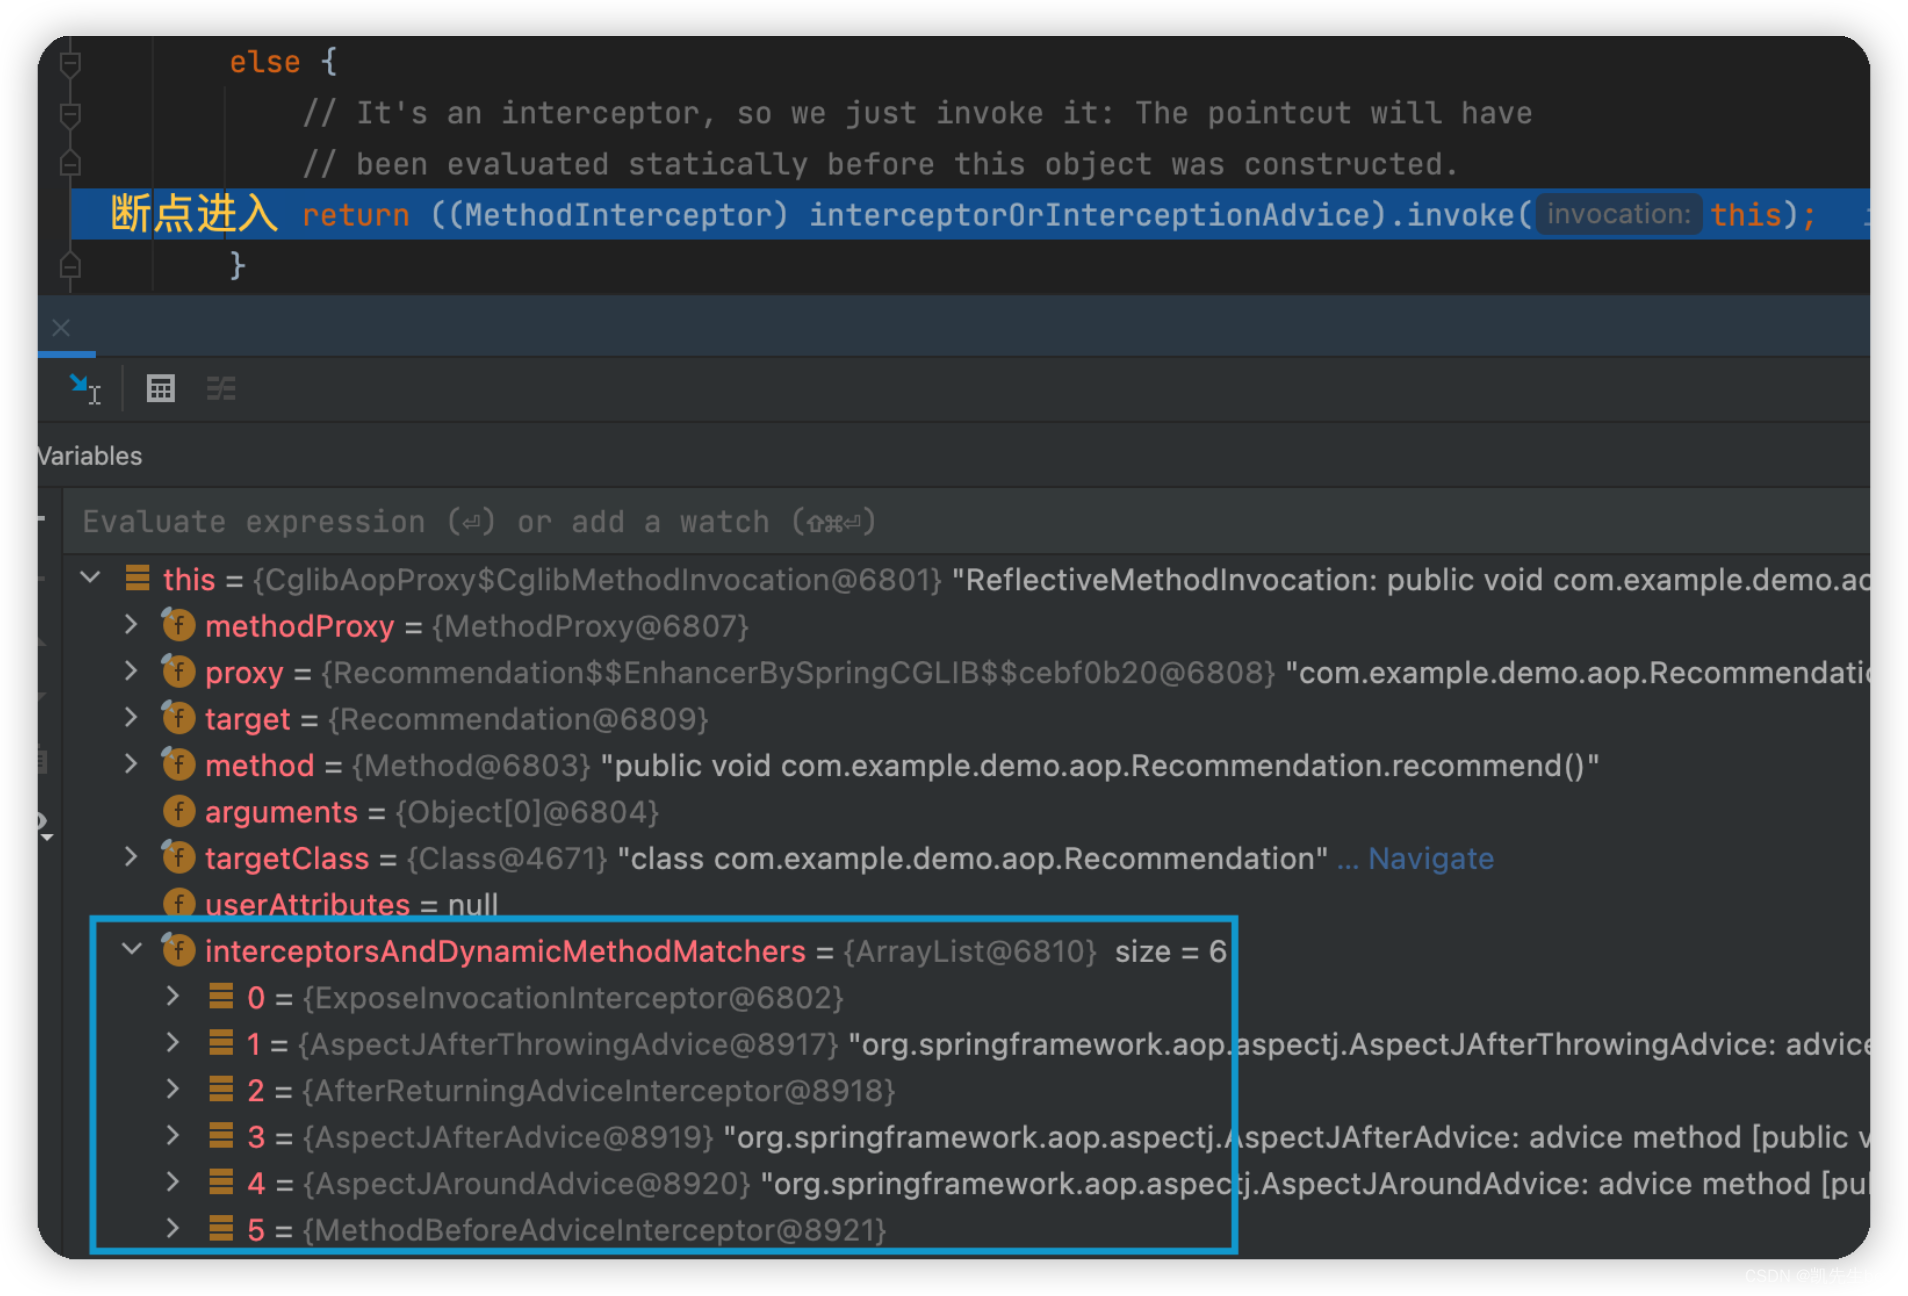
从上述截图中,我们找到 this 的 interceptorsAndDynamicMethodMatchers 。这是一个已经排好序的拦截器数组。
暂时 0 位置的的拦截器不看,剩下的顺序:
- AspectJAfterThrowingAdvice : 对应 CayAspect.afterThrow()
- AspectJAfterReturningAdvice :对应 CayAspect.afterReturn()
- AspectJAfterAdvice : 对应 CayAspect.after()
- AspectJAroundAdvice : 对应 CayAspect.around()
- AspectJMethodBeforeAdvice : 对应 CayAspect.before()
可见,这里既不是按照我们在 CayAspect 中的书写的顺序,也不是按照它的结果输出的顺序进行排序。
但是这里的 ArrayList 的顺序可以代表进入不同类型拦截器的顺序,下面就是源码的时候可以对照这个ArrayList的顺序
2. 进入 ExposeInvocationInterceptor
ExposeInvocationInterceptor 源码展示:
@Override
public Object invoke(MethodInvocation mi) throws Throwable {
    MethodInvocation oldInvocation = invocation.get();
    invocation.set(mi);
    try {
      //在这里的时候进入,会进入 CglibAopProxy
      return mi.proceed();
    }
    finally {
      invocation.set(oldInvocation);
    }
}
CglibAopProxy 源码:
@Override
@Nullable
public Object proceed() throws Throwable {
    try {
      //在这里进入,之后就会达到我们在源码 ReflectiveMethodInvocation 的断点
      return super.proceed();
    }
  	......
}
以上这两个类,没有添加断点,不是主任务,后面再进行 debug 的时候,会放行跳过,这里只是带着了解一下。
3. 进入 AspectJAfterThrowingAdvice
@Override
public Object invoke(MethodInvocation mi) throws Throwable {
    try {
      	/*
      			这里使用了 try catch 包围,直接调用了 mi.proceed(),
      			会和上面的一样走进CglibAopProxy,再回到 ReflectiveMethodInvocation
      			在这里可以添加一个断点,整体逻辑的一部分。
      	*/
      	return mi.proceed();
    }
    catch (Throwable ex) {
        if (shouldInvokeOnThrowing(ex)) {
          	invokeAdviceMethod(getJoinPointMatch(), null, ex);
        }
        throw ex;
    }
}
可见,进入 AspectJAfterThrowingAdvice 只是增加 try catch,然后继续调用了。
4. 进入 AfterReturningAdviceInterceptor
@Override
public Object invoke(MethodInvocation mi) throws Throwable {
  	/*
  			先在这里进入,会和上面的一样走进CglibAopProxy,再回到 ReflectiveMethodInvocation
  			在这里添加一个断点。
  	*/
    Object retVal = mi.proceed();
  	/*
  			在调用之后,执行@AfterReturning的方法。
  			在这里添加一个断点
  	*/
    this.advice.afterReturning(retVal, mi.getMethod(), mi.getArguments(), mi.getThis());
    return retVal;
}
5. 进入 AspectJAfterAdvice
@Override
	public Object invoke(MethodInvocation mi) throws Throwable {
		try {
      /*
      		添加了 try finally。
      		在这里直接调用 mi.proceed(),会和上面的一样走进CglibAopProxy,再回到 ReflectiveMethodInvocation
      		在这里添加断点
      */
			return mi.proceed();
		}
		finally {
      // 执行@After注解标记的方法,在这里添加一个断点
			invokeAdviceMethod(getJoinPointMatch(), null, null);
		}
	}
进入 AspectJAroundAdvice
@Override
public Object invoke(MethodInvocation mi) throws Throwable {
    if (!(mi instanceof ProxyMethodInvocation)) {
      	throw new IllegalStateException("MethodInvocation is not a Spring ProxyMethodInvocation: " + mi);
    }
    ProxyMethodInvocation pmi = (ProxyMethodInvocation) mi;
    ProceedingJoinPoint pjp = lazyGetProceedingJoinPoint(pmi);
    JoinPointMatch jpm = getJoinPointMatch(pmi);
  	/*
  			在这里可以添加一个断点,经过一系列操作会调用 @Round 注解标记的方法,
  			在 @Round 注解标记的方法 我们可以调用需要增强的方法。
  	*/
    return invokeAdviceMethod(pjp, jpm, null, null);
}
这里就没 mi.proceed(),但是 @Around 注解标记的方法中,我们写了 joinPoint.proceed(),可以调用被增强的方法。
接着会进入我们 @Around注解标记的方法
/**
* 环绕增强
* @param joinPoint 连接点
* @return 切点方法的返回值
* @throws Throwable 异常
*/
@Around("pointcut()")
public Object around(ProceedingJoinPoint joinPoint) throws Throwable {

  // 会先执行,所以这里是第一个打印的,要比 @Before 注解标记的方法还要先执行
  log.info("around before .......");
  // 接着循环调用,会和上面的一样走进CglibAopProxy,再回到 ReflectiveMethodInvocation
  Object proceed = joinPoint.proceed();
  log.info("around after .......");
  return proceed;
}
进入 MethodBeforeAdviceInterceptor
@Override
public Object invoke(MethodInvocation mi) throws Throwable {
  	//先执行 @Before 注解标记的方法。
    this.advice.before(mi.getMethod(), mi.getArguments(), mi.getThis());
  	//继续调用,但是已经是最后一个了,后面会执行 mi.proceed() 之后的语句了。
    return mi.proceed();
}
比较 MethodBeforeAdviceInterceptor 和 AspectJAfterAdvice 就可以看出端倪。在 @Before 和 @Around 之前都是先执行 mi.proceed(),不断的执行循环调用,可以理解成方法递归,当执行到 @Before 和 @Around 的时候,这里就是用到了责任链设计模式。
责任链模式
简介和简单实用,直接看菜鸟教程就行,地址链接:
https://www.runoob.com/design-pattern/chain-of-responsibility-pattern.html
菜鸟教程的简单实例感觉就是 多态 + Node节点不断链式调用,通过多态调用对应的实现,简单直接。
spring的责任链模式,虽然也是靠着多态调用对应的实现,但是又融合了类似递归的东西。
//ReflectiveMethodInvocation.java
//从List获取拦截器
Object interceptorOrInterceptionAdvice = this.interceptorsAndDynamicMethodMatchers.get(++this.currentInterceptorIndex);
//调用拦截器,需要把自己作为参数传进去
((MethodInterceptor)interceptorOrInterceptionAdvice).invoke(this);

//MethodInterceptor.java
Object invoke(MethodInvocation invocation) throws Throwable;
//实现类中有 ReflectiveMethodInvocation 的实例额,于是又调用proceed(),这样就可以取出下一个拦截器了
invocation.proceed()
大致画了一下类图:

补充:
如果想看对拦截器的排序 ,靶点:AbstractAdvisorAutoProxyCreator
源码分析 spring 5.2.7之后版本
ArrayList集合顺序:
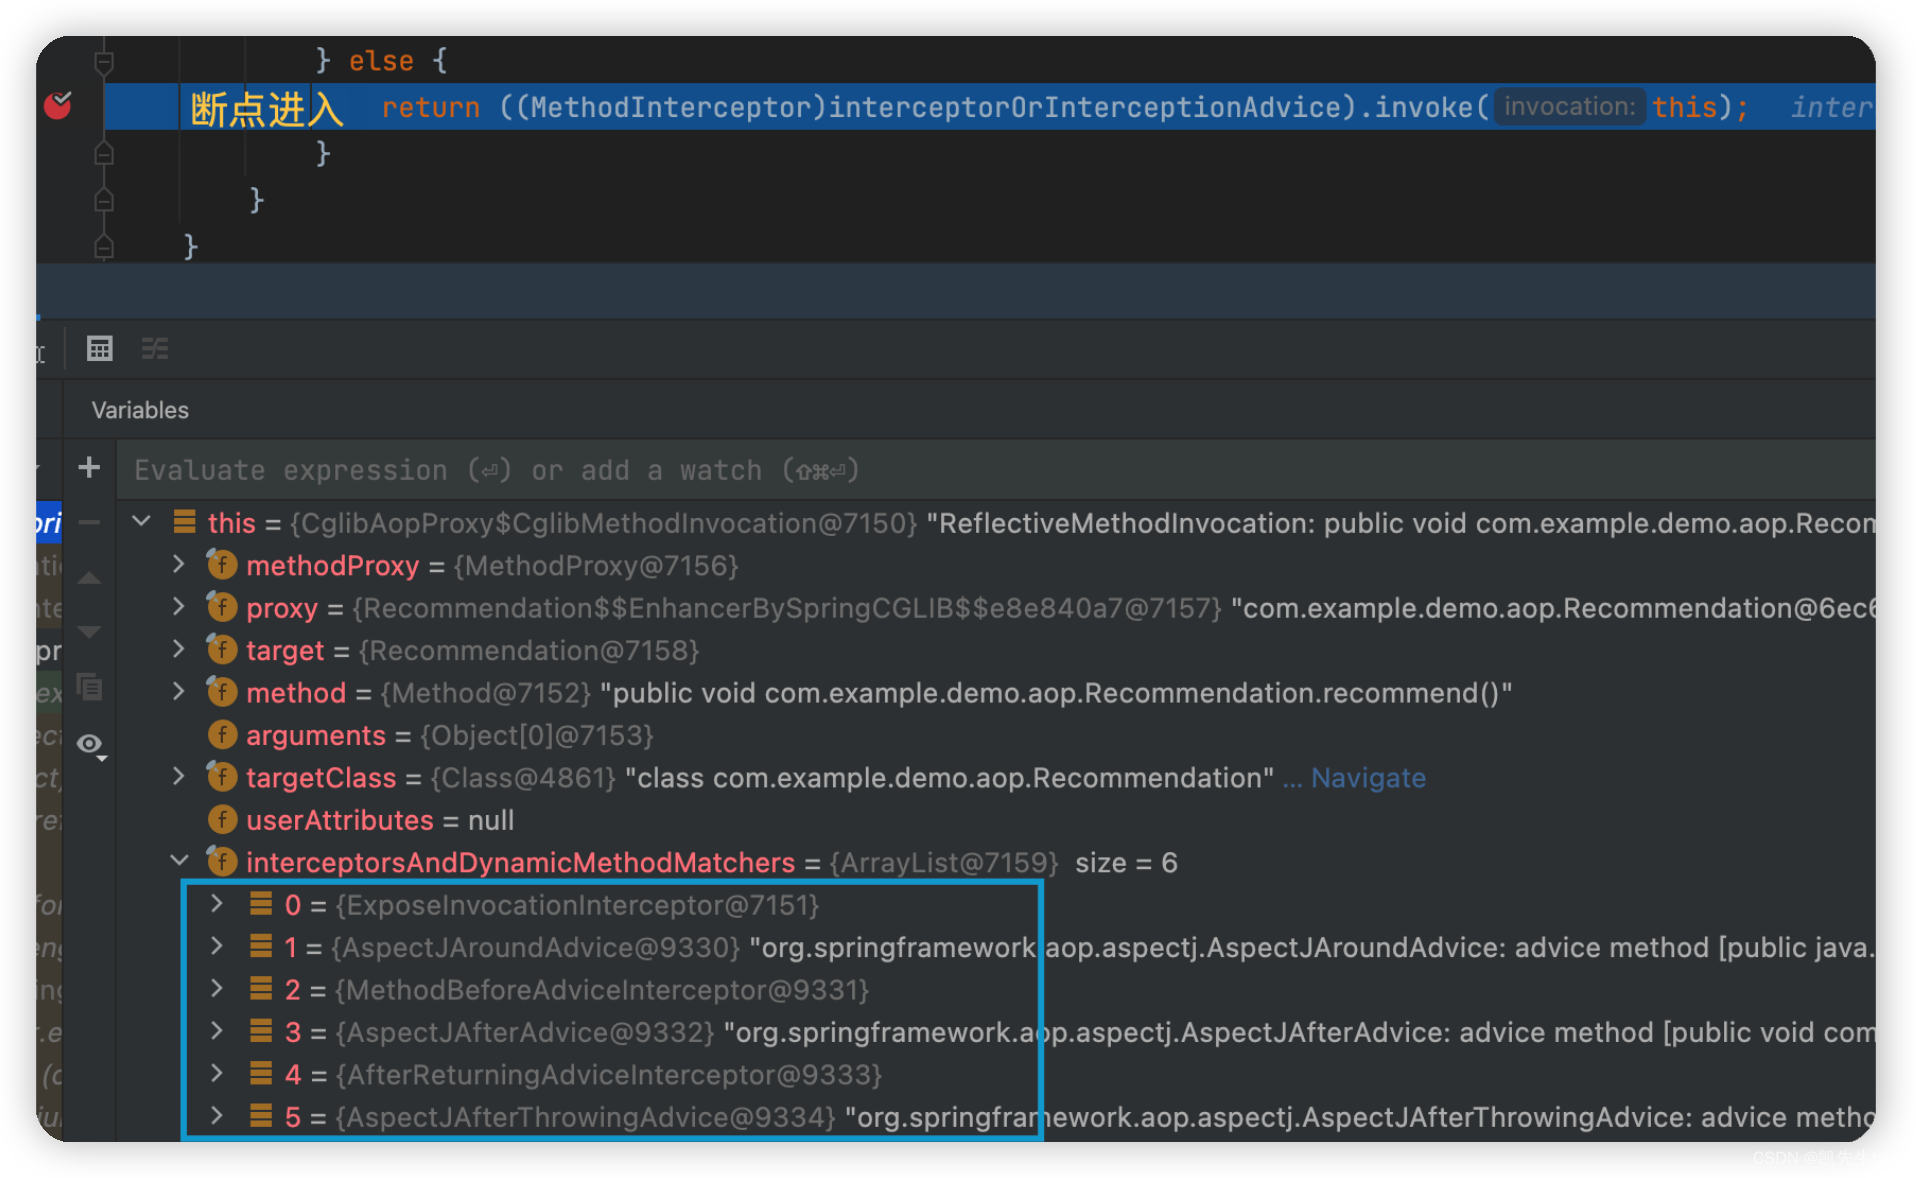
暂时 0 位置的的拦截器不看,剩下的顺序:
- AspectJAroundAdvice : 对应 CayAspect.around()
- AspectJMethodBeforeAdvice : 对应 CayAspect.before()
- AspectJAfterAdvice : 对应 CayAspect.after()
- AspectJAfterReturningAdvice : 对应 CayAspect.afterReturn()
- AspectJAfterThrowingAdvice: 对应 CayAspect.afterThrow()
spring 5.2.7之前版本的顺序:
- AspectJAfterThrowingAdvice : 对应 CayAspect.afterThrow()
- AspectJAfterReturningAdvice :对应 CayAspect.afterReturn()
- AspectJAfterAdvice : 对应 CayAspect.after()
- AspectJAroundAdvice : 对应 CayAspect.around()
- AspectJMethodBeforeAdvice : 对应 CayAspect.before()
新的版本将 around 排在了第一位,around会将所有在他后面的进行包围,所以日志结果是这样的
around before .......
before ......
推荐动漫: 小妖怪的夏天
afterReturning ......
after ......
around after .......
又因为 这里用的责任链类似于方法的递归。所以afterReturning,after 谁在ArrayList集合的后面,反而先执行。由于 spring 5.2.7 版本前后的ArrayList的顺序不同,所以执行顺序也发生了变化。
剩下的spring 5.2.7之后的版本的源码,大家可以自己看,套路都是一样。
华点
来点脑袋抽搐的想法。上面就说到了,spring在用户使用@Round注解的时候,把链式调用交给了用户,如果我们不进行链式,那么不就会丢失 @Round 的拦截器吗?所以我们来试一下。
首先去掉调用被增强方法
/**
* 环绕增强
* @param joinPoint 连接点
* @return 切点方法的返回值
* @throws Throwable 异常
*/
@Around("pointcut()")
public Object around(ProceedingJoinPoint joinPoint) throws Throwable {

    log.info("around before .......");
    //这里注释掉
    //Object proceed = joinPoint.proceed();
    log.info("around after .......");
    //这里是返回调用被调用方法的返回值,我们没有返回值,可以改成null
  	return null;
}
spring 5.2.7 之前版本(本文使用的是 spring 5.2.6)
其他保持不变,日志打印结果如下:
around before .......
around after .......
after ......
afterReturning ......
可以看到 before 和 被增强的方法的日志 没有了。
spring 5.2.7 之后版本(本文使用的是 spring 5.3.14)
其他保持不变,日志打印结果如下:
around before .......
around after .......
可以看到只剩下 around 了。


 4976
4976


 被折叠的 条评论
为什么被折叠?
被折叠的 条评论
为什么被折叠?
 到【灌水乐园】发言


