


1. 组网需求
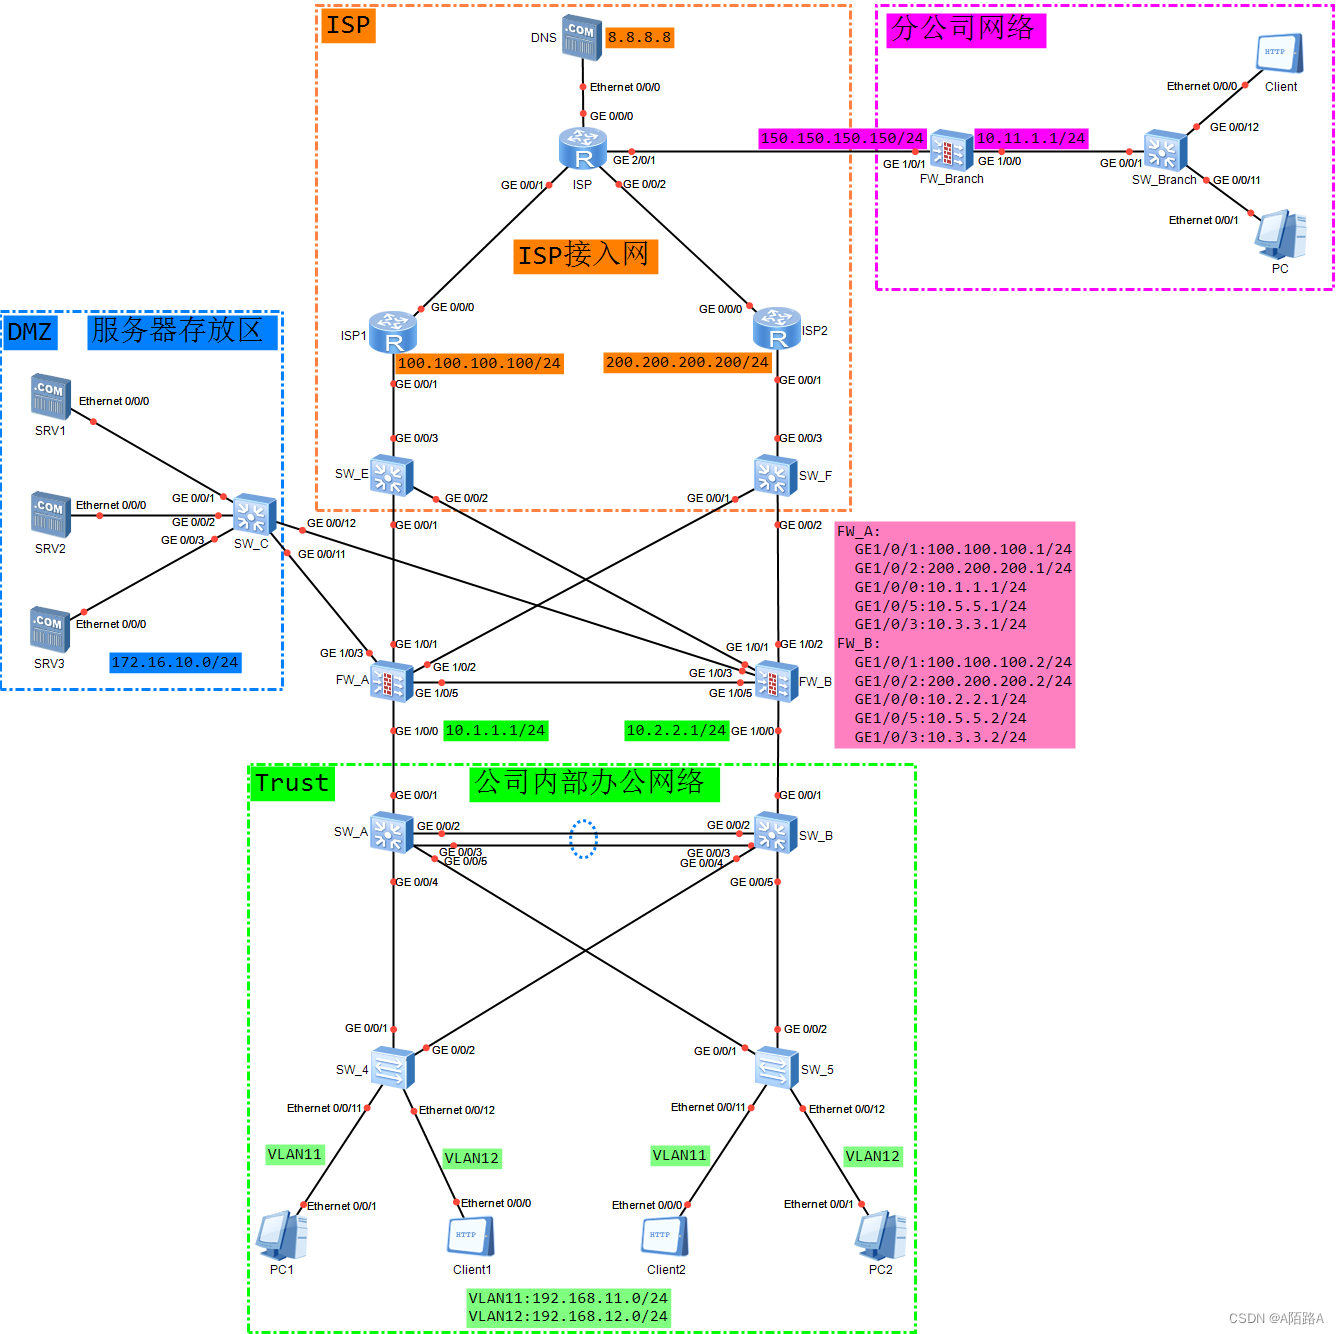
两台 FW 的业务接口都工作在三层,上下行分别连接交换机
上行的两台交换机 分别连接到不同的运营商,其中
ISP1 分配给企业的 IP 地址为 100.100.100.1、100.100.100.2、 100.100.100.3
ISP2 分配给企业的 IP 地址为 200.200.200.1、200.200.200.2、200.200.200.3
分支机构分别与总部的 100.100.100.3、200.200.200.3 建立 VPN 连接,且各自使用各自的网关上 网; 现在希望两台 FW 以负载分担方式工作,
部门 A 的用户(192.168.11.0/24)的流量去往 ISP1
部门 B(192.168.12.0/24)的流量去往 ISP2
正常情况下,FW_A 和 FW_B 共同转发流 量。当其中一台 FW 出现故障时,另外一台 FW 转发全部业务,保证业务不中断
2. 使用主要技术
双机热备技术:VRRP,VGMP,HRP
服务器负载均衡技术:SLB
安全的 VPN 技术:IPSec-VPN
智能选路:策略路由
3. 操作步骤
3.1 规划与配置
| 设备编码 | 接口 | 数据 | 设备编码 | 接口 | 数据 |
|---|---|---|---|---|---|
| FW_A | GE1/0/0 | 10.1.1.1/24 | FW_B | GE1/0/0 | 10.2.2.1/24 |
| GE1/0/1 | 100.100.100.1/24 VIP:100.100.100.3 | GE1/0/1 | 100.100.100.2/24 VIP:100.100.100.3 | ||
| GE1/0/2 | 200.200.200.1/24 VIP:200.200.200.3 | GE1/0/2 | 200.200.200.2/24 VIP:200.200.200.3 | ||
| GE1/0/3 | 10.3.3.1/24 | GE1/0/3 | 10.3.3.2/24 | ||
| GE1/0/5 | 10.5.5.1/24 | GE1/0/5 | 10.5.5.2/24 | ||
| SW_A | GE0/0/1 | VLan10:10.1.1.2/24 | SW_B | GE0/0/1 | VLan10:10.2.2.2/24 |
| GE0/0/4 | VLan11:192.168.11.254/24 VIP:192.168.11.1 | GE0/0/4 | VLan11:192.168.11.253/24 VIP:192.168.11.1 | ||
| GE0/0/5 | VLan12:192.168.12.254/24 VIP:192.168.12.1 | GE0/0/5 | VLan12:192.168.12.253/24 VIP:192.168.12.1 | ||
| SW_C | GE0/0/11 GE0/0/12 | VLan10:10.3.3.3/24 | |||
| GE0/0/1 GE0/0/2 GE0/0/3 | VLan172:172.16.10.1/24 | SRV1:172.16.10.101/24 SRV2:172.16.10.102/24 SRV3:172.16.10.103/24 | |||
| FW_Branch | GE1/0/1 | 150.150.150.150/24 | |||
| GE1/0/0 | 10.11.1.1/24 | ||||
| ISP1 | GE0/0/1 | 100.100.100.100/24 | |||
| ISP2 | GE0/0/1 | 200.200.200.200/24 |
3.2 模拟 ISP 网络
这里我采用 IS-IS 来模拟 ISP 网络,ISP1 是 100.100.100.0/24 网段,ISP2 是 200.200.200.0 网段; 配置如下
ISP1:
[ISP1] router id 1.1.1.1
[ISP1] isis 10
[ISP1-isis-10] is-level level-2
[ISP1-isis-10] network-entity 49.0010.0010.0100.1001.00    //49.0010区域ID、0010.0100.101系统ID、00 SEL选择符,对于NET地址是00
[ISP1] interface GigabitEthernet 0/0/0
[ISP1-GigabitEthernet0/0/0] ip address 10.10.100.1 255.255.255.0    //使用私网地址作为运营商内部设备互联
[ISP1-GigabitEthernet0/0/0] isis enable 10
[ISP1] interface GigabitEthernet 0/0/1
[ISP1-GigabitEthernet0/0/1] ip address 100.100.100.100 255.255.255.0    //外部互联网地址
[ISP1-GigabitEthernet0/0/1] isis enable 10
ISP2:
[ISP2] router id 2.2.2.2
[ISP2] isis 10
[ISP2-isis-10] is-level level-2
[ISP2-isis-10] network-entity 49.0010.0020.0200.2002.00
[ISP2] interface GigabitEthernet 0/0/0
[ISP2-GigabitEthernet0/0/0] ip address 10.10.200.2 255.255.255.0
[ISP2-GigabitEthernet0/0/0] isis enable 10
[ISP2] interface GigabitEthernet 0/0/1
[ISP2-GigabitEthernet0/0/1] ip address 200.200.200.200 255.255.255.0
[ISP2-GigabitEthernet0/0/1] isis enable 10
ISP:作为两个运营互联互通节点
[ISP] router id 3.3.3.3
[ISP] isis 10
[ISP-isis-10] is-level level-2
[ISP-isis-10] network-entity 49.0010.0030.0300.3003.00
[ISP] interface GigabitEthernet 0/0/0
[ISP-GigabitEthernet0/0/0] ip address 8.8.8.1 255.255.255.0    //模拟DNS所在网段
[ISP-GigabitEthernet0/0/0] isis enable 10
[ISP] interface GigabitEthernet 0/0/1
[ISP-GigabitEthernet0/0/1] ip address 10.10.100.3 255.255.255.0
[ISP-GigabitEthernet0/0/1] isis enable 10
[ISP] interface GigabitEthernet 0/0/2
[ISP-GigabitEthernet0/0/2] ip address 10.10.200.3 255.255.255.0
[ISP-GigabitEthernet0/0/2] isis enable 10
在 ISP 路由器上查看 ISIS 路由表
<ISP>dis isis route
3.3 配置总部内部网络
3.3.1 汇聚交换机配置
SW_A
sysname SW_A
[SW_A] vlan batch 10 to 12
[SW_A] stp instance 11 priority 4096    //设置实例 11 的优先级,让实例 11 在 SW_A 为Master
[SW_A] stp instance 12 priority 8192    //设置实例 12 的优先级,让实例 12 在 SW_B 为Backup
[SW_A] stp region-configuration
[SW_A-mst-region] region-name xh    //配置 MSTP 域名,所有参与 MSTP 的交换机的域名应为相同的。企业网内不建议多域
[SW_A-mst-region] revision-level 1    //配置修订级别,修订级别可以在域名和 VLAN映射表相同的情况下,来区分不同的域
[SW_A-mst-region] instance 11 vlan 11    //配置实例与 VLAN 的映射关系
[SW_A-mst-region] instance 12 vlan 12     //配置实例与 VLAN 的映射关系
[SW_A-mst-region] active region-configuration    //激活 MSTP 配置,如果没有这条命令,MSTP配置将不会生效
[SW_A] dhcp enable
[SW_A] ip pool vlan11
[SW_A-ip-pool-vlan11] gateway-list 192.168.11.1
[SW_A-ip-pool-vlan11] network 192.168.11.0 mask 255.255.255.0
[SW_A-ip-pool-vlan11] excluded-ip-address 192.168.11.2 192.168.11.10
[SW_A-ip-pool-vlan11] excluded-ip-address 192.168.11.150 192.168.11.254
[SW_A-ip-pool-vlan11] dns-list 8.8.8.8
[SW_A] ip pool vlan12
[SW_A-ip-pool-vlan12] gateway-list 192.168.12.1
[SW_A-ip-pool-vlan12] network 192.168.12.0 mask 255.255.255.0
[SW_A-ip-pool-vlan12] excluded-ip-address 192.168.12.2 192.168.12.10
[SW_A-ip-pool-vlan12] excluded-ip-address 192.168.12.150 192.168.12.254    //由于交换机主设备上的地址池信息不能实时备份到备设备上,为防止主备切换后出现 IP 地址分配冲突,主设备和备设备上配置的地址池必须要互相排除。
[SW_A-ip-pool-vlan12] dns-list 8.8.8.8
[SW_A] interface Vlanif 10
[SW_A-Vlanif10] ip address 10.1.1.2 255.255.255.0
[SW_A] interface Vlanif 11
[SW_A-Vlanif11] ip address 192.168.11.254 255.255.255.0
[SW_A-Vlanif11] vrrp vrid 11 virtual-ip 192.168.11.1    //配置 VRRP 的虚拟地址,客户机利用此 IP 作为网关,达到冗余的目的(此地址可以与主 IP 不在同一网段)
[SW_A-Vlanif11] vrrp vrid 11 priority 111    //设置 VRRP 的抢占优先级,默认为 100,值越大优先级越高
[SW_A-Vlanif11] vrrp vrid 11 preempt-mode timer delay 10//设置抢占时间,10s抢占
[SW_A-Vlanif11] vrrp vrid 11 track interface GigabitEthernet 0/0/1 reduced 50//追踪上行接口,如果接口down了优先级减少50
[SW_A-Vlanif11] dhcp select global
[SW_A] interface Vlanif 12
[SW_A-Vlanif12] ip address 192.168.12.254 255.255.255.0
[SW_A-Vlanif12] vrrp vrid 12 virtual-ip 192.168.12.1
[SW_A-Vlanif12] dhcp select global
[SW_A] interface Eth-Trunk1
[SW_A-Eth-Trunk1] trunkport GigabitEthernet 0/0/2 to 0/0/3
[SW_A-Eth-Trunk1] port link-type trunk
[SW_A-Eth-Trunk1] port trunk allow-pass vlan 2 to 4094
[SW_A-Eth-Trunk1] mode lacp-static//选择工作,模式LACP
[SW_A-Eth-Trunk1] max active-linknumber 1//选择最大工作链路
[SW_A] interface GigabitEthernet 0/0/1
[SW_A-GigabitEthernet0/0/1] port link-type access
[SW_A-GigabitEthernet0/0/1] port default vlan 10
[SW_A] interface GigabitEthernet 0/0/4
[SW_A-GigabitEthernet0/0/4] port link-type trunk
[SW_A-GigabitEthernet0/0/4] port trunk allow-pass vlan 11 to 12
[SW_A] interface GigabitEthernet 0/0/5
[SW_A-GigabitEthernet0/0/5] port link-type trunk
[SW_A-GigabitEthernet0/0/5] port trunk allow-pass vlan 11 to 12
[SW_A] ospf 1 router-id 3.3.3.3
[SW_A-ospf-1] area 0.0.0.0
[SW_A-ospf-1-area-0.0.0.0] network 10.1.1.2 0.0.0.0
[SW_A-ospf-1-area-0.0.0.0] network 192.168.11.0 0.0.0.255
[SW_A-ospf-1-area-0.0.0.0] network 192.168.12.0 0.0.0.255
[SW_A] user-interface con 0
[SW_A-ui-console0] idle-timeout 0 0     //配置 Console 口连接永不超时,主要用于实验方便,在实际网络中为了安全起见最好不这么做
SW_B
sysname SW_B
[SW_B] vlan batch 10 to 12
[SW_B] stp instance 11 priority 8192
[SW_B] stp instance 12 priority 4096
[SW_B] stp region-configuration
[SW_B-mst-region] region-name xh
[SW_B-mst-region] revision-level 1
[SW_B-mst-region] instance 11 vlan 11
[SW_B-mst-region] instance 12 vlan 12
[SW_B-mst-region] active region-configuration
[SW_B] dhcp enable
[SW_B] ip pool vlan11
[SW_B-ip-pool-vlan11] gateway-list 192.168.11.1
[SW_B-ip-pool-vlan11] network 192.168.11.0 mask 255.255.255.0
[SW_B-ip-pool-vlan11] excluded-ip-address 192.168.11.2 192.168.11.149
[SW_B-ip-pool-vlan11] excluded-ip-address 192.168.11.250 192.168.11.254
[SW_B-ip-pool-vlan11] dns-list 8.8.8.8
[SW_B] ip pool vlan12
[SW_B-ip-pool-vlan12] gateway-list 192.168.12.1
[SW_B-ip-pool-vlan12] network 192.168.12.0 mask 255.255.255.0
[SW_B-ip-pool-vlan12] excluded-ip-address 192.168.12.2 192.168.12.149
[SW_B-ip-pool-vlan12] excluded-ip-address 192.168.12.250 192.168.12.254
[SW_B-ip-pool-vlan12] dns-list 8.8.8.8
[SW_B] interface Vlanif 10
[SW_B-Vlanif10] ip address 10.2.2.2 255.255.255.0
[SW_B] interface Vlanif 11
[SW_B-Vlanif11] ip address 192.168.11.253 255.255.255.0
[SW_B-Vlanif11] vrrp vrid 11 virtual-ip 192.168.11.1
[SW_B-Vlanif11] dhcp select global
[SW_B] interface Vlanif 12
[SW_B-Vlanif12] ip address 192.168.12.253 255.255.255.0
[SW_B-Vlanif12] vrrp vrid 12 virtual-ip 192.168.12.1
[SW_B-Vlanif12] vrrp vrid 12 priority 111
[SW_B-Vlanif12]vrrp vrid 12 preempt-mode timer delay 10
[SW_B-Vlanif12]vrrp vrid 12 track interface g0/0/1 reduced 50
[SW_B-Vlanif12] dhcp select global
[SW_B] interface Eth-Trunk 1
[SW_B-Eth-Trunk1] trunkport GigabitEthernet 0/0/2 to 0/0/3
[SW_B-Eth-Trunk1]  port link-type trunk
[SW_B-Eth-Trunk1]  port trunk allow-pass vlan 2 to 4094
[SW_B-Eth-Trunk1] mode lacp-static//选择工作,模式LACP
[SW_B-Eth-Trunk1] max active-linknumber 1//选择最大工作链路
[SW_B] interface GigabitEthernet 0/0/1
[SW_B-GigabitEthernet0/0/1] port link-type access
[SW_B-GigabitEthernet0/0/1] port default vlan 10
[SW_B] interface GigabitEthernet 0/0/4
[SW_B-GigabitEthernet0/0/4] port link-type trunk
[SW_B-GigabitEthernet0/0/4] port trunk allow-pass vlan 11 to 12
[SW_B] interface GigabitEthernet 0/0/5
[SW_B-GigabitEthernet0/0/5] port link-type trunk
[SW_B-GigabitEthernet0/0/5] port trunk allow-pass vlan 11 to 12
[SW_B] ospf 1 router-id 4.4.4.4
[SW_B-ospf-1] area 0.0.0.0
[SW_B-ospf-1-area-0.0.0.0] network 192.168.0.0 0.0.255.255
[SW_B-ospf-1-area-0.0.0.0] network 10.2.2.2 0.0.0.0
[SW_B] user-interface con 0
[SW_B-ui-console0] idle-timeout 0 0
3.3.2 接入交换机配置
SW_4
sysname SW_4
[SW_4] vlan batch 11 to 12
[SW_4] stp region-configuration
[SW_4-mst-region] region-name xh
[SW_4-mst-region] revision-level 1
[SW_4-mst-region] instance 11 vlan 11
[SW_4-mst-region] instance 12 vlan 12
[SW_4-mst-region] active region-configuration
[SW_4]interface Ethernet 0/0/11
[SW_4-Ethernet0/0/11] port link-type access
[SW_4-Ethernet0/0/11] port default vlan 11
[SW_4-Ethernet0/0/11] stp edged-port enable    //配置为边缘端口,主要用于连接 PC 或者路由器等不参与生成树计算的设备
[SW_4] interface Ethernet 0/0/12
[SW_4-Ethernet0/0/12] port link-type access
[SW_4-Ethernet0/0/12] port default vlan 12
[SW_4-Ethernet0/0/12] stp edged-port enable
[SW_4] interface GigabitEthernet 0/0/1
[SW_4-GigabitEthernet0/0/1] port link-type trunk
[SW_4-GigabitEthernet0/0/1] port trunk allow-pass vlan 11 to 12
[SW_4-GigabitEthernet0/0/1] dhcp snooping trusted
[SW_4] interface GigabitEthernet 0/0/2
[SW_4-GigabitEthernet0/0/2] port link-type trunk
[SW_4-GigabitEthernet0/0/2] port trunk allow-pass vlan 11 to 12
[SW_4-GigabitEthernet0/0/2] dhcp snooping trusted
SW_5
sysname SW_5
[SW_5] vlan batch 11 to 12
[SW_5] stp region-configuration
[SW_5-mst-region] region-name xh
[SW_5-mst-region] revision-level 1
[SW_5-mst-region] instance 11 vlan 11
[SW_5-mst-region] instance 12 vlan 12
[SW_5-mst-region] active region-configuration
[SW_5] interface Ethernet 0/0/11
[SW_5-Ethernet0/0/11] port link-type access
[SW_5-Ethernet0/0/11] port default vlan 11
[SW_5-Ethernet0/0/11] stp edged-port enable    //配置为边缘端口,主要用于连接 PC 或者路由器等不参与生成树计算的设备
[SW_5] interface Ethernet0/0/12
[SW_5-Ethernet0/0/12] port link-type access
[SW_5-Ethernet0/0/12] port default vlan 12
[SW_5-Ethernet0/0/12] stp edged-port enable
[SW_5] interface GigabitEthernet 0/0/1
[SW_5-GigabitEthernet0/0/1] port link-type trunk
[SW_5-GigabitEthernet0/0/1] port trunk allow-pass vlan 11 to 12
[SW_4-GigabitEthernet0/0/1] dhcp snooping trusted
[SW_5] interface GigabitEthernet 0/0/2
[SW_5-GigabitEthernet0/0/2] port link-type trunk
[SW_5-GigabitEthernet0/0/2] port trunk allow-pass vlan 11 to 12
[SW_4-GigabitEthernet0/0/2] dhcp snooping trusted
3.3.3 配置防火墙
FW_A/B
sysname FW_A
[FW_A] web-manager timeout 60    //设置管理页面超时时间为 60 分钟,以实验方便为目的
[FW_A] aaa
[FW_A-aaa] undo manager-user password-modify enable    //取消管理员密码修改策略,以实验方便为目的
[FW_A] interface GigabitEthernet 0/0/0
[FW_A-GigabitEthernet0/0/0] ip address 192.168.5.5 255.255.255.0
[FW_A] interface GigabitEthernet 1/0/0
[FW_A-GigabitEthernet1/0/0] ip address 10.1.1.1 255.255.255.0
[FW_A-GigabitEthernet1/0/0] service-manage ping permit
[FW_A] interface GigabitEthernet 1/0/1
[FW_A-GigabitEthernet1/0/1] ip address 100.100.100.1 255.255.255.0
[FW_A-GigabitEthernet1/0/1] vrrp vrid 1 virtual-ip 100.100.100.3 active     //配置 VRRP 管理组地址,例外 USG6000V 有一个 BUG,就是在下次启动时 VRRP 状态一直会处于Initialize,必须手动重新配置一遍,要么就是等很久再开防火墙也可以
[FW_A-GigabitEthernet1/0/1] vrrp virtual-mac enable    //启动虚拟 MAC 地址,主要用于负载分担
[FW_A-GigabitEthernet1/0/1] service-manage ping permit
[FW_A] interface GigabitEthernet 1/0/2
[FW_A-GigabitEthernet1/0/2] ip address 200.200.200.1 255.255.255.0
[FW_A-GigabitEthernet1/0/2] vrrp vrid 2 virtual-ip 200.200.200.3 standby
[FW_A-GigabitEthernet1/0/2] vrrp virtual-mac enable
[FW_A-GigabitEthernet1/0/2] service-manage ping permit
[FW_A] interface GigabitEthernet 1/0/3
[FW_A-GigabitEthernet1/0/3] ip address 10.3.3.1 255.255.255.0
[FW_A] interface GigabitEthernet 1/0/5
[FW_A-GigabitEthernet1/0/5] ip address 10.5.5.1 255.255.255.0
//动态路由 OSPF 配置
ospf 1 router-id 1.1.1.1
    default-route-advertise always
    area 0.0.0.0
        network 10.1.1.1 0.0.0.0
        network 10.3.3.1 0.0.0.0
//FW_B配置与 FW_A 类似,除了接口 IP,路由相关配置,其它配置会通过 HRP 自动从 FW_A 同 步过来
sysname FW_B
[FW_B] web-manager timeout 60    //设置管理页面超时时间为 60 分钟,以实验方便为目的
[FW_B] aaa
[FW_B-aaa] undo manager-user password-modify enable    //取消管理员密码修改策略,以实验方便为目的
[FW_B] interface GigabitEthernet 0/0/0
[FW_B-GigabitEthernet0/0/0] ip address 192.168.5.6 255.255.255.0
[FW_B] interface GigabitEthernet 1/0/0
[FW_B-GigabitEthernet1/0/0] ip address 10.2.2.1 255.255.255.0
[FW_B-GigabitEthernet1/0/0] service-manage ping permit
[FW_B] interface GigabitEthernet 1/0/1
[FW_B-GigabitEthernet1/0/1] ip address 100.100.100.2 255.255.255.0
[FW_B-GigabitEthernet1/0/1] vrrp vrid 1 virtual-ip 100.100.100.3 standby
[FW_A-GigabitEthernet1/0/1] vrrp virtual-mac enable    //启动虚拟 MAC 地址,主要用于负载分担
[FW_A-GigabitEthernet1/0/1] service-manage ping permit
[FW_A] interface GigabitEthernet 1/0/2
[FW_A-GigabitEthernet1/0/2] ip address 200.200.200.2 255.255.255.0
[FW_A-GigabitEthernet1/0/2] vrrp vrid 2 virtual-ip 200.200.200.3 active
[FW_A-GigabitEthernet1/0/2] vrrp virtual-mac enable
[FW_A-GigabitEthernet1/0/2] service-manage ping permit
[FW_A] interface GigabitEthernet 1/0/3
[FW_A-GigabitEthernet1/0/3] ip address 10.3.3.2 255.255.255.0
[FW_A] interface GigabitEthernet 1/0/5
[FW_A-GigabitEthernet1/0/5] ip address 10.5.5.2 255.255.255.0
//动态路由 OSPF 配置
ospf 1 router-id 2.2.2.2
    default-route-advertise always
    area 0.0.0.0
        network 10.2.2.1 0.0.0.0
        network 10.3.3.2 0.0.0.0

//高可靠性配置
[FW_A] hrp enable
[FW_A] hrp interface GigabitEthernet 1/0/5 remote 10.5.5.2    //配置心跳检测链路
[FW_A] hrp mirror session enable    //会话同步
[FW_B] hrp enable
[FW_B] hrp interface GigabitEthernet1/0/5 remote 10.5.5.1
[FW_B] hrp mirror session enable
//dis hrp state
HRP_M[FW_A] hrp track ip-link link_100
HRP_M[FW_A] ip-link check enable
HRP_M[FW_A] ip-link name link_100
HRP_M[FW_A-iplink-link_100] destination 100.100.100.100 mode icmp
HRP_M[FW_A] ip-link name link_200
HRP_M[FW_A-iplink-link_200] destination 200.200.200.200 mode icmp
//安全域配置
HRP_M[FW_A] firewall zone trust
HRP_M[FW_A-zone-trust] add interface GigabitEthernet 0/0/0
HRP_M[FW_A-zone-trust] add interface GigabitEthernet 1/0/0
HRP_M[FW_A] firewall zone dmz
HRP_M[FW_A-zone-dmz] add interface GigabitEthernet 1/0/3
HRP_M[FW_A] firewall zone name ISP1
HRP_M[FW_A-zone-ISP1] set priority 10
HRP_M[FW_A-zone-ISP1] add interface GigabitEthernet 1/0/1
HRP_M[FW_A] firewall zone name ISP2
HRP_M[FW_A-zone-ISP2] set priority 20
HRP_M[FW_A-zone-ISP2] add interface GigabitEthernet 1/0/2
HRP_M[FW_A] firewall zone name HRP
HRP_M[FW_A-zone-HRP] set priority 55
HRP_M[FW_A-zone-HRP] add interface GigabitEthernet 1/0/5
服务器负载均衡配置
(USG6000V 有一个 BUG 就是每次设备重启后需手动重新 slb enable)
HRP_M[FW_A] slb enable
HRP_M[FW_A] slb
HRP_M[FW_A-slb] group 0 SRV
HRP_M[FW_A-slb-group-0] metric roundrobin    //轮询方式
HRP_M[FW_A-slb-group-0] health-check type icmp     //健康检查类型
HRP_M[FW_A-slb-group-0] rserver 1 rip 172.16.10.101 port 80 max-connection 10 description server1
HRP_M[FW_A-slb-group-0] rserver 2 rip 172.16.10.102 port 80 max-connection 20 description server2
HRP_M[FW_A-slb-group-0] rserver 3 rip 172.16.10.103 port 80 max-connection 30 description server3     //服务器组配置
HRP_M[FW_A-slb]  vserver 0 WEB
HRP_M[FW_A-slb-vserver-0] vip 0 100.100.100.3
HRP_M[FW_A-slb-vserver-0] vip 1 200.200.200.3
HRP_M[FW_A-slb-vserver-0] protocol http
HRP_M[FW_A-slb-vserver-0] vport 80
HRP_M[FW_A-slb-vserver-0] group SRV
安全策略
HRP_M[FW_A] security-policy
HRP_M[FW_A-policy-security] rule name Trust_ISP
HRP_M[FW_A-policy-security-rule-Trust_ISP] description NAT
HRP_M[FW_A-policy-security-rule-Trust_ISP] source-zone trust
HRP_M[FW_A-policy-security-rule-Trust_ISP] destination-zone ISP1
HRP_M[FW_A-policy-security-rule-Trust_ISP] destination-zone ISP2
HRP_M[FW_A-policy-security-rule-Trust_ISP] action permit    //用于内部网络访问外部网络

HRP_M[FW_A-policy-security] rule name Trust_Local
HRP_M[FW_A-policy-security-rule-Trust_Local] description Management
HRP_M[FW_A-policy-security-rule-Trust_Local] source-zone trust
HRP_M[FW_A-policy-security-rule-Trust_Local] destination-zone local
HRP_M[FW_A-policy-security-rule-Trust_Local] action permit    //用于管理防火墙以及路由协议等

HRP_M[FW_A-policy-security] rule name Local_Trust
HRP_M[FW_A-policy-security-rule-Local_Trust] description OSPF
HRP_M[FW_A-policy-security-rule-Local_Trust] source-zone local
HRP_M[FW_A-policy-security-rule-Local_Trust] destination-zone trust
HRP_M[FW_A-policy-security-rule-Local_Trust] action permit    //主要用于 OSPF 协议报文

HRP_M[FW_A-policy-security] rule name Local_DMZ
HRP_M[FW_A-policy-security-rule-Local_DMZ] description OSPF
HRP_M[FW_A-policy-security-rule-Local_DMZ] source-zone local
HRP_M[FW_A-policy-security-rule-Local_DMZ] destination-zone dmz
HRP_M[FW_A-policy-security-rule-Local_DMZ] action permit    //主要用于 OSPF 协议报文

HRP_M[FW_A-policy-security] rule name ISP_DMZ
HRP_M[FW_A-policy-security-rule-ISP_DMZ] description WWW
HRP_M[FW_A-policy-security-rule-ISP_DMZ] source-zone ISP1
HRP_M[FW_A-policy-security-rule-ISP_DMZ] source-zone ISP2
HRP_M[FW_A-policy-security-rule-ISP_DMZ] destination-zone dmz
HRP_M[FW_A-policy-security-rule-ISP_DMZ] service http
HRP_M[FW_A-policy-security-rule-ISP_DMZ] service ftp
HRP_M[FW_A-policy-security-rule-ISP_DMZ] service dns
HRP_M[FW_A-policy-security-rule-ISP_DMZ] long-link enable
HRP_M[FW_A-policy-security-rule-ISP_DMZ] long-link aging-time 8
HRP_M[FW_A-policy-security-rule-ISP_DMZ] action permit    //外部网络访问服务器的 WEB 服务

HRP_M[FW_A-policy-security] rule name Local_ISP
HRP_M[FW_A-policy-security-rule-Local_ISP] description IP-Link
HRP_M[FW_A-policy-security-rule-Local_ISP] source-zone local
HRP_M[FW_A-policy-security-rule-Local_ISP] destination-zone ISP1
HRP_M[FW_A-policy-security-rule-Local_ISP] destination-zone ISP2
HRP_M[FW_A-policy-security-rule-Local_ISP] action permit    //用于 IP-Link 的探测报文

HRP_M[FW_A-policy-security] rule name Trust_DMZ
HRP_M[FW_A-policy-security-rule-Trust_DMZ] source-zone trust
HRP_M[FW_A-policy-security-rule-Trust_DMZ] destination-zone dmz
HRP_M[FW_A-policy-security-rule-Trust_DMZ] service http
HRP_M[FW_A-policy-security-rule-Trust_DMZ] action permit    // 内部网络访问 DMZ 区的 WEB 服务器
策略路由
HRP_M[FW_A] ip address-set Web_IP type object
HRP_M[FW_A-object-address-set-Web_IP] address 0 100.100.100.3 mask 32
HRP_M[FW_A-object-address-set-Web_IP] address 1 200.200.200.3 mask 32    //外网访问 WEB 的地址集
HRP_M[FW_A] policy-based-route
HRP_M[FW_A-policy-pbr] rule name Trust_DMZ
HRP_M[FW_A-policy-pbr-rule-Trust_DMZ] source-zone trust
HRP_M[FW_A-policy-pbr-rule-Trust_DMZ] destination-address address-set Web_IP
HRP_M[FW_A-policy-pbr-rule-Trust_DMZ] action pbr next-hop 10.3.3.3    //内外通过外网 IP 访问 WEB 服务器

HRP_M[FW_A-policy-pbr] rule name Route_Policy_ISP1
HRP_M[FW_A-policy-pbr-rule-Route_policy_ISP1] source-zone trust
HRP_M[FW_A-policy-pbr-rule-Route_policy_ISP1] source-address 192.168.11.0 24
HRP_M[FW_A-policy-pbr-rule-Route_policy_ISP1] track ip-link link_100    //监控 100.100.100.100 是否可达,如果不可达那么这条规则就不会生效
HRP_M[FW_A-policy-pbr-rule-Route_policy_ISP1] action pbr egress-interface GigabitEthernet 1/0/1 next-hop 100.100.100.100    //这里建议要指定出接口,因为如果是 ISP1 的线路故障,有可能防火墙能通过 ISP2 的线路探测到100.100.100.100 的存在
HRP_M[FW_A-policy-pbr] rule name Route_Policy_ISP2
HRP_M[FW_A-policy-pbr-rule-Route_Policy_ISP2] source-zone trust
HRP_M[FW_A-policy-pbr-rule-Route_Policy_ISP2] source-address 192.168.12.0 24
HRP_M[FW_A-policy-pbr-rule-Route_Policy_ISP2] track ip-link link_200
HRP_M[FW_A-policy-pbr-rule-Route_Policy_ISP2] action pbr egress-interface GigabitEthernet1/0/2 next-hop 200.200.200.200    // VLAN11 的用户从 ISP1 访问外网,VLAN12的用户从 ISP2 访问外网
NAT 配置
HRP_M[FW_A] nat address-group isp1 0
HRP_M[FW_A] mode pat
HRP_M[FW_A-address-group-isp1] section 0 100.100.100.1 100.100.100.2
HRP_M[FW_A] nat address-group isp2 1
HRP_M[FW_A] mode pat
 section 0 200.200.200.1 200.200.200.2    //NAT 转换地址池,如果企业内部访问终端较多,这里就需要多个出口 IP,否则会因端口不够用导致网络不能正常访问
HRP_M[FW_A] nat-policy
HRP_M[FW_A-policy-nat] rule name NAT_ISP1
HRP_M[FW_A-policy-nat-rule-NAT_isp1] source-zone trust
HRP_M[FW_A-policy-nat-rule-NAT_isp1] destination-zone ISP1
HRP_M[FW_A-policy-nat-rule-NAT_isp1] action nat address-group isp1
HRP_M[FW_A-policy-nat] rule name NAT_ISP2
HRP_M[FW_A-policy-nat-rule-NAT_isp2] source-zone trust
HRP_M[FW_A-policy-nat-rule-NAT_isp2] destination-zone ISP2
HRP_M[FW_A-policy-nat-rule-NAT_isp2] action nat address-group isp2

[FW_A] ip route-static 0.0.0.0 0.0.0.0 100.100.100.100 preference 50 track ip-link link_100
[FW_A] ip route-static 0.0.0.0 0.0.0.0 200.200.200.200
3.4 配置 IPSec-VPN
3.4.1 总公司 IPSec-VPN 配置
FW_A
定义感兴趣流量
HRP_M[FW_A] acl number 3000
HRP_M[FW_A-acl-adv-3000] rule 5 permit ip source 192.168.0.0 0.0.255.255 destination 10.11.5.0 0.0.255.255
HRP_M[FW_A] acl number 3001
HRP_M[FW_A-acl-adv-3001] rule 5 permit ip source 192.168.0.0 0.0.255.255 destination 10.11.5.0 0.0.255.255
配置加密算法
HRP_M[FW_A] ipsec proposal Center
HRP_M[FW_A-ipsec-proposal-Center] esp authentication-algorithm sha2-256
HRP_M[FW_A-ipsec-proposal-Center] esp encryption-algorithm aes-256
创建IKE安全提议
HRP_M[FW_A] ike proposal 1
HRP_M[FW_A-ike-proposal-1] encryption-algorithm aes-256
HRP_M[FW_A-ike-proposal-1] dh group2
 authentication-algorithm sha2-256
 authentication-method pre-share
 integrity-algorithm hmac-sha2-256
 prf hmac-sha2-256
配置 IKE 对等体
HRP_M[FW_A] ike peer IKE_100
HRP_M[FW_A-ike-peer-IKE_100] pre-shared-key Huawei
HRP_M[FW_A-ike-peer-IKE_100] ike-proposal 1
HRP_M[FW_A-ike-peer-IKE_100] local-id-type fqdn
HRP_M[FW_A-ike-peer-IKE_100] local-id C100

HRP_M[FW_A] ike peer IKE_200
HRP_M[FW_A-ike-peer-IKE_200] pre-shared-key Huawei
HRP_M[FW_A-ike-peer-IKE_200] ike-proposal 1
HRP_M[FW_A-ike-peer-IKE_200] local-id-type fqdn
HRP_M[FW_A-ike-peer-IKE_200] local-id C200
配置策略模版
HRP_M[FW_A] ipsec policy-template TPL100 100
HRP_M[FW_A-ipsec-policy-templet-TPL100-100] security acl 3000
HRP_M[FW_A-ipsec-policy-templet-TPL100-100] ike-peer IKE_100
HRP_M[FW_A-ipsec-policy-templet-TPL100-100] proposal Center
HRP_M[FW_A-ipsec-policy-templet-TPL100-100] alias IPSec_100
HRP_M[FW_A-ipsec-policy-templet-TPL100-100] scenario point-to-multi-point    //模版方式才能使用点到多点

HRP_M[FW_A] ipsec policy-template TPL200 200
HRP_M[FW_A-ipsec-policy-templet-TPL200-200] security acl 3001
HRP_M[FW_A-ipsec-policy-templet-TPL200-200] ike-peer IKE_200
HRP_M[FW_A-ipsec-policy-templet-TPL200-200] proposal Center
HRP_M[FW_A-ipsec-policy-templet-TPL200-200] alias IPSec_200
HRP_M[FW_A-ipsec-policy-templet-TPL200-200] scenario point-to-multi-point
配置关联
HRP_M[FW_A] ipsec policy IPSec-100 100 isakmp template TPL100
HRP_M[FW_A] ipsec policy IPSec-200 200 isakmp template TPL200
应用接口
HRP_M[FW_A] interface GigabitEthernet1/0/1
HRP_M[FW_A-GigabitEthernet1/0/1] ipsec policy IPSec-100 master
HRP_M[FW_A] interface GigabitEthernet1/0/2
HRP_M[FW_A-GigabitEthernet1/0/2] ipsec policy IPSec-200 slave
----------------------------需要开启防火墙的策略----------------------------
HRP_M[FW_A]security-policy
HRP_M[FW_A-policy-security] rule name ISP_Local
HRP_M[FW_A-policy-security-rule-ISP_Local] description IPSec
HRP_M[FW_A-policy-security-rule-ISP_Local] source-zone ISP1
HRP_M[FW_A-policy-security-rule-ISP_Local] source-zone ISP2
HRP_M[FW_A-policy-security-rule-ISP_Local] destination-zone local
HRP_M[FW_A-policy-security-rule-ISP_Local] destination-address 100.100.100.3 32
HRP_M[FW_A-policy-security-rule-ISP_Local] destination-address 200.200.200.3 32
HRP_M[FW_A-policy-security-rule-ISP_Local] action permit

HRP_M[FW_A-policy-security] rule name ISP_Trust
HRP_M[FW_A-policy-security-rule-ISP_Trust] description VPN
HRP_M[FW_A-policy-security-rule-ISP_Trust] source-zone ISP1
HRP_M[FW_A-policy-security-rule-ISP_Trust] source-zone ISP2
HRP_M[FW_A-policy-security-rule-ISP_Trust] destination-zone trust
HRP_M[FW_A-policy-security-rule-ISP_Trust] source-address 10.11.0.0 16
HRP_M[FW_A-policy-security-rule-ISP_Trust] destination-address 192.168.0.0 16
HRP_M[FW_A-policy-security-rule-ISP_Trust] action permit

HRP_M[FW_A] nat-policy
HRP_M[FW_A-policy-nat] rule name NOT_NAT_ISP1
HRP_M[FW_A-policy-nat-rule-NOT_NAT_ISP1] source-zone trust
HRP_M[FW_A-policy-nat-rule-NOT_NAT_ISP1] destination-zone ISP1
HRP_M[FW_A-policy-nat-rule-NOT_NAT_ISP1] source-address 192.168.11.0 24
HRP_M[FW_A-policy-nat-rule-NOT_NAT_ISP1] source-address 192.168.12.0 24
HRP_M[FW_A-policy-nat-rule-NOT_NAT_ISP1] destination-address 10.11.1.0 24
HRP_M[FW_A-policy-nat-rule-NOT_NAT_ISP1] action no-nat

HRP_M[FW_A-policy-nat] rule name NOT_NAT_ISP2
HRP_M[FW_A-policy-nat-rule-NOT_NAT_ISP2] source-zone trust
HRP_M[FW_A-policy-nat-rule-NOT_NAT_ISP2] destination-zone ISP2
HRP_M[FW_A-policy-nat-rule-NOT_NAT_ISP2] source-address 192.168.11.0 24
HRP_M[FW_A-policy-nat-rule-NOT_NAT_ISP2] source-address 192.168.12.0 24
HRP_M[FW_A-policy-nat-rule-NOT_NAT_ISP2] destination-address 10.11.1.0 24
HRP_M[FW_A-policy-nat-rule-NOT_NAT_ISP2] action no-nat
3.4.2 分支机构 IPSec-VPN 配置
FW_Branch
[FW_Branch] acl number 3000
[FW_Branch-acl-adv-3000] rule 5 permit ip source 10.11.0.0 0.0.255.255 destination 192.168.0.0 0.0.255.255
[FW_Branch] acl number 3001
[FW_Branch-acl-adv-3001] rule 5 permit ip source 10.11.0.0 0.0.255.255 destination 192.168.0.0 0.0.255.255
[FW_Branch] ipsec proposal PPS_Br
[FW_Branch-ipsec-proposal-PPS_Br] esp authentication-algorithm sha2-256
[FW_Branch-ipsec-proposal-PPS_Br] esp encryption-algorithm aes-256
[FW_Branch] ike proposal 1
[FW_Branch-ike-proposal-1] encryption-algorithm aes-256
[FW_Branch-ike-proposal-1] dh group2
 authentication-algorithm sha2-256
 authentication-method pre-share
 integrity-algorithm hmac-sha2-256
 prf hmac-sha2-256

[FW_Branch] ike peer IKE_100
[FW_Branch-ike-peer-IKE_100] pre-shared-key Huawei
[FW_Branch-ike-peer-IKE_100] ike-proposal 1
[FW_Branch-ike-peer-IKE_100] local-id-type fqdn
[FW_Branch-ike-peer-IKE_100] local-id Br150
[FW_Branch-ike-peer-IKE_100] remote-address 100.100.100.3

[FW_Branch] ike peer IKE_200
[FW_Branch-ike-peer-IKE_200] pre-shared-key Huawei
[FW_Branch-ike-peer-IKE_200] ike-proposal 1
[FW_Branch-ike-peer-IKE_200] local-id-type fqdn
[FW_Branch-ike-peer-IKE_200] local-id Br150
[FW_Branch-ike-peer-IKE_200] remote-address 200.200.200.3

[FW_Branch] ipsec policy IPSec_100 10 isakmp
[FW_Branch-ipsec-policy-isakmp-IPSec_100-10] security acl 3000
[FW_Branch-ipsec-policy-isakmp-IPSec_100-10] ike-peer IKE_100
[FW_Branch-ipsec-policy-isakmp-IPSec_100-10] proposal PPS_Br

[FW_Branch] ipsec policy IPSec_200 10 isakmp
[FW_Branch-ipsec-policy-isakmp-IPSec_200-10] security acl 3001
[FW_Branch-ipsec-policy-isakmp-IPSec_200-10] ike-peer IKE_200
[FW_Branch-ipsec-policy-isakmp-IPSec_200-10] proposal PPS_Br
//配置 Tunnel 接口
[FW_Branch] interface tunnel 1
[FW_Branch-Tunnel1] ip address unnumbered interface GigabitEthernet1/0/1
[FW_Branch-Tunnel1] tunnel-protocol ipsec
[FW_Branch-Tunnel1] ipsec policy IPSec_100

[FW_Branch] interface tunnel 2
[FW_Branch-Tunnel2] ip address unnumbered interface GigabitEthernet1/0/1
[FW_Branch-Tunnel2] tunnel-protocol ipsec
[FW_Branch-Tunnel2] ipsec policy IPSec_200    //由于一个物理接口上只能有一个关联,因此这里需要用 Tunnel 接口来分别与两条链路建立 VPN 链路
配置负载分担和浮动路由
[FW_Branch] ip-link check enable
[FW_Branch] ip-link name link_100
[FW_Branch-iplink-link_100] destination 100.100.100.3 interface gigabitethernet 1/0/1
[FW_Branch] ip-link name link_200
[FW_Branch-iplink-link_200] destination 200.200.200.3 interface gigabitethernet 1/0/1

[FW_Branch] ip route-static 192.168.11.0 255.255.255.0 Tunnel 1 preference 10 track ip-link link_100
[FW_Branch] ip route-static 192.168.11.0 255.255.255.0 Tunnel 2 preference 20    //当 ISP1 出现故障,那么我们让访问192.168.11.0/24 网段的路由自动走 Tunnel 2 接口,否则默认走 Tunnel1 接口,以达到负载分担和冗余的效果
[FW_Branch] ip route-static 0.0.0.0 0.0.0.0 150.150.150.1
[FW_Branch] irewall zone untrust
    add interface GigabitEthernet1/0/1
    add interface Tunnel1
    add interface Tunnel2
-------------------------------需要配置的策略-------------------------------
[FW_Branch] security-policy
[FW_Branch-policy-security] rule name Trust_Untrust
[FW_Branch-policy-security-rule-Trust_Untrust] source-zone trust
[FW_Branch-policy-security-rule-Trust_Untrust] destination-zone untrust
[FW_Branch-policy-security-rule-Trust_Untrust] action permit

[FW_Branch-policy-security] rule name Local_Untrust
[FW_Branch-policy-security-rule-Local_Untrust] description IPSEC UPD500
[FW_Branch-policy-security-rule-Local_Untrust] source-zone local
[FW_Branch-policy-security-rule-Local_Untrust] destination-zone untrust
[FW_Branch-policy-security-rule-Local_Untrust] destination-address 100.100.100.3 32
[FW_Branch-policy-security-rule-Local_Untrust] destination-address 200.200.200.3 32
[FW_Branch-policy-security-rule-Local_Untrust] action permit

[FW_Branch-policy-security] rule name Untrust_Local
[FW_Branch-policy-security-rule-Untrust_Local] description IPSec_esp
[FW_Branch-policy-security-rule-Untrust_Local] source-zone untrust
[FW_Branch-policy-security-rule-Untrust_Local] destination-zone local
[FW_Branch-policy-security-rule-Untrust_Local] source-address 100.100.100.3 32
[FW_Branch-policy-security-rule-Untrust_Local] source-address 200.200.200.3 32
[FW_Branch-policy-security-rule-Untrust_Local] action permit

[FW_Branch-policy-security] rule name Untrust_Trust
[FW_Branch-policy-security-rule-Untrust_Trust] description VPN
[FW_Branch-policy-security-rule-Untrust_Trust] source-zone untrust
[FW_Branch-policy-security-rule-Untrust_Trust] destination-zone trust
[FW_Branch-policy-security-rule-Untrust_Trust] source-address 192.168.0.0 16
[FW_Branch-policy-security-rule-Untrust_Trust] destination-address 10.11.1.0 24
[FW_Branch-policy-security-rule-Untrust_Trust] action permit

[FW_Branch] nat-policy
[FW_Branch-policy-nat] rule name NOT_NAT
[FW_Branch-policy-nat-rule-NOT_NAT] source-zone trust
[FW_Branch-policy-nat-rule-NOT_NAT] destination-zone untrust
[FW_Branch-policy-nat-rule-NOT_NAT] source-address 10.11.1.0 24
[FW_Branch-policy-nat-rule-NOT_NAT] destination-address 192.168.11.0 24
[FW_Branch-policy-nat-rule-NOT_NAT] destination-address 192.168.12.0 24
[FW_Branch-policy-nat-rule-NOT_NAT] action no-nat
3.4.5 查看配置效果
查看分支机构网关上的 SA 状态

查看总分 FW_A 的 SA 状态

查看总部 FW_B 的 SA 状态

用分支机构的 PC 去访问总部的内网
![[外链图片转存失败,源站可能有防盗链机制,建议将图片保存下来直接上传(img-JK0eHqP1-1693026516200)(D:\desktop\学习资料\MD笔记文档\Hawei\Uploads\51.jpg)]](https://i-blog.csdnimg.cn/blog_migrate/a03c2da63801a69a13638c61f69576f5.jpeg)
查看分支与总部的路由表
![[外链图片转存失败,源站可能有防盗链机制,建议将图片保存下来直接上传(img-naebPCrL-1693026516200)(D:\desktop\学习资料\MD笔记文档\Hawei\Uploads\52.jpg)]](https://i-blog.csdnimg.cn/blog_migrate/f7fe8403bb5a74d104cb4acaabe9f88c.jpeg)
![[外链图片转存失败,源站可能有防盗链机制,建议将图片保存下来直接上传(img-zFHFAfbZ-1693026516201)(D:\desktop\学习资料\MD笔记文档\Hawei\Uploads\53.jpg)]](https://i-blog.csdnimg.cn/blog_migrate/0635fd7e452ce89e0ea483fd92066d91.jpeg)
如果能正确看到这些结果,说明你的配置没有问题。同时也说明你已经掌握企业网所需要的关键网络 技术


 563
563

 被折叠的 条评论
为什么被折叠?
被折叠的 条评论
为什么被折叠?
 到【灌水乐园】发言


