


一、springboot运行流程
1、springboot获取配置的流程

上图是我对springboot获取配置流程的简单总结。
- 运行主程序时,调用了@SpringBootApplication注解,这个注解又包含一个@Import注解,用于导入配置类。
- 这个@Import注解会去类路径下所有的META-INF/spring.factories中去搜索以“AutoConfiguration”为后缀的配置类;
- 对找到的每一个××AutoConfiguration配置类,根据其上的@EnableConfigurationProperties注解读取对于的××Properties类;
- 将读取到的××Properties中的属性值绑定到组件中
- 取用户配置文件,将配置的属性值绑定到组件中
- 将组件在容器中注册。
就这样完成了配置值的获取。
2、springboot启动流程

上图是我对springboot启动流程的简单总结。
运行主配置类时,主要分为两大步骤:首先创建Springboot的Application对象,然后是运行run方法。
2.1创建Springboot的Application对象
创建的对象根据springboot获取配置的流程,绑定了配置里面的默认值。
主要实现的功能就是到META-INF/spring.factories目录下去寻找两类东西并保存起来。
- 一个是ApplicationContextInitializer,也就是容器的初始化器;
- 一个是ApplicationListener,也就是应用程序的监听。
保存的东西供run方法运行时调用。
2.2运行run方法
(1)去META-INF/spring.factories目录下去获取监听,注意获取的是ApplicationRunListener而不是ApplicationListener。
(2)配置环境,然后调用上一步获取的监听的environmentPrepared方法表示环境准备完成
(3)创建ioc容器
(4)应用初始化器
- 将配置好的环境在ioc容器中布置;
- 读取创建Springboot的Application对象是保存的两类东西的方法,一个是初始化器,一个是contextPrepared方法,也就是告诉系统容器准备就绪。
(5)在ioc中注册命令行参数对象
(6)调用(1)获取的ApplicationRunListener中的contextLoaded方法表示上下文环境准备完成
(7)刷新容器:也就是获取、创建和加载所有的组件、配置类和自动配置类。
(8)从容器中获取ApplicationRunner和CommandLineRunner,并调用其中的run方法;
(9)调用(1)获取的ApplicationRunListener中的finished方法表示容器创建完成
(10)返回配置好的ioc容器
三、实际应用
1、基础配置应用
1.1在全局配置文件中配置端口号
server.port=8081
保存后重启项目即可生效。
1.2利用配置文件为javaBean赋值
1.2.1在全局配置文件中配置
(1)全局配置文件中的内容
#配置person的值
person.lastName-李四
person.age=18
person.birth=2019-12-14
#数组
person.lists=a,b,c
#dog的姓名和年龄
person.dog.name=lucky
person.dog.age=3
(2)测试类调用时使用@ConfigurationProperties注解来为person赋值
@ConfigurationProperties(prefix = "person")
@Component
public class Person {
这样Person类中对象的值就是配置类中的值。
1.2.2单独创建配置类
(1)创建的配置类person.property,里面的内容同上面全局配置文件
(2)测试类调用时使用@PropertySource注解来指定配置文件
@ConfigurationProperties(prefix = "person")
@Component
@PropertySource(value = {"classpath:person.properties"})
public class Person {
这样Person类中对象的值就是配置类中的值。
1.3利用@Value注解为单个属性赋值
//可以调用配置类中设置的值
@Value("${person.lastName}")
private String lastName;
//可以使用函数
@Value("#{11*2}")
private Integer age;
//可以直接赋值
@Value("true")
private Boolean boss;
1.4利用@Bean注解给容器中添加组件,达到配置的目的
//@Configuration指明当前类是配置类,替代之前的spring配置文件
//以前在配置文件中用<bean></bean>标签添加组件,在配置类中用@Bean注解替代
@Configuration
public class MyAppConfig {

    //将方法的返回值添加到容器中,容器中这个组件默认的id就是方法名
    @Bean
    public HelloService helloService(){
        System.out.println("配置类@Bean给容器中添加组件了。");
        return new HelloService();
    }
}
1.5利用profile对不同环境提供不同配置
应用场景:一个项目在开发时和上线后的配置环境可能不同,通过profile可以方便的切换环境。
1.5.1profile文件形式
(1)properties文件格式
spring.profiles.active=dev
(2)yml文件格式
server:
  port: 8081
spring:
  profiles:
    active:dev
---
server:
  port: 8083
spring:
  profiles:dev
2、日志应用
2.1springboot默认日志框架
SpringBoot底层是使用slf4j+logback的方式进行日志记录;它凭借中间替换包可以把其他的日志都替换成slf4j;所以springboot能自动适配所有的日志。
2.2引入其他日志框架
引入其他框架的时候,只需要把这个框架依赖的日志框架排除掉即可;
举例:日志框架切换为log4j2
<dependency>
    <groupId>org.springframework.boot</groupId>
    <artifactId>spring‐boot‐starter‐web</artifactId>
    <exclusions>
        <exclusion>
            <artifactId>spring‐boot‐starter‐logging</artifactId>
            <groupId>org.springframework.boot</groupId>
        </exclusion>
    </exclusions>
</dependency>

<dependency>
    <groupId>org.springframework.boot</groupId>
    <artifactId>spring‐boot‐starter‐log4j2</artifactId>
</dependency>
2.3日志的输出格式
日志输出格式:
- %d表示日期时间,
- %thread表示线程名,
- %‐5level:级别从左显示5个字符宽度
- %logger{50} 表示logger名字最长50个字符,否则按照句点分割。
- %msg:日志消息,
- %n是换行符
示例:
%d{yyyy‐MM‐dd HH:mm:ss.SSS} [%thread] %‐5level %logger{50} ‐ %msg%n
2.4修改日志的默认配置
logging.level.com.atguigu=trace
#logging.path=
# 不指定路径在当前项目下生成springboot.log日志
# 可以指定完整的路径;
#logging.file=G:/springboot.log
# 在当前磁盘的根路径下创建spring文件夹和里面的log文件夹;
#使用 spring.log 作为默认文件
logging.path=/spring/log
# 在控制台输出的日志的格式
logging.pattern.console=%d{yyyy‐MM‐dd} [%thread] %‐5level
    %logger{50} ‐ %msg%n
# 指定文件中日志输出的格式
logging.pattern.file=%d{yyyy‐MM‐dd} === [%thread] === %‐5level
    === %logger{50} ==== %msg%n
3、web开发
3.1静态资源的映射规则
3.1.1以jar包的方式调用静态资源
有些静态资源被打包成jar包供开发者调用,在maven中导入相关依赖后,就可以在相关jar包下的META-INF/resoured/webjars下面看到相关的静态资源。在浏览器中进行资源访问时,只需要写webjars下面的资源名称即可。
举例:引入jquery-webjar的依赖
<dependency>
   <groupId>org.webjars</groupId>
   <artifactId>jquery</artifactId>
   <version>3.3.1-1</version>
</dependency>
引入jquery后的webjar路径
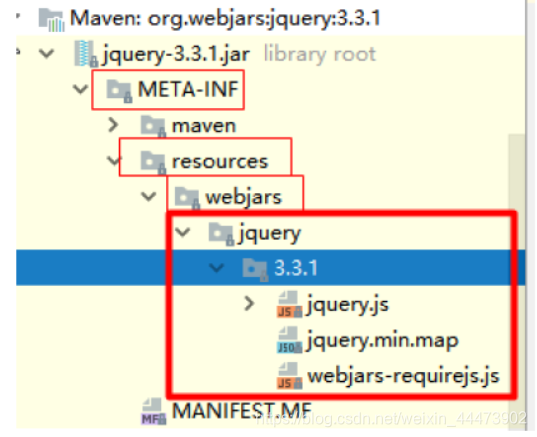
浏览器调用jquery.js:http://localhost:8080/webjars/jquery/3.3.1-1/jquery.js
3.1.2引入其他静态资源
在浏览器中输入“IP:端口/**”springboot都会去特定的五个目录下去寻找。
- “classpath:/META‐INF/resources/”, 类路径下的/META-INF/resources/
- “classpath:/resources/”, 类路径下的/resources/
- “classpath:/static/”, 类路径下的/static/
- “classpath:/public/” 类路径下的/public/
- “/”:当前项目的根路径
举例:在"classpath:/resources/",目录下导入静态资源

在浏览器中输入路径http://localhost:8080/asserts/js/Chart.min.js,可以查询到Chart.min.js,而不用xieresources目录。
3.1.3欢迎页的映射
浏览器中输入"/“或者”/index.html"时,springboot会自动在上述5个类路径下寻找index.html。
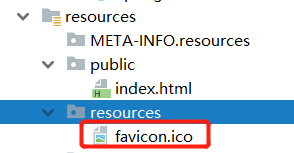
3.1.4喜爱图标的映射
浏览器打开页面后,页面的头部会有图标显示。若什么也不配置的情况下,springboot会去上述5个路径下去寻找名为“favicon.ico”的文件,找到后默认引用这个文件的图标作为所有未配置图标页面的图标。
3.2引入模板引擎thymeleaf
当页面是动态的时,可以通过模板引擎来将模板和数据进行整合,并按照模板的样式展示数据。

3.2.1引入thymeleaf
<!--引入Thymeleaf-->
<dependency>
   <groupId>org.springframework.boot</groupId>
   <artifactId>spring-boot-starter-thymeleaf</artifactId>
</dependency>
3.2.2thymeleaf应用
(1)在controller中添加数据
//查出一些数据在页面展示
@RequestMapping("/success")
public String success(Map<String,Object> map){
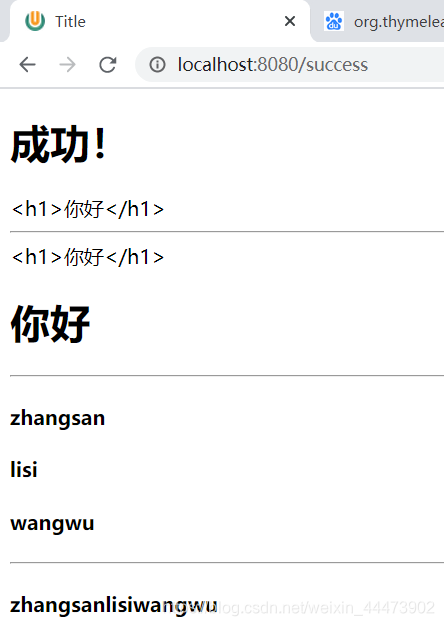
map.put("hello","<h1>你好</h1>");
map.put("users", Arrays.asList("zhangsan","lisi","wangwu"));
//classpath:/templates/success.html
return "success";
}
(2)编辑success.html文件
<body>
    <h1>成功!</h1>
    <!--th:text 将div里面的文本内容设置为-->
    <div th:text="${hello}">这是显示欢迎信息</div>
    <!--分界线-->
    <hr/>
    <div th:text="${hello}"></div>
    <div th:utext="${hello}"></div>
    <hr/>

<!--遍历-->
<!--th:each每次遍历都会生成当前这个标签:3个h4-->
    <h4 th:text="${user}" th:each="user:${users}"></h4>
    <hr/>
    <!--1个h4-->
    <h4>
        <span th:each="user:${users}">[[${user}]]</span>
    </h4>
</body>
(3)启动应用,浏览器输入网址
3.3视图映射方法引入资源
//使用WebMvcConfigureAdapter可以扩展springMVC的功能
//所有的WebMvcConfigureAdapter组件都会一起起作用
@Bean//将组件注册在容器中
public WebMvcConfigurerAdapter webMvcConfigurerAdapter(){
    WebMvcConfigurerAdapter adapter = new WebMvcConfigurerAdapter(){
        public void addViewControllers(
            ViewControllerRegistry registry){
            registry.addViewController("/").setViewName("index");
            registry.addViewController("/index.html").
                setViewName("index");
        }
    };
    return adapter;
}
3.4拦截器的创建与注册
3.4.1拦截器创建
/**
* 登陆检查,
*/
public class LoginHandlerInterceptor implements HandlerInterceptor {
//目标方法执行之前
    @Override
    public boolean preHandle(
        HttpServletRequest request, HttpServletResponse response,
        Object handler) throws Exception {
        Object user = request.getSession()
            .getAttribute("loginUser");
        if(user == null){
        //未登陆,返回登陆页面
        request.setAttribute("msg","没有权限请先登陆");
        request.getRequestDispatcher("/index.html").
            forward(request,response);
        return false;
    }else{
    //已登陆,放行请求
        return true;
    }
}
3.4.2注册拦截器
//所有的WebMvcConfigurerAdapter组件都会一起起作用
@Bean //将组件注册在容器
public WebMvcConfigurerAdapter webMvcConfigurerAdapter(){
    WebMvcConfigurerAdapter adapter =
        new WebMvcConfigurerAdapter() {
        @Override
        public void addViewControllers(
            ViewControllerRegistry registry) {
        registry.addViewController("/").setViewName("login");
        registry.addViewController("/index.html").
            setViewName("login");
        registry.addViewController("/main.html").
            setViewName("dashboard");
        }

        //注册拦截器
        @Override
        public void addInterceptors(InterceptorRegistry registry) {
            //super.addInterceptors(registry);
            //静态资源; *.css , *.js
            //SpringBoot已经做好了静态资源映射
            registry.addInterceptor(new
                LoginHandlerInterceptor()).addPathPatterns("/**")
            .excludePathPatterns("/index.html","/","/user/login");
         }
    };
    return adapter;
}


 1393
1393


 被折叠的 条评论
为什么被折叠?
被折叠的 条评论
为什么被折叠?
 到【灌水乐园】发言


