


文章目录
一、Pytest简介
1.定义:
pytest 是 python 的第三方单元测试框架,比自带 unittest 更简洁和高效,支持315种以上的插件,同时兼容 unittest 框架。这就使得我们在 unittest 框架迁移到 pytest 框架的时候不需要重写代码。
2.作用:
- 单元测试框架,比unittest测试框架更灵活;
- 入门难度低,第三方库丰富;
- 通用性;
- 与allure生成的报告非常美观;
- 定制性强;
二、Pytest代码编写
1.编写代码注意事项
- 模块名称(即py文件名称)必须以test_开头或以_test结尾;
- 测试的类名(即Class Testxxx)必须以Test开头,且在类中不能含有init;
- 测试方法(即def testxxx)必须以test开头;
2.pytest测试用例运行方式
1)主函数方式:
  if __name__ == '__main__':
  	  pytest.main([ "-vs","test_1.py"])
a).运行所有测试用例:
方法:pytest.main(参数)
参数:
-s 打印测试用例中的print语句;
-v 增加打印细节;
-x 一旦发现失败用例,停止运行;
-maxfail=2 出现两个用例失败就停止;
-n 多线程:pytest.main([“-vs”,“./testcase”,“-n=2”])两个线程;
-k 组合调用执行部分用例:pytest -vs ./testcase -k “ao"只执行含有ao的测试用例;
-m “标签名” 给测试用例添加标签:
pytest.main([”-s",“test_123.py”,“-m=webtest”])只运行用webtest标记的测试;
b).指定模块运行:
pytest.main([“-vs”,“TestAdd::test_add2”])
pytest.main([“-vs”,“test_123.py”])
c).指定目录运行:
pytest.main([“-vs”,“./文件夹名称”])
2)命令行方式:
a).运行所有:pytest test_add.py
b).指定模块:pytest -vs test_add1.py
a).运行所有:pytest -vs ./文件夹名称
E:\python_practice\test__123.py>pytest -vs  test_1.py
============================= test session starts =============================
platform win32 -- Python 3.7.0, pytest-7.1.2, pluggy-0.13.1 -- e:\python3.7\pyth
cachedir: .pytest_cache
benchmark: 3.2.3 (defaults: timer=time.perf_counter disable_gc=False min_rounds=
metadata: {'Python': '3.7.0', 'Platform': 'Windows-10-10.0.19041-SP0', 'Packages
'forked': '1.4.0', 'html': '3.1.1', 'metadata': '2.0.1', 'ordering': '0.6', 'rer
rootdir: E:\python_practice\test__123.py
plugins: allure-pytest-2.9.45, benchmark-3.2.3, forked-1.4.0, html-3.1.1, metada
collected 3 items

test_1.py::test_add PASSED
test_1.py::TestAdd::test_add PASSED
test_1.py::TestAdd::test_add2 PASSED
3)配置文件pytest.ini方式:
位置:pytest.ini一般放置在项目根目录中,名字就为这个名字不要进行改变;
编码:ANSI编码;
作用:改变pytest默认的行为
使用方法:
[pytest]
addopts = -vs
testpaths = ./test_case
python_files = test_*.py
python_classes = Test*
python_functions = test
注:配置好文件后运行pytest -vs可能会有报错–>这个问题可以用notpad++改变编码格式为ANSI
UnicodeDecodeError: 'gbk' codec can't decode byte 0xb9 in position 46: illegal m
3.测试用例执行顺序
pytest默认的执行顺序是从上到下
注:如果想要改变默认的顺序需要使用mark标记
如:@pytest.mark.run(order=1)即顺序为第一个
# 测试脚本
class TestAdd:
    @pytest.mark.run(order=2)
    def test_add2(self):
        assert 3 == add(1, 2)

    @pytest.mark.run(order=1)
    def test_add3(self):
        assert 5 == add(1, 4)
运行结果:
test_case/test_1.py::TestAdd::test_add3 PASSED
test_case/test_1.py::TestAdd::test_add2 PASSED
4.断言的使用
- assert “h” in "“hello”
- assert 3==4
- assert 3!=4
- assert f()==4
- assert not xx(即:判断xx不为真)
5.mark方法使用
1)跳过(skip)和失败(xfail)
跳过:pytest.skip(reason=‘原因’)
无条件跳过:@pytest.mark.skip(reason=‘原因’)
有条件跳过:@pytest.mark.skipif(条件,reason=‘原因’)
失败:pytest.xfail(reason=‘原因’)
使用:@pytest.mark.xfail(reason=‘原因’)
注:如果在测试时希望看到跳过原因可以使用pytest -rs
2)分组执行用例
- smoke:冒烟用例,分布在各个模块里面,使用:@pytest.mark.smoke
- g1:为组一,在使用时可以任意定义名称,使用:@pytest.mark.g1
- g2:为组二,在使用时可以任意定义名称,使用:@pytest.mark.g2
#此时的配置文件为:
[pytest]
addopts = -vs
testpaths = ./test_case
python_files = test_*.py
python_classes = Test*
python_functions = test
markers=
		smoke:冒烟用例
		g1:组一
		g2:组二
在执行用例时可使用
pytest -m “smoke”
pytest -m “smoke or g1 or g2”
pytest -m “smoke and g1”
三、Pytest框架实现“前后置”的处理
前提:为什么需要使用前后置?
web自动化执行用例之前,请问需要打开浏览器吗?用例执行后需要关闭浏览器吗?
- setup/teardown,setup_class/teardown_class:主要作用于所有用例或者所有的类;
- @pytest.fixtrue():可以作用于部分,也可以作用于全部;
- conftest.py和@pytest.fixtrue()结合使用:作用与全局的前后置。
1.setup/teardown,setup_class/teardown_class
功能:主要作用于所有用例或者所有的类
class TestMashang:
    #在所有的用例之前只执行一次
    def setup_class(self):
        print("创建数据库连接,打开数据库")
    #每个用例之前执行一次
    def setup(self):
        print("打开浏览器,加载网页")

    def test_01_aaa(self):
        print("测试用例1")

    def test_02_bbb(self):
        print("测试用例2")

    #每个用例之后执行一次
    def teardown(self):
        print("关闭浏览器")
    #在所有的用例之后只执行一次
    def teardown_class(self):
        print("关闭数据库")
运行结果如下:
..\..\..\..\..\python_practice\test__123.py\test_case\aaa_123.py ------
创建数据库连接,打开数据库
打开浏览器,加载网页
测试用例1
关闭浏览器
打开浏览器,加载网页
测试用例2
关闭浏览器
关闭数据库

============================== 2 passed in 0.03s ==============================
2.@pytest.fixture()装饰器
功能:主要实现部分用例的前后置
使用方法:@pytest.fixture(scope=“”,params=“”,autouse=“”,ids=“”,name=“”)
参数说明:
- scope:表示被装饰器方法标记的域,包括function、class、module、package/session;
- params:参数化(列表[],元组(),字典[{},{}],字典元组({},{}) );
- autouse:默认为False;
- ids:当使用params参数化时,给每一个值设置一个变量名;
- name:别名(注意当取了别名以后原来的名字不可用);
import pytest

@pytest.fixture(scope='function',params=['05'])
def my_fixture(request):
    print('前置')
    yield
    print('后置')
    return request.param

class TestMashang11:
    def test_01_sss(self):
        print('----')
        print('测试用例1')

    def test_02_ggg(self,my_fixture):
        print('测试用例2')
运行结果如下:
..\..\..\..\..\python_practice\test__123.py\test_case\test_1.py ----
测试用例1
.前置
测试用例2
.后置

============================== 2 passed in 0.02s ==============================
3.conftest.py和@pytest.fixture()结合方法
功能:主要实现全局前置应用,如全局登录等
注意:
- conftest.py文件是单独存放在一个文件夹,且名称不能修改;
- 可以在不同的py文件中使用相同的fixture函数;
- 原则上conftest.py需要和运行的用例放在同一层,且不需要import操作;
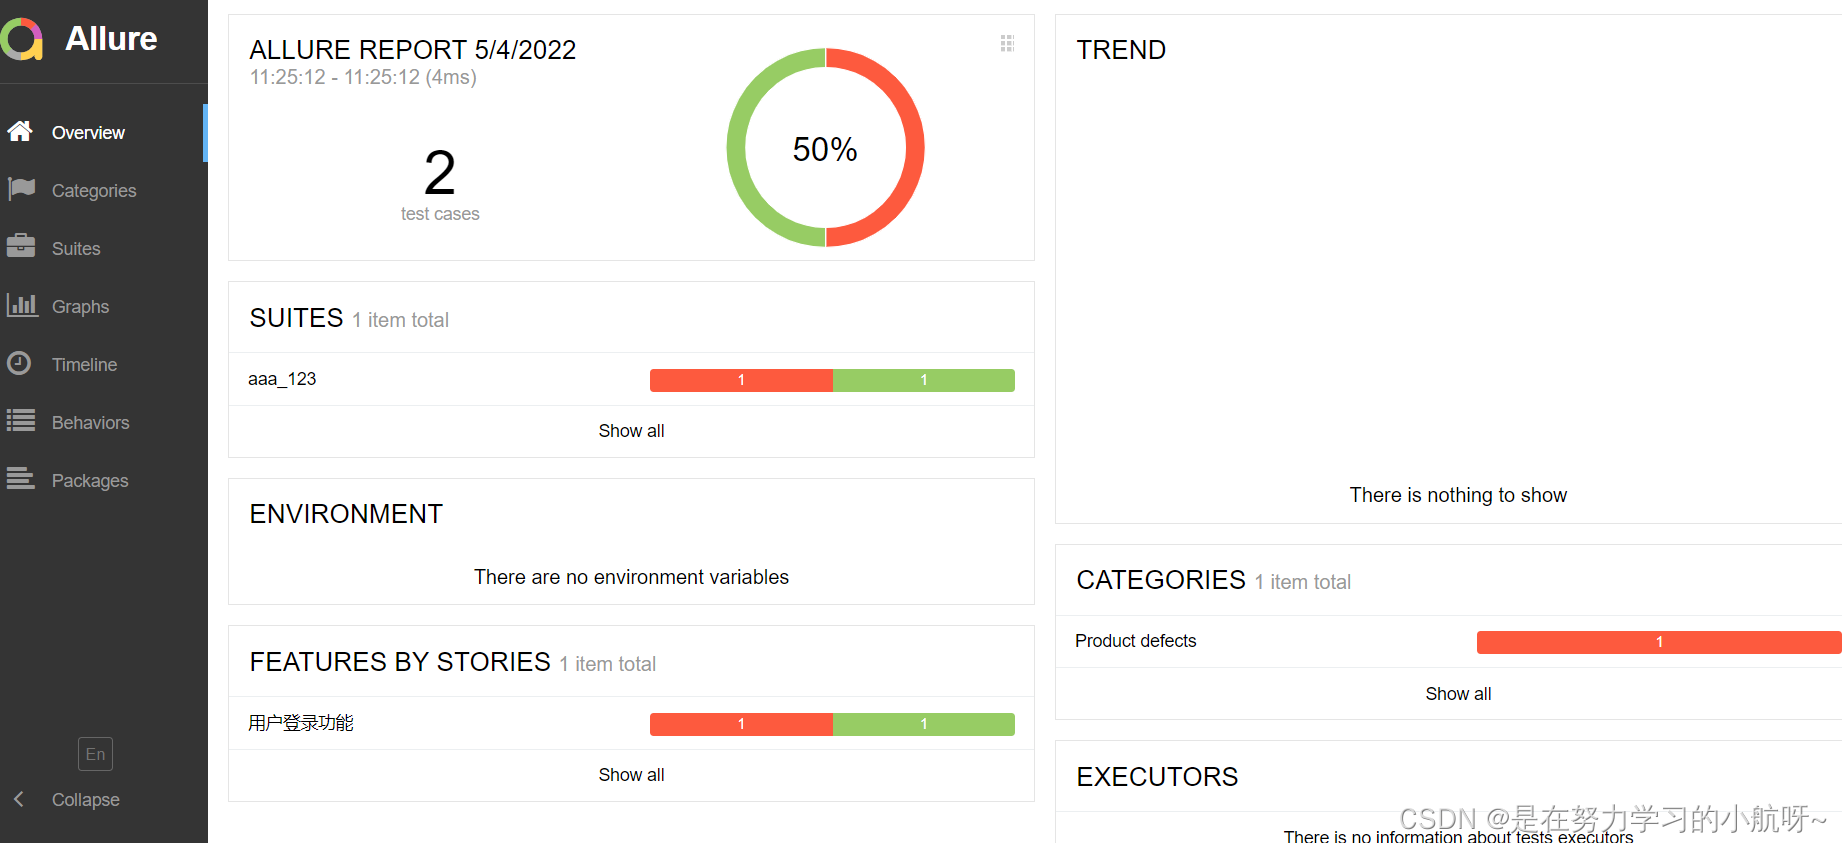
四、Pytest结合allure结合生成报告
使用前提:
- 首先安装allure(allure-pytest,allure(https://github.com/allure-framework/allure2/releases));
- 配置path系统环境变量;
- 重启;
- 测试allure是否安装成功(allure --version);
示例:
import pytest,allure
class TestClass005():
    @allure.feature("用户登录功能")#用于定义被测试的功能,被测产品的需求点
    @allure.story("登录成功")     #用于定义被测功能的用户场景,即子功能点
    def test_success(self):
        assert 1==1
    @allure.feature("用户登录功能")#用于定义被测试的功能,被测产品的需求点
    @allure.story("登录失败")     #用于定义被测功能的用户场景,即子功能点
    def test_fail(self):
        assert 1==2
运行:
$pytest --alluredir=report/xml aaa_123.py
$allure generate report/xml -o report/html --clean
注意:report文件夹需要与运行文件同一个目录下
运行结果如下:
Report successfully generated to report\html
 ## 四、Pytest多线程,多进程
安装:
pip install pytest-xdist多进程
pip install pytest-parallel多线程


 626
626


 被折叠的 条评论
为什么被折叠?
被折叠的 条评论
为什么被折叠?
 到【灌水乐园】发言


