


一个序列模型,按照顺序到层中,比如官方案例👇
# Using Sequential to create a small model. When `model` is run,
# input will first be passed to `Conv2d(1,20,5)`. The output of
# `Conv2d(1,20,5)` will be used as the input to the first
# `ReLU`; the output of the first `ReLU` will become the input
# for `Conv2d(20,64,5)`. Finally, the output of
# `Conv2d(20,64,5)` will be used as input to the second `ReLU`
model = nn.Sequential(
          nn.Conv2d(1,20,5),
          nn.ReLU(),
          nn.Conv2d(20,64,5),
          nn.ReLU()
        )

# Using Sequential with OrderedDict. This is functionally the
# same as the above code
model = nn.Sequential(OrderedDict([
          ('conv1', nn.Conv2d(1,20,5)),
          ('relu1', nn.ReLU()),
          ('conv2', nn.Conv2d(20,64,5)),
          ('relu2', nn.ReLU())
        ]))
先有输入通道为1,输出通道为20,卷积核为5的卷积层,接着接一层激活函数,再来一层输入通道为20,输出通道为64,卷积核为5的卷积层,最后接激活函数。
$$
H_{out} = \left \lfloor \dfrac{H_{in}+2\times padding[0]-(kernel_size[0]-1)-1}{stride[0]}+1 \right \rfloor
\
W_{out} = \left \lfloor \dfrac{W_{in}+2\times padding[1]-(kernel_size[1]-1)-1}{stride[1]}+1 \right \rfloor
$$
这里的
H
i
n
,
W
i
n
H_{in},W_{in}
Hin,Win说的是图片的宽和高,stride和padding是未知,需要求,dilation是默认1。
以CIFAR10作为模型来处理,网络结构是这样的👇
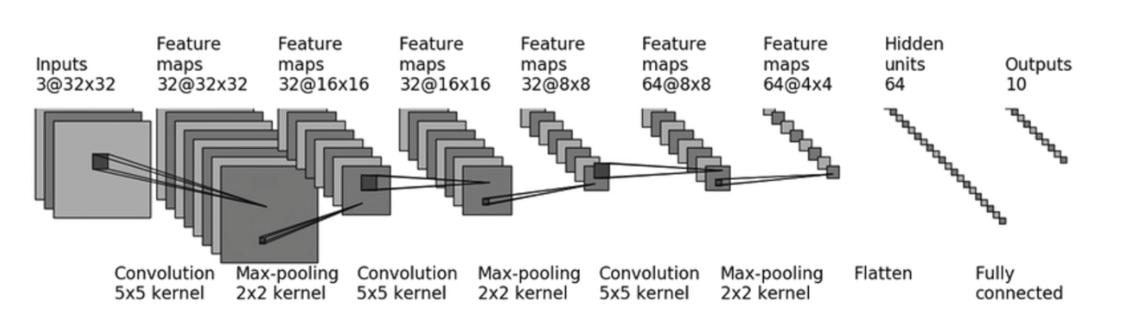
经过8步处理,分别是:
- 卷积
- 最大池化
- 卷积
- 最大池化
- 卷积
- 最大池化
- 展开
- 全连接
案例代码👇
import torch
import torchvision
from torch import nn
from torch.nn import Conv2d
from torch.utils.data import DataLoader


class Tudui(nn.Module):
    def __init__(self):
        super(Tudui, self).__init__()
        self.conv1 = nn.Conv2d(3,32,5,padding = 2)
        self.maxpool1 = nn.MaxPool2d(kernel_size = 2)
        self.conv2 = nn.Conv2d(16, 16 ,5,padding = 2)
        self.maxpool2 = nn.MaxPool2d(kernel_size = 2)
        self.conv3 = nn.Conv2d(8 ,8 , 5, padding = 2)
        self.maxpool3 = nn.MaxPool2d(2)
        self.flatten = nn.Flatten()
        # self.linear = nn.Linear()
    def forward(self , input):
        input = self.conv1(input)
        input = self.maxpool1(input)
        input = self.conv2(input)
        input = self.maxpool2(input)
        input = self.conv3(input)
        input = self.maxpool3(input)
        input = self.flatten(input)


tudui = Tudui()
print(tudui)
#64是batch_size ,一次传入64张图片
#3,32,32是3通道,32×32的图片大小,看最上面那个网络模型架构图就行
input = torch.ones((64,3,32,32))
output = tudui(input)
print(output.shape)
#打印完输出的形状后,就知道要传入linear层有多少特征
如果不知道要传入线性层多少个特征,可以在flatten层据停止,看输出是多少。
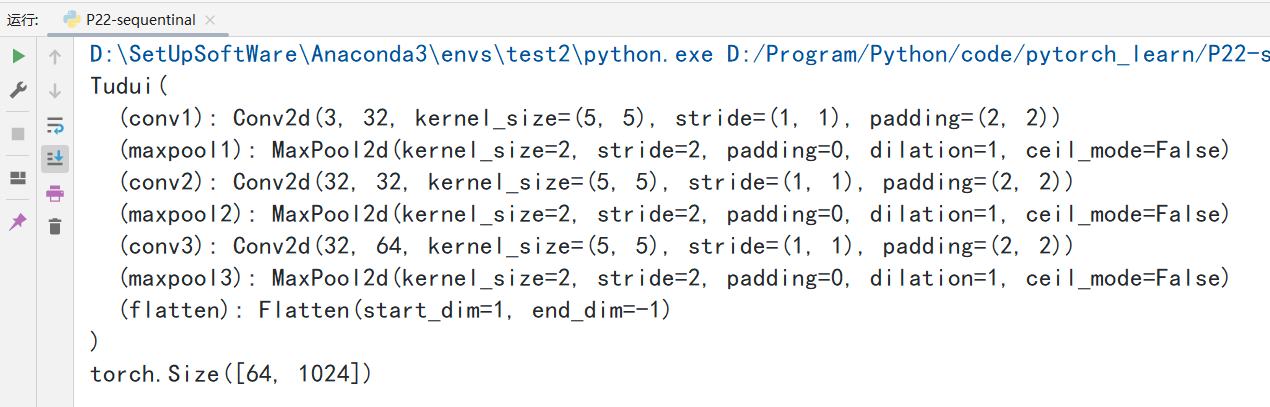
接着在flatten层后添加线性层,有两层线性层,一层是将1024变换为64,一层是将64变换为10。
class Tudui(nn.Module):
    def __init__(self):
        super(Tudui, self).__init__()
        self.conv1 = nn.Conv2d(3,32,5,padding = 2)
        self.maxpool1 = nn.MaxPool2d(kernel_size = 2)
        self.conv2 = nn.Conv2d(32 , 32 ,5,padding = 2)
        self.maxpool2 = nn.MaxPool2d(kernel_size = 2)
        self.conv3 = nn.Conv2d(32 ,64 , 5, padding = 2)
        self.maxpool3 = nn.MaxPool2d(kernel_size = 2)
        self.flatten = nn.Flatten()
        self.linear1 = nn.Linear(in_features = 1024 , out_features = 64)
        self.linear2 = nn.Linear(in_features = 64, out_features = 10)
    def forward(self , input):
        input = self.conv1(input)
        input = self.maxpool1(input)
        input = self.conv2(input)
        input = self.maxpool2(input)
        input = self.conv3(input)
        input = self.maxpool3(input)
        input = self.flatten(input)
        input = self.linear1(input)
        input = self.linear2(input)
        return input
运行结果如下👇

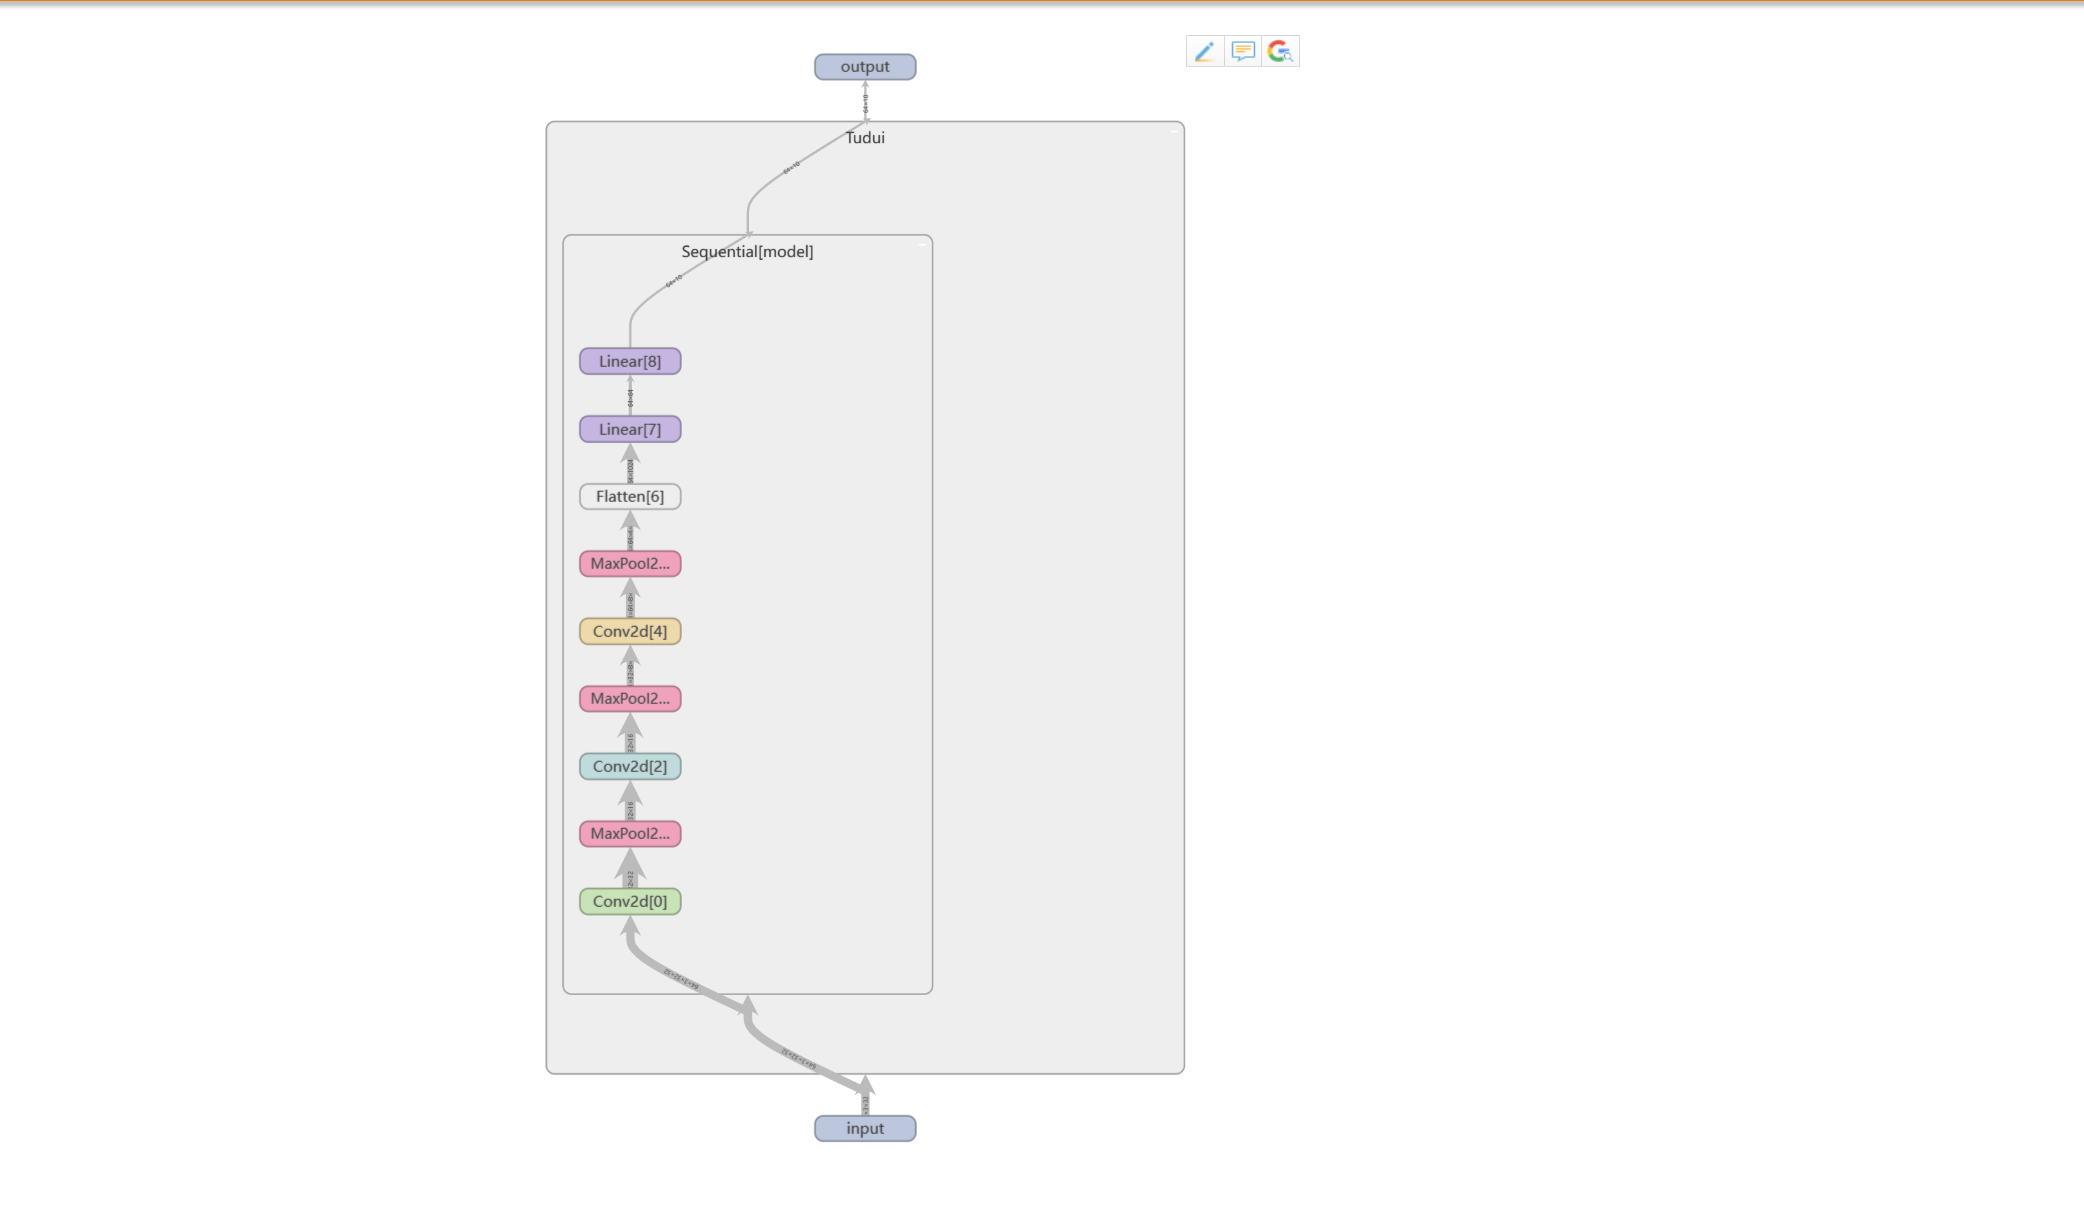
也可以用tensorboard进行网络模型的可视化。
import torch
import torchvision
from tensorboardX import SummaryWriter
from torch import nn
from torch.nn import Conv2d
from torch.utils.data import DataLoader


class Tudui(nn.Module):
    def __init__(self):
        super(Tudui, self).__init__()
        # self.conv1 = nn.Conv2d(3,32,5,padding = 2)
        # self.maxpool1 = nn.MaxPool2d(kernel_size = 2)
        # self.conv2 = nn.Conv2d(32 , 32 ,5,padding = 2)
        # self.maxpool2 = nn.MaxPool2d(kernel_size = 2)
        # self.conv3 = nn.Conv2d(32 ,64 , 5, padding = 2)
        # self.maxpool3 = nn.MaxPool2d(kernel_size = 2)
        # self.flatten = nn.Flatten()
        # self.linear1 = nn.Linear(in_features = 1024 , out_features = 64)
        # self.linear2 = nn.Linear(in_features = 64, out_features = 10)
        self.model = nn.Sequential(
            nn.Conv2d(3,32,5,padding = 2),
            nn.MaxPool2d(kernel_size = 2),
            nn.Conv2d(32,32,5,padding = 2),
            nn.MaxPool2d(kernel_size = 2),
            nn.Conv2d(32 , 64 , 5 ,padding = 2),
            nn.MaxPool2d(kernel_size = 2),
            nn.Flatten(),
            nn.Linear(in_features = 1024 ,
                    out_features = 64),
            nn.Linear(in_features = 64 ,
                    out_features = 10)
        )
    def forward(self , input):
        # input = self.conv1(input)
        # input = self.maxpool1(input)
        # input = self.conv2(input)
        # input = self.maxpool2(input)
        # input = self.conv3(input)
        # input = self.maxpool3(input)
        # input = self.flatten(input)
        # input = self.linear1(input)
        # input = self.linear2(input)
        input = self.model(input)
        return input


tudui = Tudui()
print(tudui)

input = torch.ones((64, 3,32,32))
output = tudui(input)

print(output.shape)
#可视化网络结构
writer = SummaryWriter("tb_logs/seq")
writer.add_graph(model = tudui , input_to_model = input)
writer.close()
打开网络结构👇


 3423
3423


 被折叠的 条评论
为什么被折叠?
被折叠的 条评论
为什么被折叠?
 到【灌水乐园】发言


