


目录
AOP介绍
AOP (Aspect Oriented Programming) 即面向切面编程
作用
在不修改源码的情况下,可以对目标对象的方法进行增强
特点:
- 非侵入式编程: 在不修改源码的情况下对已有方法进行增强
- 提高代码复用: 增强的内容抽象成方法或者对象可重复使用
- 统一管理维护: 抽象成独立的方法或对象方便后期维护管理
原理:
- Spring AOP 实现的原理是动态代理技术
- 底层支持两种动态代理
- 当目标实现接口时采用JDK动态代理
- 当目标没有实现接口采用Cglib动态代理(可配置统一使用Cglib)
AOP应用场景
日志记录
事务控制(spring的声明式事务)
性能监控
权限控制
术语:
1、Joinpoint(连接点):
在spring中,连接点指需要增强的所有方法(指的是那些要被增强功能的候选方法对象),spring只支持方法类型的连接点。
2、Pointcut(切入点)
所谓切入点是指我们要对哪些 Joinpoint 进行拦截的定义。
3、Advice(通知/增强)
所谓通知是指拦截到 Joinpoint 之后所要做的事情就是通知。 通知的类型: 前置通知,后置通知,异常通知,最终通知,环绕通知。
4、Target(目标对象)
被代理的对象. 比如:对业务类增强,目标对象就是业务类
5、Weaving(织入):
织入指的是把增强用于目标对象,创建代理对象的过程。spring采用动态代理织入,AspectJ采用编译期织入和类装载期织入。
6、Proxy(代理):
一个类被AOP织入增强后,即产生一个结果代理类。比如动态代理案例中的经纪人。
7、 Aspect(切面)
切面指的是切入点和通知的结合。

导入依赖
<!--aop: spring整合第三方的面向切面编程组件-->
<dependency>
    <groupId>org.aspectj</groupId>
    <artifactId>aspectjweaver</artifactId>
    <version>1.8.7</version>
</dependency>
AOP切入点表达式
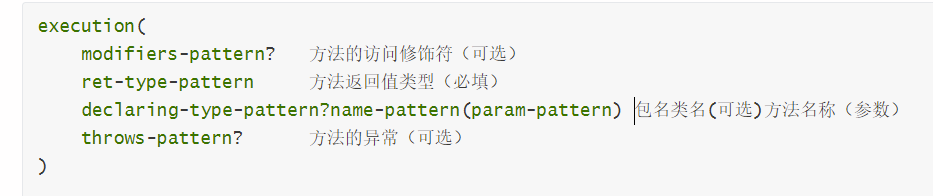


    <bean class="com.halulu.dao.Info" id="info"></bean>

    <aop:config>
        <aop:pointcut id="pt" expression="execution(* com.halulu..service.*.*(..))"/>
    </aop:config>
	<!--    execution(* com.halulu..service.*.*(..))
     修饰符省略
     返回值类型任意
     在com.halulu的子包中的servece包的任意类的任意方法
     参数任意-->
AOP常用标签说明
1、
<aop:config>作用:声明aop配置。
2、<aop:aspect>作用:配置切面。
3、<aop:pointcut>作用:配置切入点表达式。
4、<aop:before>作用:配置前置通知
5、<aop:after-returning>作用:配置后置通知
6、<aop:after-throwing>作用:配置异常通知
7、<aop:after>作用:配置最终通知
8、<aop:around>作用:配置环绕通知
注意:
1、在配置文件xml中,后置通知
<aop:after>必须在后置通知<aop:after-returning>和异常通知<aop:after-throwing>之后,否则位置会出错。2、建议使用环绕通知
<aop:around>,功能更强大,位置也不会出错。
环绕通知

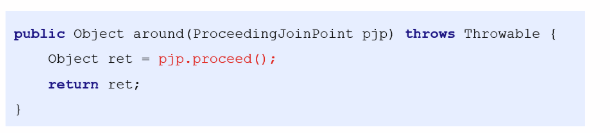
AOP–xml形式
public void around(ProceedingJoinPoint joinPoint) throws Throwable{
        try {
            System.out.println("前置通知before");
            Object[] args = joinPoint.getArgs();
            System.out.println("args" + args[0] + " + " + args[1]);
            args[1] = 100;
            joinPoint.proceed(args);
            System.out.println("后置通知after-returing");
        } catch (Throwable throwable) {
            System.out.println("异常通知after-throwing");
        }finally {
            System.out.println("最终通知after");
        }
    }
    <bean class="com.halulu.dao.Info" id="info"></bean>

    <aop:config>
        <aop:pointcut id="pt" expression="execution(* com.halulu..service.*.*(..))"/>
        <aop:aspect ref="info">
            <aop:around method="around" pointcut-ref="pt"></aop:around>
        </aop:aspect>
    </aop:config>
AOP–xml+注解
开启注解扫描
<aop:aspectj-autoproxy/>
<?xml version="1.0" encoding="UTF-8"?>
<beans xmlns="http://www.springframework.org/schema/beans"
       xmlns:xsi="http://www.w3.org/2001/XMLSchema-instance"
       xmlns:aop="http://www.springframework.org/schema/aop"
       xmlns:context="http://www.springframework.org/schema/context"
       xsi:schemaLocation="http://www.springframework.org/schema/beans http://www.springframework.org/schema/beans/spring-beans.xsd http://www.springframework.org/schema/aop https://www.springframework.org/schema/aop/spring-aop.xsd http://www.springframework.org/schema/context https://www.springframework.org/schema/context/spring-context.xsd">

    <!--开启IOC注解扫描-->
    <context:component-scan base-package="com.halulu"></context:component-scan>

    <!--开启aop注解扫描-->
    <aop:aspectj-autoproxy/>

</beans>
//切面类
@Aspect //配置当前类为切面类
@Component //创建对象加入IOC
public class LogAspect {

    /*
    * 注解实现通知的注意:
    *    spring框架aop遗留bug介绍:各种通知的注解方式实现其中最终通知与后置通知的顺序是有问题。
    *    解决方案:推荐使用环绕通知注解实现
    * */

    //切入点, 当前的方法名就是切入点表达式的别名
    @Pointcut("execution(* com..service.impl.*.*(..))")
    public void pointcut(){}

    //前置通知方法,并调用切入点表达式方法
    //@Before("pointcut()")
    public void before(){
        System.out.println("前置通知...写入日志");
    }

    //后置通知方法
    //@AfterReturning("pointcut()")
    public void afterReturning(){
        System.out.println("后置通知...写入日志");
    }

    //异常通知方法
    //@AfterThrowing("pointcut()")
    public void afterThrowing(){
        System.out.println("异常通知...写入日志");
    }

    //最终通知方法
    //@After("pointcut()")
    public void after(){
        System.out.println("最终通知...写入日志");
    }

    //环绕通知的方法
    @Around("pointcut()")
    public Object around(ProceedingJoinPoint joinPoint){
        Object result = null;
        try{

            //打印前置通知
            System.out.println("[环绕前置通知...写入日志]");

            //获取目标方法的名字
            String methodName = joinPoint.getSignature().getName();
            System.out.println("目标方法名字:"+methodName);

            //获取目标方法的参数列表
            Object[] args = joinPoint.getArgs();
            System.out.println("目标方法参数列表:"+ Arrays.toString(args));


            //执行目标方法
            result = joinPoint.proceed();

            //打印后置通知
            System.out.println("[环绕后置通知...写入日志]");

        }catch (Throwable e){

            //打印异常通知
            System.out.println("[环绕异常通知...写入日志]");

            e.printStackTrace();
            throw new RuntimeException(e);

        }finally {

            //打印最终通知
            System.out.println("[环绕最终通知...写入日志]");
        }

        return result;
    }
}
AOP–纯注解
package com.halulu.confing;

import org.springframework.context.annotation.ComponentScan;
import org.springframework.context.annotation.Configuration;
import org.springframework.context.annotation.EnableAspectJAutoProxy;

@Configuration
@ComponentScan(basePackages = "com.halulu")
@EnableAspectJAutoProxy
public class BeansConfig {

}
@Aspect
@Component
public class Info {

    @Pointcut("execution(* com.halulu..service.*.*(..))")
    public void pt(){}

    @Around("pt()")
    public void around(ProceedingJoinPoint joinPoint) throws Throwable{
        try {
            System.out.println("前置通知before");
            Object[] args = joinPoint.getArgs();
            System.out.println("args" + args[0] + " + " + args[1]);
            joinPoint.proceed(args);
            System.out.println("后置通知after-returing");
        } catch (Throwable throwable) {
            System.out.println("异常通知after-throwing");
        }finally {
            System.out.println("最终通知after");
        }
    }

}
@RunWith(SpringJUnit4ClassRunner.class)
@ContextConfiguration(classes = BeansConfig.class)
public class DemoTest {

    @Autowired
    private UserService userService;

    @Test
    public void test(){
        userService.sum(10,10);
    }
}
Spring声明式事务介绍
声明式事务将事务管理代码从业务方法中分离出来,以声明的方式来实现事务管理。Spring声明式事务管理通过AOP实现。
Spring对不同持久层技术提供了不同的事务实现(事务管理器):
1、基于hibernate的事务管理: HibernateTransactionManager
2、基于JPA的事务管理理:JPATransactionManager
3、基于jdbc、mybatis、连接池的事务管理:DataSourceTransanctionManager
事务的传播行为:

Spring声明式事务–xml
<?xml version="1.0" encoding="UTF-8"?>
<beans xmlns="http://www.springframework.org/schema/beans"
       xmlns:xsi="http://www.w3.org/2001/XMLSchema-instance"
       xmlns:context="http://www.springframework.org/schema/context" xmlns:tx="http://www.springframework.org/schema/tx"
       xmlns:aop="http://www.springframework.org/schema/aop"
       xsi:schemaLocation="http://www.springframework.org/schema/beans http://www.springframework.org/schema/beans/spring-beans.xsd http://www.springframework.org/schema/context https://www.springframework.org/schema/context/spring-context.xsd http://www.springframework.org/schema/tx http://www.springframework.org/schema/tx/spring-tx.xsd http://www.springframework.org/schema/aop https://www.springframework.org/schema/aop/spring-aop.xsd">

    <!--
    目标:使用spring的声明式事务管理所有业务层的方法添加事务功能

    实现步骤
        1. 开启IOC注解扫描
        2. 加载外部配置文件jdbc.properties
        3. 创建连接池对象
        4. 创建JdbcTemplate,注入连接池对象
        5. 配置spring声明式事务

    -->

    <!--1.开启IOC注解扫描-->
    <context:component-scan base-package="com.halulu"></context:component-scan>

    <!--2.加载外部的jdbc.properties配置文件-->
    <context:property-placeholder location="classpath:jdbc.properties"></context:property-placeholder>

    <!--3.创建DataSource连接池对象-->
    <bean id="dataSource" class="com.alibaba.druid.pool.DruidDataSource">
        <property name="url" value="${jdbc.url}"></property>
        <property name="driverClassName" value="${jdbc.driver}"></property>
        <property name="username" value="${jdbc.username}"></property>
        <property name="password" value="${jdbc.password}"></property>
    </bean>

    <!--4.创建JdbcTemplate对象-->
    <bean id="jdbcTemplate" class="org.springframework.jdbc.core.JdbcTemplate">
        <property name="dataSource" ref="dataSource"></property>
    </bean>

    <!--5.配置spring声明式事务-->
    <!--5.1 创建事务管理器并加入IOC容器-->
    <bean id="transactionManager"  class="org.springframework.jdbc.datasource.DataSourceTransactionManager">
        <!--注入dataSource-->
        <property name="dataSource" ref="dataSource"></property>
    </bean>
    <!--5.2 配置事务通知,配不同的方法设置不同的事务传播行为-->
    <tx:advice id="tx" transaction-manager="transactionManager">
        <tx:attributes>
            <!--给不用的方法名配置不同的事务,原则:查询不用事务,增删改使用事务
                <tx:method> 用于配置每个方法
                name="get*" 设置方法名以get开头的,查询方法开头还有 query/find/search/select...
                propagation="SUPPORTS", 设置事务的传播行为,这里不使用事务。如果不设置默认值:REQUIRED
                read-only="true",设置事务只读,查询都配置只读。如果不设置默认值:false, 适合增删改的方法

                <tx:method name="*"/> 剩余的所有其他方法,propagation="REQUIRED",read-only="false",代表所有增删改使用事务
            -->
            <tx:method name="get*" propagation="SUPPORTS" read-only="true"/>
            <tx:method name="query*" propagation="SUPPORTS" read-only="true"/>
            <tx:method name="find*" propagation="SUPPORTS" read-only="true"/>
            <tx:method name="search*" propagation="SUPPORTS" read-only="true"/>
            <tx:method name="select*" propagation="SUPPORTS" read-only="true"/>
            <tx:method name="*"/>
        </tx:attributes>
    </tx:advice>

    <!--5.3 aop配置,将事务通知给到切入点去增强-->
    <aop:config>
        <aop:advisor advice-ref="tx" pointcut="execution(* com..service.impl.*.*(..))"></aop:advisor>
    </aop:config>
</beans>
注意:
<tx:advice>导入的是xmlns:tx="http://www.springframework.org/schema/tx
Spring声明式事务–xml+注解
开启事务注解扫描
<tx:annotation-driven transaction-manager="transactionManager"/>
<?xml version="1.0" encoding="UTF-8"?>
<beans xmlns="http://www.springframework.org/schema/beans"
       xmlns:xsi="http://www.w3.org/2001/XMLSchema-instance"
       xmlns:context="http://www.springframework.org/schema/context" xmlns:tx="http://www.springframework.org/schema/tx"
       xmlns:aop="http://www.springframework.org/schema/aop"
       xsi:schemaLocation="http://www.springframework.org/schema/beans http://www.springframework.org/schema/beans/spring-beans.xsd http://www.springframework.org/schema/context https://www.springframework.org/schema/context/spring-context.xsd http://www.springframework.org/schema/tx http://www.springframework.org/schema/tx/spring-tx.xsd http://www.springframework.org/schema/aop https://www.springframework.org/schema/aop/spring-aop.xsd">

    <!--1.开启IOC注解扫描-->
    <context:component-scan base-package="com.halulu"></context:component-scan>

    <!--2.加载外部的jdbc.properties配置文件-->
    <context:property-placeholder location="classpath:jdbc.properties"></context:property-placeholder>

    <!--3.创建DataSource连接池对象-->
    <bean id="dataSource" class="com.alibaba.druid.pool.DruidDataSource">
        <property name="url" value="${jdbc.url}"></property>
        <property name="driverClassName" value="${jdbc.driver}"></property>
        <property name="username" value="${jdbc.username}"></property>
        <property name="password" value="${jdbc.password}"></property>
    </bean>

    <!--4.创建JdbcTemplate对象-->
    <bean id="jdbcTemplate" class="org.springframework.jdbc.core.JdbcTemplate">
        <property name="dataSource" ref="dataSource"></property>
    </bean>

    <!--5.spring声明式事务配置-->
    <!--5.1 配置事务管理器:实现事务提交或回滚功能-->
    <bean id="transactionManager" class="org.springframework.jdbc.datasource.DataSourceTransactionManager">
        <!--注入连接池-->
        <property name="dataSource" ref="dataSource"></property>
    </bean>
    <!--5.2 事务注解配置-->
    <tx:annotation-driven transaction-manager="transactionManager"></tx:annotation-driven>
</beans>
/**
 * @Transactional的使用, 加上事务的管理
 * 使用方式:
 *   1) 配置在接口上,接口的所有实现类所有方法都使用事务
 *   2)配置在类上,当前类里面所有的方法都使用事务
 *   3)配置在指定方法上,只有当前方法使用事务
 *
 * 如果想查询方法不使用事务,必须每个方法逐个配置如下
 *   @Transactional(propagation = Propagation.SUPPORTS,readOnly = true)
 *
 * 总结:注解方式的声明式事务配置非常不灵活,性能不够好,推荐使用xml方式
 */
@Service
@Transactional
public class AccountServcieImpl implements AccountService {

    //注入AccountDao
    @Autowired
    private AccountDao accountDao;

    /**
     * 保存业务
     *
     * @param account
     */
    @Override
    public void save(Account account) {

        //第一条sql语句
        accountDao.save(account);

        //模拟异常
        //int a = 1/0;

        //第二条sql语句
        accountDao.save(account);
    }

    @Transactional(propagation = Propagation.SUPPORTS,isolation = Isolation.DEFAULT)
    @Override
    public List<Account> findAll() {
        System.out.println("查询方法");
        return null;
    }
}
Spring声明式事务–纯注解
开启 事务 注解扫描
@EnableTransactionManagement
@Configuration //代替 bean.xml 文件
@ComponentScan(basePackages = "com.halulu") //开启 IOC 注解扫描
@EnableTransactionManagement //开启 事务 注解扫描
@Import(JdbcConfig.class)   //加载 JdbcConfig 配置类数据
public class SpringConfiguration {
}
@PropertySource("classpath:jdbc.properties")
public class JdbcConfig {

    @Value("${jdbc.url}")
    private String url;

    @Value("${jdbc.driver}")
    private String driver;

    @Value("${jdbc.username}")
    private String username;

    @Value("${jdbc.password}")
    private String password;


    //创建DataSource
    @Bean
    public DataSource createDataSource(){
        DruidDataSource dataSource = new DruidDataSource();
        dataSource.setUrl(url);
        dataSource.setDriverClassName(driver);
        dataSource.setUsername(username);
        dataSource.setPassword(password);
        return dataSource;
    }

    //创建DataSource
    @Bean
    public JdbcTemplate createJdbcTemplate(DataSource dataSource){
        JdbcTemplate jdbcTemplate = new JdbcTemplate();
        jdbcTemplate.setDataSource(dataSource);
        return jdbcTemplate;
    }

    //创建事务管理器DataSourceTransactionManager
    @Bean
    public DataSourceTransactionManager createDataSourceTransactionManager(DataSource dataSource){

        DataSourceTransactionManager transactionManager = new DataSourceTransactionManager();
        transactionManager.setDataSource(dataSource);
        return transactionManager;
    }
}
Spring编程式事务
- Spring编程式事务,主要是为了弥补声明式事务的缺点(只能对整个方法进行事务管理,不能对方法的某些行单独进行事务控制)
- 应用场景: 需要自由的对方法内的某些代码进行事务控制,此时声明式事务满足不了,可以使用编程式事务控制
<?xml version="1.0" encoding="UTF-8"?>
<beans xmlns="http://www.springframework.org/schema/beans"
       xmlns:xsi="http://www.w3.org/2001/XMLSchema-instance"
       xmlns:context="http://www.springframework.org/schema/context" xmlns:tx="http://www.springframework.org/schema/tx"
       xmlns:aop="http://www.springframework.org/schema/aop"
       xsi:schemaLocation="http://www.springframework.org/schema/beans http://www.springframework.org/schema/beans/spring-beans.xsd http://www.springframework.org/schema/context https://www.springframework.org/schema/context/spring-context.xsd http://www.springframework.org/schema/tx http://www.springframework.org/schema/tx/spring-tx.xsd http://www.springframework.org/schema/aop https://www.springframework.org/schema/aop/spring-aop.xsd">

    <!--
    目标:使用spring的声明式事务管理所有业务层的方法添加事务功能

    实现步骤
        1. 开启IOC注解扫描
        2. 加载外部配置文件jdbc.properties
        3. 创建连接池对象
        4. 创建JdbcTemplate,注入连接池对象
        5. 配置spring声明式事务

    -->

    <!--1.开启IOC注解扫描-->
    <context:component-scan base-package="com.halulu"></context:component-scan>

    <!--2.加载外部的jdbc.properties配置文件-->
    <context:property-placeholder location="classpath:jdbc.properties"></context:property-placeholder>

    <!--3.创建DataSource连接池对象-->
    <bean id="dataSource" class="com.alibaba.druid.pool.DruidDataSource">
        <property name="url" value="${jdbc.url}"></property>
        <property name="driverClassName" value="${jdbc.driver}"></property>
        <property name="username" value="${jdbc.username}"></property>
        <property name="password" value="${jdbc.password}"></property>
    </bean>

    <!--4.创建JdbcTemplate对象-->
    <bean id="jdbcTemplate" class="org.springframework.jdbc.core.JdbcTemplate">
        <property name="dataSource" ref="dataSource"></property>
    </bean>

    <!--5.配置spring声明式事务-->
    <!--5.1 创建事务管理器并加入IOC容器-->
    <bean id="transactionManager"  class="org.springframework.jdbc.datasource.DataSourceTransactionManager">
        <!--注入dataSource-->
        <property name="dataSource" ref="dataSource"></property>
    </bean>

    <!--5.2 创建编程式事务模板对象并加入IOC容器-->
    <bean id="transactionTemplate" class="org.springframework.transaction.support.TransactionTemplate">
        <!--注入事务管理器-->
        <property name="transactionManager" ref="transactionManager"></property>
    </bean>

</beans>
@Service
public class AccountServcieImpl implements AccountService {

    //注入AccountDao
    @Autowired
    private AccountDao accountDao;

    //注入事务控制模板
    @Autowired
    private TransactionTemplate transactionTemplate;

    /**
     * 保存业务
     *
     * @param account
     */
    @Override
    public void save(Account account) {

        //目标:手动编程控制事务

        transactionTemplate.execute(new TransactionCallback<Object>() {
            @Override
            public Object doInTransaction(TransactionStatus transactionStatus) {
                //doInTransaction 事务控制的方法,里面的所有代码在一个事务中

                //第一条sql语句
                accountDao.save(account);

                //模拟异常
                //int a = 1/0;

                //第二条sql语句
                accountDao.save(account);
                return null;
            }
        });


    }

    @Override
    public List<Account> findAll() {
        System.out.println("查询方法");
        return null;
    }
}


 431
431


 被折叠的 条评论
为什么被折叠?
被折叠的 条评论
为什么被折叠?
 到【灌水乐园】发言


