


1proto-actor 源码解析
下面我们从actor 系统设计各个模块设计剖析源码,从官方文档结构,结合文档和自己的理解,然后再配合源码,剖析actor设计。
1.1actor核心
actor 特点
- 从 function 或者method创建
- 从对象工厂
- 生成actor通过自动,指定,或者前缀名
1.1.1Props(创建actor 的配置)
配置和构造actor 的上下文context
自定义属性
一种是从函数创建,actor 必须实现Receive(c Context)方法,这是actor信息的入口,开发者需要对各种各样的消息进行处理
//函数签名
// PropsFromProducer creates a props with the given actor producer assigned
func PropsFromProducer(producer Producer) *Props {
return &Props{
producer: producer,
contextDecorator: make([]ContextDecorator, 0),
}
}
// The Producer type is a function that creates a new actor
type Producer func() Actor
// Actor is the interface that defines the Receive method.
//
// Receive is sent messages to be processed from the mailbox associated with the instance of the actor
type Actor interface {
Receive(c Context)
}
来看看我们怎么使用,如果下图可以直接一个函数actor.PropsFromProducer(func() actor.Actor { return &helloActor{} }),返回一个实现actor接口的对象
package main
import (
"fmt"
console "github.com/AsynkronIT/goconsole"
"github.com/AsynkronIT/protoactor-go/actor"
)
type hello struct{ Who string }
type helloActor struct{}
func (state *helloActor) Receive(context actor.Context) {
switch msg := context.Message().(type) {
case *hello:
fmt.Printf("Hello %v\n", msg.Who)
}
}
func main() {
system := actor.NewActorSystem()
props := actor.PropsFromProducer(func() actor.Actor { return &helloActor{} })
pid := system.Root.Spawn(props)
system.Root.Send(pid, &hello{Who: "Roger"})
_, _ = console.ReadLine()
}
另一种是直接使用函数创建,本质都一样,需要一个func(c actor.Context)的接口方法处理消息
props :=actor.PropsFromFunc(func(c actor.Context) {

})
Props 有大量的方法自定义actor,一些方法可能极少使用,例如WithMailbox,WithDispatcher等方法
//自定义消息分发器
func (props *Props) WithDispatcher(dispatcher mailbox.Dispatcher) *Props
// 自定义邮箱
func (props *Props) WithMailbox(mailbox mailbox.Producer) *Props
//自定义context 装饰器
func (props *Props) WithContextDecorator(contextDecorator ...ContextDecorator) *Props
//自定义监管策略
func (props *Props) WithSupervisor(supervisor SupervisorStrategy) *Props
//...............类似自定义的方法
1.1.2Spawning Actors (创建actor)
- 创建props定义actor 如何被创建
- 创建actor使用props
- 有三种方式创建Spawning actor
var system = new ActorSystem();
var pid1 = system.Root.Spawn(props); // 自定生成actor名字
var pid2 = system.Root.SpawnPrefix(props, "prefix"); // 通过指定前缀自动生成actor名
var pid3 = system.Root.SpawnNamed(props, "my-actor"); // 自定义actor 名
如果需要创建child actor 并用父actor监管子actor,我们可以这么做
type hello struct{ Who string }
type parentActor struct{}
func (state *parentActor) Receive(context actor.Context) {
switch msg := context.Message().(type) {
case *hello:
props := actor.PropsFromProducer(newChildActor) //创建子actor,并将消息发给子actor
child := context.Spawn(props)
context.Send(child, msg)
}
}
func newParentActor() actor.Actor {
return &parentActor{}
}
type childActor struct{}
func (state *childActor) Receive(context actor.Context) {
switch msg := context.Message().(type) {
case *actor.Started:
fmt.Println("Starting, initialize actor here")
case *actor.Stopping:
fmt.Println("Stopping, actor is about to shut down")
case *actor.Stopped:
fmt.Println("Stopped, actor and its children are stopped")
case *actor.Restarting:
fmt.Println("Restarting, actor is about to restart")
case *hello:
fmt.Printf("Hello %v\n", msg.Who)
panic("Ouch")
}
}
func newChildActor() actor.Actor {
return &childActor{}
}
Spawn原理
//自己生成唯一id,然后调用SpawnNamed
func (rc *RootContext) Spawn(props *Props) *PID {
pid, err := rc.SpawnNamed(props, rc.actorSystem.ProcessRegistry.NextId())
if err != nil {
panic(err)
}
return pid
}
//将前缀和自动生成的id 拼接,然后调用SpawnNamed
func (rc *RootContext) SpawnPrefix(props *Props, prefix string) *PID {
pid, err := rc.SpawnNamed(props, prefix+rc.actorSystem.ProcessRegistry.NextId())
if err != nil {
panic(err)
}
return pid
}
// actor name 存在将会返回ErrNameExists 错误
// 禁止使用系统前缀,如"YourPrefix$1", "Remote$1", "future$1"
func (rc *RootContext) SpawnNamed(props *Props, name string) (*PID, error) {
rootContext := rc
if props.guardianStrategy != nil { //如果自定义保证策略不为空,则用新策略重新生成rootContext,
//这里为什么要拷贝?因为所有actor共用一个rootContext,通用情况下是一样的,但是当有变化的时候,应该拷贝一份,只对这个actor 生效
rootContext = rc.Copy().WithGuardian(props.guardianStrategy)
}
//如果产生actor 的中间件不为空,那么就调用中间件
if rootContext.spawnMiddleware != nil {
return rc.spawnMiddleware(rc.actorSystem, name, props, rootContext)
}
return props.spawn(rc.actorSystem, name, rootContext)
}
spawn
func (props *Props) spawn(actorSystem *ActorSystem, name string, parentContext SpawnerContext) (*PID, error) {
return props.getSpawner()(actorSystem, name, props, parentContext)
}
//不自定spawner将会采用默认Spawner
func (props *Props) getSpawner() SpawnFunc {
if props.spawner == nil {
return defaultSpawner
}
return props.spawner
}
来看看defaultSpawner
// Default values
var (
defaultDispatcher = mailbox.NewDefaultDispatcher(300)
defaultMailboxProducer = mailbox.Unbounded()
defaultSpawner = func(actorSystem *ActorSystem, id string, props *Props, parentContext SpawnerContext) (*PID, error) {
//创建rootContext
ctx := newActorContext(actorSystem, props, parentContext.Self())
//从props获取mailBox
mb := props.produceMailbox()
//从props 获取消息分发器
dp := props.getDispatcher()
//生成process
proc := NewActorProcess(mb)
//生成Pid
pid, absent := actorSystem.ProcessRegistry.Add(proc, id)
if !absent {
return pid, ErrNameExists
}
//将actorContext的地址设为自己的pid
ctx.self = pid
mb.Start() //启动邮箱
mb.RegisterHandlers(ctx, dp) //注册邮箱消息分发器
mb.PostSystemMessage(startedMessage) //发送系统启动消息
return pid, nil
}
defaultContextDecorator = func(ctx Context) Context {
return ctx
}
)
1.1.3PID (actor 之间如何通信)
我们不能直接引用actor,我们只能获取actor 的序列化PID(process ID 简写) 去发送消息给actor的邮箱,这样做的一个好处是,PID可以轻松且廉价地序列化并通过线路发送,从而允许actor进行远程通信。
有两种方法交流在PIDS 之间进行交流
1.1.3.1Send
Send是向参与者发送消息的一种非阻塞、即时发送并且不存储的的方法,也就是说只发一次。消息将在接收actor的邮箱中排队,如果接收actor没有停止的话,那么最终会去处理这个消息。告诉对方消息也是与actor之间进行通信的最有效的方式,因此它是首选的默认方式,除非您的用例需要请求/应答通信模式。
1.1.3.2Request
Request和send 和相似,但是在结构里面包含了发送者的pid,因此接收者可以响应发送者,这仅仅只用于两个actor用请求响应交流,这种方式为了包含请求者的pid信息有更多分配,如果是在远端网络交流话增加了序列化和反序列化的压力
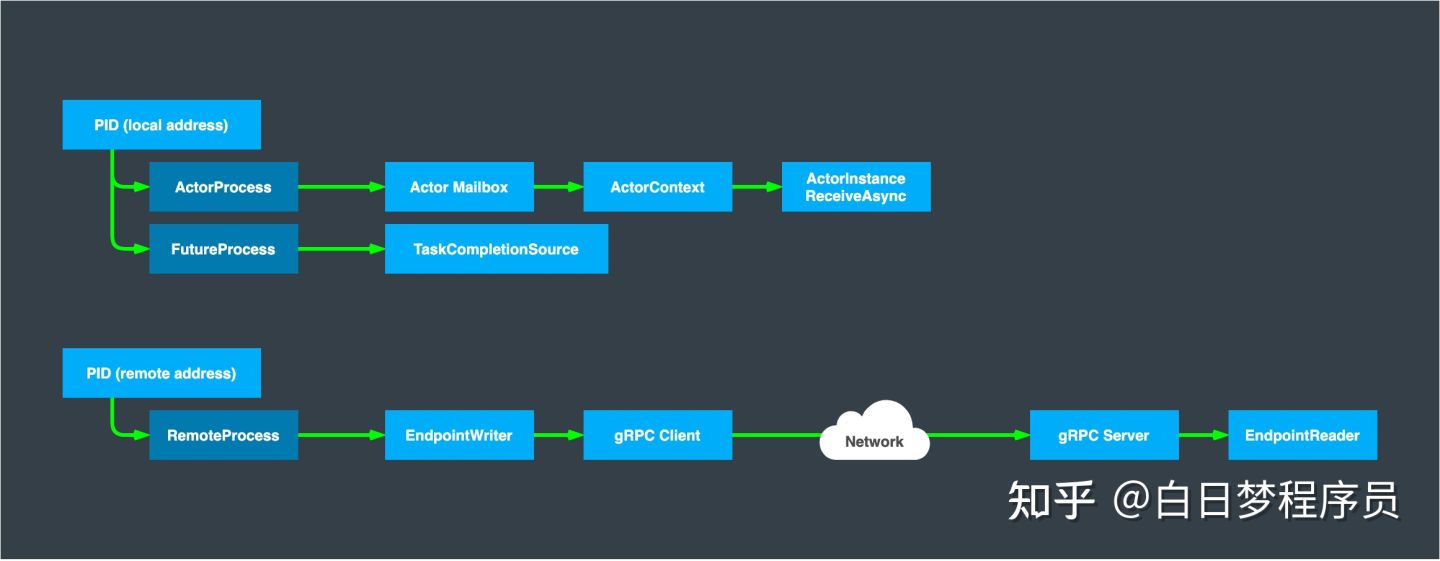
1.1.3.3PIDs 架构
pid 就像actor 的电话号码一样,process 就是将消息通过电话号码传达给对方相关的基础设施层。
有三种process,分别是LocalProcess,RemoteProcessandFutureProcess
PIDs 结构
type PID struct {
//actor主机地址,可以理解为唯一机器地址
Address string `protobuf:"bytes,1,opt,name=Address,proto3" json:"Address,omitempty"`
//actor唯一id,可以理解为actor的地址,在分布式环境中,这中id 应该是全局唯一的
Id string `protobuf:"bytes,2,opt,name=Id,proto3" json:"Id,omitempty"`
p *Process
}
//生成一个pid 的方式,在上面Spawn的时候,生成process 和id,然后调用Add 生成PID
func (pr *ProcessRegistryValue) Add(process Process, id string) (*PID, bool) {
return &PID{
Address: pr.Address,
Id: id,
}, pr.LocalPIDs.SetIfAbsent(id, process)
}
//LocalPIDs 是一个加互斥锁实现的并发map,如果key 存在将会返回false,代表actor已经存在
func (m ConcurrentMap) SetIfAbsent(key string, value interface{}) bool {
// Get map shard.
shard := m.GetShard(key)
shard.Lock()
_, ok := shard.items[key]
if !ok {
shard.items[key] = value
}
shard.Unlock()
return !ok
}
生成远程PID,通常用于跨主机通信
server := actor.NewPID("127.0.0.1:8080", "chatserver")
// NewPID returns a new instance of the PID struct
func NewPID(address, id string) *PID {
return &PID{
Address: address,
Id: id,
}
}
1.1.4Context (actor 上下文管理,类似http 的context)
Actor提供了两种形式的上下文,RootContext和ActorContext。这些上下文由不同方面提供的各种功能组成。这两种类型的上下文都实现了Spawner、Stopper、Info和Sender方面,而ActorContext实现还了其他的功能
Spawner
实现于 RootContext, ActorContext
通过Props 创建actor
Stopper
实现于 RootContext, ActorContext
提供马上停止actor的能力或者提醒actor在停止之前要先处理完邮箱中的信息
Info
实现于 RootContext, ActorContext
提供actor parent PID 自己的PID,发送者的PID,actor 自己或者ActorSystem的信息
Sender
实现于 RootContext, ActorContext
提供发送即时消息的能力,并且异步请求响应
Receiver
Implemented by ActorContext
提供接收被 MessageEnvelope包装的消息能力
Invoker
Implemented by ActorContext
提供调用系统消息,调用用户消息,并且解决错误的能力
Supervisor
只实现于 ActorContext
提供方法在当前actor的监管下去控制子actor的生命周期,解决在监管层级下出现的错误
1.1.5Mailboxes (actor 之间如何处理信息)
发送消息时,信息不是直接到达接收actor,而是到达接收actor的邮箱,等待接收actor有时间再去处理。
默认邮箱有两种类型的信息,系统和用户信息,系统信息被用于内部Actor 在失败处理信息情况下,挂起或者恢复邮箱。系统信息用于管理actor 生命周期,用户信息则会发给实际的actor处理。
消息在投递进邮箱总是按fifo 先进先出顺序,有种情况除外,那就是在处理用户消息时,有系统消息进入邮箱了。actor依然是按照先进先出的原则对邮箱信息进行处理。
从根本上将,邮箱有下面几条规则:
- 邮箱可以被大量的发送者发送投递消息,但是消费者始终只有一个,就是拥有这个邮箱的actor,有点像redis单线程原理了。
- 邮箱是有序的,按投递的时间顺序,当然特殊情况除外,优先级邮箱
- 邮箱是不共享actor之间的状态的,如果共享又回到了锁的状态了,每个actor都是独享自己的邮箱
- 默认邮箱是无边界的,这意味着可以有大量消息投递到邮箱队列里面
无边界邮箱是方便的默认设置,理论上可以容纳无限消息,但在向邮箱添加邮件的速度快于参与者处理邮件的速度的情况下,这可能会导致应用程序内存不足。因此,可以指定有边界邮箱,当邮箱已满时,有界邮箱将向死信传递新邮件。
有限邮箱
丢掉尾部信息

丢掉头部信息

Mailbox Invoker
actor 创建时必须注册两个handler函数,一个是dispatcher ,一个是 Invoker,当actor创建出来,invoker 将会成为 actor context, dispatcher从actor Props里面赋值
当邮箱从队列中弹出消息时,它将消息移交给注册的 Invoker来处理该消息。对于actor,actor的上下文将获取消息并调用参与者的“Receive”方法进行处理。简单来说就是调用actor的Receive接口。如下面的 Receive接口
type parentActor struct{}
func (state *parentActor) Receive(context actor.Context) {
switch msg := context.Message().(type) {
case *hello:
props := actor.PropsFromProducer(newChildActor)
child := context.Spawn(props)
context.Send(child, msg)
}
}
如果在处理消息时发生错误,邮箱会将错误逐步上升到其注册的调用程序,以便它可以采取适当的操作(例如重新启动actor),并在可能的情况下继续处理消息。
Mailbox Dispatchers
当邮箱收到邮件时,它将使用dispatcher调度自己处理邮箱队列中的邮件。
调度程序实现因语言而异,例如,在Go中,它是对goroutine的简单调用,而在C#中,处理是通过注册要在线程池上运行的任务来完成的。
dispatcher负责限制每个邮箱运行的吞吐量。邮箱将在单个线程中逐个处理邮件。通过限制每次运行的吞吐量,可以释放正在使用的线程,以便安排其他邮箱运行。
有些准则在选择dispatcher,详细如下,但并不是很死板。
- 隔绝一个或多个actor在不同线程里面的原因是:
- 确保系统不会被高负载的actor一直占用cpu 时间片,导致其他actor出现饥饿现象
- 确保重要的actor有权利处理他们自己的事情;
- 创建隔离栅栏,确保系统出现的一部分问题不会影响到另一部分正常运行
- 允许actor去执行特殊 SyncrhonizationContext;
因为特殊需求自定义dispatcher时,需要了解框架的工作原理才能正确配置dispatchers。自定义调度程序不应被视为性能问题的默认解决方案。对于复杂的应用程序来说,拥有一个或几个定制的dispatcher是正常的,对于系统中的大多数或所有参与者来说,需要定制的dispatcher配置是不常见的。
Mailbox Statistics
邮件统计允许开发者监听下面事件
- 用户消息
- 系统消息
- 启动事件
- 空事件
Mailbox statistics提供了扩展区监听下面几个事件 MailboxStarted, MailboxEmpty, MessagePosted, MessageReceived.
package main
import (
"log"
console "github.com/AsynkronIT/goconsole"
"github.com/AsynkronIT/protoactor-go/actor"
"github.com/AsynkronIT/protoactor-go/mailbox"
)
type mailboxLogger struct{}
func (m *mailboxLogger) MailboxStarted() {
log.Print("Mailbox started")
}
func (m *mailboxLogger) MessagePosted(msg interface{}) {
log.Printf("Message posted %v", msg)
}
func (m *mailboxLogger) MessageReceived(msg interface{}) {
log.Printf("Message received %v", msg)
}
func (m *mailboxLogger) MailboxEmpty() {
log.Print("No more messages")
}
func main() {
system := actor.NewActorSystem()
rootContext := system.Root
props := actor.PropsFromFunc(func(ctx actor.Context) {
}).WithMailbox(mailbox.Unbounded(&mailboxLogger{}))
pid := rootContext.Spawn(props)
rootContext.Send(pid, "Hello")
_, _ = console.ReadLine()
}
结果:
2021/10/29 23:55:28 Mailbox started 2021/10/29 23:55:28 Message posted &{} 2021/10/29 23:55:28 Message posted Hello 2021/10/29 23:55:28 Message received &{} 2021/10/29 23:55:28 Message received Hello 2021/10/29 23:55:28 No more messages
如上面的例子只要在创建props 添加mailLogger就能收到这些消息,其中&{}代表actor.Started,只要该actor一收到消息并投递到该actor的mailbox就会来到MessagePosted ,再调用该logger的MessageReceived方法。在这里面我们可以统计玩家信息,统计次数等待操作。
mailbox 原理
在spawn 时候,会生成mailbox,生成的邮箱由系统、用户、和邮箱统计结构组成
var defaultMailboxProducer = mailbox.Unbounded()
//无限容量邮箱队列
func Unbounded(mailboxStats ...Statistics) Producer {
return func() Mailbox {
q := &unboundedMailboxQueue{
userMailbox: goring.New(10), //环形队列
}
return &defaultMailbox{
systemMailbox: mpsc.New(),//系统邮箱,链表实现的队列,不是环形
userMailbox: q, //用户邮箱
mailboxStats: mailboxStats,//邮箱统计
}
}
}
邮箱具有两个方法
Push(x interface{}) //插入信息
Pop() interface{}   //弹出信息
下面来看看邮箱启动的时候调用的方法
//启动统计
mb.Start()
//发送系统消息
mb.PostSystemMessage(startedMessage)
//发送用户信息
func (m *defaultMailbox) PostSystemMessage(message interface{}) {
for _, ms := range m.mailboxStats { //插入统计消息
ms.MessagePosted(message)
}
m.systemMailbox.Push(message)//将消息放入系统邮箱
atomic.AddInt32(&m.sysMessages, 1)
m.schedule() //调度邮箱信息
}
整个actor消息处理核心都在schedule,来看看 schedule干了什么
protoactor-go-dev\mailbox\mailbox.go +77
//调度
func (m *defaultMailbox) schedule() {
//将scheduler状态置为running 代表正在调度,然后调用dispatcher进行调度,默认是协程调度
if atomic.CompareAndSwapInt32(&m.schedulerStatus, idle, running) {
m.dispatcher.Schedule(m.processMessages)
}
}
//fn 结构
func (m *defaultMailbox) processMessages() {
process:
m.run() //启动邮箱处理程序
// 设置邮箱空闲
atomic.StoreInt32(&m.schedulerStatus, idle)
sys := atomic.LoadInt32(&m.sysMessages)
user := atomic.LoadInt32(&m.userMessages)
//如果用户消息或者系统消息没有处理完,重走处理流程
if sys > 0 || (atomic.LoadInt32(&m.suspended) == 0 && user > 0) {
// 重新将邮箱scheduler状态置为running
if atomic.CompareAndSwapInt32(&m.schedulerStatus, idle, running) {
//再处理一次
goto process
}
}
for _, ms := range m.mailboxStats {
ms.MailboxEmpty() //将邮箱状态统计清空
}
}
func (m *defaultMailbox) run() {
var msg interface{}
//处理异常情况,下面会执行用户的业务逻辑,假设用户程序不可靠,造成panic,所有在这里要捕获panic
defer func() {
if r := recover(); r != nil {
plog.Info("[ACTOR] Recovering", log.Object("actor", m.invoker), log.Object("reason", r), log.Stack())
m.invoker.EscalateFailure(r, msg)
}
}()
i, t := 0, m.dispatcher.Throughput() //获取吞吐量
for {
if i > t { //i>t 说明处理信息以及超过设置的吞吐量,这时候我们要切走cpu 执行权限
i = 0
runtime.Gosched() //切走调度器,让其它actor 有cpu 处理自己的消息,这样就符合actor 的异步了,actor有时间才会处理自己的消息,什么时候处理消息时不确定的。
}
i++
//处理系统消息
if msg = m.systemMailbox.Pop(); msg != nil {
atomic.AddInt32(&m.sysMessages, -1)
switch msg.(type) {
case *SuspendMailbox:
atomic.StoreInt32(&m.suspended, 1)
case *ResumeMailbox:
atomic.StoreInt32(&m.suspended, 0)
default:
m.invoker.InvokeSystemMessage(msg) //调用invoker 处理系统消息
}
for _, ms := range m.mailboxStats {
ms.MessageReceived(msg)
}
continue
}
// 不用处理系统消息了,所以我们要将m.suspended置为1
if atomic.LoadInt32(&m.suspended) == 1 {
return
}
//处理用户信息
if msg = m.userMailbox.Pop(); msg != nil {
atomic.AddInt32(&m.userMessages, -1)
m.invoker.InvokeUserMessage(msg) //调用invoker处理消息
for _, ms := range m.mailboxStats {
//调用统计信息
ms.MessageReceived(msg)
}
} else { //如果用户消息为空直接返回
return
}
}
}
invoker 结构
//可见invoker 是actorContext
//protoactor-go-dev\actor\props.go +31
ctx := newActorContext(actorSystem, props, parentContext.Self())
mb.RegisterHandlers(ctx, dp)

//给mailBox 分配invoker
//protoactor-go-dev\mailbox\mailbox.go +29
func (m *defaultMailbox) RegisterHandlers(invoker MessageInvoker, dispatcher Dispatcher) {
   m.invoker = invoker
   m.dispatcher = dispatcher
}
invoker处理消息
在邮箱调用Schedule的时候,会调用invoker 处理系统消息和用户消息
//处理用户消息
func (ctx *actorContext) InvokeUserMessage(md interface{}) {
if atomic.LoadInt32(&ctx.state) == stateStopped {
// already stopped
return
}
influenceTimeout := true
if ctx.receiveTimeout > 0 { //这里参考receive Timeout 介绍,当消息实现了NotInfluenceReceiveTimeout 接口,influenceTimeout 为ok
_, influenceTimeout = md.(NotInfluenceReceiveTimeout)
influenceTimeout = !influenceTimeout //取反,如果为true,停止timer,只要md 没有实现这个接口,那么influenceTimeout就会为true,然后重置timer
if influenceTimeout {
ctx.extras.stopReceiveTimeoutTimer()
}
}
//这里实现了NotInfluenceReceiveTimeout接口,influenceTimeout为true,influenceTimeout 默认为true,取反后,influenceTimeout 默认为false,实现了这个接口和默认是一样?怀疑是个bug
//处理消息
ctx.processMessage(md)
if ctx.receiveTimeout > 0 && influenceTimeout {
ctx.extras.resetReceiveTimeoutTimer(ctx.receiveTimeout)
}
}
//处理系统消息
func (ctx *actorContext) InvokeSystemMessage(message interface{}) {
switch msg := message.(type) {
case *continuation:
ctx.messageOrEnvelope = msg.message // apply the message that was present when we started the await
msg.f() // invoke the continuation in the current actor context
ctx.messageOrEnvelope = nil // release the message
case *Started: //将系统开始消息发送给用户
ctx.InvokeUserMessage(msg) // forward
case *Watch:
ctx.handleWatch(msg)
case *Unwatch:
ctx.handleUnwatch(msg)
case *Stop:
ctx.handleStop(msg)
case *Terminated:
ctx.handleTerminated(msg)
case *Failure:
ctx.handleFailure(msg)
case *Restart:
ctx.handleRestart(msg)
default:
plog.Error("unknown system message", log.Message(msg))
}
}
func (ctx *actorContext) processMessage(m interface{}) {
//调用Receive 中间件处理消息
if ctx.props.receiverMiddlewareChain != nil {
ctx.props.receiverMiddlewareChain(ctx.ensureExtras().context, WrapEnvelope(m))
return
}
//调用context装饰器
if ctx.props.contextDecoratorChain != nil {
ctx.ensureExtras().context.Receive(WrapEnvelope(m))
return
}
// actor 通过这样取消息
// switch ctx.Message().(type)
// message方法是将原来的消息从context信封解出来而已
//func (ctx *actorContext) Message() interface{} {
// return UnwrapEnvelopeMessage(ctx.messageOrEnvelope)
// }
ctx.messageOrEnvelope = m //将消息封装成信封放在context上面
ctx.defaultReceive() //调用默认的接收处理
ctx.messageOrEnvelope = nil // release message
}
func (ctx *actorContext) defaultReceive() {
//收到这个消息,将会停止
if _, ok := ctx.Message().(*PoisonPill); ok {
ctx.Stop(ctx.self)
return
}
// 用了context装饰器,我们要使用
if ctx.props.contextDecoratorChain != nil {
ctx.actor.Receive(ctx.ensureExtras().context)
return
}
//调用actor的默认Receive处理消息,还记得我们定义的actor吗,实现了Receive接口,这里将会把context 传递进去
ctx.actor.Receive(Context(ctx))
}
1.1.6Deadletter (当有可能丢消息时的处理)
相关文章:
.. _Erlang documentation: http://www.erlang.org/faq/academic.html
_Nobody Needs Reliable Messaging: http://www.infoq.com/articles/no-reliable-messaging
- 能够确定无法传递的消息,会被尽可能的传递给一个叫deadLetters的actor,无论是本地消息通信或者网络传输,都可能失败导致无法将消息转为Deadletter 而丢失。
- 死信的功能是用于调试,actor 发送的信息没有到达时,通知死信能告诉你是发送者或者接收者的配置错误,为了实现这一目的,通常需要选择合适的死信记录器,并且清理日志输出。应该避免为了清晰的调试,将信息发给已经停止的actor。
- 如何接收死信?
actor订阅事件流上的DeadLetter类型,订阅的参与者将收到(本地)系统中发布的所有死信。死信不会在网络上传播,如果您想在一个地方收集它们,必须为每个网络节点订阅一个参与者并手动转发它们。为什么要这么做呢?
因为:死信通常出现在不能建立网络连接或者远端actor此时不存在的时候。 - 死信通常是不令人担忧的,当参与者没有自己决定停止,它发送的消息很有可能丢失,复杂的环境中,可能会丢失消息,这种消息通常是不重要的消息,比如多次调用stop,只有一个能成功,其他消息丢失,或者,actor连续宕机,子actor收到多个父级的停止信息。
1.1.7Router (转发信息给一组actors)
路由器可以在参与者内部或外部使用,您可以自己管理路由器,也可以使用具有配置功能的自包含路由器参与者。
Actor附带了几个有用的路由器,您可以根据应用程序的需要直接选择。但也可以创建自己的。
一般来说,发送到路由器的任何消息都将转发到它的一个路由对象,但有一个例外。特别广播信息将发送给所有路线。有关详细信息,请参阅特别处理的消息部分
下面是使用轮训算法实现的router例子
//pool of 5 workers
var props = system.Root.NewRoundRobinPool(MyActorProps, 5);
var pid = system.Root.Spawn(props);
Pools vs. Groups
有两种类型的router,一种是池子,一种是组。
- Pool 根据指定参数数量自动创建指定数量的worker
- 有时,与其让路由器参与者创建其路由,不如自己创建路由并提供给路由器供其使用。您可以通过将路由对象的PID传递给组路由器来实现这一点
下面列出的大多数路由策略在这两种类型中都可用。在实际中,其中一些可能只有一种类型可用。
Supervision
- 路由器是作为actor实现的,因此路由器由它的父节点监督,并且它们可以监督子节点。
- 组路由器使用在其他地方创建的路由,它没有自己的子路由。如果一个路由器死亡,一个组路由器将不知道它。
- 另一方面,池路由器创建自己的子节点。因此,路由器也是路由器的管理者。
- 默认情况下,池路由器使用一种自定义策略,该策略仅针对所有异常返回“升级”,然后监督故障工作进程的路由器将上报错误给自己的父进程。如果路由器的父进程决定重新启动路由器,则所有池工作进程也将因此重新创建。
Routing Strategies
路由策略的一个例子
package main
import (
"log"
"strconv"
"time"
console "github.com/AsynkronIT/goconsole"
"github.com/AsynkronIT/protoactor-go/actor"
"github.com/AsynkronIT/protoactor-go/router"
)
type myMessage struct{ i int }
func (m *myMessage) Hash() string {
return strconv.Itoa(m.i)
}
func main() {
log.Println("Round robin routing:")
system := actor.NewActorSystem()
rootContext := system.Root
act := func(context actor.Context) {
switch msg := context.Message().(type) {
case *myMessage:
log.Printf("%v got message %d", context.Self(), msg.i)
}
}
pid := rootContext.Spawn(router.NewRoundRobinPool(5).WithFunc(act))
for i := 0; i < 10; i++ {
rootContext.Send(pid, &myMessage{i})
}
time.Sleep(1 * time.Second)
log.Println("Random routing:")
pid = rootContext.Spawn(router.NewRandomPool(5).WithFunc(act))
for i := 0; i < 10; i++ {
rootContext.Send(pid, &myMessage{i})
}
time.Sleep(1 * time.Second)
log.Println("ConsistentHash routing:")
pid = rootContext.Spawn(router.NewConsistentHashPool(5).WithFunc(act))
for i := 0; i < 10; i++ {
rootContext.Send(pid, &myMessage{i})
}
time.Sleep(1 * time.Second)
log.Println("BroadcastPool routing:")
pid = rootContext.Spawn(router.NewBroadcastPool(5).WithFunc(act))
for i := 0; i < 10; i++ {
rootContext.Send(pid, &myMessage{i})
}
_, _ = console.ReadLine()
}
结果:
2021/10/31 16:17:47 Round robin routing:
2021/10/31 16:17:47 nonhost/$1/router/$4 got message 1
2021/10/31 16:17:47 nonhost/$1/router/$6 got message 3
2021/10/31 16:17:47 nonhost/$1/router/$4 got message 6
2021/10/31 16:17:47 nonhost/$1/router/$6 got message 8
2021/10/31 16:17:47 nonhost/$1/router/$2 got message 4
2021/10/31 16:17:47 nonhost/$1/router/$2 got message 9
2021/10/31 16:17:47 nonhost/$1/router/$3 got message 0
2021/10/31 16:17:47 nonhost/$1/router/$3 got message 5
2021/10/31 16:17:47 nonhost/$1/router/$5 got message 2
2021/10/31 16:17:47 nonhost/$1/router/$5 got message 7
2021/10/31 16:17:48 Random routing:
2021/10/31 16:17:48 nonhost/$7/router/$9 got message 0
2021/10/31 16:17:48 nonhost/$7/router/$9 got message 4
2021/10/31 16:17:48 nonhost/$7/router/$c got message 3
2021/10/31 16:17:48 nonhost/$7/router/$a got message 1
2021/10/31 16:17:48 nonhost/$7/router/$9 got message 8
2021/10/31 16:17:48 nonhost/$7/router/$a got message 2
2021/10/31 16:17:48 nonhost/$7/router/$8 got message 6
2021/10/31 16:17:48 nonhost/$7/router/$8 got message 7
2021/10/31 16:17:48 nonhost/$7/router/$8 got message 9
2021/10/31 16:17:48 nonhost/$7/router/$b got message 5
2021/10/31 16:17:49 ConsistentHash routing:
2021/10/31 16:17:49 nonhost/$d/router/$f got message 0
2021/10/31 16:17:49 nonhost/$d/router/$i got message 1
2021/10/31 16:17:49 nonhost/$d/router/$i got message 2
2021/10/31 16:17:49 nonhost/$d/router/$i got message 6
2021/10/31 16:17:49 nonhost/$d/router/$g got message 3
2021/10/31 16:17:49 nonhost/$d/router/$h got message 7
2021/10/31 16:17:49 nonhost/$d/router/$g got message 8
2021/10/31 16:17:49 nonhost/$d/router/$i got message 9
2021/10/31 16:17:49 nonhost/$d/router/$e got message 4
2021/10/31 16:17:49 nonhost/$d/router/$e got message 5
2021/10/31 16:17:50 BroadcastPool routing:
2021/10/31 16:17:50 nonhost/$j/router/$o got message 0
2021/10/31 16:17:50 nonhost/$j/router/$o got message 1
2021/10/31 16:17:50 nonhost/$j/router/$o got message 2
2021/10/31 16:17:50 nonhost/$j/router/$o got message 3
2021/10/31 16:17:50 nonhost/$j/router/$o got message 4
2021/10/31 16:17:50 nonhost/$j/router/$o got message 5
2021/10/31 16:17:50 nonhost/$j/router/$o got message 6
2021/10/31 16:17:50 nonhost/$j/router/$o got message 7
2021/10/31 16:17:50 nonhost/$j/router/$o got message 8
2021/10/31 16:17:50 nonhost/$j/router/$o got message 9
2021/10/31 16:17:50 nonhost/$j/router/$n got message 0
2021/10/31 16:17:50 nonhost/$j/router/$k got message 0
2021/10/31 16:17:50 nonhost/$j/router/$k got message 1
2021/10/31 16:17:50 nonhost/$j/router/$k got message 2
2021/10/31 16:17:50 nonhost/$j/router/$k got message 3
2021/10/31 16:17:50 nonhost/$j/router/$k got message 4
2021/10/31 16:17:50 nonhost/$j/router/$n got message 1
2021/10/31 16:17:50 nonhost/$j/router/$l got message 0
2021/10/31 16:17:50 nonhost/$j/router/$n got message 2
2021/10/31 16:17:50 nonhost/$j/router/$l got message 1
2021/10/31 16:17:50 nonhost/$j/router/$n got message 3
2021/10/31 16:17:50 nonhost/$j/router/$l got message 2
2021/10/31 16:17:50 nonhost/$j/router/$n got message 4
2021/10/31 16:17:50 nonhost/$j/router/$l got message 3
2021/10/31 16:17:50 nonhost/$j/router/$n got message 5
2021/10/31 16:17:50 nonhost/$j/router/$l got message 4
2021/10/31 16:17:50 nonhost/$j/router/$n got message 6
2021/10/31 16:17:50 nonhost/$j/router/$l got message 5
2021/10/31 16:17:50 nonhost/$j/router/$n got message 7
2021/10/31 16:17:50 nonhost/$j/router/$n got message 8
2021/10/31 16:17:50 nonhost/$j/router/$n got message 9
2021/10/31 16:17:50 nonhost/$j/router/$k got message 5
2021/10/31 16:17:50 nonhost/$j/router/$m got message 0
2021/10/31 16:17:50 nonhost/$j/router/$k got message 6
2021/10/31 16:17:50 nonhost/$j/router/$m got message 1
2021/10/31 16:17:50 nonhost/$j/router/$k got message 7
2021/10/31 16:17:50 nonhost/$j/router/$m got message 2
2021/10/31 16:17:50 nonhost/$j/router/$k got message 8
2021/10/31 16:17:50 nonhost/$j/router/$k got message 9
2021/10/31 16:17:50 nonhost/$j/router/$m got message 3
2021/10/31 16:17:50 nonhost/$j/router/$m got message 4
2021/10/31 16:17:50 nonhost/$j/router/$m got message 5
2021/10/31 16:17:50 nonhost/$j/router/$m got message 6
2021/10/31 16:17:50 nonhost/$j/router/$m got message 7
2021/10/31 16:17:50 nonhost/$j/router/$m got message 8
2021/10/31 16:17:50 nonhost/$j/router/$m got message 9
2021/10/31 16:17:50 nonhost/$j/router/$l got message 6
2021/10/31 16:17:50 nonhost/$j/router/$l got message 7
2021/10/31 16:17:50 nonhost/$j/router/$l got message 8
2021/10/31 16:17:50 nonhost/$j/router/$l got message 9
下面是Proto.Actor提供的一些路由策略
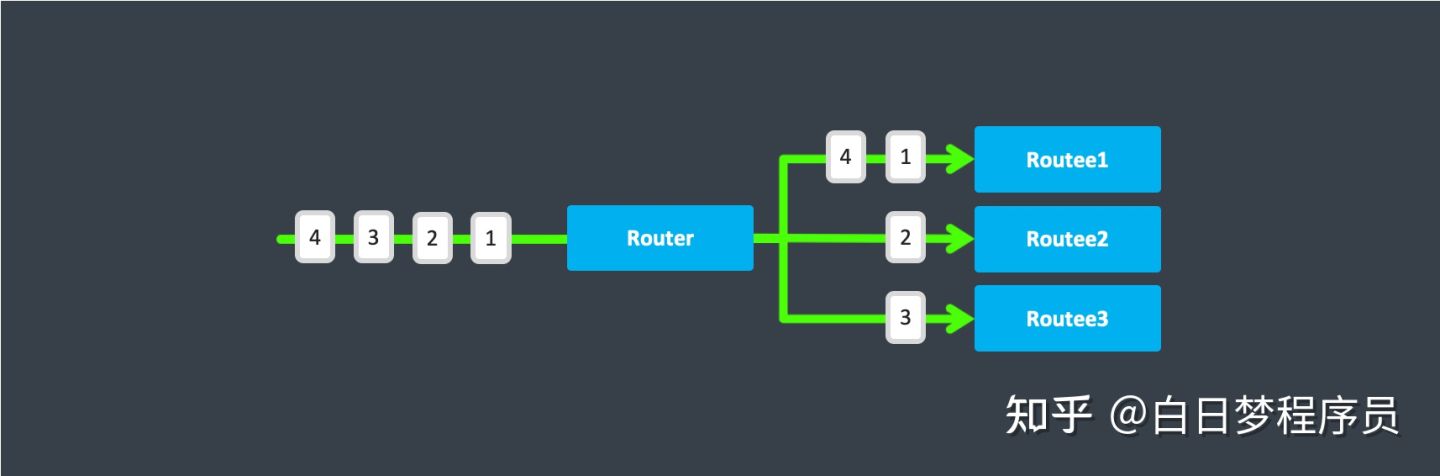
RoundRobinPool and RoundRobinGroup 在路由时遵循轮训原则,这是以最大努力的方式将消息分发给多个工作者actor的最简单方法。
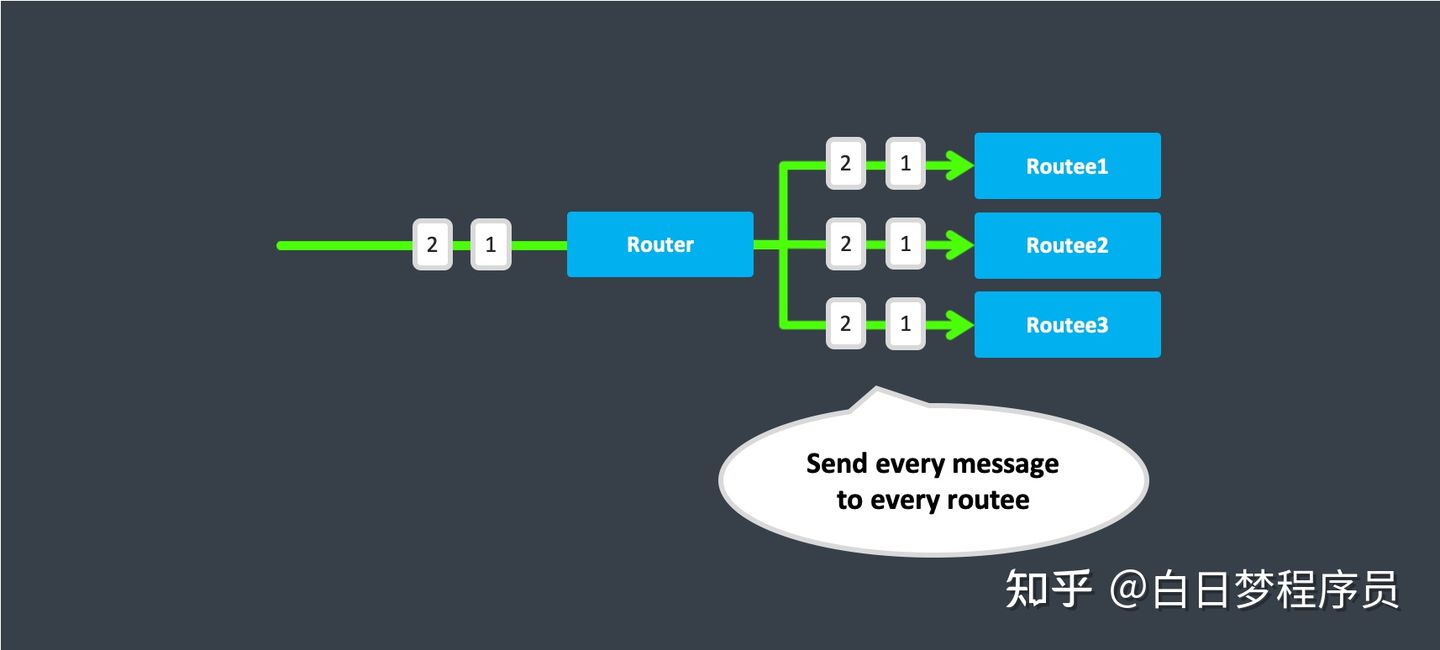
Broadcast
BroadcastPool and BroadcastGroup 广播任何消息给所有的路由者
Random
RandomPool and RandomGroup在转发消息时随机的
ConsistentHashing
The ConsistentHashingPool and ConsistentHashingGroup使用一致性hash算法 去转发消息,同一个key转发到同一个路由者,.NET 对象作为key,或者number, string or Guid.
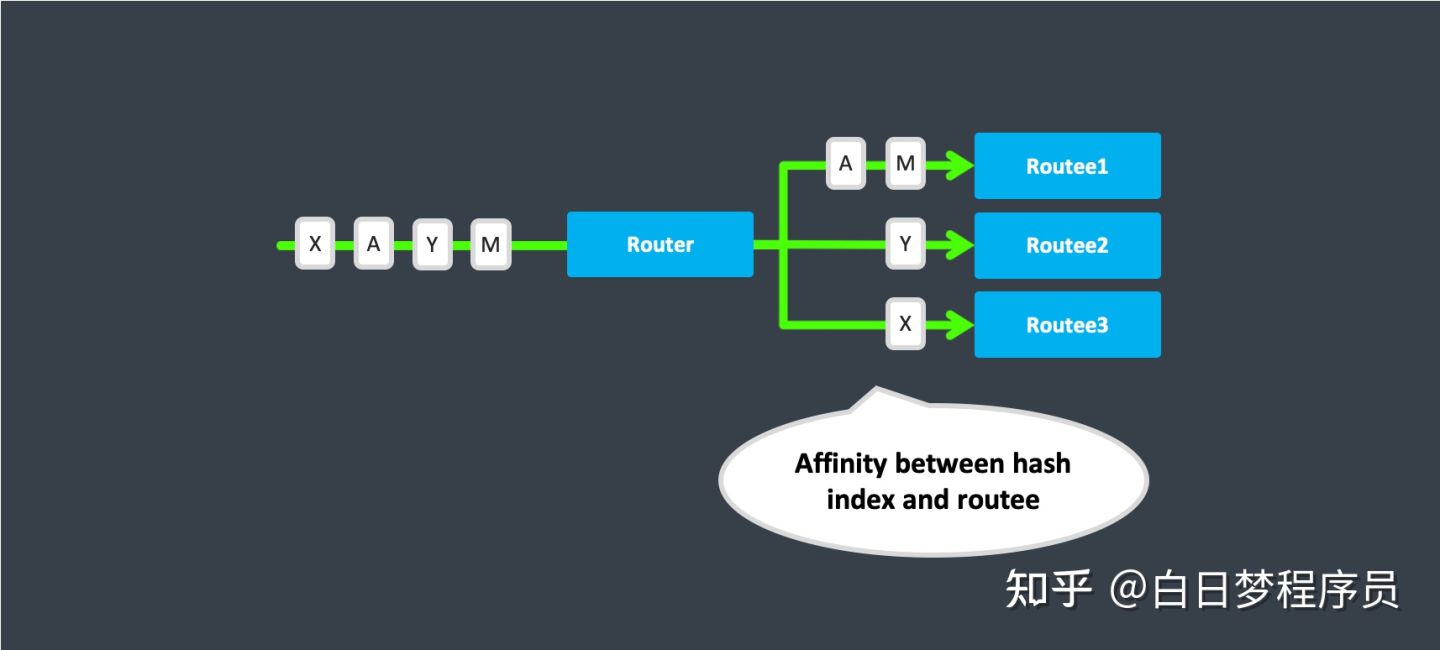
ConsistentHash在处理Commands(来自领域驱动的CQRS )很有用
Routing 在 Proto.Actor是怎么设计的
- 从表面上看, routers看起来像普通的actor,但实际上它们的实现方式不同。routers被设计成在接收消息和将消息快速传递给路由者方面非常高效。
- 普通actor可用于路由消息,但actor的单线程处理可能成为瓶颈。Routers通过对允许并发路由的常用消息处理管道进行优化,可以实现更高的吞吐量。这是通过将路由器的路由逻辑直接嵌入到它们的PID中而不是路由器actor来实现的。发送到路由器ActorRef的消息可以立即路由到路由器,完全绕过单线程路由器actor。
- 路由代码的内部比Router由普通actor实现时更复杂。使用路由API的开发者看不到这些复杂性。但是在设计自定义路由器需要注意这点。
1.1.8Eventstream (事件如何管理)
actor.DeadLetter
actor 将信息发给不存在的actor.PID,消息将会被转发到actor.EventStream作为死信,这可以监控系统是否存在过期或者宕掉的actor PIDs。
1.1.9Behaviors (如果构建actor之间的状态机)
There are three methods available for changing behaviors:
Becomesimply sets the passedReceivemethod as the current behavior, replacing the default method.BecomeStackedpushes the passedReceivemethod onto the behavior stack, but preserves the previous behavior.UnbecomeStackedreverts to the previously used behavior.
package main
import (
"fmt"
console "github.com/AsynkronIT/goconsole"
"github.com/AsynkronIT/protoactor-go/actor"
)
type Hello struct{ Who string }
type SetBehaviorActor struct {
behavior actor.Behavior
}
func (state *SetBehaviorActor) Receive(context actor.Context) {
state.behavior.Receive(context)
}
func (state *SetBehaviorActor) One(context actor.Context) {
switch msg := context.Message().(type) {
case Hello:
fmt.Printf("Hello %v\n", msg.Who)
state.behavior.Become(state.Other)
}
}
func (state *SetBehaviorActor) Other(context actor.Context) {
switch msg := context.Message().(type) {
case Hello:
fmt.Printf("%v, ey we are now handling messages in another behavior", msg.Who)
}
}
func NewSetBehaviorActor() actor.Actor {
act := &SetBehaviorActor{
behavior: actor.NewBehavior(),
}
act.behavior.Become(act.One)
return act
}
func main() {
system := actor.NewActorSystem()
rootContext := system.Root
props := actor.PropsFromProducer(NewSetBehaviorActor)
pid := rootContext.Spawn(props)
rootContext.Send(pid, Hello{Who: "Roger"})
rootContext.Send(pid, Hello{Who: "Roger"})
console.ReadLine()
}
1.1.10Middleware(如何拦截或者观察actors 之间的信息)
创建actor时,可以通过props 时的两个扩展来处理到来或者离开的消息,和http 框架的中间件类似,只不过这不是递归调用的。
接收中间件拦截传入消息。它是使用Props.WithReceiveMiddleware()方法注入的。每个中间件都将按照传递的顺序进行调用,并负责调用下一个中间件。
Receive middleware
接收中间件由接受接收参数的方法/委托组成,接收参数是下一个调用并返回接收方法的中间件。中间件和actor的Receive方法一起构成一个链,每个中间件都应该在该链中调用下一个中间件并返回其结果。
中间件接口为:
type ReceiverMiddleware func(next ReceiverFunc) ReceiverFunc
type ReceiverFunc func(c ReceiverContext, envelope *MessageEnvelope)
使用例子
package main
import (
"fmt"
console "github.com/AsynkronIT/goconsole"
"github.com/AsynkronIT/protoactor-go/actor"
)
type hello struct{ Who string }
type helloActor struct{}
func (state *helloActor) Receive(context actor.Context) {
switch msg := context.Message().(type) {
case *hello:
fmt.Printf("Hello %v\n", msg.Who)
}
}
func main() {
system := actor.NewActorSystem()
props := actor.PropsFromProducer(func() actor.Actor { return &helloActor{} }).WithReceiverMiddleware(
func(next actor.ReceiverFunc) actor.ReceiverFunc {
return func(c actor.ReceiverContext, envelope *actor.MessageEnvelope) {
fmt.Println("middleware 1");
next(c,envelope)
}
},
func(next actor.ReceiverFunc) actor.ReceiverFunc {
return func(c actor.ReceiverContext, envelope *actor.MessageEnvelope) {
fmt.Println("middleware 2");
next(c,envelope)
}
},
)
pid := system.Root.Spawn(props)
system.Root.Send(pid, &hello{Who: "Roger"})
_, _ = console.ReadLine()
}
打印结果:
//start消息
middleware 1
middleware 2
//hello 消息
middleware 1
middleware 2
Hello Roger
发送方中间件拦截通过上下文发送的传出消息。它是使用Props.WithSenderMiddleware()方法设置的。与接收中间件一样,发送方中间件形成一个链,每个中间件在其中调用下一个中间件。消息被包装在一个包含消息、发送方和消息头的MessageEnvelope中。这样做的主要目的是允许向头添加上下文元数据,然后将其传播到远程参与者。
SenderMiddleware
//中间件结构
type SenderMiddleware func(next SenderFunc) SenderFunc
type SenderFunc func(c SenderContext, target *PID, envelope *MessageEnvelope)
package main
import (
"fmt"
console "github.com/AsynkronIT/goconsole"
"github.com/AsynkronIT/protoactor-go/actor"
)
type hello struct{ Who string }
type helloActor struct{
Pid1 *actor.PID
}
func (state *helloActor) Receive(context actor.Context) {
switch msg := context.Message().(type) {
case *hello:
fmt.Printf("Hello %v\n", msg.Who)
context.Send(state.Pid1,"")
}
}
func main() {
system := actor.NewActorSystem()
props1:=actor.PropsFromFunc(func(c actor.Context) {
})
pid1:=system.Root.Spawn(props1)
props := actor.PropsFromProducer(func() actor.Actor { return &helloActor{Pid1: pid1} }).WithSenderMiddleware(
func(next actor.SenderFunc) actor.SenderFunc {
return func(c actor.SenderContext, target *actor.PID, envelope *actor.MessageEnvelope) {
fmt.Println("middleware 1");
next(c,target,envelope)
}
},
).WithSenderMiddleware(
func(next actor.SenderFunc) actor.SenderFunc {
return func(c actor.SenderContext, target *actor.PID, envelope *actor.MessageEnvelope) {
fmt.Println("middleware 2");
next(c,target,envelope)
}
},
)
pid := system.Root.Spawn(props)
system.Root.Send(pid, &hello{Who: "Roger"})
_, _ = console.ReadLine()
}
结果:
Hello Roger
middleware 1
middleware 2
exit status 2
1.1.11Receive Timeout (actor 空闲时怎么执行代码)
Context.SetReceiveTimeout 设置了在actor 非活动时间会收到ReceiveTimeout消息,因此,actor receive函数必须能自己处理ReceiveTimeout 消息。
超时定时器可能会在其他消息之前入队后马上触发,并将超时消息入队,所以不能保证在设置了超时时间,超时消息在其他消息之前到达。
props := actor.PropsFromFunc(func(context actor.Context) {
    switch msg := context.Message().(type) {
    case *actor.Started:
        context.SetReceiveTimeout(1 * time.Second)
     //如果actor 没有收到其他消息时间超过1秒,那么就会收到系统发来的actor.ReceiveTimeout消息
    case *actor.ReceiveTimeout:
        log.Printf("ReceiveTimeout")
    }
})
设置了receive-timeout,将会设置一个按设定间隔运行的timer,并且timer 开始计时,当timer 结束后,将会发生ReceiveTimeout给自己,timer 将会重置并且再一次start.
当actor收到任何消息,timer会自己重置并且重新开始计时,这就意味着在没有收到任何信息一定时间后会收到ReceiveTimeout消息
Non influencing messages
这是一种发送消息给actor不会重置接收超时的timer通过标记消息为NoInfluence,原理见protoactor-go-dev\actor\actor_context.go+431
完整demo
package main
import (
"fmt"
"log"
"time"
console "github.com/AsynkronIT/goconsole"
"github.com/AsynkronIT/protoactor-go/actor"
)
type NoInfluence string
func (NoInfluence) NotInfluenceReceiveTimeout() {}
func main() {
log.Println("Receive timeout test")
system := actor.NewActorSystem()
c := 0
rootContext := system.Root
props := actor.PropsFromFunc(func(context actor.Context) {
switch msg := context.Message().(type) {
case *actor.Started:
context.SetReceiveTimeout(1 * time.Second)
case *actor.ReceiveTimeout:
c++
log.Printf("ReceiveTimeout: %d", c)
case string:
log.Printf("received '%s'", msg)
if msg == "cancel" {
fmt.Println("Cancelling")
context.CancelReceiveTimeout()
}
case NoInfluence:
log.Println("received a no-influence message")
}
})
pid := rootContext.Spawn(props)
for i := 0; i < 6; i++ {
rootContext.Send(pid, "hello")
time.Sleep(500 * time.Millisecond)
}
log.Println("hit [return] to send no-influence messages")
_, _ = console.ReadLine()
for i := 0; i < 6; i++ {
rootContext.Send(pid, NoInfluence("hello"))
time.Sleep(500 * time.Millisecond)
}
log.Println("hit [return] to send a message to cancel the timeout")
_, _ = console.ReadLine()
rootContext.Send(pid, "cancel")
log.Println("hit [return] to finish")
_, _ = console.ReadLine()
rootContext.Stop(pid)
}
结果如下,当发送hello 消息时,间隔500 ms ,所以并没有触发超时,当发送完成后,时间超过1秒,所以接收到到超时消息。发送no-influence 不会触发超时定时器。最后发送取消定时器的操作。
执行结果:
2021/10/30 10:00:50 Receive timeout test
2021/10/30 10:00:50 received 'hello'
2021/10/30 10:00:50 received 'hello'
2021/10/30 10:00:51 received 'hello'
2021/10/30 10:00:51 received 'hello'
2021/10/30 10:00:52 received 'hello'
2021/10/30 10:00:52 received 'hello'
2021/10/30 10:00:53 hit [return] to send no-influence messages
2021/10/30 10:00:53 ReceiveTimeout: 1
2021/10/30 10:01:13 received a no-influence message
2021/10/30 10:01:13 received a no-influence message
2021/10/30 10:01:14 received a no-influence message
2021/10/30 10:01:14 received a no-influence message
2021/10/30 10:01:15 received a no-influence message
2021/10/30 10:01:15 received a no-influence message
2021/10/30 10:01:16 hit [return] to send a message to cancel the timeout
Cancelling
2021/10/30 10:02:11 hit [return] to finish
2021/10/30 10:02:11 received 'cancel'
context.SetReceiveTimeout原理
func (ctx *actorContext) SetReceiveTimeout(d time.Duration) {
if d <= 0 {
panic("Duration must be greater than zero")
}
if d == ctx.receiveTimeout { //d==0 避免下面的操作直接返回
return
}
if d < time.Millisecond {
// anything less than than 1 millisecond is set to zero
d = 0
}
ctx.receiveTimeout = d //设置接收超时
ctx.ensureExtras()
//将原来的timer 停止掉,避免这时候突然触发
ctx.extras.stopReceiveTimeoutTimer()
if d > 0 { //d >0, 原来的receiveTimeoutTimer 为空,重新添加
if ctx.extras.receiveTimeoutTimer == nil {
ctx.extras.initReceiveTimeoutTimer(time.AfterFunc(d, ctx.receiveTimeoutHandler))
} else { //要不然重置
ctx.extras.resetReceiveTimeoutTimer(d)
}
}
}
//这个timer只会执行一次,将receiveTimeoutMessage发送后,CancelReceiveTimeout会将receiveTimeout置为0,并将定时器置为nil。
func (ctx *actorContext) receiveTimeoutHandler() {
if ctx.extras != nil && ctx.extras.receiveTimeoutTimer != nil {
ctx.CancelReceiveTimeout()
ctx.Send(ctx.self, receiveTimeoutMessage)
}
}
1.1.12Futures (Go)(处理任务完成)
Future.Wait() or Future.Result() 等待响应到来,或者超时当actor处理业务阻塞住,到来的消息将会阻塞在邮箱里面
package main
import (
"github.com/AsynkronIT/protoactor-go/actor"
"log"
"os"
"os/signal"
"syscall"
"time"
)
type pong struct {
}
type ping struct {
}
type pongActor struct {
timeOut bool
}
func (p *pongActor) Receive(ctx actor.Context) {
// Dead letter occurs because the PID of Future process ends and goes away when Future times out
// so the pongActor fails to send message.
switch ctx.Message().(type) {
case *ping:
var sleep time.Duration
if p.timeOut {
sleep = 2500 * time.Millisecond
p.timeOut = false
} else {
sleep = 300 * time.Millisecond
p.timeOut = true
}
time.Sleep(sleep)
ctx.Respond(&pong{})
}
}
type pingActor struct {
pongPid *actor.PID
}
func (p *pingActor) Receive(ctx actor.Context) {
switch ctx.Message().(type) {
case struct{}:
future := ctx.RequestFuture(p.pongPid, &ping{}, 1*time.Second)
// Future.Result internally waits until response comes or times out
result, err := future.Result()
if err != nil {
log.Print("Timed out")
return
}
log.Printf("Received pong message %#v", result)
}
}
func main() {
system := actor.NewActorSystem()
pongProps := actor.PropsFromProducer(func() actor.Actor {
return &pongActor{}
})
pongPid := system.Root.Spawn(pongProps)
pingProps := actor.PropsFromProducer(func() actor.Actor {
return &pingActor{
pongPid: pongPid,
}
})
pingPid := system.Root.Spawn(pingProps)
finish := make(chan os.Signal, 1)
signal.Notify(finish, syscall.SIGINT)
signal.Notify(finish, syscall.SIGTERM)
ticker := time.NewTicker(2 * time.Second)
defer ticker.Stop()
for {
select {
case <-ticker.C:
system.Root.Send(pingPid, struct{}{})
case <-finish:
log.Print("Finish")
return
}
}
}
结果
2021/10/30 11:47:55 Received pong message &main.pong{}
2021/10/30 11:47:58 Timed out
2021/10/30 11:47:59 INFO  [ACTOR]   [DeadLetter] throttled="1"
2021/10/30 11:47:59 Received pong message &main.pong{}
2021/10/30 11:48:02 Timed out
2021/10/30 11:48:03 INFO  [ACTOR]   [DeadLetter] throttled="1"
2021/10/30 11:48:03 Received pong message &main.pong{}
2021/10/30 11:48:06 Timed out
Future.PipeTo
当响应在超时之前到来,响应消息将会发送给PipeTo 指向的目标,这并不会阻塞actor,所以到来的消息会执行当他们到来后。如下图所示,后一条消息完成在之前消息完成之前,那么将会收到后一条消息的响应。当执行超时后,消息将会发送到死信,并且发送的actor不会注意到。
package main
import (
"github.com/AsynkronIT/protoactor-go/actor"
"github.com/AsynkronIT/protoactor-go/router"
"log"
"os"
"os/signal"
"syscall"
"time"
)
type pong struct {
count uint
}
type ping struct {
count uint
}
type pingActor struct {
count uint
pongPid *actor.PID
}
func (p *pingActor) Receive(ctx actor.Context) {
switch msg := ctx.Message().(type) {
case struct{}:
p.count++
message := &ping{
count: p.count,
}
ctx.RequestFuture(p.pongPid, message, 2500*time.Millisecond).PipeTo(ctx.Self())
case *pong:
log.Printf("Received pong message %#v", msg)
}
}
func main() {
system := actor.NewActorSystem()
pongProps := router.NewRoundRobinPool(10).
WithFunc(func(ctx actor.Context) {
switch msg := ctx.Message().(type) {
case *ping:
var sleep time.Duration
remainder := msg.count % 3
if remainder == 0 {
sleep = 1700 * time.Millisecond
} else if remainder == 1 {
sleep = 300 * time.Millisecond
} else {
sleep = 2900 * time.Millisecond
}
time.Sleep(sleep)
message := &pong{
count: msg.count,
}
ctx.Respond(message)
}
})
pongPid := system.Root.Spawn(pongProps)
pingProps := actor.PropsFromProducer(func() actor.Actor {
return &pingActor{
count: 0,
pongPid: pongPid,
}
})
pingPid := system.Root.Spawn(pingProps)
finish := make(chan os.Signal, 1)
signal.Notify(finish, syscall.SIGINT)
signal.Notify(finish, syscall.SIGTERM)
ticker := time.NewTicker(1 * time.Second)
defer ticker.Stop()
for {
select {
case <-ticker.C:
system.Root.Send(pingPid, struct{}{})
case <-finish:
log.Print("Finish")
return
}
}
}
响应结果:
2021/10/30 11:40:23 Received pong message &main.pong{count:0x1}
2021/10/30 11:40:26 Received pong message &main.pong{count:0x4}
2021/10/30 11:40:26 Received pong message &main.pong{count:0x3}
2021/10/30 11:40:27 INFO  [ACTOR]	[DeadLetter] throttled="1"
2021/10/30 11:40:29 Received pong message &main.pong{count:0x7}
2021/10/30 11:40:29 Received pong message &main.pong{count:0x6}
2021/10/30 11:40:30 INFO  [ACTOR]	[DeadLetter] throttled="1"
2021/10/30 11:40:32 Received pong message &main.pong{count:0xa}
2021/10/30 11:40:32 Received pong message &main.pong{count:0x9}
2021/10/30 11:40:33 INFO  [ACTOR]	[DeadLetter] throttled="1"
2021/10/30 11:40:35 Received pong message &main.pong{count:0xd}
2021/10/30 11:40:35 Received pong message &main.pong{count:0xc}
2021/10/30 11:40:36 INFO  [ACTOR]	[DeadLetter] throttled="1"
2021/10/30 11:40:38 Received pong message &main.pong{count:0x10}
2021/10/30 11:40:38 Received pong message &main.pong{count:0xf}
2021/10/30 11:40:39 INFO  [ACTOR]	[DeadLetter] throttled="1"
2021/10/30 11:40:41 Received pong message &main.pong{count:0x13}
2021/10/30 11:40:41 Received pong message &main.pong{count:0x12}
2021/10/30 11:40:42 INFO  [ACTOR]	[DeadLetter] throttled="1"
2021/10/30 11:40:44 Received pong message &main.pong{count:0x16}
PipeTo原理
将转发的actor 地址添加到Future 的pids里面,等待结果到来,然后转发到pids 里面去
// PipeTo forwards the result or error of the future to the specified pids
func (f *Future) PipeTo(pids ...*PID) {
f.cond.L.Lock()
f.pipes = append(f.pipes, pids...)
// for an already completed future, force push the result to targets
if f.done {
f.sendToPipes()
}
f.cond.L.Unlock()
}
//错误消息或者结果到指定PID
func (f *Future) sendToPipes() {
if f.pipes == nil {
return
}
var m interface{}
if f.err != nil {
m = f.err
} else {
m = f.result
}
for _, pid := range f.pipes {
pid.sendUserMessage(f.actorSystem, m)
}
f.pipes = nil
}
Future实现原理
当我们调用请求RequestFuture的时候,内部是创建了一个Future 的actor,然后将id 包装在消息里面发给接收actor,接收actor再处理完消息再通过sender ID 响应消息,我们就可以接收到消息。
func (ctx *actorContext) RequestFuture(pid *PID, message interface{}, timeout time.Duration) *Future {
future := NewFuture(ctx.actorSystem, timeout)
env := &MessageEnvelope{
Header: nil,
Message: message,
Sender: future.PID(),
}
ctx.sendUserMessage(pid, env)
return future
}
//接收响应回来的消息
func (f *Future) Result() (interface{}, error) {
f.wait()
return f.result, f.err
}
NewFuture
protoactor-go-dev\actor\future.go
在里面加了个定时器,等待接收者响应消息,由于是个actor,整个过程也是异步的
// NewFuture creates and returns a new actor.Future with a timeout of duration d
func NewFuture(actorSystem *ActorSystem, d time.Duration) *Future {
ref := &futureProcess{Future{actorSystem: actorSystem, cond: sync.NewCond(&sync.Mutex{})}}
id := actorSystem.ProcessRegistry.NextId()
pid, ok := actorSystem.ProcessRegistry.Add(ref, "future"+id) //生成Future 的id
if !ok {
plog.Error("failed to register future process", log.Stringer("pid", pid))
}
ref.pid = pid
if d >= 0 { //给Future加个超时定时器
tp := time.AfterFunc(d, func() {
ref.cond.L.Lock()
if ref.done {
ref.cond.L.Unlock()
return
}
ref.err = ErrTimeout
ref.cond.L.Unlock()
ref.Stop(pid)
})
atomic.StorePointer((*unsafe.Pointer)(unsafe.Pointer(&ref.t)), unsafe.Pointer(tp))
}
return &ref.Future
}
1.1.13Dispatchers - (决定actor如何执行)
Dispatcher负责调度ActorSystem内部运行的所有代码。调度器是Proto.Actor最重要的部分之一,因为它们控制每个参与者的吞吐量和时间共享,为每个参与者提供公平的资源共享。
通过props WithDispatcher方法去配置Dispatchers
props := actor.PropsFromProducer(func() actor.Actor { return &helloActor{} }).
        WithDispatcher()
当Spawn 时候如果没有自定义,则会选择默认Dispatcher
func (props *Props) getDispatcher() mailbox.Dispatcher {
if props.dispatcher == nil {
return defaultDispatcher
}
return props.dispatcher
}
defaultDispatcher = mailbox.NewDefaultDispatcher(300)
来看看dispatcher 结构
package mailbox
type Dispatcher interface {
Schedule(fn func())
Throughput() int
}
type goroutineDispatcher int
func (goroutineDispatcher) Schedule(fn func()) {
go fn()
}
func (d goroutineDispatcher) Throughput() int {
return int(d)
}
func NewDefaultDispatcher(throughput int) Dispatcher {
return goroutineDispatcher(throughput)
}
type synchronizedDispatcher int
func (synchronizedDispatcher) Schedule(fn func()) {
fn()
}
func (d synchronizedDispatcher) Throughput() int {
return int(d)
}
func NewSynchronizedDispatcher(throughput int) Dispatcher {
return synchronizedDispatcher(throughput)
}
- Dispatcher抽象成两个接口,一个是 Schedule(fn func()),决定fn 怎么调用,有两种调用模式,一直是同步,一种是异步,异步就是goroutine调用fn,
- Throughput() int返回该Dispatcher的量
1.2 actor 生命周期
生命周期图,来自于官方文档
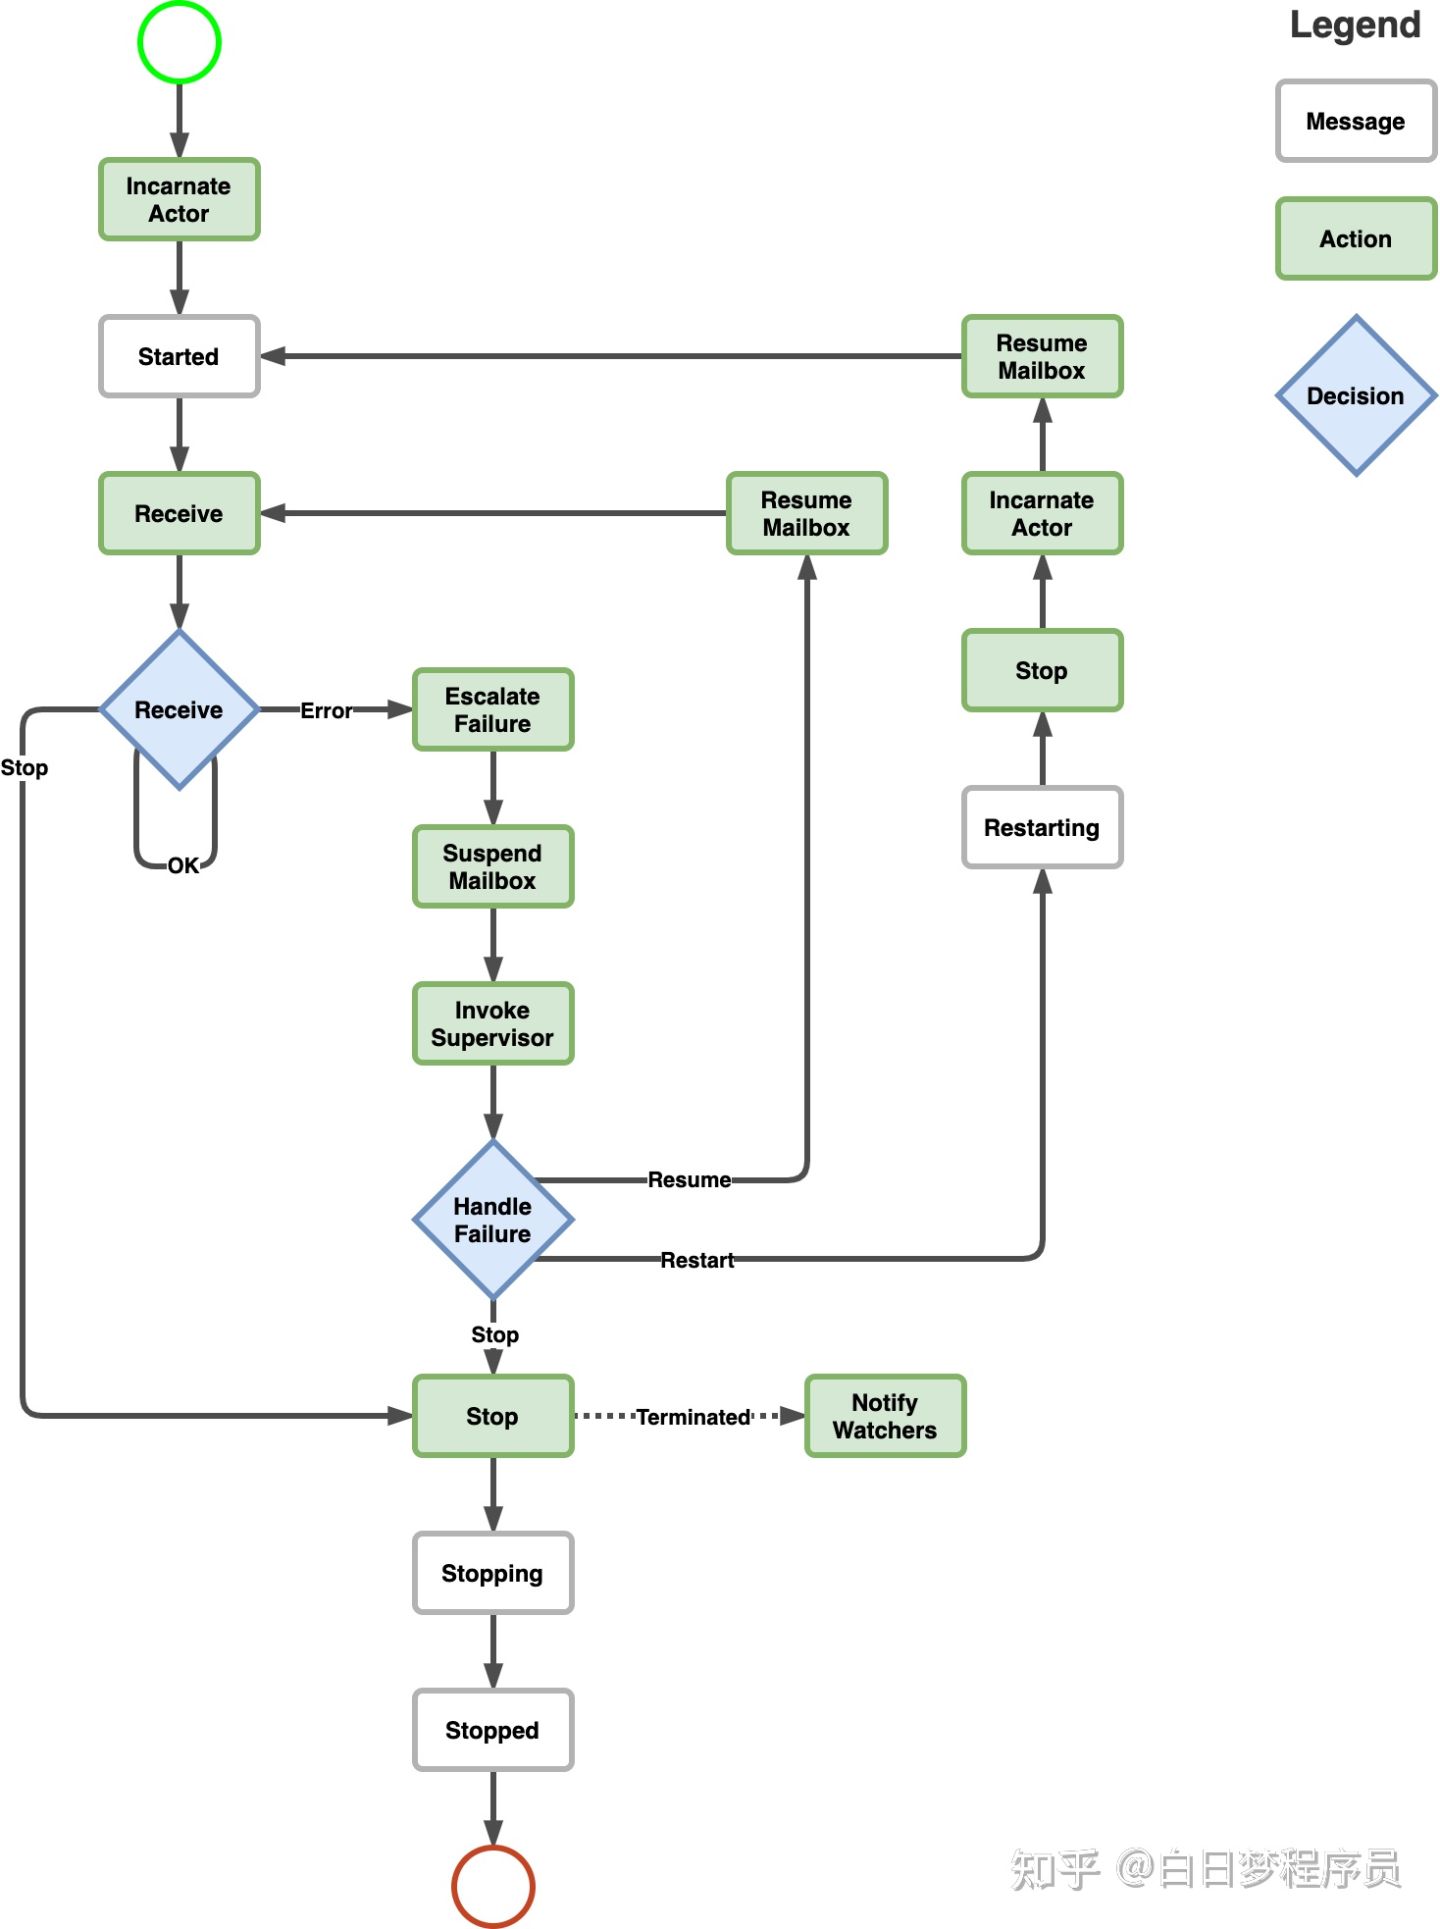
1.2.1生命周期举例
actor 被创建出来后,将会进入到一些带状态和行动的生命周期,大多数情况下, 当actor创建并启动后会收到Started 信息,之后会一直运行直到程序结束,极少数情况下生命周期可能不同。
actor 通常有下面几种状态
- Incarnated -actor 将被构建,但是还没有构建好并正常运行的状态
- Started - actor 刚创建时收到的信息
Alive- Actor 正在运行的状态Stopping- 正在停止到停止的中间状态Restarting- actor 被关闭准备重启的状态Stopped- actor 停止并且将从系统中移除
下面举个例子,来看看actor 的生命周期。
package main
import (
"fmt"
"time"
console "github.com/AsynkronIT/goconsole"
"github.com/AsynkronIT/protoactor-go/actor"
)
type hello struct{ Who string }
type helloActor struct{}
func (state *helloActor) Receive(context actor.Context) {
switch msg := context.Message().(type) {
case *actor.Started:
fmt.Println("Started, initialize actor here")
case *actor.Stopping:
fmt.Println("Stopping, actor is about shut down")
case *actor.Stopped:
fmt.Println("Stopped, actor and its children are stopped")
case *actor.Restarting:
fmt.Println("Restarting, actor is about restart")
case *hello:
fmt.Printf("Hello %v\n", msg.Who)
}
}
func main() {
system := actor.NewActorSystem() //创建actor系统
props := actor.PropsFromProducer(func() actor.Actor { return &helloActor{} }) //创建actor属性
pid := system.Root.Spawn(props)//产生一个actor,并且生成找到该actor的PID
system.Root.Send(pid, &hello{Who: "Roger"}) //发送hello 消息
// why wait?
// Stop is a system message and is not processed through the user message mailbox
// thus, it will be handled _before_ any user message
// we only do this to show the correct order of events in the console
time.Sleep(1 * time.Second)
system.Root.Stop(pid)
_, _ = console.ReadLine()
}
打印结果:
Started, initialize actor here
Hello Roger
Stopping, actor is about shut down
Stopped, actor and its children are stopped
在刚生成actor的时候,系统会给actor 发送Started 信息,这时候给actor 发送Hello 信息,最后停止actor和他的children.
1.2.2Failure and supervision(错误和监管)
指actor收到错误信息了,actor mailbox 将会挂起等到未来处理,根据supervisor的决定去恢复邮箱,停止或者重启。
2.2.3状态应用场景
- Started: 用在初始化actor的状态 ,例如从数据库加载数据到状态里面
- Stopping: 这种情况下大多代表actor要被销毁,所以需要持久化数据或者做其他业务逻辑,优雅的停止服务
- Stopped:在变为这种状态前会收到Stopping消息,然后相关对象会被销毁,当actor出在这种状态 不能接受任何信息了,信息将会被垃圾回收。
- Restarting : 邮箱会被重新恢复,重启的actor会重新收到Started 信息
未完待续:
下篇预告,分成几篇写原因是知乎字数限制((*^_^*))
- actor定时任务
- 数据持久化策略
- 如何写一个游戏项目
- 远程网络连接
- 集群
- 拓展功能


 1095
1095


 被折叠的 条评论
为什么被折叠?
被折叠的 条评论
为什么被折叠?
 到【灌水乐园】发言


