


Linux 基础
官网
https://www.vmware.com/
https://www.centos.org/download/
https://cn.ubuntu.com/
常用命令
修改主机名
- 使用 hostnamectl 命令:
hostnamectl set-hostname your-new-hostname - 完后还需要重启或执行以下命令使修改生效:
systemctl restart network
文件、文件夹操作
ls
查看文件信息
		-l 列表
		-a 显示全部文件
		-h 空间大小
ls -l -a -h
ls -lah

root@ubunut:~# ls -l
total 8
drwxr-xr-x 2 root root 4096 Mar 10 20:51 a
drwx------ 3 root root 4096 Jan 13 14:22 snap

d 开头是文件夹
- 开头是文件
cd = change directory
cd /home    # 进入目录
cd ./home
cd ..
cd ~
pwd    # 查看当前目录
mkdir = make directory
mkdir test    建立文件夹
mkdir ./test
mkdir ../test
mkdir ~/test
mkdir -p ./test/t1/t2     建立文件夹
touch test.txt   	# 创建一个新文件
cat test.txt      	# 查看文件内容
cat /etc/services   # 翻页查看文件内容
more /etc/services  # 按 q 退出翻页
cp = copy
cp [-r] 参数1 参数2
cp t1.txt t2.txt   # 复制 t1.txt 为 t2.txt
cp -r t1 t2 	   # 复杂文件夹t1 为 t2

mv = move
mv 参数1 参数2
mv dir1  dir2      # 移动或改名 dir1 到 dir2
rm = remove
rm [-r -f] [参数1 参数2 ....]
-r  		删除文件夹
-f force 	强力删除

rm t1.txt  		# 删除文件
rm -r t1   		# 删除文件夹
rm -r t1 t2 t3  # 删除多个文件夹

通配符 * 进行模糊匹配
rm -r -f t*
rm -r -f *.txt
su user	# 切换用户
su - root   # 切换管理员权限
exit			# 退出
小复习
使用格式:su [-] user   	# 切换用户  su --- switch user, [-] 可选,表示师范在切换用户后加载环境变量
su ab   	# 切换用户为 ab
su - root	# 切换root用户
	# 如果:认证失败,root密码没有设置root的passwd,使用:sudo passwd root
	# 或者使用:sudo su - root
sudo		# 临时提升权限
sudo find / -name "test"
并不是所有的用户都有权利使用 sudo,需要为普通用户配置 sudo 认证。
vim /etc/sudoers # 打开 认证文件,在最后添加:user ALL=(ALL)     NOPASSWD:ALL
通过:	esc, 输入:wq 保存并退出

使用格式:ls  [选项 -l -a -h -i]  (参数:文件路径)
ls 			# 查询当前目录的信息
ls -l		# 以列表形式输出
ls -lha 	# 以列表形式输出所有信息

输出信息中包含如下内容,主要是区分文件格式以及权限
drwxrw-r--	# d = directory 文件夹
-rwxrw-r-x  # - = 文件
- [rwx (当前用户)] [rw-(用户组)]  [r-x (其他用户)]

mkdir a 		# 新建文件夹
mkdir b			# 新建文件夹
mkdir c d e		# 新建多个文件夹
mkdir {1..5}	# 新建多个文件夹

touch 1.txt					# 新建文件
touch 1.txt 2.txt 3.txt		# 新建文件
touch {4..10}.txt			# 新建文件

cat 1.txt				# 输出 1.txt 文件中的信息
cat /etc/profile		# 输出 /etc/profile 文件中的信息
more 1.txt				# 逐步输出 1.txt 文件中的信息
cp /etc/profile 1.txt  	# 复制 /etc/profile 生成  1.txt

rmdir a			# 删除文件夹
rm 1.txt		# 删除文件
rm -r a			# 删除文件夹

mv a b			# 修改文件夹名字
mv ./1.txt ./b/2.txt	# 移动
信息查询
which 要查找的命令
which cd
which pwd
which touch

find 起始路径 -name "被查找文件名"
find / -name "test"
find / -name "test*"
find / -name "*test"
find / -name "*test*"

find 起始路径 -size +|-n[kMG]
+ - 表示大于 小于
n 表示大小数字
kMG 表示大小单位,k=kb M=MB G=GB
find / -size -10k   查找小于10kB的文件
find / -size +100M  查找大于100MB的文件
find / -size +1G  查找大于1GB的文件
grep [-n] 关键字 文件路径    在文件中通过关键字过滤文件行
grep "test" test.txt
grep -n "test" test.txt

wc [-c -m -l -w] 文件路径
-c 统计bytes数量
-m 统计字符数量
-l 统计行数量
-w 统计单词数量

管道符 |    将左边命令的结果,作为右边命令的输入

cat test.txt | grep "test"
cat test.txt | grep -n "test" | grep te   管道符支持嵌套

tail [-f -num] 路径
-f  持续跟踪
-num 查看尾部num行
tail -f test.txt   		# 持续侦测,要等到按下[ctrl]-c才会结束tail的侦测
tail /etc/profile		# 默认的情况中,显示最后的十行
tail -n 3 /etc/profile	# 显示最后的3行

root@ubuntu:~/a# cat test.txt
Hello,my name is Jack.
I am 18 years old.
I like to read books,play soccer,and draw.
My favority subject is Science.
I have a pet cat name KK。
I'm excited to make new friends and learn English with all of you.

root@ubuntu:~/a# tail -f test.txt	# 持续跟踪,使用Ctrl +C结束
Hello,my name is Jack.
I am 18 years old.
I like to read books,play soccer,and draw.
My favority subject is Science.
I have a pet cat name KK。
I'm excited to make new friends and learn English with all of you.

^C    	# 持续跟踪,使用Ctrl +C结束
root@ubuntu:~/a# tail -3 test.txt  # 查看末尾3行
I have a pet cat name KK。
I'm excited to make new friends and learn English with all of you.

root@ubuntu:~/a#
新的旅程开始了
ifconfig			# 查看IP
curl ifconfig.me    # 查看公网IP
man man 			# 查看参考手册
man ls				# 查看参考手册中 ls 命令
ls --help			# 利用 help 提示 ls 命令
reset				# 重置终端机
apt					# APT 软件包,需要 root 权限
sudo apt update		# 更新
sudo apt install net-tools	# 安装
sudo apt remove net-tools	# 删除
sudo apt searce net-tools 	# 查询

echo hello world		# 输出
echo "hello world"		# 输出
echo -e "hello\tworld" 	# 输出,-e 处理转义字符
echo pwd
echo `pwd`  		# 使用反引号符
> filename			# 重定向符,新建或覆盖
>> filename			# 重定向符,末尾追加
echo "hello world" > 1.txt  	# 覆盖
echo "hello world" >> 1.txt  	# 将信息追加到文件末尾
ls >> test.txt					# 末尾追加
echo -e "hello\nworld" >> 1.txt	# 末尾追加
vim
vi\vim = visual interface
vim是vi的增强版

vi 文件路径
vim 文件路径

sudo apt install vim	# 安装vim
vi/vim 共分为三种模式,命令模式(Command Mode)、输入模式(Insert Mode)和命令行模式(Command-Line Mode)
以树状图显示进程关系:pstree
pstree
查看网络状态:netstat
netstat
查看当前日历:cal [year]
cal
cal 2025
查看当前系统时间:date
root@ubunut:~/a# date
Mon Mar 10 08:55:39 PM CST 2025
root@ubunut:~/a# echo `date`
Mon Mar 10 08:55:44 PM CST 2025
root@ubunut:~/a# date "+%Y-%m-%d %H:%M:%S"
2025-03-10 20:56:14
root@ubunut:~/a# date "+%F %T"
2025-03-10 20:56:39
root@ubunut:~/a# date -d +1day
Tue Mar 11 08:59:35 PM CST 2025
root@ubunut:~/a# date -d +2day
Wed Mar 12 08:59:46 PM CST 2025
root@ubunut:~/a# date -d -2day
Sat Mar  8 08:59:51 PM CST 2025
root@ubunut:~/a# date -d -2day +%F
2025-03-08
用户管理
用户相关操作需要使用 root 权限
su ab		# 切换用户,只能获得用户的执行权限,无法获得环境变量
su - root	# 切换用户,获得用户的执行权限以及环境变量

-----用户操作
useradd [-g -d] user	# 添加用户
userdel [-r] user		# 删除用户user
id user					# 查询用户信息
usermod -aG Group user	# 修改用户组,将 user加入 Group组

-----用户组操作
groupadd A		# 新建用户组 A
groupdel B		# 删除用户组 B
cat /etc/group	# 查询用户组信息
groupmod -n a A	# 修改用户组 A 为 a

-----实例
sudo adduser ab	# 添加用户
sudo passwd ab 	# 设置ab的密码
id ab			# 查询用户信息
userdel ab		# 删除用户
userdel username 	# 仅删除用户username 账户
userdel -r username # 删除用户账户username 及其主目录
cat /etc/group		# 查询用户组信息
groupadd A	# 新建用户组 A
groupdel B	# 删除用户组 B
groupmod -n a A		# 修改用户组 A 为 a
usermod -aG ab ad	# 将 ab 加入 ad 的副组
deluser username 	# 删除用户账户username 及其主目录等相关文件
deluser ab ad		# 在 ad 中删除 ab

修改文件权限:chmod
chmod u+x filename
chmod 755 filename

修改文件所有者:chown
chown username filename
chown username:groupname filename

修改文件所属组:chgrp
chgrp groupname filename
- 实际演练效果
root@ubunut:~/a# sudo adduser ab	# 添加用户
Adding user `ab' ...
Adding new group `ab' (1000) ...
Adding new user `ab' (1000) with group `ab' ...
Creating home directory `/home/ab' ...
Copying files from `/etc/skel' ...
New password:
Retype new password:
passwd: password updated successfully
Changing the user information for ab
Enter the new value, or press ENTER for the default
	Full Name []:
	Room Number []:
	Work Phone []:
	Home Phone []:
	Other []:
Is the information correct? [Y/n] y
root@ubunut:~/a#
root@ubunut:~# su ab		# 切换用户,只能获得用户的执行权限,无法获得环境变量
ab@ubunut:/root$ su - root	# 切换用户,获得用户的执行权限以及环境变量
Password:
root@ubunut:~# sudo passwd ab # 设置ab的密码
New password:
Retype new password:
passwd: password updated successfully
root@ubunut:~#
root@ubunut:~# echo $PATH	# 环境变量
/root/.nix-profile/bin:/usr/local/sbin:/usr/local/bin:/usr/sbin:/usr/bin:/sbin:/bin:/usr/games:/usr/local/games:/snap/bin
root@ubunut:~#
root@ubunut:~# id ab		# 查询用户信息
uid=1000(ab) gid=1000(ab) groups=1000(ab)
root@ubunut:~# userdel ab	# 删除用户
root@ubunut:~# id
uid=0(root) gid=0(root) groups=0(root)
root@ubunut:~# id ab
id: ?? no such user
root@ubunut:~#
root@ubunut:~# groupadd A	# 新建用户组 A
root@ubunut:~# groupadd B	# 新建用户组 B
root@ubunut:~# cat /etc/group	# 查询用户组信息
....
ab:x:1000:
A:x:30001:
B:x:30002:
root@ubunut:~# groupmod -n a A	# 修改用户组 A 为 a
root@ubunut:~# cat /etc/group	# 查询用户组信息
....
ab:x:1000:
a:x:30001:
B:x:30002:
root@ubunut:~# groupdel B	# 删除用户组 B
....
ab:x:1000:
a:x:30001:

root@ubunut:~# ll
total 20
drwxr-xr-x  5 root root 4096 Mar 10 21:46 ./
drwxr-xr-x 21 root root 4096 Mar 10 20:47 ../
drwxr-x---  2 ab   ab    4096 Mar 10 21:30 ab/
drwxr-x---  2 ac   ac   4096 Mar 10 21:46 ac/
drwxr-x---  2 ad   ad   4096 Mar 10 21:46 ad/
root@ubunut:~# usermod -g a ab
root@ubunut:~# usermod -g a ac
root@ubunut:~# usermod -g a ad
root@ubunut:~# ll
total 20
drwxr-xr-x  5 root root 4096 Mar 10 21:46 ./
drwxr-xr-x 21 root root 4096 Mar 10 20:47 ../
drwxr-x---  2 ab   a    4096 Mar 10 21:30 ab/
drwxr-x---  2 ac   a    4096 Mar 10 21:46 ac/
drwxr-x---  2 ad   a    4096 Mar 10 21:46 ad/
root@ubunut:~$ su ab
ab@ubunut:~$ touch 1.txt
ab@ubunut:~$ ll
-rw-r--r-- 1 ab   a       0 Mar 10 21:51 1.txt

root@ubunut:~# usermod -aG ab ad	# 将 ab 加入 ad 的副组
root@ubunut:~# cat /etc/group
...
ab:x:1000:
a:x:30001:
ac:x:1001:
ad:x:1002:ab
root@ubunut:~# deluser ab ad	# 在 ad 中删除 ab
Removing user `ab' from group `ad' ...
Done.
root@ubunut:~# cat /etc/group
...
ab:x:1000:
a:x:30001:
ac:x:1001:
ad:x:1002:
软链接
root@ubunut:~# cat a/sol.c
#include<stdio.h>

int main(){
    printf("Hello World!\n");
    return 0;
}

root@ubunut:~# ln -s a/sol.c ./link_sol	# 建立软连接 link_sol
root@ubunut:~# ln -s a ./b				# 建立软连接 b
root@ubunut:~# ls
a  b  link_sol  snap
root@ubunut:~# cat link_sol
#include<stdio.h>

int main(){
    printf("Hello World!\n");
    return 0;
}

root@ubunut:~# rm -rf link_sol 			# 删除软连接 link_sol
root@ubunut:~# ls
a  b  snap
root@ubunut:~# cd b
root@ubunut:~/b# ls
1.txt  2.txt  3.txt  bash.sh  hello.txt  sol.c
root@ubunut:~/b# pwd
/root/b
root@ubunut:~/b# rm 2.txt
root@ubunut:~/b# ls
1.txt  3.txt  bash.sh  hello.txt  sol.c
root@ubunut:~/b# ls ../a/
1.txt  3.txt  bash.sh  hello.txt  sol.c
root@ubunut:~/b# rm ../a/3.txt
root@ubunut:~/b# ls
1.txt  bash.sh  hello.txt  sol.c
root@ubunut:~/b#
远程链接,客户机与虚拟机间的信息传输
Xshell 是一个强大的安全终端模拟软件,它支持SSH1, SSH2, 以及Microsoft Windows 平台的TELNET 协议。Xshell 通过互联网到远程主机的安全连接以及它创新性的设计和特色帮助用户在复杂的网络环境中享受他们的工作。Xshell可以在Windows界面下用来访问远端不同系统下的服务器,从而比较好的达到远程控制终端的目的。除此之外,其还有丰富的外观配色方案以及样式选择。
Xftp是一个功能强大的SFTP、FTP 文件传输软件。使用了 Xftp 以后,MS Windows 用户能安全地在 UNIX/Linux 和 Windows PC 之间传输文件。Xftp 能同时适应初级用户和高级用户的需要。它采用了标准的 Windows 风格的向导,它简单的界面能与其他 Windows 应用程序紧密地协同工作,此外它还为高级用户提供了众多强劲的功能特性。
在安装过程中遇到这个问题:无法定位程序输入点于动态链接库
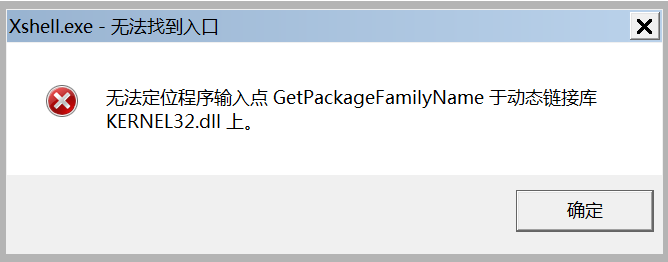
解决办法
无法定位程序输入点kernel32.dll的解决方法分享,3个方法教你快速修复
FinalShell是一款可以代替 XShell 的同类产品,一体化服务器的网络管理软件,不仅是ssh客户端,还是功能强大的开发运维工具,充分满足开发、运维需求。还具有海外服务器远程桌面加速、ssh加速、双边tcp加速、内网穿透等功能。
虚拟机Ubuntu安装VMtools
- 在VMware虚拟机的菜单中点击:虚拟机->安装VMware-Tools->install
- 点击桌面光盘文件先解压到桌面.就是其中那个压缩文件
- 打开终端,输入如下命令:sudo ./vmware-tools-distrib/vmware-install.pl
- 按照提示输入密码,一直回车,最后重启生效。
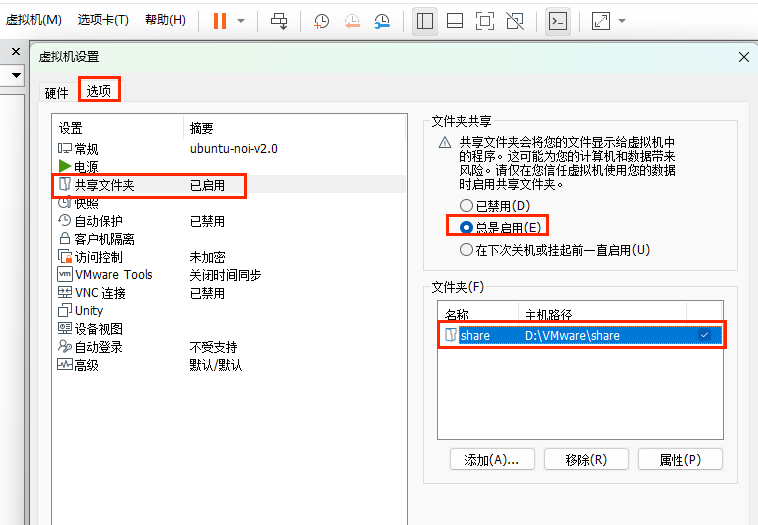
虚拟机设置共享文件夹
- 在原电脑系统中设定一个共享文件夹,如:D:\VMware\share
- 将该文件夹添加到虚拟机设置—>选项—>共享文件夹—>文件夹—>添加。
- 创建/mnt/hgfs文件夹
sudo mkdir /mnt/hgfs - 挂载共享文件夹(每次启动虚拟机都要重新挂载一次)
sudo mount -t fuse.vmhgfs-fuse .host:/ /mnt/hgfs -o allow_other
虚拟机设置共享文件夹
sudo apt-get autoremove open-vm-tools 								# 卸载
sudo mount -t fuse.vmhgfs-fuse .host:/ /mnt/hgfs -o allow_other 	# 挂载
- 验证是否设置成功(如果能进入到该路径即证明成功了)
cd /mnt/hgfs/你的共享文件夹名称
查看共享文件夹下的文件:ls
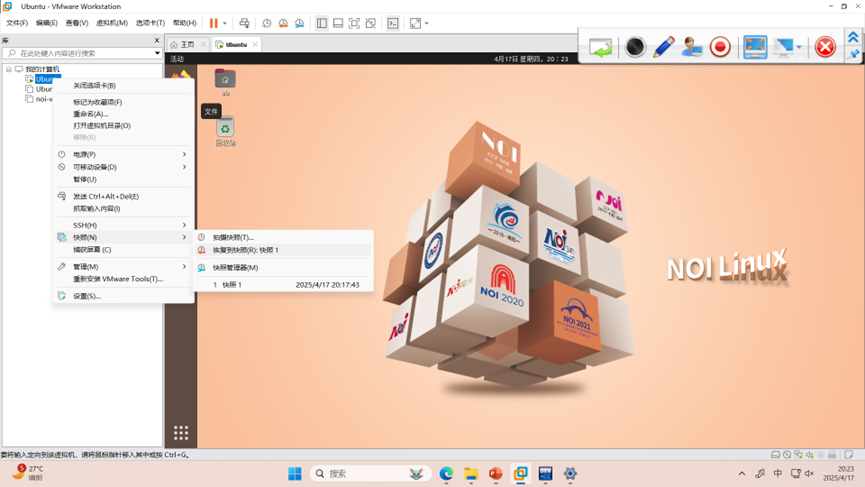
系统还原保护
-
windows-中也可以创建还原点,在需要时回退到之前的系统状态:开始–设置–系统–系统信息–系统保护–创建还原点
-
拍摄快照,速度快,可以快速回退到之前的系统状态,也可以删除不需要的快照。
-
系统克隆,速度慢,需要较大的空间
Linux 进阶
一些常见问题的解决方法
(一)下载安装的问题
【问题】error:invalid Magic number.
问题现象
error:invalid Magic number.
error:you needto loadthe kernel first.,Press any key to continue..
解决办法
安装过程中内核没有被正确加载或者引导文件存在问题
-
ISO 文件损坏:确保你下载的 Ubuntu ISO 文件是完整的且未损坏。你可以通过校验文件的 MD5 或 SHA256 值来确认文件的完整性。建议在下载完成后使用官方提供的校验工具进行验证。
-
虚拟机设置问题:确保你的虚拟机设置正确,特别是内存分配。有时,内存不足也会导致类似问题。尝试增加虚拟机的内存分配。
-
尝试不同的Ubuntu版本
如果以上方法无法解决问题,建议重新下载 Ubuntu ISO 文件,并按照官方指南重新创建启动介质。此外,确保你的 VMware 版本是最新的,以避免因软件版本不兼容导致的问题。
【问题】SMBus Host Controller not enabled
【问题】客户机操作系统已禁用 CPU。请关闭或重置虚拟机。
问题现象
客户机操作系统已禁用 CPU。请关闭或重置虚拟机。
解决办法
虚拟机配置存在问题或与宿主机的硬件资源不兼容
- 检查虚拟机配置的CPU数量或核心数,确保它们不超过宿主机的实际资源及VMware的限制。
- 检查BIOS设置,确保虚拟化技术(如Intel VT-x或AMD-V)已启用。虚拟化技术对于运行虚拟机至关重要。
- 检查并更新VMware Tools,VMware Tools是VMware提供的增强虚拟机功能的软件包,它有助于提高兼容性和性能表现。
- 关闭或重置虚拟机。
【问题】linux 安装中文输入法
https://zhuanlan.zhihu.com/p/91141981
(二)虚拟机运行的问题
【问题】linux中运行ifconfig出现错误,不能 sudo apt install net-tools
问题现象
E::无法定位软件包 net-tools
解决办法
注意 # 符号以及后面的内容仅做注释作用
首先保证网络连接正常
sudo apt-get update   # 从服务器更新软件列表,更新本地包缓存
sudo apt-get upgrade      # 升级已安装的软件包
sudo apt-get install net-tools
【问题】Finalshell连接报错 java.net.ConnectException: Connection refused: connect
问题现象
连接主机...
java.net.ConnectException: Connection refused: connect
解决办法
一般Ubuntu都会默认安装openssh-client,但是没有安装openssh-server。
sudo apt-get update                  # 从服务器更新软件列表
sudo apt-get install openssh-server  # 安装ssh服务器
sudo service ssh status              # 检查ssh服务器是否运行
sudo service ssh start               # 启动ssh
【问题】ubuntu 切换到超级用户失败(su:认证失败)
问题现象
linux@ubuntu:~$ su - root
密码:
su:认证失败
Ubuntu安装后,root用户默认是被锁定的,不允许登录,也不允许 su 到 root ,可以通过更改root的密码来登录root。
解决办法
su 切换root不行,用手动形式进行改密码切换。
sudo passwd root
之后就可以输入 su 登录到root用户了。
su :切换到某某用户模式,提示输入密码时该密码为切换后账户的密码,用法为“su 账户名称”。
如果后面不加账户时系统默认为root账户,密码也为超级账户的密码。没有时间限制。
sudo : 暂时切换到超级用户模式以执行超级用户权限,提示输入密码时该密码为当前用户的密码,而不是超级账户的密码,Ubuntu默认时间限制为一次时长15分钟。


 1万+
1万+

 被折叠的 条评论
为什么被折叠?
被折叠的 条评论
为什么被折叠?
 到【灌水乐园】发言


