


实验网络拓扑图如图所示,在总公司和分公司的边界路由器上做GRE over IPSec VPN,实现两地内部网络私有地址之间可以安全通信。
1、基础配置如下:
(1)按图中所示配置总公司和分公司中各计算机、服务器、路由器对应端口的IP地址相关信息;
(2)在Router0和Router1上配置一条默认路由,实现Internet间互通
(3) 测试Router0和Router1的公网地址间的互通性
2、在总公司与分公司之间配置GRE隧道技术
(1)在Router0和Router1上配置 GRE VPN (tunnel号为1,地址分别为10.1.1.1/30和10.1.1.2/30)
(2)测试tunnel地址之间的互通性
3、在总公司与分公司之间配置IPsec VPN,对GRE tunnel数据进行加密。
(1) 配置 IKE(ISAKMP)策略:
策略序号为1,加密算法为aes,Hash 算法为MD5,密钥算法(Diffie-Hellman)为group 2,认证方式(Authentication)为pre-share。
(2)定义认证标识:预共享密码为tx18
(3)配置 IPsec transform:
定义transform set命名为tx18set,加密算法为esp-3des, HMAC 算法为esp-MD5-HMAC
(4)定义感兴趣流量:
用扩展acl 180来定义通过 VPN 传输的流量
(5)创建 crypto map:
定义transform set命名为tx18map,将之前定义的 ACL,加密数据发往的对端,以及 IPsec transform 结合在 crypto map中
(6)将 crypto map 应用于对应接口
在Router0和Router1上配置动态路由rip协议,实现总公司和分公司私网路由
4、在Router0和Router1上配置动态路由ospf协议(进程号1,area 0),实现总公司和分公司私网路由
5、测试PC0能否ping通PC5,为什么?
6、分析GRE over IPSec VPN数据包,了解GRE over IPSec VPN数据封装格式
7、选做:
在公司边界路由器上做PAT,实现总公司和分公司的PC可以ping通公网PC
基础配置
Router 0配置IP地址
R0> enable
R0# config terminal
R0(config)# interface fastEthernet 0/0
R0(config-if)# ip address 192.168.107.254 255.255.255.0
R0(config-if)# no shutdown
R0(config-if)# exit
R0(config)# interface serial 0/3/0
R0(config-if)# ip address 58.1.1.1 255.255.255.252
R0(config-if)# no shutdown
R0(config-if)# exit
Router 1配置IP地址
R1> enable
R1# config terminal
R1(config)# interface fastEthernet 0/0
R1(config-if)# ip address 192.168.143.254 255.255.255.0
R1(config-if)# no shutdown
R1(config-if)# exit
R1(config)# interface serial 0/3/0
R1(config-if)# ip address 210.28.144.2 255.255.255.252
R1(config-if)# no shutdown
R1(config-if)# exit
Router 2配置IP地址
R2> enable
R2# configure terminal
R2(config)# interface serial 0/1/0
R2(config-if)# ip address 58.1.1.2 255.255.255.252
R2(config-if)# exit
R2(config)# interface serial 0/0/0
R2(config-if)# ip address 210.28.144.1 255.255.255.252
R2(config-if)# exit
R2(config)# interface fastEthernet 0/0
R2(config-if)# ip address 61.1.1.1 255.255.255.0
R2(config-if)# exit
Router 0配置默认路由
R0(config)# ip route 0.0.0.0 0.0.0.0 58.1.1.2
Router 1配置默认路由
R1(config)# ip route 0.0.0.0 0.0.0.0 210.28.144.1
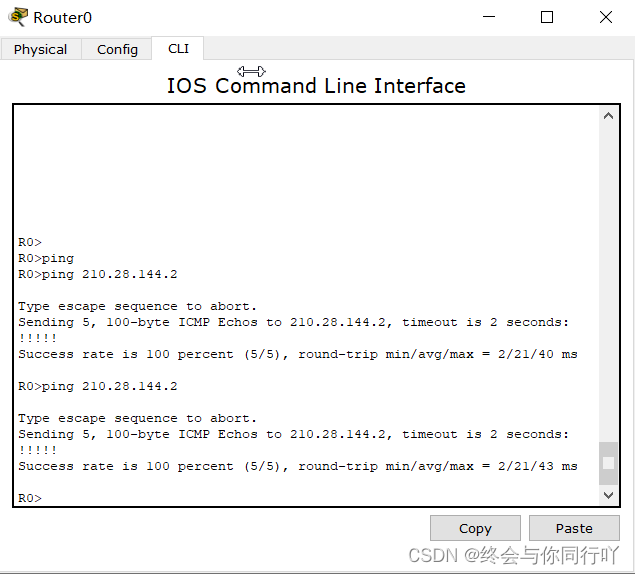
Router 0和Router 1的公网地址互通性测试
GRE隧道配置
Router 0配置GRE VPN
R0(config)# interface tunnel 1
R0(config-if)# ip address 10.1.1.1 255.255.255.252
R0(config-if)# tunnel source serial 0/3/0
R0(config-if)# tunnel destination 210.28.144.2
Router 1配置GRE VPN
R1(config)# interface tunnel 1
R1(config-if)# ip address 10.1.1.2 255.255.255.252
R1(config-if)# tunnel source serial 0/3/0
R1(config-if)# tunnel destination 58.1.1.1
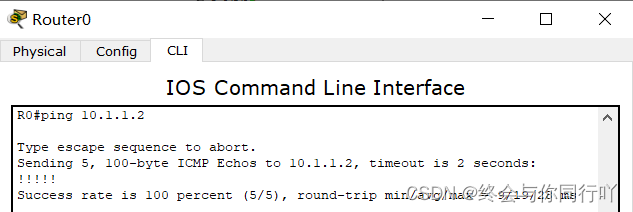
测试tunnel间的互通性
IPSec配置
Router 0配置IPSec
R0(config)#crypto isakmp policy 1
R0(config-isakmp)#encryption aes
R0(config-isakmp)#hash md5
R0(config-isakmp)#authentication pre-share
R0(config-isakmp)#group 2
R0(config-isakmp)#lifetime 86400
R0(config-isakmp)#exit
R0(config)#crypto isakmp key tx18 address 210.28.144.2
R0(config)#crypto ipsec transform-set tx18set esp-3des esp-md5-hmac
R0(config)#access-list 180 permit gre host 58.1.1.1 host 210.28.144.2
R0(config)#crypto map tx18map 1 ipsec-isakmp
R0(config-crypto-map)#match address 180
R0(config-crypto-map)#set peer 210.28.144.2
R0(config-crypto-map)#set transform-set tx18set
R0(config-crypto-map)#exit
R0(config)#interface serial 0/3/0
R0(config-if)#crypto map tx18map
R0(config-if)#exit
Router 1配置IPSec
R1(config)#crypto isakmp policy 1
R1(config-isakmp)#encryption aes
R1(config-isakmp)#hash md5
R1(config-isakmp)#authentication pre-share
R1(config-isakmp)#group 2
R1(config-isakmp)#lifetime 86400
R1(config-isakmp)#exit
R1(config)#crypto isakmp key tx18 address 58.1.1.1
R1(config)#crypto ipsec transform-set tx18set esp-3des esp-md5-hmac
R1(config)#access-list 180 permit gre host 210.28.144.2 host 58.1.1.1
R1(config)#crypto map tx18map 1 ipsec-isakmp
R1(config-crypto-map)#match address 180
R1(config-crypto-map)#set peer 58.1.1.1
R1(config-crypto-map)#set transform-set tx18set
R1(config-crypto-map)#exit
R1(config)#interface serial 0/3/0
R1(config-if)#crypto map tx18map
R1(config-if)#exit
Router 0配置OSPF协议
R0(config)#router ospf 1
R0(config-router)#network 192.168.107.10 0.0.0.255 area 0
R0(config-router)#network 10.1.1.1 0.0.0.3 area 0
R0(config-router)#exit
Router 1配置OSPF协议
R1(config)#router ospf 1
R1(config-router)#network 192.168.107.0 0.0.0.255 area 0
R1(config-router)#network 10.1.1.1 0.0.0.3 area 0
R0(config-router)#exit
PC 0 ping PC 5测试

PC 0可以ping通PC 5,因为我们已经配置完成了GRE over IPSec VPN,包括OSPF和静态路由都已经配置完成,总公司和分公司的流量会通过隧道进行传输,所以PC 0可以ping通PC 5。
PAT配置
Router 0配置PAT
R0(config)# interface FastEthernet0/0
R0(config-if)# ip nat inside
R0(config-if)# exit
R0(config)# interface Serial0/3/0
R0(config-if)# ip nat outside
R0(config-if)# exit
R0(config)# access-list 1 permit 192.168.107.0 0.0.0.255
R0(config)# ip nat pool mypool 58.1.1.1 58.1.1.1 netmask 255.255.255.0
R0(config)# ip nat inside source list 1 pool mypool overload
Router 1配置PAT
R1(config)# interface FastEthernet0/0
R1(config-if)# ip nat inside
R1(config-if)# exit
R1(config)# interface Serial0/3/0
R1(config-if)# ip nat outside
R1(config-if)# exit
R1(config)#access-list 1 permit 192.168.143.0 0.0.0.255
R1(config)#ip nat pool mypool 210.28.144.2 210.28.144.2 netmask 255.255.255.0
R1(config)#ip nat  inside source list 1 pool mypool overload
分析GRE over IPSec VPN数据包
分析GRE over IPSec VPN数据包,了解GRE over IPSec VPN数据封装格式 ?
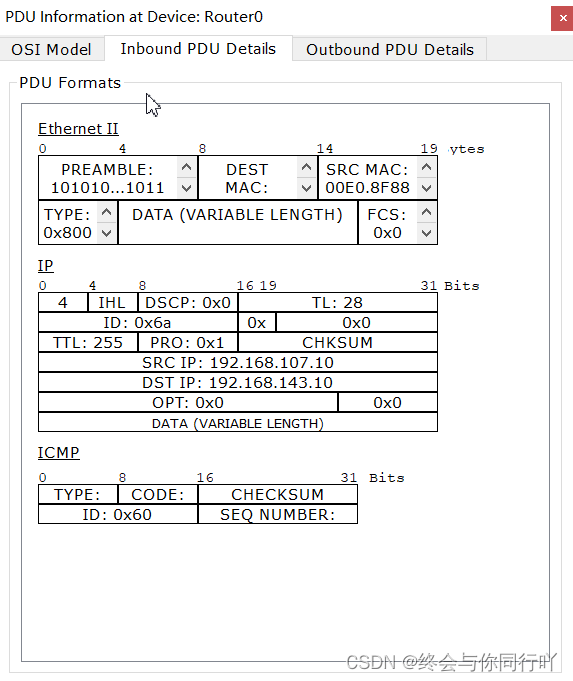

解析:我们用PC 0 ping PC5,观察Router 0的PDU,观察入站PDU可以看到,源IP地址为192.168.107.10,目的IP地址为192.168.143.10。观察出站PDU发现,最开始源IP地址和目的IP地址并未发生变化,通过GRE封装之后,加了IP头部,源IP地址为58.1.1.1,目的IP地址为210.28.144.2。然后经过了IPSec的加密,加了IP头部,源IP地址为58.1.1.1,目的地址为210.28.144.2。


 1008
1008


 被折叠的 条评论
为什么被折叠?
被折叠的 条评论
为什么被折叠?
 到【灌水乐园】发言


