


引言
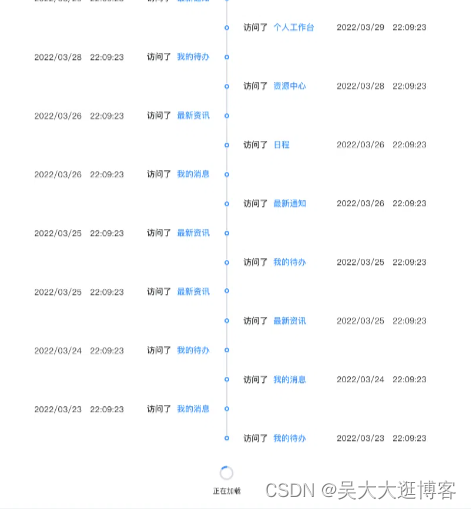
不浪费大家时间,兄弟们先看效果图,如果是你们想要的就看,不是想要的效果就去下家
.
.
.
.
这次实现的是步骤条式的懒加载效果,滚动条到底实现触发接口;
说加载前先说下步骤条样式的实现思路,具体代码有点杂,有需要的可以留言dd
步骤条布局:
思路:div不浮动竖排排列,或者用flex布局的纵向轴,第一层的每个div上下紧靠这里不可以用magin-top和button,然后设置个border-left或者border-right样式,这时一条不间断长线就会形成,然后设置圆圈,圆圈的样式可以使用定位,和第一层的div进行定位布局,会形成带圆圈的一条长线。但是此时每个div写上内容的时候发现不会对齐圆圈,这时要将第一层div里面的内容进行margin-top:一个负值,让其移上去一些距离,实现和圆圈对齐。
这时,一个简单的步骤条就实现了哦,要实现左右布局的效果,再去用奇偶选择去设置transform: translateX(xx);
算了,上个代码吧,可能要改,但是希望对你有帮助qaq,这里是vue的哈
布局:这里的f f-d-c等样式是封装的flex样式,后面贴上
<div class="record-one f" v-for="i in 20">
  <div class="f">
    <div class="f f-d-c f-a-c tx">
      <div class="circle"></div>
      <div class="line"></div>
    </div>
    <div class="f text">
      <div></div>
      <div class="f f-a-c">
        <div class="content">访问了 <span style="color: #368fff">资源中心</span></div>
        <div class="time">2022年08月28日   <span class="mar-left-20">09:09:09</span></div>
      </div>
    </div>
  </div>
</div>
css:less或scss
 .record-one{
    &:nth-child(2n+1) .text{
      transform: translateX(-100% - 2px);
      text-align: right;
      //padding-right: 20px;
      justify-content: space-between;
      //color: red;
    }
    .tx{
      //margin-top: -5px;
    }
    .circle{
      width: 6px;
      height: 6px;
      border-radius: 50%;
      background: #FFFFFF;
      border: 2px solid #368FFF;
      flex-shrink: 0;
    }
    .line{
      width: 2px;
      min-height: 100%;
      background-color: #D9DCE2;
    }
    .text{
      width: 442px;
      margin-bottom: 20px;
      >div:last-child{
        margin-top: -17px;
        padding: 10px 10px;
        border-radius: 4px;
        &:hover{
          cursor: pointer;
          background: #D2E6FF;
        }
      }
    }
    .content{
      min-width: 70px;
      margin-left: 8px;
      //margin-top: -7px;
    }
    .time{
      margin-left: 21px;
      //margin-top: -7px;
      color: #333333;
    }
    &:last-child .tx .line{
      display: none;
    }
  }
flex封装
.f {
	display: flex;
	/* 设置为flex布局 */
}
.f-a-c {
	align-items: center;
	/* 交叉轴上如何对齐,每个div中心轴对齐 */
}
.f-a-b {
	align-items: baseline;
}
.f-d-c {
	flex-direction: column;
	/* 排列方式,垂直 */
}
.f-w-w {
	flex-wrap: wrap; /*ie浏览器不支持--父元素要加个宽度*/
	/* 换行方式 */
}
.f-j-c {
	justify-content: center;
	/* 居中 */
}
.f-j-b {
	justify-content: space-between;
	/* 两边排列 */
}
.f-j-a {
	justify-content: space-around;
	/* 靠近两边,没有接触到旁边 */
}
.f-j-s {
	justify-content: start;
	/* 靠近左侧 */
}
.f-s-1 {
	flex-shrink: 1;
}
.f-s-0 {
	flex-shrink: 0;
}
.f-1 {
	flex: 1;
}
.mar-top-10 {
	margin-top: 10px;
}
.mar-top-20 {
	margin-top: 20px;
}
.mar-left-10 {
	margin-left: 10px;
}
.mar-left-20 {
	margin-left: 20px;
}
步骤条布局到此结束,有问题的留言dd,
.
.
.
.
.
触底加载
下面说触底加载思路,这里当时调研了,主要有两个简单的方法:
①如果你项目中用了elementUI这里可以去用其中的无限滚动组件InfiniteScroll,当然这里面也有小坑,但是不大,好摸索;
②js计算高度实现,直接上代码吧,代码里有注释
 mounted() {
        this.scrollFunc();
    },
    destroyed() {
        //销毁scroll事件监听
        $(document).unbind("scroll");
    },
    methods:{
        scrollFunc(){
            $(document).scroll(()=>{
                var viewH =$(document).height(),//body文档流的总高度
                    screenHeight=$(window).height(),//窗口屏幕的高度
                    scrollHeight =$(document).scrollTop();//滚动高度
                /*触底加载条件=>[文档流高度-(滚动高度+屏幕高度)< 10px]*/
                if(viewH-(screenHeight+scrollHeight)<2){
                    //进行截流-(这里可以写个正规的截流函数)
                    if(this.lock === true){
                        return ;
                    }
                    console.log('触底加载');
                    this.lock = true;
                    setTimeout(()=>{
                        //模拟数据请求
                        this.times ++;
                        this.lock=false;
                    },2000)
                }
            });
        },
    }


 1261
1261


 被折叠的 条评论
为什么被折叠?
被折叠的 条评论
为什么被折叠?
 到【灌水乐园】发言


