


使用SSM框架对用户信息执行CRUD操作
使用SSM框架对用户信息进行CRUD操作,次练习是为了整合及熟悉SpringMVC+Spring+Mybatis。
使用Ajax获取后端的用户数据,展示在前端页面上(要用Ajax获取数据,就要拼接页面)。其中我将查询所有和根据名字模糊查询合并在了一起(条件查询),将添加用户和修改用户合并在了一起(实际上也经常这么干),删除用户只进行了逻辑删除,现实中大部分都是只在页面进行删除,实际上数据库上不删除(毕竟现在数据很值钱嘛)。
具体实现步骤如下(我实在本地写好,直接导入的,功能可能会有所缺失,想要的可以联系我,不一定按照这个步骤来,功能是一块一块的实现的,为了方便,我这里分了以下步骤)
第一步:建库建表,引包:


第二步:创建spring的配置文件applicationContext.xml:
<?xml version="1.0" encoding="UTF-8"?>
<beans xmlns="http://www.springframework.org/schema/beans"
xmlns:xsi="http://www.w3.org/2001/XMLSchema-instance"
xmlns:p="http://www.springframework.org/schema/p"
xmlns:aop="http://www.springframework.org/schema/aop"
xmlns:context="http://www.springframework.org/schema/context"
xmlns:jee="http://www.springframework.org/schema/jee"
xmlns:tx="http://www.springframework.org/schema/tx"
xsi:schemaLocation="
http://www.springframework.org/schema/aop http://www.springframework.org/schema/aop/spring-aop-4.0.xsd
http://www.springframework.org/schema/beans http://www.springframework.org/schema/beans/spring-beans-4.0.xsd
http://www.springframework.org/schema/context http://www.springframework.org/schema/context/spring-context-4.0.xsd
http://www.springframework.org/schema/jee http://www.springframework.org/schema/jee/spring-jee-4.0.xsd
http://www.springframework.org/schema/tx http://www.springframework.org/schema/tx/spring-tx-4.0.xsd">
<!-- 自动扫描 -->
<context:component-scan base-package="com.lyh.service" />
<!-- 配置数据源 -->
<bean id="dataSource" class="org.springframework.jdbc.datasource.DriverManagerDataSource">
<property name="driverClassName" value="com.mysql.jdbc.Driver"/>
<property name="url" value="jdbc:mysql://localhost:3306/db_ssm?useUnicode=true&characterEncoding=utf-8"/>
<property name="username" value="root"/>
<property name="password" value="123456"/>
</bean>
<!-- 配置mybatis的sqlSessionFactory -->
<bean id="sqlSessionFactory" class="org.mybatis.spring.SqlSessionFactoryBean">
<property name="dataSource" ref="dataSource" />
<!-- 自动扫描mappers.xml文件 -->
<property name="mapperLocations" value="classpath:com/lyh/mappers/*.xml"></property>
<!-- mybatis配置文件 -->
<property name="configLocation" value="classpath:mybatis-config.xml"></property>
</bean>
<!-- DAO接口所在包名,Spring会自动查找其下的类 -->
<bean class="org.mybatis.spring.mapper.MapperScannerConfigurer">
<property name="basePackage" value="com.lyh.dao" />
<property name="sqlSessionFactoryBeanName" value="sqlSessionFactory"></property>
</bean>
<!-- (事务管理)transaction manager, use JtaTransactionManager for global tx -->
<bean id="transactionManager" class="org.springframework.jdbc.datasource.DataSourceTransactionManager">
<property name="dataSource" ref="dataSource" />
</bean>
<!-- 配置事务通知属性 -->
<tx:advice id="txAdvice" transaction-manager="transactionManager">
<!-- 定义事务传播属性 -->
<tx:attributes>
<tx:method name="insert*" propagation="REQUIRED" />
<tx:method name="update*" propagation="REQUIRED" />
<tx:method name="edit*" propagation="REQUIRED" />
<tx:method name="save*" propagation="REQUIRED" />
<tx:method name="add*" propagation="REQUIRED" />
<tx:method name="new*" propagation="REQUIRED" />
<tx:method name="set*" propagation="REQUIRED" />
<tx:method name="remove*" propagation="REQUIRED" />
<tx:method name="delete*" propagation="REQUIRED" />
<tx:method name="change*" propagation="REQUIRED" />
<tx:method name="get*" propagation="REQUIRED" read-only="true" />
<tx:method name="find*" propagation="REQUIRED" read-only="true" />
<tx:method name="load*" propagation="REQUIRED" read-only="true" />
<tx:method name="*" propagation="REQUIRED" read-only="true" />
</tx:attributes>
</tx:advice>
<!-- 配置事务切面 -->
<aop:config>
<aop:pointcut id="serviceOperation" expression="execution(* com.lyh.service.*.*(..))" />
<aop:advisor advice-ref="txAdvice" pointcut-ref="serviceOperation" />
</aop:config>
</beans>
第三步:创建springMVC的配置文件spring-mvc.xml:
<?xml version="1.0" encoding="UTF-8"?>
<beans xmlns="http://www.springframework.org/schema/beans"
    xmlns:xsi="http://www.w3.org/2001/XMLSchema-instance"
    xmlns:p="http://www.springframework.org/schema/p"
    xmlns:aop="http://www.springframework.org/schema/aop"
    xmlns:context="http://www.springframework.org/schema/context"
    xmlns:jee="http://www.springframework.org/schema/jee"
    xmlns:tx="http://www.springframework.org/schema/tx"
    xmlns:mvc="http://www.springframework.org/schema/mvc"
    xsi:schemaLocation="
        http://www.springframework.org/schema/aop
		http://www.springframework.org/schema/aop/spring-aop-4.0.xsd
        http://www.springframework.org/schema/beans
		http://www.springframework.org/schema/beans/spring-beans-4.0.xsd
        http://www.springframework.org/schema/context
		http://www.springframework.org/schema/context/spring-context-4.0.xsd
        http://www.springframework.org/schema/jee
        http://www.springframework.org/schema/jee/spring-jee-4.0.xsd
        http://www.springframework.org/schema/tx
        http://www.springframework.org/schema/tx/spring-tx-4.0.xsd
        http://www.springframework.org/schema/mvc
        http://www.springframework.org/schema/mvc/spring-mvc.xsd
        ">

	<!-- 使用注解的包,包括子集 -->
	<context:component-scan base-package="com.lyh.controller" />

	<!-- 支持对象与json的转换 -->
    <mvc:annotation-driven/>

	<!-- 视图解析器 -->
	<bean id="viewResolver" class="org.springframework.web.servlet.view.InternalResourceViewResolver">
		<property name="prefix" value="/WEB-INF/jsp/" />
		<property name="suffix" value=".jsp"></property>
	</bean>

</beans>
第四步:创建Mybatis的配置文件mybatis-config.xml:
<?xml version="1.0" encoding="UTF-8" ?>
<!DOCTYPE configuration
PUBLIC "-//mybatis.org//DTD Config 3.0//EN"
"http://mybatis.org/dtd/mybatis-3-config.dtd">
<configuration>
	<!-- 别名 -->
	<typeAliases>
		<package name="com.lyh.model"/>
	</typeAliases>
</configuration>
第五步:配置web.xml,将各个配置文件都引进来:
<?xml version="1.0" encoding="UTF-8"?>
<web-app xmlns:xsi="http://www.w3.org/2001/XMLSchema-instance" xmlns="http://xmlns.jcp.org/xml/ns/javaee" xsi:schemaLocation="http://xmlns.jcp.org/xml/ns/javaee http://xmlns.jcp.org/xml/ns/javaee/web-app_3_1.xsd" id="WebApp_ID" version="3.1">
  <display-name>SSM_CRUD</display-name>
  <welcome-file-list>
    <welcome-file>login.jsp</welcome-file>
  </welcome-file-list>

  <!-- 加载spring配置文件 -->
  <context-param>
  	<param-name>contextConfigLocation</param-name>
  	<param-value>classpath:applicationContext.xml</param-value>
  </context-param>

  <!-- 对springMVC的支持 -->
  <servlet>
  	<servlet-name>springMVC</servlet-name>
  	<servlet-class>org.springframework.web.servlet.DispatcherServlet</servlet-class>
  	<!-- 加载springMVC配置文件 -->
  	<init-param>
  		<param-name>contextConfigLocation</param-name>
  		<param-value>classpath:spring-mvc.xml</param-value>
  	</init-param>
  </servlet>
  <servlet-mapping>
  	<servlet-name>springMVC</servlet-name>
  	<url-pattern>*.action</url-pattern>
  </servlet-mapping>

  <!-- Spring监听器 -->
	<listener>
		<listener-class>org.springframework.web.context.ContextLoaderListener</listener-class>
	</listener>

  <!-- 编码过滤器 -->
	<filter>
		<filter-name>encodingFilter</filter-name>
		<filter-class>org.springframework.web.filter.CharacterEncodingFilter</filter-class>
		<async-supported>true</async-supported>
		<init-param>
			<param-name>encoding</param-name>
			<param-value>UTF-8</param-value>
		</init-param>
	</filter>
	<filter-mapping>
		<filter-name>encodingFilter</filter-name>
		<url-pattern>*.action</url-pattern>
	</filter-mapping>

</web-app>
第六步:创建实体:
public class UserInfo {
	private Integer u_id;		//编号
	private String u_name;		//用户名
	private String u_pwd;		//密码
	private String u_sex;		//性别
	private int u_age;			//年龄
	private int delflag;		//删除标记(默认为0)

	public UserInfo() {}

	public UserInfo(String u_name, String u_pwd) {
		this.u_name = u_name;
		this.u_pwd = u_pwd;
	}

	public UserInfo(String u_name, String u_pwd, String u_sex, int u_age, int delflag) {
		this.u_name = u_name;
		this.u_pwd = u_pwd;
		this.u_sex = u_sex;
		this.u_age = u_age;
		this.delflag = delflag;
	}

	public UserInfo(Integer u_id, String u_name, String u_pwd, String u_sex, int u_age, int delflag) {
		this.u_id = u_id;
		this.u_name = u_name;
		this.u_pwd = u_pwd;
		this.u_sex = u_sex;
		this.u_age = u_age;
		this.delflag = delflag;
	}

	public Integer getU_id() {
		return u_id;
	}

	public void setU_id(Integer u_id) {
		this.u_id = u_id;
	}

	public String getU_name() {
		return u_name;
	}

	public void setU_name(String u_name) {
		this.u_name = u_name;
	}

	public String getU_pwd() {
		return u_pwd;
	}

	public void setU_pwd(String u_pwd) {
		this.u_pwd = u_pwd;
	}

	public String getU_sex() {
		return u_sex;
	}

	public void setU_sex(String u_sex) {
		this.u_sex = u_sex;
	}

	public int getU_age() {
		return u_age;
	}

	public void setU_age(int u_age) {
		this.u_age = u_age;
	}

	public int getDelflag() {
		return delflag;
	}

	public void setDelflag(int delflag) {
		this.delflag = delflag;
	}

}
第七步:创建dao层接口:
public interface UserInfoDao {

	/**
	 * @方法名: login
	 * @方法说明: 用户登录的dao接口
	 * @作者: LiYuHui
	 * @邮箱:1327711913@qq.com
	 * @日期: 2020年6月26日上午11:32:59
	 * @param userInfo
	 * @return
	 * @return: UserInfo
	 */
	public UserInfo login(UserInfo userInfo);

	/**
	 * @方法名: findUserInfo
	 * @方法说明: 查询用户信息(条件查询)的dao接口
	 * @作者: LiYuHui
	 * @邮箱:1327711913@qq.com
	 * @日期: 2020年6月26日上午11:34:20
	 * @param map
	 * @return
	 * @return: List<UserInfo>
	 */
	public List<UserInfo> findUserInfo(Map<String,Object> map);

	/**
	 * @方法名: addUserInfo
	 * @方法说明: 添加用户信息的dao接口
	 * @作者: LiYuHui
	 * @邮箱:1327711913@qq.com
	 * @日期: 2020年6月26日上午11:35:34
	 * @param userInfo
	 * @return
	 * @return: int
	 */
	public int addUserInfo(UserInfo userInfo);

	/**
	 * @方法名: updateUserInfo
	 * @方法说明: 修改用户信息的dao接口
	 * @作者: LiYuHui
	 * @邮箱:1327711913@qq.com
	 * @日期: 2020年6月26日上午11:36:12
	 * @param userInfo
	 * @return
	 * @return: int
	 */
	public int updateUserInfo(UserInfo userInfo);

	/**
	 * @方法名: deleteUserInfo
	 * @方法说明: 逻辑删除用户信息(实际数据库中不删除)的dao接口
	 * @作者: LiYuHui
	 * @邮箱:1327711913@qq.com
	 * @日期: 2020年6月26日上午11:36:59
	 * @param u_id
	 * @return
	 * @return: int
	 */
	public int deleteUserInfo(int u_id);
}
第八步:创建dao层的mapper.xml映射文件:
<?xml version="1.0" encoding="UTF-8" ?>
<!DOCTYPE mapper
PUBLIC "-//mybatis.org//DTD Mapper 3.0//EN"
"http://mybatis.org/dtd/mybatis-3-mapper.dtd">
<mapper namespace="com.lyh.dao.UserInfoDao">

	<!-- 用户登录:根据用户名和密码登录系统 -->
	<select id="login" parameterType="UserInfo" resultType="UserInfo">
		select
			u_id,
			u_name,
			u_pwd,
			u_sex,
			u_age,
			delflag
		from
			t_userInfo
		where
			delflag=0
		and
			u_name=#{u_name}
		and
			u_pwd=#{u_pwd}
	</select>

	<!-- 条件查询用户信息(查询所有和根据姓名查询) -->
	<select id="findUserInfo" resultType="UserInfo" parameterType="Map">
		select
			u_id,
			u_name,
			u_pwd,
			u_sex,
			u_age,
			delflag
		from
			t_userInfo
		<where>
			delflag=0
		<if test="searchName != null">
			and u_name like concat('%',#{searchName},'%')
		</if>
		</where>
	</select>

	<!-- 添加用户信息 -->
	<insert id="addUserInfo" parameterType="UserInfo">
		insert into
			t_userInfo(
				u_name,
				u_pwd,
				u_sex,
				u_age,
				delflag
			)values(
				#{u_name},
				#{u_pwd},
				#{u_sex},
				#{u_age},
				#{delflag}
			)
	</insert>

	<!-- 修改用户信息 -->
	<update id="updateUserInfo" parameterType="UserInfo">
		update
			t_userInfo
		<set>
			u_name=#{u_name},
			u_pwd=#{u_pwd},
			u_sex=#{u_sex},
			u_age=#{u_age}
		</set>
		<where>
			u_id=#{u_id}
		</where>
	</update>

	<!-- 删除用户信息(逻辑删除) -->
	<update id="deleteUserInfo" parameterType="int">
		update
			t_userInfo
		<set>
			delflag=1
		</set>
		<where>
			u_id=#{u_id}
		</where>
	</update>
</mapper>
第九步:创建service层接口及其实现类:
public interface UserInfoService {
	/**
	 * @方法名: login
	 * @方法说明: 用户登录的service接口
	 * @作者: LiYuHui
	 * @邮箱:1327711913@qq.com
	 * @日期: 2020年6月26日上午11:32:59
	 * @param userInfo
	 * @return
	 * @return: UserInfo
	 */
	public UserInfo login(UserInfo userInfo);

	/**
	 * @方法名: findUserInfo
	 * @方法说明: 查询用户信息(条件查询)的service接口
	 * @作者: LiYuHui
	 * @邮箱:1327711913@qq.com
	 * @日期: 2020年6月26日上午11:34:20
	 * @param map
	 * @return
	 * @return: List<UserInfo>
	 */
	public List<UserInfo> findUserInfo(Map<String,Object> map);

	/**
	 * @方法名: addUserInfo
	 * @方法说明: 添加用户信息的service接口
	 * @作者: LiYuHui
	 * @邮箱:1327711913@qq.com
	 * @日期: 2020年6月26日上午11:35:34
	 * @param userInfo
	 * @return
	 * @return: int
	 */
	public int addUserInfo(UserInfo userInfo);

	/**
	 * @方法名: updateUserInfo
	 * @方法说明: 修改用户信息的service接口
	 * @作者: LiYuHui
	 * @邮箱:1327711913@qq.com
	 * @日期: 2020年6月26日上午11:36:12
	 * @param userInfo
	 * @return
	 * @return: int
	 */
	public int updateUserInfo(UserInfo userInfo);

	/**
	 * @方法名: deleteUserInfo
	 * @方法说明: 逻辑删除用户信息(实际数据库中不删除)的service接口
	 * @作者: LiYuHui
	 * @邮箱:1327711913@qq.com
	 * @日期: 2020年6月26日上午11:36:59
	 * @param u_id
	 * @return
	 * @return: int
	 */
	public int deleteUserInfo(int u_id);
}

====================================================

@Service
public class UserInfoServiceImpl implements UserInfoService {

	//自动注入dao
	@Autowired
	private UserInfoDao userInfoDao;

	/**
	 * 用户登录
	 */
	@Override
	public UserInfo login(UserInfo userInfo) {
		return userInfoDao.login(userInfo);
	}

	/**
	 * 查询用户(条件查询)
	 */
	@Override
	public List<UserInfo> findUserInfo(Map<String, Object> map) {
		return userInfoDao.findUserInfo(map);
	}

	/**
	 * 添加用户信息
	 */
	@Override
	public int addUserInfo(UserInfo userInfo) {
		userInfo.setDelflag(0);
		return userInfoDao.addUserInfo(userInfo);
	}

	/**
	 * 修改用户信息
	 */
	@Override
	public int updateUserInfo(UserInfo userInfo) {
		return userInfoDao.updateUserInfo(userInfo);
	}

	/**
	 * 逻辑删除用户信息
	 */
	@Override
	public int deleteUserInfo(int u_id) {
		return userInfoDao.deleteUserInfo(u_id);
	}

}
第十步:创建controller层:
/**@文件名: UserInfoController.java
 * @类功能说明: 用户信息的controller
 * @作者: LiYuHui
 * @Email: 1327711913@qq.com
 * @日期: 2020年6月26日上午11:49:54
 * @修改说明:<br>
 * <pre>
 * 	 <li>作者: LiYuHui</li>
 * 	 <li>日期: 2020年6月26日上午11:49:54</li>
 *	 <li>内容: </li>
 * </pre>
 */
@Controller
@RequestMapping("userInfo")
public class UserInfoController {

	//自动注入service
	@Autowired
	private UserInfoService userInfoService;

	/**
	 * @方法名: login
	 * @方法说明: 用户登录系统
	 * @作者: LiYuHui
	 * @邮箱:1327711913@qq.com
	 * @日期: 2020年6月26日下午4:51:26
	 * @param userInfo
	 * @param request
	 * @return
	 * @throws UnsupportedEncodingException
	 * @return: String
	 */
	@RequestMapping("/login")
	public String login(UserInfo userInfo,HttpServletRequest request) throws UnsupportedEncodingException {
		HttpSession session = request.getSession();
		UserInfo resultUserInfo = userInfoService.login(userInfo);
		if(resultUserInfo!=null) {
			session.setAttribute("currentUserInfo", resultUserInfo);
			return "main";
		}else {
			//用户名url加密
			return "redirect:../login.jsp?error=1&u_name="+URLEncoder.encode(userInfo.getU_name(), "utf-8")+"&u_pwd="+userInfo.getU_pwd();
		}
	}

	/**
	 * @方法名: toUserInfoList
	 * @方法说明: 页面跳转
	 * @作者: LiYuHui
	 * @邮箱:1327711913@qq.com
	 * @日期: 2020年6月26日下午5:45:18
	 * @param searchName
	 * @return
	 * @return: String
	 */
	@RequestMapping("/toUserInfoList")
	public String toUserInfoList(String searchName) {
		/*ModelAndView mav = new ModelAndView();
		Map<String,Object> map = new HashMap<String,Object>();
		map.put("searchName", searchName);
		List<UserInfo> userList = userInfoService.findUserInfo(map);
		mav.addObject("userList", userList);
		mav.setViewName("userInfo/userInfoList");*/
		return "userInfo/userInfoList";
	}

	/**
	 * @方法名: findUserInfo
	 * @方法说明: 查询用户信息(转为json格式)
	 * @作者: LiYuHui
	 * @邮箱:1327711913@qq.com
	 * @日期: 2020年6月26日下午6:22:18
	 * @param searchName
	 * @return
	 * @return: List<UserInfo>
	 */
	@RequestMapping("/findUserInfo")
	@ResponseBody
	public List<UserInfo> findUserInfo(String searchName){
		Map<String,Object> map = new HashMap<String,Object>();
		map.put("searchName", searchName);
		return userInfoService.findUserInfo(map);
	}

	/**
	 * @方法名: toEditUserInfo
	 * @方法说明: 跳转添加/修改页面
	 * @作者: LiYuHui
	 * @邮箱:1327711913@qq.com
	 * @日期: 2020年6月26日下午6:59:55
	 * @param userInfo
	 * @return
	 * @return: ModelAndView
	 */
	@RequestMapping("/toEditUserInfo")
	public ModelAndView toEditUserInfo(UserInfo userInfo) {
		ModelAndView mav = new ModelAndView();
		if(userInfo.getU_id()==null) {
			mav.addObject("title", "新增用户信息");
		}else {
			mav.addObject("title", "修改用户信息");
			mav.addObject("userInfo", userInfo);
		}
		mav.setViewName("userInfo/editUserInfo");
		return mav;
	}

	/**
	 * @方法名: editUserInfo
	 * @方法说明: 添加/修改用户信息
	 * @作者: LiYuHui
	 * @邮箱:1327711913@qq.com
	 * @日期: 2020年6月26日下午7:22:57
	 * @param userInfo
	 * @return
	 * @return: String
	 */
	@RequestMapping("/editUserInfo")
	public String editUserInfo(UserInfo userInfo) {
		int result = 0;
		if(userInfo.getU_id()==null) {
			result = userInfoService.addUserInfo(userInfo);
		}else {
			result = userInfoService.updateUserInfo(userInfo);
		}
		return "forward:toUserInfoList.action";
	}

	/**
	 * @方法名: deleteUserInfo
	 * @方法说明: 逻辑删除用户信息
	 * @作者: LiYuHui
	 * @邮箱:1327711913@qq.com
	 * @日期: 2020年6月26日下午10:00:14
	 * @param u_id
	 * @return
	 * @return: JSONObject
	 */
	@RequestMapping("/deleteUserInfo")
	@ResponseBody
	public JSONObject deleteUserInfo(int u_id) {
		JSONObject jsonObject = new JSONObject();
		int result=userInfoService.deleteUserInfo(u_id);
		jsonObject.put("resultNum", result);
		return jsonObject;
	}
}
第十一步:编写登录页面:
<%@ page language="java" contentType="text/html; charset=UTF-8" pageEncoding="UTF-8"%>
<!DOCTYPE html PUBLIC "-//W3C//DTD HTML 4.01 Transitional//EN" "http://www.w3.org/TR/html4/loose.dtd">
<html>
<head>
<meta http-equiv="Content-Type" content="text/html; charset=UTF-8">
<title>用户登录界面</title>
<script type="text/javascript" src="${pageContext.request.contextPath }/js/jquery-3.4.1.js"></script>
</head>
<body>
<form action="userInfo/login.action" method="post">
<table cellspacing="0" cellpadding="0" width="300px" align="center" border="0">
<tr>
<th>请登录</th>
</tr>
<tr align="center">
<td>
<input type="text" name="u_name" id="u_name" placeholder="用户名"/>
</td>
</tr>
<tr align="center">
<td>
<input type="password" name="u_pwd" id="u_pwd" placeholder="密码"/>
</td>
</tr>
<tr align="center">
<td>
<span id="msg" style="color:red"></span>
</td>
</tr>
<tr align="center">
<td>
<input type="submit" value="登录"/>
<input type="reset" value="重置"/>
</td>
</tr>
</table>
<script type="text/javascript">
function getQueryString(name){
var reg = new RegExp("(^|&)" + name + "=([^&]*)(&|$)", "i");
var url=decodeURI(decodeURI(window.location.search)); //获取返回路径
var r=url.substr(1).match(reg);
if(r!=null){
return unescape(r[2]);
}
return null;
}
//页面加载后触发事件
$(function (){
var error = getQueryString("error")
var userName = getQueryString("u_name");
var Pwd = getQueryString("u_pwd");
if(error==1){
$("#u_name").val(userName);
$("#u_pwd").val(Pwd);
$("#msg").html("*用户名或密码有误");
}
});
</script>
</form>
</body>
</html>
第十二步:手动编写主页面(布局,这里就不用easyUI什么的了,手动编写):
<%@ page language="java" contentType="text/html; charset=UTF-8" pageEncoding="UTF-8"%>
<!DOCTYPE html PUBLIC "-//W3C//DTD HTML 4.01 Transitional//EN" "http://www.w3.org/TR/html4/loose.dtd">
<html>
	<head>
		<meta http-equiv="Content-Type" content="text/html; charset=UTF-8">
		<title>主界面</title>
	</head>
		<frameset rows="10%,*">
			<frame src="${pageContext.request.contextPath }/common/top.jsp"/>
			<frameset cols="20%,*">
				<frame src="${pageContext.request.contextPath}/common/menu.jsp"/>
				<frame name="main"/>
			</frameset>
		</frameset>
</html>
第十三步:分别编写top、menu页面:
top.jsp:
<%@ page language="java" contentType="text/html; charset=UTF-8" pageEncoding="UTF-8"%>
<!DOCTYPE html PUBLIC "-//W3C//DTD HTML 4.01 Transitional//EN" "http://www.w3.org/TR/html4/loose.dtd">
<html>
	<head>
		<meta http-equiv="Content-Type" content="text/html; charset=UTF-8">
		<title>Insert title here</title>
	</head>
	<body>
		<h2 style="text-align:center;">欢迎【<span style="color:red">${currentUserInfo.u_name }</span>】登录本系统</h2>
	</body>
</html>
menu.jsp:
<%@ page language="java" contentType="text/html; charset=UTF-8" pageEncoding="UTF-8"%>
<!DOCTYPE html PUBLIC "-//W3C//DTD HTML 4.01 Transitional//EN" "http://www.w3.org/TR/html4/loose.dtd">
<html>
	<head>
		<meta http-equiv="Content-Type" content="text/html; charset=UTF-8">
		<title>Insert title here</title>
	</head>
	<body>
		<ul>
			<li>用户列表
				<ul>
					<li>
						<a href="${pageContext.request.contextPath }/userInfo/toUserInfoList.action" target="main" style="text-decoration: none">用户信息</a>
					</li>
				</ul>
			</li>
		</ul>
		<ul>
			<li>日志列表
				<ul>
					<li>
						<a href="#" target="main" style="text-decoration: none">日志信息</a>
					</li>
				</ul>
			</li>
		</ul>
	</body>
</html>
第十四步:编写用户列表页面:
<html>
<head>
<meta http-equiv="Content-Type" content="text/html; charset=UTF-8">
<title>用户列表</title>
<script type="text/javascript" src="${pageContext.request.contextPath }/js/jquery-3.4.1.js"></script>
</head>
<body>
<div id="userList"></div>
<script type="text/javascript">
function findUserInfo(){
var top = "<table cellspacing='0' cellpadding='0' width='500px' align='center' border='1'>"+
"<tr>"+
"<th colspan='6'>用户列表</th>"+
"</tr>"+
"<tr>"+
"<td colspan='6'>"+
"<a href='toEditUserInfo.action'><button>添加</button></a>"+
"<input type='text' name='searchName' id='searchName' style='border-color: red'/>"+
"<input type='button' οnclick='searchByName()' value='查询' style='color: red'>"+
"</td>"+
"</tr>"+
"<tr>"+
"<th>编号</th>"+
"<th>用户名</th>"+
"<th>密码</th>"+
"<th>性别</th>"+
"<th>年龄</th>"+
"<th>操作</th>"+
"</tr>";
var content = "";
var searchName = $("#searchName").val();
//ajax方式获取数据
$.ajax({
url:"findUserInfo.action",
type:"post",
data:{searchName:searchName},
dataType:"json",
success:function(result){
$.each(result,function(index,row){
content += "<tr align='center'>"+
"<td>"+row.u_id+"</td>"+
"<td>"+row.u_name+"</td>"+
"<td>"+row.u_pwd+"</td>"+
"<td>"+row.u_sex+"</td>"+
"<td>"+row.u_age+"</td>"+
"<td>"+
"<a href='toEditUserInfo.action?u_id="+row.u_id+"&u_name="+row.u_name+"&u_pwd="+row.u_pwd+"&u_sex="+row.u_sex+"&u_age="+row.u_age+"'><button>修改</button></a>"+
" "+
"<a href='javascript:deleteUserInfo("+row.u_id+")'><button>删除</button></a>"+
"</td>"+
"</tr>";
});
$("#userList").html(top+content+"</table>")
},
error:function(){
alert("网络不稳定,请稍后再试");
}
});
}
//页面加载触发事件
$(function (){
findUserInfo();
});
function searchByName(){
findUserInfo();
}
//删除用户信息触发事件
function deleteUserInfo(u_id){
var flag = confirm("您确认要删除该信息吗?");
if(flag){
//ajax获取数据
$.post("deleteUserInfo.action",{u_id:u_id},function(result){
if(result.resultNum>0){
alert("删除用户信息成功!");
//页面重新加载
window.location.reload();
}else{
alert("删除用户信息失败!");
}
});
}
}
</script>
</body>
</html>
第十五步:编写编辑用户信息页面:
<%@ page language="java" contentType="text/html; charset=UTF-8" pageEncoding="UTF-8"%>
<!DOCTYPE html PUBLIC "-//W3C//DTD HTML 4.01 Transitional//EN" "http://www.w3.org/TR/html4/loose.dtd">
<html>
<head>
<meta http-equiv="Content-Type" content="text/html; charset=UTF-8">
<title>编辑界面</title>
</head>
<body>
<form action="editUserInfo.action" method="post">
<table cellspacing="0" cellpadding="0" width="500px" align="center" border="1">
<tr>
<th>${title }</th>
</tr>
<tr>
<td>
<input type="hidden" name="u_id" id="u_id" value="${userInfo.u_id }"/>
</td>
</tr>
<tr align="center">
<td>
<input type="text" name="u_name" id="u_name" placeholder="用户名" value="${userInfo.u_name }"/>
</td>
</tr>
<tr align="center">
<td>
<input type="password" name="u_pwd" id="u_pwd" placeholder="密码" value="${userInfo.u_pwd }"/>
</td>
</tr>
<tr align="center">
<td>
<input type="text" name="u_sex" id="u_sex" placeholder="性别" value="${userInfo.u_sex }"/>
</td>
</tr>
<tr align="center">
<td>
<input type="text" name="u_age" id="u_age" placeholder="年龄" value="${userInfo.u_age }"/>
</td>
</tr>
<tr align="center">
<td>
<input type="submit" value="提交"/>
<input type="reset" value="取消"/>
</td>
</tr>
</table>
</form>
</body>
</html>
-
截图:
-
查询用户信息


-
添加用户信息

-
修改用户信息


-
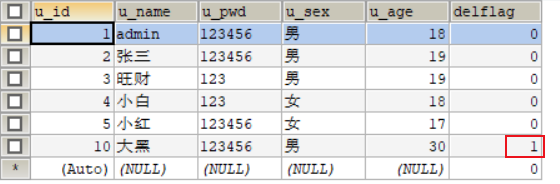
删除用户信息(逻辑删除)


-
静态资源布局如下:

SSM-CRUD所需jar包


 1153
1153


 被折叠的 条评论
为什么被折叠?
被折叠的 条评论
为什么被折叠?
 到【灌水乐园】发言


