


提示:文章写完后,目录可以自动生成,如何生成可参考右边的帮助文档
文章目录
前言
简单的搭建一个springboot项目,并深入springboot的精髓
springboot相对于spring做了什么升级与优化
1、优化了bean对象注入ioc容器的过程 – 自动装配
2、统一配置管理 application.yml
3、集成Tomcat容器
目的:为了简化项目的搭建和开发
spring项目搭建
1、idea创建maven项目,pom文件引入springboot依赖
<?xml version="1.0" encoding="UTF-8"?>
<project xmlns="http://maven.apache.org/POM/4.0.0"
         xmlns:xsi="http://www.w3.org/2001/XMLSchema-instance"
         xsi:schemaLocation="http://maven.apache.org/POM/4.0.0 http://maven.apache.org/xsd/maven-4.0.0.xsd">
    <modelVersion>4.0.0</modelVersion>

    <groupId>org.example</groupId>
    <artifactId>springboot-auto-demo</artifactId>
    <version>1.0-SNAPSHOT</version>
    <parent>
        <groupId>org.springframework.boot</groupId>
        <artifactId>spring-boot-starter-parent</artifactId>
        <version>2.7.0</version>
    </parent>
    <properties>
        <maven.compiler.source>8</maven.compiler.source>
        <maven.compiler.target>8</maven.compiler.target>
        <project.build.sourceEncoding>UTF-8</project.build.sourceEncoding>
    </properties>


    <!--内置属性-->
    <dependencies>
        <!--Spring Boot核心启动器,包含了自动配置、日志和YAML-->
        <dependency>
            <groupId>org.springframework.boot</groupId>
            <artifactId>spring-boot-starter</artifactId>
        </dependency>
        <!--支持常规的测试依赖,包括JUnit、Hamcrest、Mockito以及spring-test模块。-->
        <dependency>
            <groupId>org.springframework.boot</groupId>
            <artifactId>spring-boot-starter-test</artifactId>
            <scope>test</scope>
        </dependency>

    </dependencies>
    <!--编译打包-->
    <build>
        <plugins>
            <plugin>
                <groupId>org.springframework.boot</groupId>
                <artifactId>spring-boot-maven-plugin</artifactId>
                <version>2.3.3.RELEASE</version>
                <executions>
                    <execution>
                        <goals>
                            <goal>repackage</goal>
                        </goals>
                    </execution>
                </executions>
            </plugin>
        </plugins>
    </build>

</project>
2、创建启动类
import org.springframework.boot.SpringApplication;
import org.springframework.boot.autoconfigure.SpringBootApplication;
import org.springframework.context.ApplicationContext;

@SpringBootApplication
public class AutoApplication {
    public static void main(String[] args) {
        ApplicationContext ac = SpringApplication.run(AutoApplication.class, args);
    }
}
简单的两步就完成了
1、pom.xml:Maven 项目文件,用于管理:源代码、配置文件、开发者的信息和角色、问题追踪系统、组织信息、项目授权、项目的url、项目的依赖关系等等。
2、springboot启动类,这里是真正实现springboot逻辑的地方
1、自动装配
通过启动类入手,我们发现该启动类存在两个核心内容,一个是@SpringBootApplication注解,一个是SpringApplication.run()方法。
1.1、@SpringBootApplication
类关系图
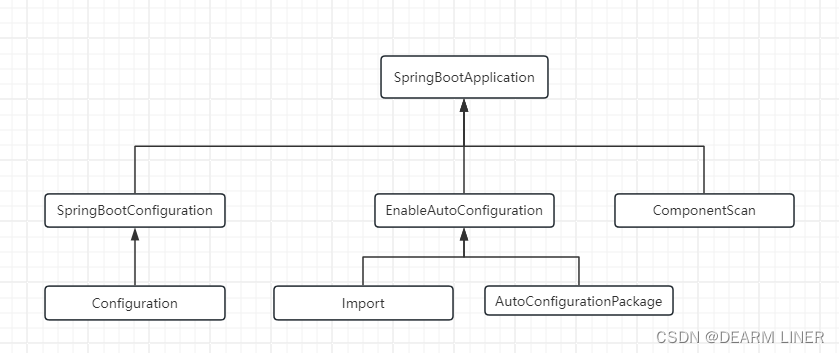
- @SpringBootConfiguration:标注当前类是Configuration配置类,
- @ComponentScan:springboot会自动扫描包路径下面的带有指定注解的类,自动装配到ioc容器里。其作用等同于<context:component-scan base-package=“org.example” />配置
- @EnableAutoConfiguration:
-
@Import: 自动装配的核心注解,可以引入三种类型的类
1. 实现了ImportSelector接口的类,这种情况下又判断是否实现了DeferredImportSelector接口,会有不同的处理逻辑, 实现了DeferredImportSelector接口的类,最终会调用到其内部接口DeferredImportSelector.Group的process方法,否则,如果没 有实现DeferredImportSelector接口,则会调用到ImportSelector的getImports方法。
2. 实现了ImportBeanDefinitionRegistrar接口的类,通过将BeanDefinition注册到Spring容器中从而实现bean加载。
3. Configuration配置类、普通类,可以直接加载到SpringIoC容器中。 -
@AutoConfigurationPackage:导入AutoConfigurationPackages.Registrar 类【其中 ImportBeanDefinitionRegistrar 用于存储导入配置的基础包信息】,将基础包及其子包注册到 AutoConfigurationPackages 中,以便实现自动配置的功能。
-
上面的注解中,核心注解是@Import,通过@Import导入的类实现ImportSelector接口,通过selectImport方法就是去找需要注入的配置类。而selectImport找的过程用到了SPI机制,去META-INF/spring.factories文件找相关的配置类。
	public String[] selectImports(AnnotationMetadata annotationMetadata) {
        if (!this.isEnabled(annotationMetadata)) {
            return NO_IMPORTS;
        } else {
        	// 获取所有需要自动装配的Configuration Entry
            AutoConfigurationImportSelector.AutoConfigurationEntry autoConfigurationEntry = this.getAutoConfigurationEntry(annotationMetadata);
            return StringUtils.toStringArray(autoConfigurationEntry.getConfigurations());
        }
    }

	protected AutoConfigurationImportSelector.AutoConfigurationEntry getAutoConfigurationEntry(AnnotationMetadata annotationMetadata) {
        if (!this.isEnabled(annotationMetadata)) {
            return EMPTY_ENTRY;
        } else {
        	// 获取注解所有属性/属性值
            AnnotationAttributes attributes = this.getAttributes(annotationMetadata);
            // 获取 META-INF/spring.factories 所有的 Configuration 配置类
            List<String> configurations = this.getCandidateConfigurations(annotationMetadata, attributes);
            // 去除重复的配置类
            configurations = this.removeDuplicates(configurations);
            Set<String> exclusions = this.getExclusions(annotationMetadata, attributes);
            this.checkExcludedClasses(configurations, exclusions);
            configurations.removeAll(exclusions);
            // this.getConfigurationClassFilter(),根据maven 导入的启动器过滤出 需要导入的配置类
            // 过滤依据:主要根据 spring-autoconfigure-metadata.properties 文件进行过滤
            configurations = this.getConfigurationClassFilter().filter(configurations);
            this.fireAutoConfigurationImportEvents(configurations, exclusions);
            return new AutoConfigurationImportSelector.AutoConfigurationEntry(configurations, exclusions);
        }
    }

 	protected List<String> getCandidateConfigurations(AnnotationMetadata metadata, AnnotationAttributes attributes) {
 		// 获取 META-INF/spring.factories 所有的 Configuration 配置类
        List<String> configurations = SpringFactoriesLoader.loadFactoryNames(this.getSpringFactoriesLoaderFactoryClass(), this.getBeanClassLoader());
        Assert.notEmpty(configurations, "No auto configuration classes found in META-INF/spring.factories. If you are using a custom packaging, make sure that file is correct.");
        return configurations;
    }

    public static List<String> loadFactoryNames(Class<?> factoryType, @Nullable ClassLoader classLoader) {
        ClassLoader classLoaderToUse = classLoader;
        if (classLoader == null) {
            classLoaderToUse = org.springframework.core.io.support.SpringFactoriesLoader.class.getClassLoader();
        }

        String factoryTypeName = factoryType.getName();
        // 获取 META-INF/spring.factories 所有的 Configuration 配置类
        return (List)loadSpringFactories(classLoaderToUse).getOrDefault(factoryTypeName, Collections.emptyList());
    }

	private static Map<String, List<String>> loadSpringFactories(ClassLoader classLoader) {
        Map<String, List<String>> result = (Map)cache.get(classLoader);
        if (result != null) {
            return result;
        } else {
            Map<String, List<String>> result = new HashMap();

            try {
            	// 获取 META-INF/spring.factories 所有的 Configuration 配置类
                Enumeration<URL> urls = classLoader.getResources("META-INF/spring.factories");

                while(urls.hasMoreElements()) {
                    URL url = (URL)urls.nextElement();
                    UrlResource resource = new UrlResource(url);
                    Properties properties = PropertiesLoaderUtils.loadProperties(resource);
                }
                ~~~省略部分代码~~~

        }
    }
1.2、SpringApplication.run()
public ConfigurableApplicationContext run(String... args) {
		// 创建一个 StopWatch 对象,记录run()启动时长
        StopWatch stopWatch = new StopWatch();
        stopWatch.start();
        // 创建bootstrap上下文
        DefaultBootstrapContext bootstrapContext = this.createBootstrapContext();
        ConfigurableApplicationContext context = null;
        this.configureHeadlessProperty();
        // 从类路径下的 META-INF/spring.factories文件中获取所有对应SpringApplicationRunListener的全路径数组
        SpringApplicationRunListeners listeners = this.getRunListeners(args);
        // 启动SpringApplicationRunListener
        listeners.starting(bootstrapContext, this.mainApplicationClass);

        try {
        	// 加载application.properties和外部的属性配置
            ApplicationArguments applicationArguments = new DefaultApplicationArguments(args);
            // 根据监听器和默认的参数,准备spring环境
            ConfigurableEnvironment environment = this.prepareEnvironment(listeners, bootstrapContext, applicationArguments);
            this.configureIgnoreBeanInfo(environment);
            // 打印Banner,可以自定义启动logo(在resources路径下创建一个banner.txt文件,将你想打印的图标放入其中)
            Banner printedBanner = this.printBanner(environment);
            // 创建 ApplicationContext 容器,根据WebApplicationType 类型决定创建容器类型
            // WebApplicationType:NONE,不启动内嵌的WebServer,不是运行web application
            // WebApplicationType:SERVLET,启动内嵌的基于servlet的web server
            // WebApplicationType:REACTIVE,启动内嵌的reactive web server,这个application是一个reactive web application
            context = this.createApplicationContext();
            context.setApplicationStartup(this.applicationStartup);
            // 准备应用上下文,在refresh前加载并执行所有的ConfigurableApplicationContext的initialize 方法。
            this.prepareContext(bootstrapContext, context, environment, listeners, applicationArguments, printedBanner);
            /*************刷新容器,初始化ioc容器,向容器中加入配置类、组件,触发自动配置功能***************/
            this.refreshContext(context);
            // 执行Spring容器初始化的后置处理
            this.afterRefresh(context, applicationArguments);
            stopWatch.stop();
            if (this.logStartupInfo) {
                (new StartupInfoLogger(this.mainApplicationClass)).logStarted(this.getApplicationLog(), stopWatch);
            }

            listeners.started(context);
            // 执行callRunners, 支持自定义run方法
            this.callRunners(context, applicationArguments);
        } catch (Throwable var10) {
            this.handleRunFailure(context, var10, listeners);
            throw new IllegalStateException(var10);
        }

        try {
            listeners.running(context);
            return context;
        } catch (Throwable var9) {
            this.handleRunFailure(context, var9, (SpringApplicationRunListeners)null);
            throw new IllegalStateException(var9);
        }
    }
main方法启动——>执行run方法——>refreshContext(就是spring的核心流程)——> refresh() 刷新容器 ——>i nvokeBeanFactoryPostProcessors会扫描到Import注解,然后如果某个类带有该注解,则会通过反射机制实例化,并且调用selectImport方法,实际上selectImport方法就是去找需要注入的配置类(@Configuration)。读取完配置类后走spring的bean初始化流程,实现自动装配机制。
是不是还有点疑惑,那是谁来完成这个配置类的编写呢?这个时候就用到的starter机制了,这个在下个文章中会介绍。
2、统一配置管理
1、SpringApplication.run(),找到相关的配置文件,加入解析到到environment中的集合对象MutablePropertySources中
从SpringApplication.run()出发,我们通过代码找到如何进行配置的管理的
	public ConfigurableApplicationContext run(String... args) {
		// 根据监听器和默认的参数,准备spring环境
        ConfigurableEnvironment environment = this.prepareEnvironment(listeners, bootstrapContext, applicationArguments);
        this.configureIgnoreBeanInfo(environment);
	}
    private ConfigurableEnvironment prepareEnvironment(
            SpringApplicationRunListeners listeners,
            ApplicationArguments applicationArguments) {
        // 1.取得当前环境或者创建一个环境:SERVLET,REACTIVE,NONE ,我们属于SERVLET
        ConfigurableEnvironment environment = getOrCreateEnvironment();
        // 2.配置环境
        configureEnvironment(environment, applicationArguments.getSourceArgs());
        // 3.加载配置文件.通过ApplicationEnvironmentPreparedEvent事件发布,执行对应的监听器事件
        listeners.environmentPrepared(environment);
        // 4.绑定环境到SpringApplication
        bindToSpringApplication(environment);
        if (!this.isCustomEnvironment) {
            environment = new EnvironmentConverter(getClassLoader())
                    .convertEnvironmentIfNecessary(environment, deduceEnvironmentClass());
        }
        ConfigurationPropertySources.attach(environment);
        return environment;
    }

    protected void configureEnvironment(ConfigurableEnvironment environment,
                                        String[] args) {
        if (this.addConversionService) {
            ConversionService conversionService = ApplicationConversionService
                    .getSharedInstance();
            environment.setConversionService(
                    (ConfigurableConversionService) conversionService);
        }
        // 加载启动命令行配置属性
        configurePropertySources(environment, args);
        // 设置active属性
        configureProfiles(environment, args);
    }

    protected void configurePropertySources(ConfigurableEnvironment environment,
                                            String[] args) {
        // 获取环境中的配置信息
        MutablePropertySources sources = environment.getPropertySources();
        // 若默认配置不为空,则添加默认配置defaultProperties
        if (this.defaultProperties != null && !this.defaultProperties.isEmpty()) {
            sources.addLast(
                    new MapPropertySource("defaultProperties", this.defaultProperties));
        }
        // 加载命令行的配置
        if (this.addCommandLineProperties && args.length > 0) {
            String name = CommandLinePropertySource.COMMAND_LINE_PROPERTY_SOURCE_NAME;
            if (sources.contains(name)) {
                PropertySource<?> source = sources.get(name);
                CompositePropertySource composite = new CompositePropertySource(name);
                composite.addPropertySource(new SimpleCommandLinePropertySource(
                        "springApplicationCommandLineArgs", args));
                composite.addPropertySource(source);
                sources.replace(name, composite);
            }
            else {
                sources.addFirst(new SimpleCommandLinePropertySource(args));
            }
        }
    }

    // configureProfiles设置active属性
    protected void configureProfiles(ConfigurableEnvironment environment, String[] args) {
        environment.getActiveProfiles(); // ensure they are initialized
        // But these ones should go first (last wins in a property key clash)
        Set<String> profiles = new LinkedHashSet<>(this.additionalProfiles);
        profiles.addAll(Arrays.asList(environment.getActiveProfiles()));
        environment.setActiveProfiles(StringUtils.toStringArray(profiles));
    }

    @Override
    public void environmentPrepared(ConfigurableEnvironment environment) {
        this.initialMulticaster.multicastEvent(new ApplicationEnvironmentPreparedEvent(
                this.application, this.args, environment));
    }

    @Override
    public void multicastEvent(ApplicationEvent event) {
        multicastEvent(event, resolveDefaultEventType(event));
    }
    @Override
    public void multicastEvent(final ApplicationEvent event, @Nullable ResolvableType eventType) {
        ResolvableType type = (eventType != null ? eventType : resolveDefaultEventType(event));
        for (final ApplicationListener<?> listener : getApplicationListeners(event, type)) {
            Executor executor = getTaskExecutor();
            if (executor != null) {
                executor.execute(() -> invokeListener(listener, event));
            }
            else {
                invokeListener(listener, event);
            }
        }
    }
    private void onApplicationEnvironmentPreparedEvent(
            ApplicationEnvironmentPreparedEvent event) {
        // 加载spring.factories配置文件中的EnvironmentPostProcessor信息
        List<EnvironmentPostProcessor> postProcessors = loadPostProcessors();
        // 添加监听器ConfigFileApplicationListener到postProcessors
        postProcessors.add(this);
        AnnotationAwareOrderComparator.sort(postProcessors);
        // 执行EnvironmentPostProcessor和监听器事件逻辑
        for (EnvironmentPostProcessor postProcessor : postProcessors) {
            postProcessor.postProcessEnvironment(event.getEnvironment(),
                    event.getSpringApplication());
        }
    }

    protected void addPropertySources(ConfigurableEnvironment environment,
                                      ResourceLoader resourceLoader) {
        RandomValuePropertySource.addToEnvironment(environment);
        new Loader(environment, resourceLoader).load();
    }
    public void load() {
        // LIFO队列
        this.profiles = new LinkedList<>();
        // 已经处理的文件
        this.processedProfiles = new LinkedList<>();
        // 已激活文件
        this.activatedProfiles = false;
        this.loaded = new LinkedHashMap<>();
        // 初始化
        initializeProfiles();
        // 解析文件
        while (!this.profiles.isEmpty()) {
            Profile profile = this.profiles.poll();
            // 添加已激活配置文件到环境
            if (profile != null && !profile.isDefaultProfile()) {
                addProfileToEnvironment(profile.getName());
            }
            // 获取默认配置文件路径,循环加载配置文件(不检查是否已经存在)
            load(profile, this::getPositiveProfileFilter,
                    addToLoaded(MutablePropertySources::addLast, false));
            this.processedProfiles.add(profile);
        }
        // 重置已经处理的文件
        resetEnvironmentProfiles(this.processedProfiles);
        // 对加载过的配置文件进行排序(排序就会检查是否存在)
        load(null, this::getNegativeProfileFilter,
                addToLoaded(MutablePropertySources::addFirst, true));
        // 添加解析完的配置文件到environment中的集合对象MutablePropertySources中
        addLoadedPropertySources();
    }
    private void initializeProfiles() {
        this.profiles.add(null);
        // 取得已激活配置文件,如spring.profiles.active指定的application.yaml文件
        Set<Profile> activatedViaProperty = getProfilesActivatedViaProperty();
        this.profiles.addAll(getOtherActiveProfiles(activatedViaProperty));
        addActiveProfiles(activatedViaProperty);
        // 如没有已激活配置文件,则新建一个默认的配置文件
        if (this.profiles.size() == 1) { // only has null profile
            for (String defaultProfileName : this.environment.getDefaultProfiles()) {
                Profile defaultProfile = new Profile(defaultProfileName, true);
                this.profiles.add(defaultProfile);
            }
        }
    }
    // 取得已经指定的配置文件,如spring.profiles.active指定的yaml文件
    private Set<Profile> getProfilesActivatedViaProperty() {
        // 环境中没有spring.profiles.active和spring.profiles.include指定的文件,返回空
        if (!this.environment.containsProperty(ACTIVE_PROFILES_PROPERTY)
                && !this.environment.containsProperty(INCLUDE_PROFILES_PROPERTY)) {
            return Collections.emptySet();
        }
        // 返回active已经激活的配置文件
        Binder binder = Binder.get(this.environment);
        Set<Profile> activeProfiles = new LinkedHashSet<>();
        activeProfiles.addAll(getProfiles(binder, INCLUDE_PROFILES_PROPERTY));
        activeProfiles.addAll(getProfiles(binder, ACTIVE_PROFILES_PROPERTY));
        return activeProfiles;
    }
    private void load(Profile profile, DocumentFilterFactory filterFactory,
                      DocumentConsumer consumer) {
        // getSearchLocations() 获取默认的配置文件路径 "classpath:/,classpath:/config/,file:./,file:./config/"
        getSearchLocations().forEach((location) -> {
            boolean isFolder = location.endsWith("/");
            Set<String> names = isFolder ? getSearchNames() : NO_SEARCH_NAMES;
            names.forEach(
                    // 根据yaml,properties的不同来解析配置文件
                    (name) -> load(location, name, profile, filterFactory, consumer));
        });
    }
    private Set<String> getSearchLocations() {
        if (this.environment.containsProperty(CONFIG_LOCATION_PROPERTY)) {
            return getSearchLocations(CONFIG_LOCATION_PROPERTY);
        }
        // String DEFAULT_SEARCH_LOCATIONS = "classpath:/,classpath:/config/,file:./,file:./config/";
        Set<String> locations = getSearchLocations(
                CONFIG_ADDITIONAL_LOCATION_PROPERTY);
        locations.addAll(
                asResolvedSet(ConfigFileApplicationListener.this.searchLocations,
                        DEFAULT_SEARCH_LOCATIONS));
        return locations;
    }
简单来说,分为以下4步
- 初始化环境为SERVLET
- 通过ApplicationEnvironmentPreparedEvent事件发布,执行对应的监听器事件
- 配置运行spring.profiles.active的配置文件
- 将 classpath:/,classpath:/config/,file:./,file:./config/ 路径下的配置文件解析到到environment中的集合对象MutablePropertySources中
2、自动装配类PropertyPlaceholderAutoConfiguration,将PropertySources的配置解析到BeanDefinition中
接下来我们把目光放到PropertyPlaceholderAutoConfiguration自动装配类
@AutoConfiguration
@AutoConfigureOrder(Ordered.HIGHEST_PRECEDENCE)
public class PropertyPlaceholderAutoConfiguration {
	@Bean
	@ConditionalOnMissingBean(search = SearchStrategy.CURRENT)
	public static PropertySourcesPlaceholderConfigurer propertySourcesPlaceholderConfigurer() {
		return new PropertySourcesPlaceholderConfigurer();
	}
}
public class PropertySourcesPlaceholderConfigurer extends PlaceholderConfigurerSupport implements EnvironmentAware {

        // 本地的
        public static final String LOCAL_PROPERTIES_PROPERTY_SOURCE_NAME = "localProperties";
        // 环境信息
        public static final String ENVIRONMENT_PROPERTIES_PROPERTY_SOURCE_NAME = "environmentProperties";
        // 这三个哥们  到此处应该已经非常熟悉了
        @Nullable
        private MutablePropertySources propertySources; // 注意此处:它只表示当前的环境持有的~~~~
        @Nullable
        private PropertySources appliedPropertySources;
        @Nullable
        private Environment environment; // 当前bean所处的环境~
        // 显然,~~并不建议直接set
        public void setPropertySources(PropertySources propertySources) {
            this.propertySources = new MutablePropertySources(propertySources);
        }
        // 此处:它完全重写了Bean工厂后置处理器的处理方法~~~~~
        @Override
        public void postProcessBeanFactory(ConfigurableListableBeanFactory beanFactory) throws BeansException {
            // 若propertySources还没构造,就先构造一个出来~~~~~
            if (this.propertySources == null) {
                this.propertySources = new MutablePropertySources();
                if (this.environment != null) {
                    // 此处把当前环境都放进去了,所以占位符可以使用当前环境Environment内的任何key了
                    this.propertySources.addLast(
                            new PropertySource<Environment>(ENVIRONMENT_PROPERTIES_PROPERTY_SOURCE_NAME, this.environment) {
                                @Override
                                @Nullable
                                public String getProperty(String key) {
                                    return this.source.getProperty(key);
                                }
                            }
                    );
                }
                try {
                    // 把本地的也作为一个source加进去  注意此处可能是addFirst和addLast~~~
                    // key为:localProperties
                    PropertySource<?> localPropertySource = new PropertiesPropertySource(LOCAL_PROPERTIES_PROPERTY_SOURCE_NAME, mergeProperties());
                    if (this.localOverride) {
                        this.propertySources.addFirst(localPropertySource);
                    }
                    else {
                        this.propertySources.addLast(localPropertySource);
                    }
                }
                catch (IOException ex) {
                    throw new BeanInitializationException("Could not load properties", ex);
                }
            }
            processProperties(beanFactory, new PropertySourcesPropertyResolver(this.propertySources));
            // 表示最终生效的 propertySources
            this.appliedPropertySources = this.propertySources;
        }
        protected void processProperties(ConfigurableListableBeanFactory beanFactoryToProcess,
                                         final ConfigurablePropertyResolver propertyResolver) throws BeansException {
            // 设置ConfigurablePropertyResolver的几大参数~~~
            propertyResolver.setPlaceholderPrefix(this.placeholderPrefix);
            propertyResolver.setPlaceholderSuffix(this.placeholderSuffix);
            propertyResolver.setValueSeparator(this.valueSeparator);
            // 使用lambda表达式创建一个StringValueResolver~~~~
            StringValueResolver valueResolver = strVal -> {
                // 解析占位符~~~~~ 此处只能解析占位符
                String resolved = (this.ignoreUnresolvablePlaceholders ?
                        propertyResolver.resolvePlaceholders(strVal) :
                        propertyResolver.resolveRequiredPlaceholders(strVal));
                if (this.trimValues) {
                    resolved = resolved.trim();
                }
                // 返回null还是返回resolved  最后还得有个判断
                return (resolved.equals(this.nullValue) ? null : resolved);
            };
            // 调用父类的doProcessProperties  把属性扫描到Bean的身上去~~~
            // 并且我们发现 我们自定义的EmbeddedValueResolver是会被添加到bean工厂里面的
            doProcessProperties(beanFactoryToProcess, valueResolver);
        }
    }

	// doProcessProperties 会调用父类 PlaceholderConfigurerSupport的
	    // @since 3.1  实现了EnvironmentAware 接口可以得到自己所在的环境
    //  它实现了BeanFactoryAware 接口  所以它知道自己的容器是谁。
    public abstract class PlaceholderConfigurerSupport extends PropertyResourceConfigurer implements BeanNameAware, BeanFactoryAware {

        // 这三个符号已经非常熟悉了~  参考:AbstractPropertyResolver
        public static final String DEFAULT_PLACEHOLDER_PREFIX = "${";
        public static final String DEFAULT_PLACEHOLDER_SUFFIX = "}";
        public static final String DEFAULT_VALUE_SEPARATOR = ":";
        protected String placeholderPrefix = DEFAULT_PLACEHOLDER_PREFIX;
        protected String placeholderSuffix = DEFAULT_PLACEHOLDER_SUFFIX;
        @Nullable
        protected String valueSeparator = DEFAULT_VALUE_SEPARATOR;

        // 默认不trim(其实我建议trim 否则太容器出错了)
        protected boolean trimValues = false;

        @Nullable
        protected String nullValue;
        protected boolean ignoreUnresolvablePlaceholders = false;
        @Nullable
        private String beanName;
        @Nullable
        private BeanFactory beanFactory;
        //... // 生路所有的get/set方法~

        // 它并没有直接实现父类的方法processProperties,而是提供了这个do方法供子类使用~
        // 注意此处入参:要求传入一个StringValueResolver~
        protected void doProcessProperties(ConfigurableListableBeanFactory beanFactoryToProcess, StringValueResolver valueResolver) {

            // BeanDefinitionVisitor:遍历Bean的各个属性,用properties填充
            // 它会将替换的操作委托给内部的一个StringValueResolver来执行
            // 关于StringValueResolver这个上篇博文有详细讲解,出门右拐就到~
            // 此处是唯一使用BeanDefinitionVisitor这个类的地方~~~~
            BeanDefinitionVisitor visitor = new BeanDefinitionVisitor(valueResolver);

            // 获取容器中所有bean的名称
            String[] beanNames = beanFactoryToProcess.getBeanDefinitionNames();
            for (String curName : beanNames) {
                // Check that we're not parsing our own bean definition,
                // to avoid failing on unresolvable placeholders in properties file locations.
                // 确定处理的Bean不是自己,且保证自己只处理自己所在bean工厂里面的bean定义们~~别的工厂关我啥事呢~
                if (!(curName.equals(this.beanName) && beanFactoryToProcess.equals(this.beanFactory))) {
                    BeanDefinition bd = beanFactoryToProcess.getBeanDefinition(curName);
                    try {
                        // 对bean定义bd进行属性值占位符解析
                        visitor.visitBeanDefinition(bd);
                    } catch (Exception ex) {
                        throw new BeanDefinitionStoreException(bd.getResourceDescription(), curName, ex.getMessage(), ex);
                    }
                }
            }
            // New in Spring 2.5: resolve placeholders in alias target names and aliases as well.
            // 使用StringValueResolver处理一下别名~
            beanFactoryToProcess.resolveAliases(valueResolver);
            // New in Spring 3.0: resolve placeholders in embedded values such as annotation attributes.
            // 把此处理器也加入到Bean工厂里吧~~~~ 赋能bean工厂  使用过的处理器都加进来
            beanFactoryToProcess.addEmbeddedValueResolver(valueResolver);
        }
    }
配置文件的运作流程整个逻辑代码是挺好理解的,并不复杂,稍微花点心,就看懂了,逻辑总结起来不外乎几步:
获取配置文件,转化为propertySources
构造基于propertySources的解析器valueResolver
获取BeanDefinitions,遍历,并对占位符逐一解析并替换
3、集成Tomcat容器
在refresh()核心方法中
	@Override
	protected void onRefresh() {
		super.onRefresh();
		try {
			// 创建tomcat服务器
			createWebServer();
		}
		catch (Throwable ex) {
			throw new ApplicationContextException("Unable to start web server", ex);
		}
	}
	private void createWebServer() {
        WebServer webServer = this.webServer;
        ServletContext servletContext = getServletContext();
        if (webServer == null && servletContext == null) {
            StartupStep createWebServer = this.getApplicationStartup().start("spring.boot.webserver.create");
            // 获取tomcat容器工厂
            ServletWebServerFactory factory = getWebServerFactory();
            createWebServer.tag("factory", factory.getClass().toString());
            // 获取tomcat容器,并启动Tomcat容器
            this.webServer = factory.getWebServer(getSelfInitializer());
            createWebServer.end();
            getBeanFactory().registerSingleton("webServerGracefulShutdown",
                    new WebServerGracefulShutdownLifecycle(this.webServer));
            getBeanFactory().registerSingleton("webServerStartStop",
                    new WebServerStartStopLifecycle(this, this.webServer));
        }
        else if (servletContext != null) {
            try {
                getSelfInitializer().onStartup(servletContext);
            }
            catch (ServletException ex) {
                throw new ApplicationContextException("Cannot initialize servlet context", ex);
            }
        }
        initPropertySources();
    }
总的来说,springboot做的优化项简化了系统的搭建过程和系统的开发,实现微服务的快速部署


 238
238

 被折叠的 条评论
为什么被折叠?
被折叠的 条评论
为什么被折叠?
 到【灌水乐园】发言


