


Nginx
参考
环境
系统:ubuntu 18
安装
首先确保ubuntu的镜像源是最新的
apt-get update
apt-get upgrade
如果update失败,请更换镜像源试一下:
清华镜像源:https://mirrors.tuna.tsinghua.edu.cn/
更换镜像源
打开网站,搜索中填写对应系统Ubuntu,然后点击搜索结果ubuntu右边的问号

点击问号后选择你的ubuntu版本,我的是18.04
查看ubuntu版本命令:lsb_release -a 或者 cat /etc/issue 都可以
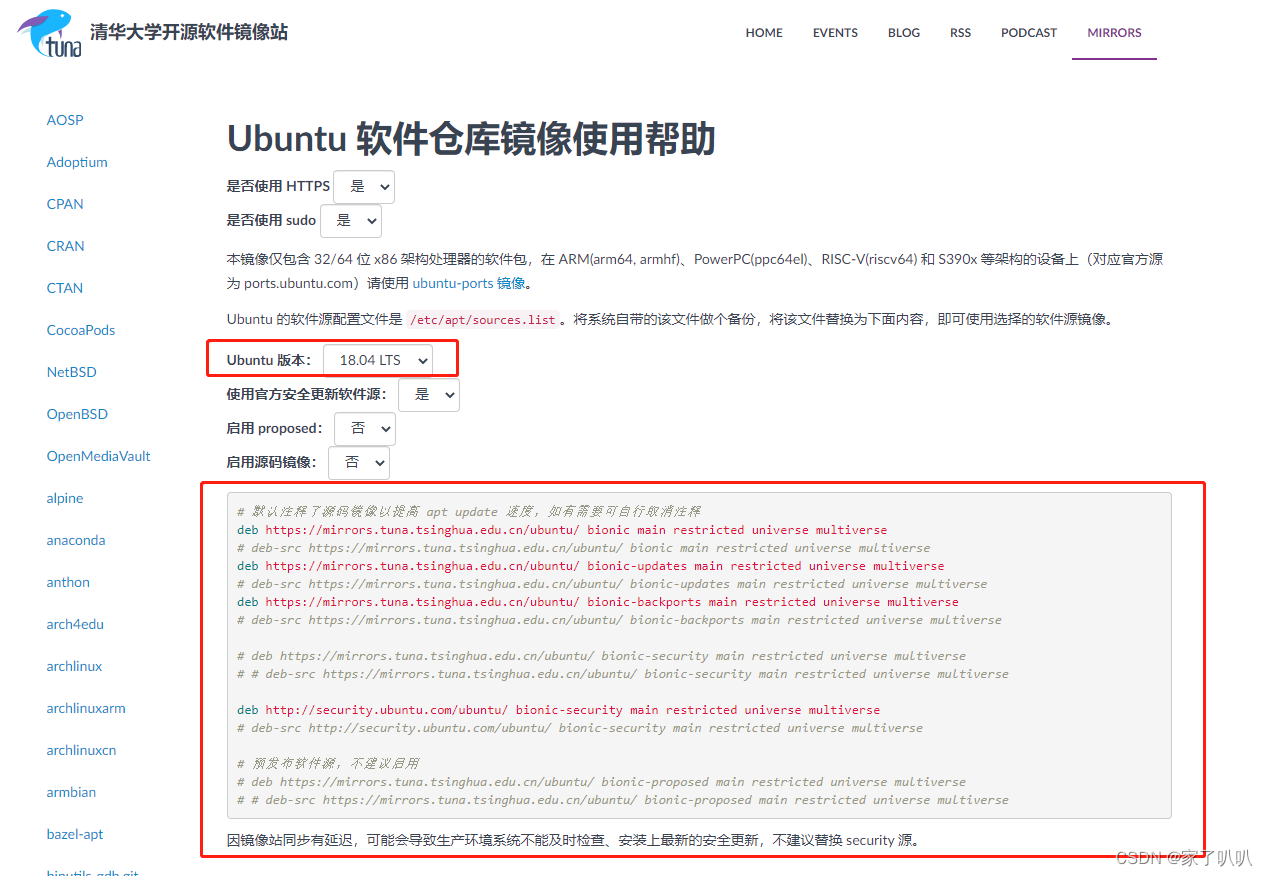
修改镜像源加载文件
文件位置(Ubuntu):etc/apt/sources.list
建议将原来的sources.list文件备份,cp etc/apt/sources.list etc/apt/sources.list.bk
然后将清华镜像源文件内容修改至你的sources.list中即可
修改完毕后:
apt-get update
apt-get upgrade
安装Nginx
命令:
apt-get install nginx -y
查看nginx服务状态,安装完成后nginx服务应该是active状态
systemctl status nginx
配置防火墙策略,允许Nginx 的流量通过
ufw allow ‘Nginx Full’
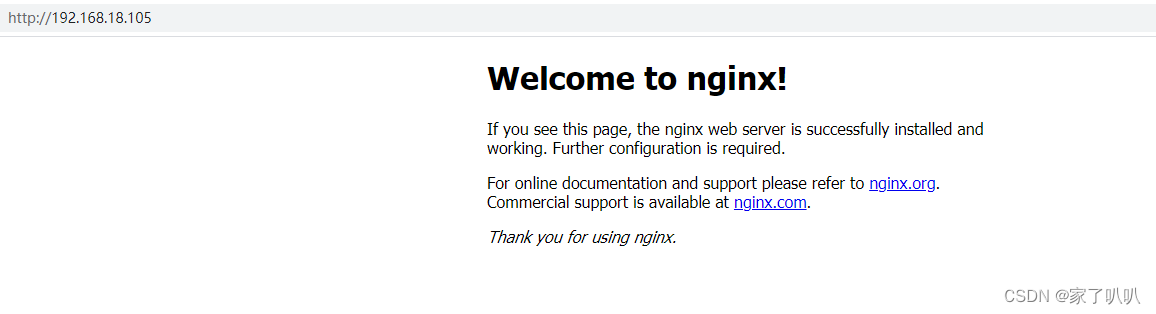
此时,nginx安装完毕,在同一网络中的设备用浏览器访问nginx服务器ip时页面如下
配置
Nginx配置文件位置:/etc/nginx/nginx.conf
如下是一个基础的https代理配置内容,配置中用到了ssl证书,ssl证书可以去阿里云、百度云、腾讯云等购买,然后签发证书再配置到服务器中
或者使用openssl工具自己进行签发(自签名证书不会被公共信任机构认可,因此只能用于测试或内部环境):OpenSSL签发证书
user www-data;
worker_processes auto;
pid /run/nginx.pid;
include /etc/nginx/modules-enabled/*.conf;

events {
        worker_connections 768;
        # multi_accept on;
}

http {

        ##
        # Basic Settings
        ##

        sendfile on;
        tcp_nopush on;
        tcp_nodelay on;
        keepalive_timeout 65;
        types_hash_max_size 2048;
        # server_tokens off;

        # server_names_hash_bucket_size 64;
        # server_name_in_redirect off;

        include /etc/nginx/mime.types;
        default_type application/octet-stream;

        ##
        # SSL Settings
        ##

        ssl_protocols TLSv1 TLSv1.1 TLSv1.2; # Dropping SSLv3, ref: POODLE
        ssl_prefer_server_ciphers on;

        ##
        # Logging Settings
        ##

        access_log /var/log/nginx/access.log;
        error_log /var/log/nginx/error.log;

        ##
        # Gzip Settings
        ##

        gzip on;

        # gzip_vary on;
        # gzip_proxied any;
        # gzip_comp_level 6;
        # gzip_buffers 16 8k;
        # gzip_http_version 1.1;
        # gzip_types text/plain text/css application/json application/javascript text/xml application/xml application/xml+rss text/javascript;

        ##
        # Virtual Host Configs
        ##
#################################其他部分为Nginx配置默认值###############################################
        server {
        listen       443 ssl;  #监听的端口号,也可以写成 IP:端口 的形式。ssl访问(https)
        server_name  localhost;#域名,注意当listen中出现了IP时,此字段的配置就失去作用了

        ssl_certificate      cert.pem;#证书文件路径 默认/etc/nginx/
        ssl_certificate_key  key.pem;#私钥文件路径 默认/etc/nginx/

        ssl_session_cache    shared:SSL:1m;#启用SSL Session 缓存,减少TLS反复验证;(1M内存可以缓存4000个连接)
        ssl_session_timeout  5m;#5分钟链接超时关闭时间

		#用于配置Nginx服务器支持的SSL/TLS密钥交换算法和加密算法
		#ssl_ciphers 允许指定所支持的密码套件,以及控制使用哪些算法进行加密
		#ssl_ciphers "TLS_AES_256_GCM_SHA384:TLS_CHACHA20_POLY1305_SHA256:TLS_AES_128_GCM_SHA256";#使用现代密码套件
        ssl_ciphers  HIGH:!aNULL:!MD5;#使用更广泛兼容的密码套件:
        #ssl_prefer_server_ciphers 字段用于配置 Nginx 服务器在与客户端建立 SSL/TLS 连接时是否优先使用服务器端定义的密码套件(ssl_ciphers配置)
        ssl_prefer_server_ciphers  on;#将 on 设置为启用服务器端密码套件的优先级,将 off 设置为禁用。默认情况下,该字段未显式设置,相当于 off。

		#路由处理,根据请求地址路径匹配,匹配到对应的location然后进行对应的处理,location详细配置参考文章:【Nginx之locaiton规则详解】
        location / {
            root   /var/www/platform;   #web server位置
            index  index.html index.htm;#当没有访问任何文件时,则默认访问 index.html index.htm(首页)
        }

        location /platform {
           #代理到后端的请求地址
           #访问地址:https://localhost:443/platform/login
           #最终代理:http://127.0.0.1:12345/platform/login
           proxy_pass http://127.0.0.1:12345;
           #注意:如果写成proxy_pass http://127.0.0.1:12345/;
           #访问地址:https://localhost:443/platform/login
           #最终代理:http://127.0.0.1:12345/login
       }

       }
		#client_max_body_size 字段用于配置 Nginx 服务器允许接收的客户端请求体(request body)的最大大小。
		#单位:k、m、g
        client_max_body_size 50m;#限定request body最大50兆

        # include /etc/nginx/conf.d/*.conf;   #如果用不到就可以注释掉
        # include /etc/nginx/sites-enabled/*; #如果用不到就可以注释掉
####################################################################################################
}


#配置Nginx邮件代理服务器,用Nginx接收和转发电子邮件
#mail {
#       # See sample authentication script at:
#       # http://wiki.nginx.org/ImapAuthenticateWithApachePhpScript
#
#       # auth_http localhost/auth.php;
#       # pop3_capabilities "TOP" "USER";
#       # imap_capabilities "IMAP4rev1" "UIDPLUS";
#
#       server {
#               listen     localhost:110;
#               protocol   pop3;
#               proxy      on;
#       }
#
#       server {
#               listen     localhost:143;
#               protocol   imap;
#               proxy      on;
#       }
#}
修改完配置文件后,检查配置文件语法:
nginx -t
重新启动nginx:
srvice nginx reload
或者
systemctl restart nginx


 119
119


 被折叠的 条评论
为什么被折叠?
被折叠的 条评论
为什么被折叠?
 到【灌水乐园】发言


