登录时的图形验证码——Springboot项目

一、使用场景

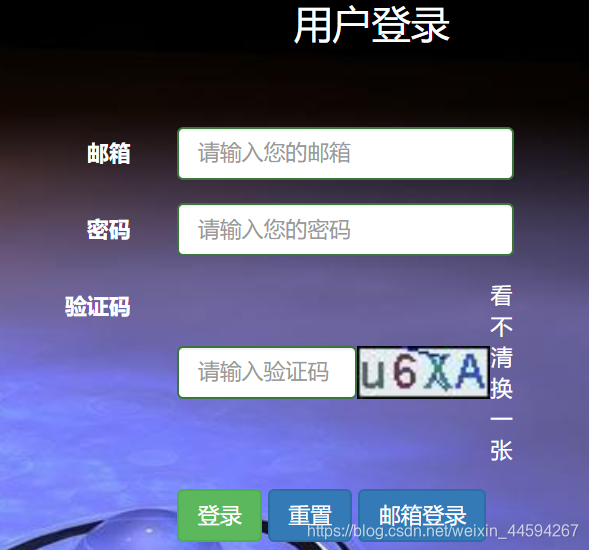
在网站登录时,一般会使用到图形验证码进行登录验证。如图:
在这里插入图片描述

二、 实现思路

主要有两个步骤,如下:
1、验证码图像的产生:用一个工具类Code(无返回值),该工具类主要是用来在页面显示验证码图像和获取验证码。
① 输出图像到页面:ImageIO.write(image, “JPEG”, os);
② 获取验证码:session.setAttribute(“code”, result);
2、验证码图形的刷新:在网页上写一个refreshCode函数。

三、具体实现

step1:写Code工具类,该类的静态方法getCode()产生随机验证码和输出图像到页面

//封装生成验证码的工具类
public class Code {
    private static char code[] = {'a', 'b', 'c', 'd', 'e', 'f', 'g', 'h', 'i', 'j',
            'k', 'm', 'n', 'p', 'q', 'r', 's', 't', 'u', 'v', 'w', 'x', 'y',
            'z', 'A', 'B', 'C', 'D', 'E', 'F', 'G', 'H', 'J', 'K', 'L', 'M',
            'N', 'P', 'Q', 'R', 'S', 'T', 'U', 'V', 'W', 'X', 'Y', 'Z', '2',
            '3', '4', '5', '6', '7', '8', '9'};
    private static final int WIDTH = 50;
    private static final int HEIGHT = 20;
    private static final int LENGTH = 4;
    public static void getCode(HttpServletRequest request,
                               HttpServletResponse response){
        // TODO Auto-generated method stub
        // 设置响应报头信息
        response.setHeader("Pragma", "No-cache");
        response.setHeader("Cache-Control", "no-cache");
        response.setDateHeader("Expires", 0);
        // 设置响应的MIME类型
        response.setContentType("image/jpeg");

        BufferedImage image = new BufferedImage(WIDTH, HEIGHT,
                BufferedImage.TYPE_INT_RGB);
        Font mFont = new Font("Arial", Font.TRUETYPE_FONT, 18);
        Graphics g = image.getGraphics();
        Random rd = new Random();

        // 设置背景颜色
        g.setColor(new Color(rd.nextInt(55) + 200, rd.nextInt(55) + 200, rd
                .nextInt(55) + 200));
        g.fillRect(0, 0, WIDTH, HEIGHT);

        // 设置字体
        g.setFont(mFont);

        // 画边框
        g.setColor(Color.black);
        g.drawRect(0, 0, WIDTH - 1, HEIGHT - 1);

        // 随机产生的验证码
        String result = "";
        for (int i = 0; i < LENGTH; ++i) {
            result += code[rd.nextInt(code.length)];
        }
        HttpSession session = request.getSession();
        session.setAttribute("code", result);

        // 画验证码
        for (int i = 0; i < result.length(); i++) {
            g.setColor(new Color(rd.nextInt(200), rd.nextInt(200), rd
                    .nextInt(200)));
            g.drawString(result.charAt(i) + "", 12 * i + 1, 16);
        }

        // 随机产生2个干扰线
        for (int i = 0; i < 2; i++) {
            g.setColor(new Color(rd.nextInt(200), rd.nextInt(200), rd
                    .nextInt(200)));
            int x1 = rd.nextInt(WIDTH);
            int x2 = rd.nextInt(WIDTH);
            int y1 = rd.nextInt(HEIGHT);
            int y2 = rd.nextInt(HEIGHT);
            g.drawLine(x1, y1, x2, y2);
        }

        // 释放图形资源
        g.dispose();
        try {
            OutputStream os = response.getOutputStream();

            // 输出图像到页面
            ImageIO.write(image, "JPEG", os);
        } catch (IOException e) {
            e.printStackTrace();
        }
    }

}

step2:写前端页面,文本输入框、验证码图像和刷新
在这里插入图片描述

step3:在controller层,用getCode方法,获取图像输出到step2的页面以及将验证码set到session中。
在这里插入图片描述

step4:如何刷新验证码?
还记得step2中的href="javascript:refreshCode()"吗?写一个JS函数。
因为人们可能会短时间内多次刷新验证码,其中time是用来区分验证码的
在这里插入图片描述

  • 3
    点赞
  • 19
    收藏
    觉得还不错? 一键收藏
  • 1
    评论

“相关推荐”对你有帮助么?

  • 非常没帮助
  • 没帮助
  • 一般
  • 有帮助
  • 非常有帮助
提交
评论 1
添加红包

请填写红包祝福语或标题

红包个数最小为10个

红包金额最低5元

当前余额3.43前往充值 >
需支付:10.00
成就一亿技术人!
领取后你会自动成为博主和红包主的粉丝 规则
hope_wisdom
发出的红包
实付
使用余额支付
点击重新获取
扫码支付
钱包余额 0

抵扣说明:

1.余额是钱包充值的虚拟货币,按照1:1的比例进行支付金额的抵扣。
2.余额无法直接购买下载,可以购买VIP、付费专栏及课程。

余额充值