SpringBoot2——SpringBoot入门、SpringBoot的自动配置、配置文件和开发小技巧
一、简介
Spring Boot基于Spring开发,Spimg Boot本身并不提供Spring框架的核心特性以及扩展功能,只是用于快速、敏捷地开发新一代基于Spring框架的应用程序。也就是说,它并不是用来替代Spring的解决方案,而是和Spring框架紧密结合用于提升Spring开发者体验的工具。Spring Boot以约定大于配置的核心思想,默认帮我们进行了很多设置,多数Spring Boot应用只需要很少的Spring配置。同时它集成了大量常用的第三方库配置(例如Redis.MongoDB、Jpa、RabbitMQ、Quat等等),Sping Boot应用中这些第三方库几乎可以零配置的开箱即用。
SpringBoot官网:https://spring.io/projects/spring-boot
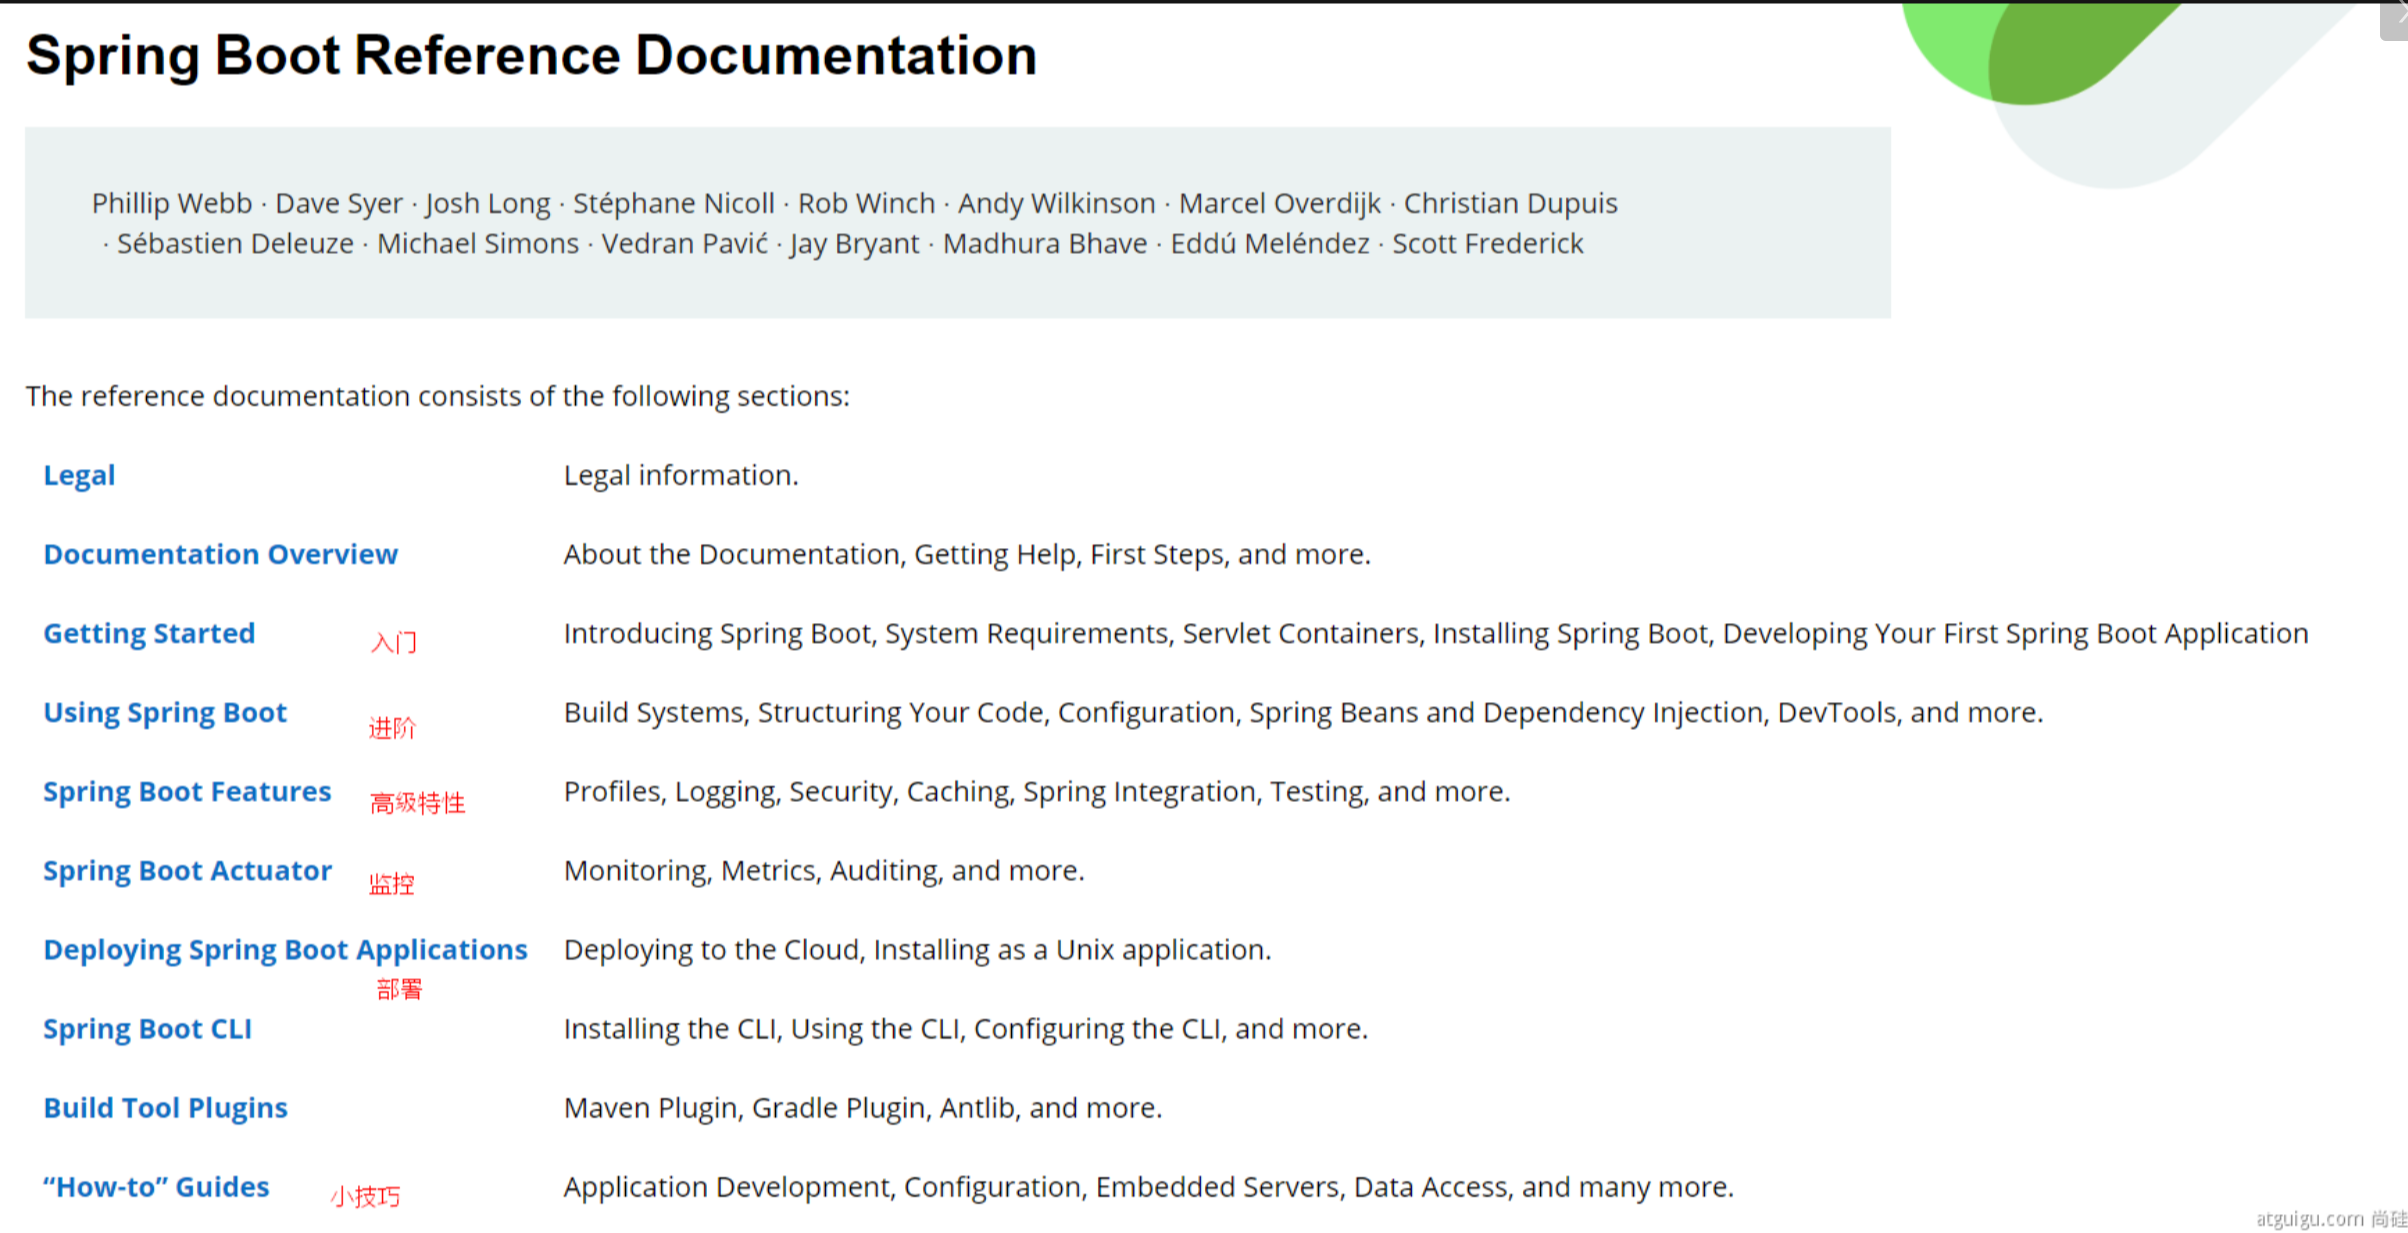
官方文档架构:

二、hello world
方式一:创建Maven项目
1 创建Maven项目
2 导入SpringBoot起步依赖
3 创建主程序
4 定义Controller
5 启动测试
6 部署
-
pom.xml加入依赖
<?xml version="1.0" encoding="UTF-8"?> <project xmlns="http://maven.apache.org/POM/4.0.0" xmlns:xsi="http://www.w3.org/2001/XMLSchema-instance" xsi:schemaLocation="http://maven.apache.org/POM/4.0.0 http://maven.apache.org/xsd/maven-4.0.0.xsd"> <modelVersion>4.0.0</modelVersion> <groupId>com.zb</groupId> <artifactId>springboot-helloworld</artifactId> <version>1.0-SNAPSHOT</version> <!--springboot工程需要继承的父工程--> <parent> <groupId>org.springframework.boot</groupId> <artifactId>spring-boot-starter-parent</artifactId> <version>2.1.8.RELEASE</version> </parent> <dependencies> <!--web开发的起步依赖--> <dependency> <groupId>org.springframework.boot</groupId> <artifactId>spring-boot-starter-web</artifactId> </dependency> </dependencies> </project> -
创建主程序
/** * 主程序类 * @SpringBootApplication:这是一个SpringBoot应用 */ @SpringBootApplication public class MainApplication { public static void main(String[] args) { SpringApplication.run(MainApplication.class); } } -
定义Controller
//@Controller //@ResponseBody @RestController//相当于@Controller和@ResponseBody public class HelloController { @RequestMapping("/hello") public String handle01() { return "Hello,Spring Boot"; } } -
测试
执行引导类中的main方法

-
部署
需要在pom.xml文件中导入插件:<build> <plugins> <plugin> <groupId>org.springframework.boot</groupId> <artifactId>spring-boot-maven-plugin</artifactId> </plugin> </plugins> </build>把项目打成jar包,直接在目标服务器执行即可
三、SpringBoot的自动配置(重点)
3.1 SpringBoot特点
3.1.1 依赖管理
-
父项目做依赖管理
依赖管理
<parent>
    <groupId>org.springframework.boot</groupId>
    <artifactId>spring-boot-starter-parent</artifactId>
    <version>2.3.4.RELEASE</version>
</parent>

他的父项目
<parent>
    <groupId>org.springframework.boot</groupId>
    <artifactId>spring-boot-dependencies</artifactId>
    <version>2.3.4.RELEASE</version>
</parent>

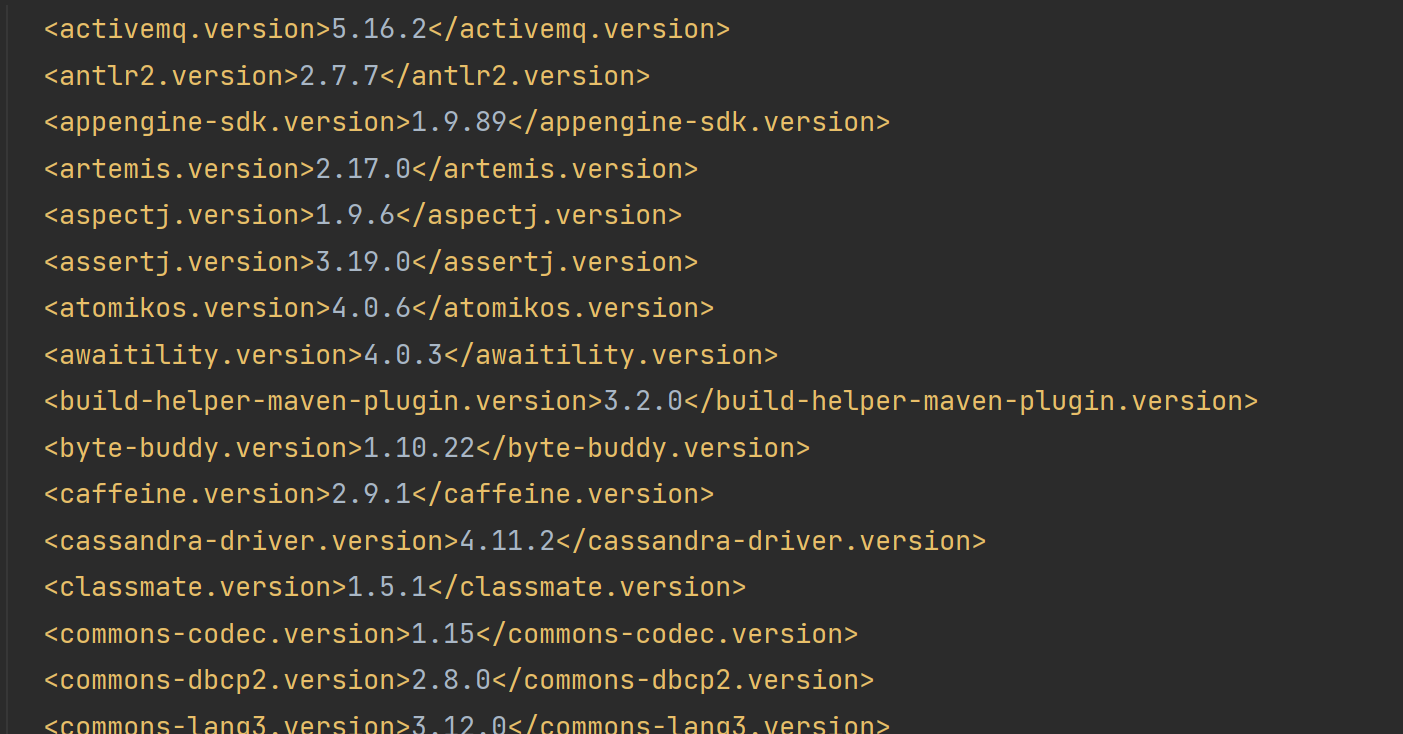
几乎声明了所有开发中常用的依赖的版本号,自动版本仲裁机制
父项目中所声明的版本号(等等)
-
开发导入starter场景启动器
1、见到很多 spring-boot-starter-* : *就某种场景
2、只要引入starter,这个场景的所有常规需要的依赖我们都自动引入
3、SpringBoot所有支持的场景
https://docs.spring.io/spring-boot/docs/current/reference/html/using-spring-boot.html#using-boot-starter
4、见到的 *-spring-boot-starter: 第三方为我们提供的简化开发的场景启动器。所有场景启动器最底层的依赖 <dependency> <groupId>org.springframework.boot</groupId> <artifactId>spring-boot-starter</artifactId> <version>2.3.4.RELEASE</version> <scope>compile</scope> </dependency> -
无需关注版本号,自动版本仲裁
1、引入依赖默认都可以不写版本 2、引入非版本仲裁的jar,要写版本号。 -
修改默认依赖版本号
1、查看spring-boot-dependencies里面规定当前依赖的版本 用的 key。
2、在当前项目里面重写配置<properties> <mysql.version>5.1.43</mysql.version> </properties>
3.1.2 自动配置
-
自动配好Tomcat(自动引入了Tomcat依赖)
在spring-boot-starter-web下存在 <dependency> <groupId>org.springframework.boot</groupId> <artifactId>spring-boot-starter-tomcat</artifactId> <version>2.5.2</version> <scope>compile</scope> </dependency> -
自动配好SpringMVC
- 引入SpringMVC全套组件
- 自动配好SpringMVC常用组件(功能)
-
自动配好Web常见功能,如:字符编码问题
SpringBoot帮我们配置好了所有web开发的常见场景
public static void main(String[] args) { //1、返回我们IOC容器 ConfigurableApplicationContext run = SpringApplication.run(MainApplication.class, args); //2、查看容器里面的组件 String[] names = run.getBeanDefinitionNames(); for (String name : names) { System.out.println(name); } } -
默认的包结构
-
主程序所在包及其下面的所有子包里面的组件都会被默认扫描进来(无需以前的包扫描配置)
-
想要改变扫描路径,
-
@SpringBootApplication(scanBasePackages=**"com.atguigu"**) -
或者
@ComponentScan指定扫描路径
@SpringBootApplication //等同于 @SpringBootConfiguration @EnableAutoConfiguration @ComponentScan("com.atguigu.boot") -
-
-
各种配置拥有默认值
- 默认配置最终都是映射到某个类上,如:MultipartProperties
- 配置文件的值最终会绑定每个类上,这个类会在容器中创建对象
-
按需加载所有自动配置项
-
非常多的starter
-
引入了哪些场景这个场景的自动配置才会开启
-
SpringBoot所有的自动配置功能都在 spring-boot-autoconfigure 包里面
-
3.2 容器功能
3.2.1 组件添加
3.2.1.1 @Configuration、@Bean
@Configuration的作用:标注在类上,配置spring容器(应用上下文)。相当于把该类作为spring的xml配置文件中的<beans>。
@Configuration注解的类中,使用@Bean注解标注的方法,返回的类型都会直接注册为bean
Full模式与Lite模式:
- 配置类组件之间
无依赖关系,用Lite模式加速容器启动过程,减少判断 - 配置类组件之间
有依赖关系,方法会被调用得到之前单实例组件,用Full模式(默认)
@Configuration使用示例:
/**
 * 1、配置类里面使用@Bean标注在方法上给容器注册组件,默认也是单实例的
 * 2、配置类本身也是组件
 * 3、proxyBeanMethods:代理bean的方法
 *      Full(proxyBeanMethods = true)、【保证每个@Bean方法被调用多少次返回的组件都是单实例的】
 *      Lite(proxyBeanMethods = false)【每个@Bean方法被调用多少次返回的组件都是新创建的】
 *      组件依赖必须使用Full模式默认。其他默认是否Lite模式
 */
@Configuration(proxyBeanMethods = true) //告诉SpringBoot这是一个配置类 == 配置文件
public class MyConfig {

    /**
     * Full:外部无论对配置类中的这个组件注册方法调用多少次获取的都是之前注册容器中的单实例对象
     * @return
     */
    @Bean //给容器中添加组件。以方法名作为组件的id。返回类型就是组件类型。返回的值,就是组件在容器中的实例
    public User user01(){
        User zhangsan = new User("zhangsan", 18);
        //user组件依赖了Pet组件
        zhangsan.setPet(tomcatPet());
        return zhangsan;
    }

    @Bean("tom") //指定tom为组件的id
    public Pet tomcatPet(){
        return new Pet("tomcat");
    }

}
@Configuration测试代码:
/**
 * 主程序类
 * @SpringBootApplication:这是一个SpringBoot应用
 */
@SpringBootApplication
public class MainApplication {

    public static void main(String[] args) {
        //1、返回我们IOC容器
        ConfigurableApplicationContext run = SpringApplication.run(MainApplication.class, args);

        //2、查看容器里面的组件
//        String[] names = run.getBeanDefinitionNames();
//        for (String name : names) {
//            System.out.println(name);
//        }

        //从容器中获取组件
        Pet tom1 = run.getBean("tom", Pet.class);
        Pet tom2 = run.getBean("tom", Pet.class);
        System.out.println(tom1 == tom2);//true


        MyConfig bean = run.getBean(MyConfig.class);
        //当proxyBeanMethods = true时,com.zb.boot.config.MyConfig$$EnhancerBySpringCGLIB$$de8f3ffa@5328a9c1
        //当proxyBeanMethods = false时,输出com.zb.boot.config.MyConfig@3e134896
        System.out.println(bean);

        //如果@Configuration(proxyBeanMethods = true)代理对象调用方法。SpringBoot总会检查这个组件是否在容器中有。
        //保证组件单实例
        User user1 = bean.user01();
        User user2 = bean.user01();
        System.out.println(user1 == user2);//当proxyBeanMethods = true时,输出true;否则输出false

        User user01 = run.getBean("user01", User.class);
        Pet tom = run.getBean("tom", Pet.class);
        System.out.println("用户的宠物:"+(user01.getPet() == tom));//用户的宠物:true

    }

}
3.2.1.2 @Component、@Controller、@Service、@Repository
它们是Spring的基本标签,在Spring Boot中并未改变它们原来的功能。只要该注解标记的类写在包扫描的范围呢,就会在容器内注册bean。
3.2.1.3 @ComponentScan和@Import导入组件
@ComponentScan对应xml时代的<context:component-scan>,用来告诉Spring从哪里找到bean。定义哪些包需要被扫描。Spring将会将在被指定的包及其下级的包(sub packages)中bean加入到容器中。
@SpringBootConfiguration
@EnableAutoConfiguration
@ComponentScan("com.zb.boot") //自动扫描com.zb.boot包下的组件
public class MainApplication {
    public static void main(String[] args) {
        SpringApplication.run(MainApplication.class, args);
	}
}
@Import引入普通的类可以帮助我们把普通的类定义为Bean。@Import可以添加在@SpringBootApplication(启动类)、@Configuration(配置类)、@Component(组件类)对应的类上。
/**
 * @Import({User.class, DBHelper.class})
 *      给容器中自动创建出这两个类型的组件、默认组件的名字就是全类名
 */
@Import({User.class, DBHelper.class})
@Configuration(proxyBeanMethods = false) //告诉SpringBoot这是一个配置类 == 配置文件
public class MyConfig {
}
获取组件:
@SpringBootApplication
public class MainApplication {

    public static void main(String[] args) {
        //返回我们IOC容器
        ConfigurableApplicationContext run = SpringApplication.run(MainApplication.class, args);
        //从容器中获取组件
        User user = (User) run.getBean("com.zb.boot.bean.User");
        DBHelper dbHelper = run.getBean(DBHelper.class);
        System.out.println(user);
        System.out.println(dbHelper);
    }
}
3.2.1.4 @Conditional
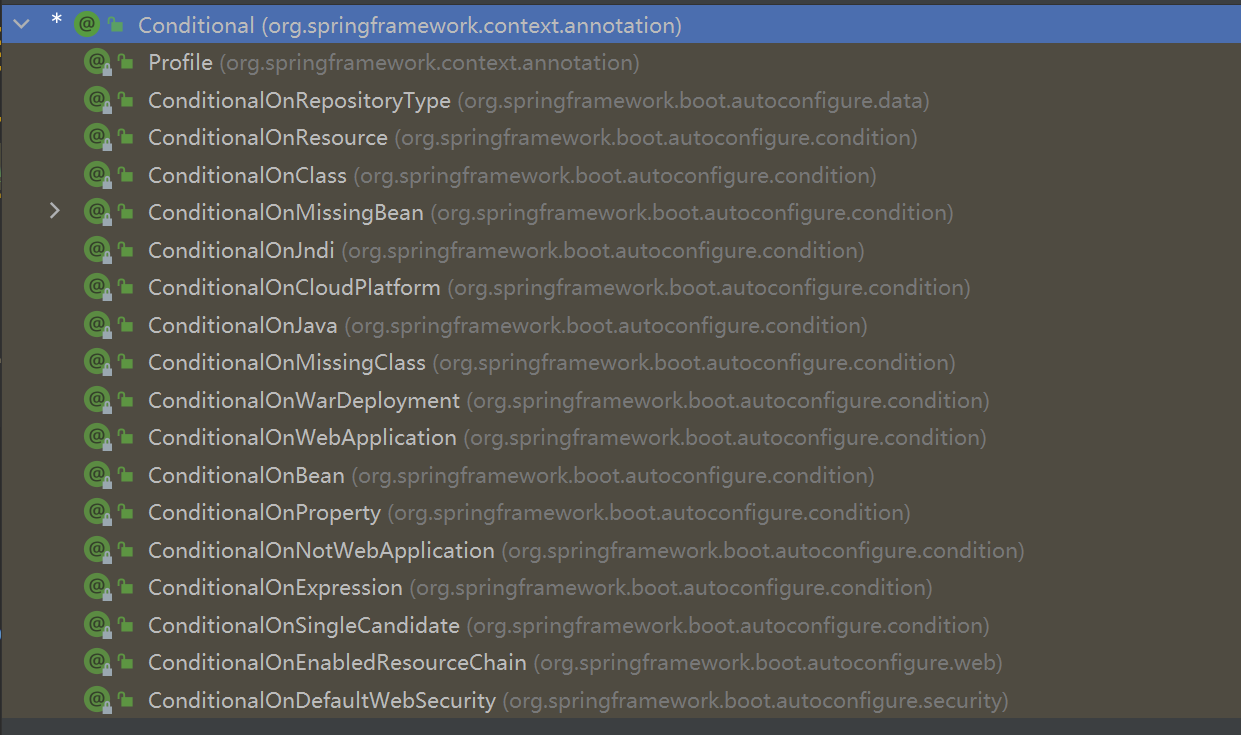
条件装配:Conditional指定按照一定的条件进行判断,满足条件给容器注册bean
标注在方法上:
@Import({User.class, DBHelper.class})
@Configuration(proxyBeanMethods = false)
public class MyConfig {

    @ConditionalOnBean(name = "tomcatPet") //当容器中有tomcatPet的实例时,@Bean才生效
    @Bean //给容器中添加组件。以方法名作为组件的id。返回类型就是组件类型。返回的值,就是组件在容器中的实例
    public User user01(){
        User zhangsan = new User("zhangsan", 18);
        //user组件依赖了Pet组件
        zhangsan.setPet(tomcatPet());
        return zhangsan;
    }

    public Pet tomcatPet(){
        return new Pet("tomcat");
    }

}
/**
 * 主程序类
 * @SpringBootApplication:这是一个SpringBoot应用
 */
@SpringBootApplication
public class MainApplication {

    public static void main(String[] args) {
        //返回我们IOC容器
        ConfigurableApplicationContext run = SpringApplication.run(MainApplication.class, args);

        boolean tomcatPet = run.containsBean("tomcatPet");
        System.out.println("容器中Tom组件:"+tomcatPet);//容器中Tom组件:false

        boolean user01 = run.containsBean("user01");
        System.out.println("容器中user01组件:"+user01);//容器中user01组件:false
    }
}
标注在类上: 一个类中可以注入很多实例,@Conditional标注在类上就决定了一批bean是否注入。
@Configuration(proxyBeanMethods = false)
@ConditionalOnMissingBean(name = "tom")//没有tom名字的Bean时,MyConfig类的Bean才能生效。
public class MyConfig {

    @Bean
    public User user01(){
        User zhangsan = new User("zhangsan", 18);
        zhangsan.setPet(tomcatPet());
        return zhangsan;
    }

    @Bean("tom22")
    public Pet tomcatPet(){
        return new Pet("tomcat");
    }
}

public static void main(String[] args) {
    //返回我们IOC容器
    ConfigurableApplicationContext run = SpringApplication.run(MainApplication.class, args);

    boolean tom = run.containsBean("tom");
    System.out.println("容器中Tom组件:"+tom);//false

    boolean user01 = run.containsBean("user01");
    System.out.println("容器中user01组件:"+user01);//true

    boolean tom22 = run.containsBean("tom22");
    System.out.println("容器中tom22组件:"+tom22);//true

}
3.2.2 原生配置文件引入
3.2.2.1 @ImportResource
@ImportResource:导入Spring的配置文件,让配置文件里面的内容生效。即实现xml配置的装载
beans.xml
<?xml version="1.0" encoding="UTF-8"?>
<beans xmlns="http://www.springframework.org/schema/beans"
       xmlns:xsi="http://www.w3.org/2001/XMLSchema-instance"
       xmlns:context="http://www.springframework.org/schema/context"
       xsi:schemaLocation="http://www.springframework.org/schema/beans http://www.springframework.org/schema/beans/spring-beans.xsd http://www.springframework.org/schema/context https://www.springframework.org/schema/context/spring-context.xsd">

    <bean id="haha" class="com.zb.boot.bean.User">
        <property name="name" value="zhangsan"></property>
        <property name="age" value="18"></property>
    </bean>

    <bean id="hehe" class="com.zb.boot.bean.Pet">
        <property name="name" value="tomcat"></property>
    </bean>
</beans>
使用@ImportResource实现xml配置的装载
@Configuration(proxyBeanMethods = false)
@ImportResource("classpath:beans.xml")
public class MyConfig {
...
}

//测试代码:
@SpringBootApplication
public class MainApplication {

    public static void main(String[] args) {
        //1、返回我们IOC容器
        ConfigurableApplicationContext run = SpringApplication.run(MainApplication.class, args);

        boolean haha = run.containsBean("haha");
        boolean hehe = run.containsBean("hehe");
        System.out.println("haha:"+haha);//true
        System.out.println("hehe:"+hehe);//true

    }
}
3.2.3 配置绑定
如何使用Java读取到properties文件中的内容,并且把它封装到JavaBean中,以供随时使用;
传统方法:
public class getProperties {
     public static void main(String[] args) throws FileNotFoundException, IOException {
         Properties pps = new Properties();
         pps.load(new FileInputStream("a.properties"));
         Enumeration enum1 = pps.propertyNames();//得到配置文件的名字
         while(enum1.hasMoreElements()) {
             String strKey = (String) enum1.nextElement();
             String strValue = pps.getProperty(strKey);
             System.out.println(strKey + "=" + strValue);
             //封装到JavaBean。
         }
     }
 }
3.2.3.1 @Component + @ConfigurationProperties
定义一个application.properties
mycar.brand=BYD
mycar.price=100000
使用@ConfigurationProperties进行配置绑定
/**
 * 只有在容器中的组件,才会拥有SpringBoot提供的强大功能
 */
@Component
@ConfigurationProperties(prefix = "mycar") //将会读取properties文件中所有以mycar开头的属性,并和bean中的字段进行匹配
public class Car {

    private String brand;
    private Integer price;
    .....
}

测试代码:
@SpringBootApplication
public class MainApplication {

    public static void main(String[] args) {
        //返回我们IOC容器
        ConfigurableApplicationContext run = SpringApplication.run(MainApplication.class, args);

        Car bean = run.getBean(Car.class);
        System.out.println(bean);//Car{brand='BYD', price=100000}

    }
}
3.2.3.2 @EnableConfigurationProperties + @ConfigurationProperties
当bean外部依赖的时候,可以使用@EnableConfigurationProperties + @ConfigurationProperties
@EnableConfigurationProperties(Car.class) //1、开启Car配置绑定功能
@Configuration(proxyBeanMethods = false)
public class MyConfig {

}
//2、把这个Car这个组件自动注册到容器中
@ConfigurationProperties(prefix = "mycar") //将会读取properties文件中所有以mycar开头的属性,并和bean中的字段进行匹配
public class Car {

    private String brand;
    private Integer price;
    .....
}

测试代码:
@SpringBootApplication
public class MainApplication {

    public static void main(String[] args) {
        //返回我们IOC容器
        ConfigurableApplicationContext run = SpringApplication.run(MainApplication.class, args);

        Car bean = run.getBean(Car.class);
        System.out.println(bean);//Car{brand='BYD', price=100000}

    }
}
3.3 自动配置原理
3.3.1 引导加载自动配置类
3.3.1.1 SpringBootApplication
标注在某个类上说明这个类是SpringBoot的主配置类 , SpringBoot就应该运行这个类的main方法来启动SpringBoot 应用
@SpringBootConfiguration
@EnableAutoConfiguration
@ComponentScan(
    excludeFilters = {@Filter(
    type = FilterType.CUSTOM,
    classes = {TypeExcludeFilter.class}
), @Filter(
    type = FilterType.CUSTOM,
    classes = {AutoConfigurationExcludeFilter.class}
)}
)
public @interface SpringBootApplication {
    ...
}
3.3.1.2 @ComponentScan
作用:自动扫描并加载符合条件的组件或者bean ,将这个bean定义加载到IOC容器中
3.3.1.3 @SpringBootConfiguration
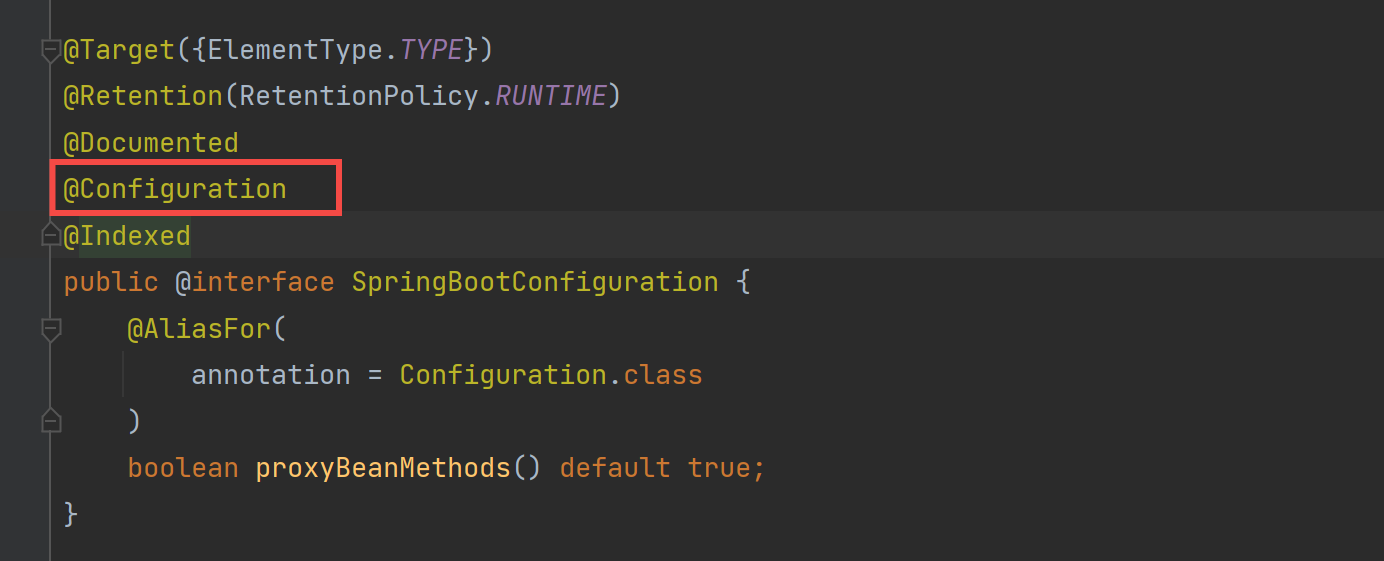
- 该注解标注在某个类上, 说明该类为SpringBoot的配置类。
- 在该注解下还有一个注解为 @Conguration,即为配置类。@Configuration是Spring下的配置类注解,@SpringBootConfiguration是SpringBoot下的配置类注解,但二者的本质相同
3.3.1.4 @EnableAutoConfiguration(重点)
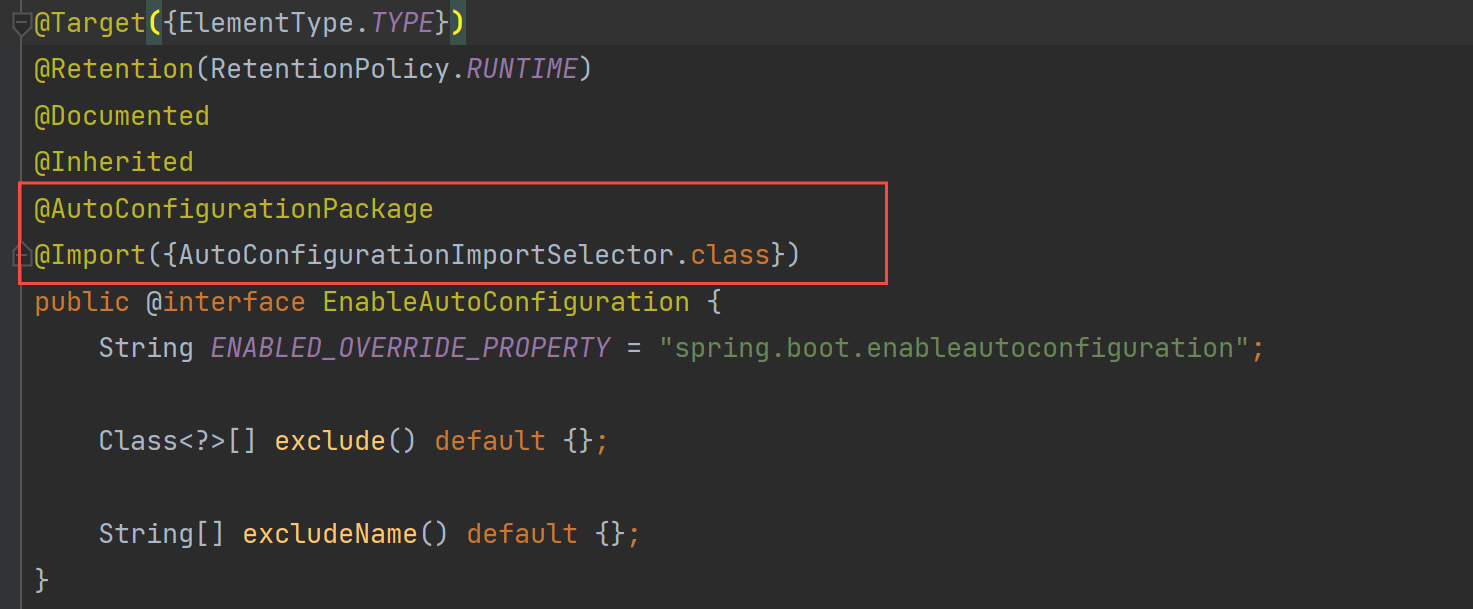
@EnableAutoConfiguration就是 为SpringBoot实现自动配置的核心注解。它的意思就是开启自动配置功能。也就是说我们之前需要配置的东西,现在都不需要配置了 而在 @EnableAutoConfiguration 的内部又有两个非常重要的注解,分别为 @AutoConfigurationPackage 和 @Import(AutoConfigurationImportSelector.class) 。
3.3.1.4.1 @AutoConfigurationPackage 自动配置包
我们进入 @AutoConfigurationPackag 的内部,我们发现这个该注解是由一个@Import注解来完成的
@Import({Registrar.class})
public @interface AutoConfigurationPackage {
    String[] basePackages() default {};

    Class<?>[] basePackageClasses() default {};
}
Registrar.class 作用:将主启动类的所在包及包下面所有子包里面的所有组件扫描到Spring容器
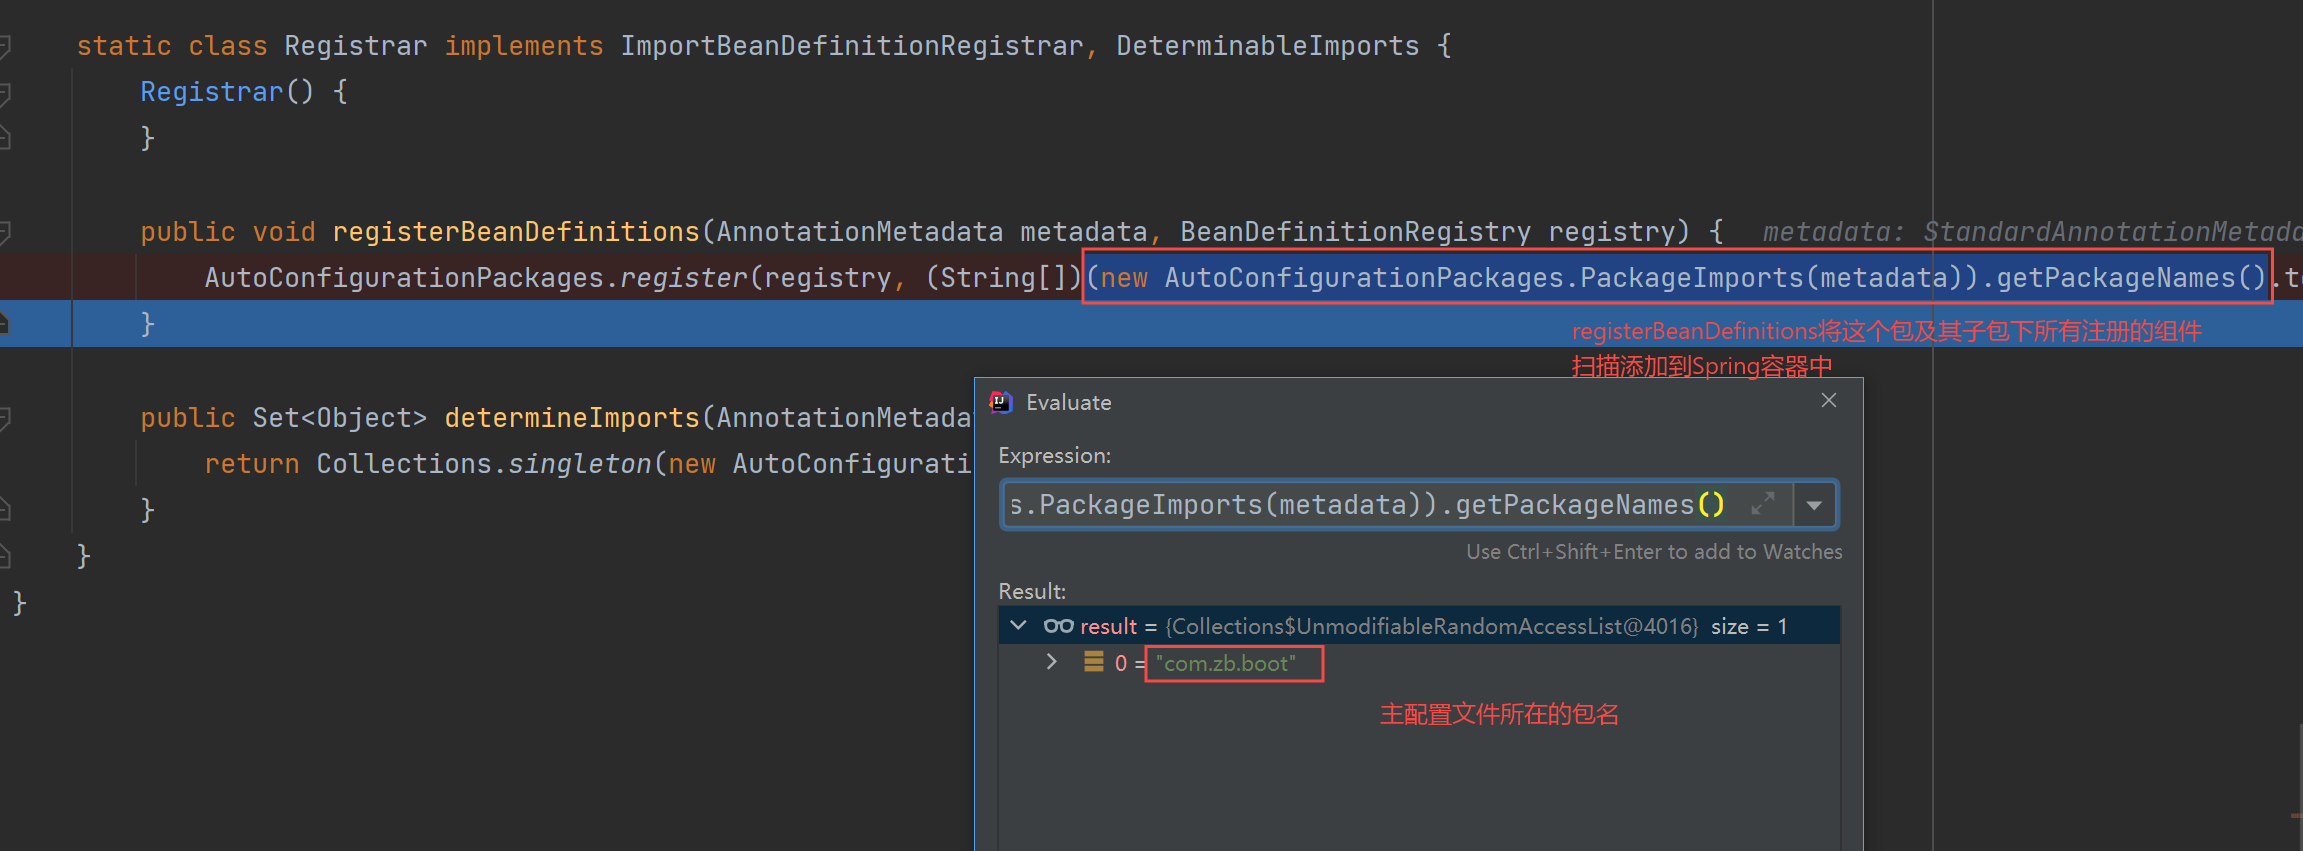
总结: @AutoConfigurationPackag 的作用就是将SpringBoot 主配置类所在的包 及其 下面的所有子包里面的所有组件 扫描到 Spring 容器中
3.3.1.4.2 @Import(AutoConfigurationImportSelector.class)(重点)
这一个注解的作用就是给容器中导入组件,这个注解需要导入的组件就是 AutoConfigurationImportSelector,也就是自动配置导入选择器,它可以帮我们选择需要导入的组件
源码分析:
-
AutoConfigurationImportSelector的静态内部类下的process()方法,调用了getAutoConfigurationEntry()方法

-
getAutoConfigurationEntry()方法用来给容器中批量导入一些组件,其中调用了getCandidateConfigurations() 方法获取候选的配置。
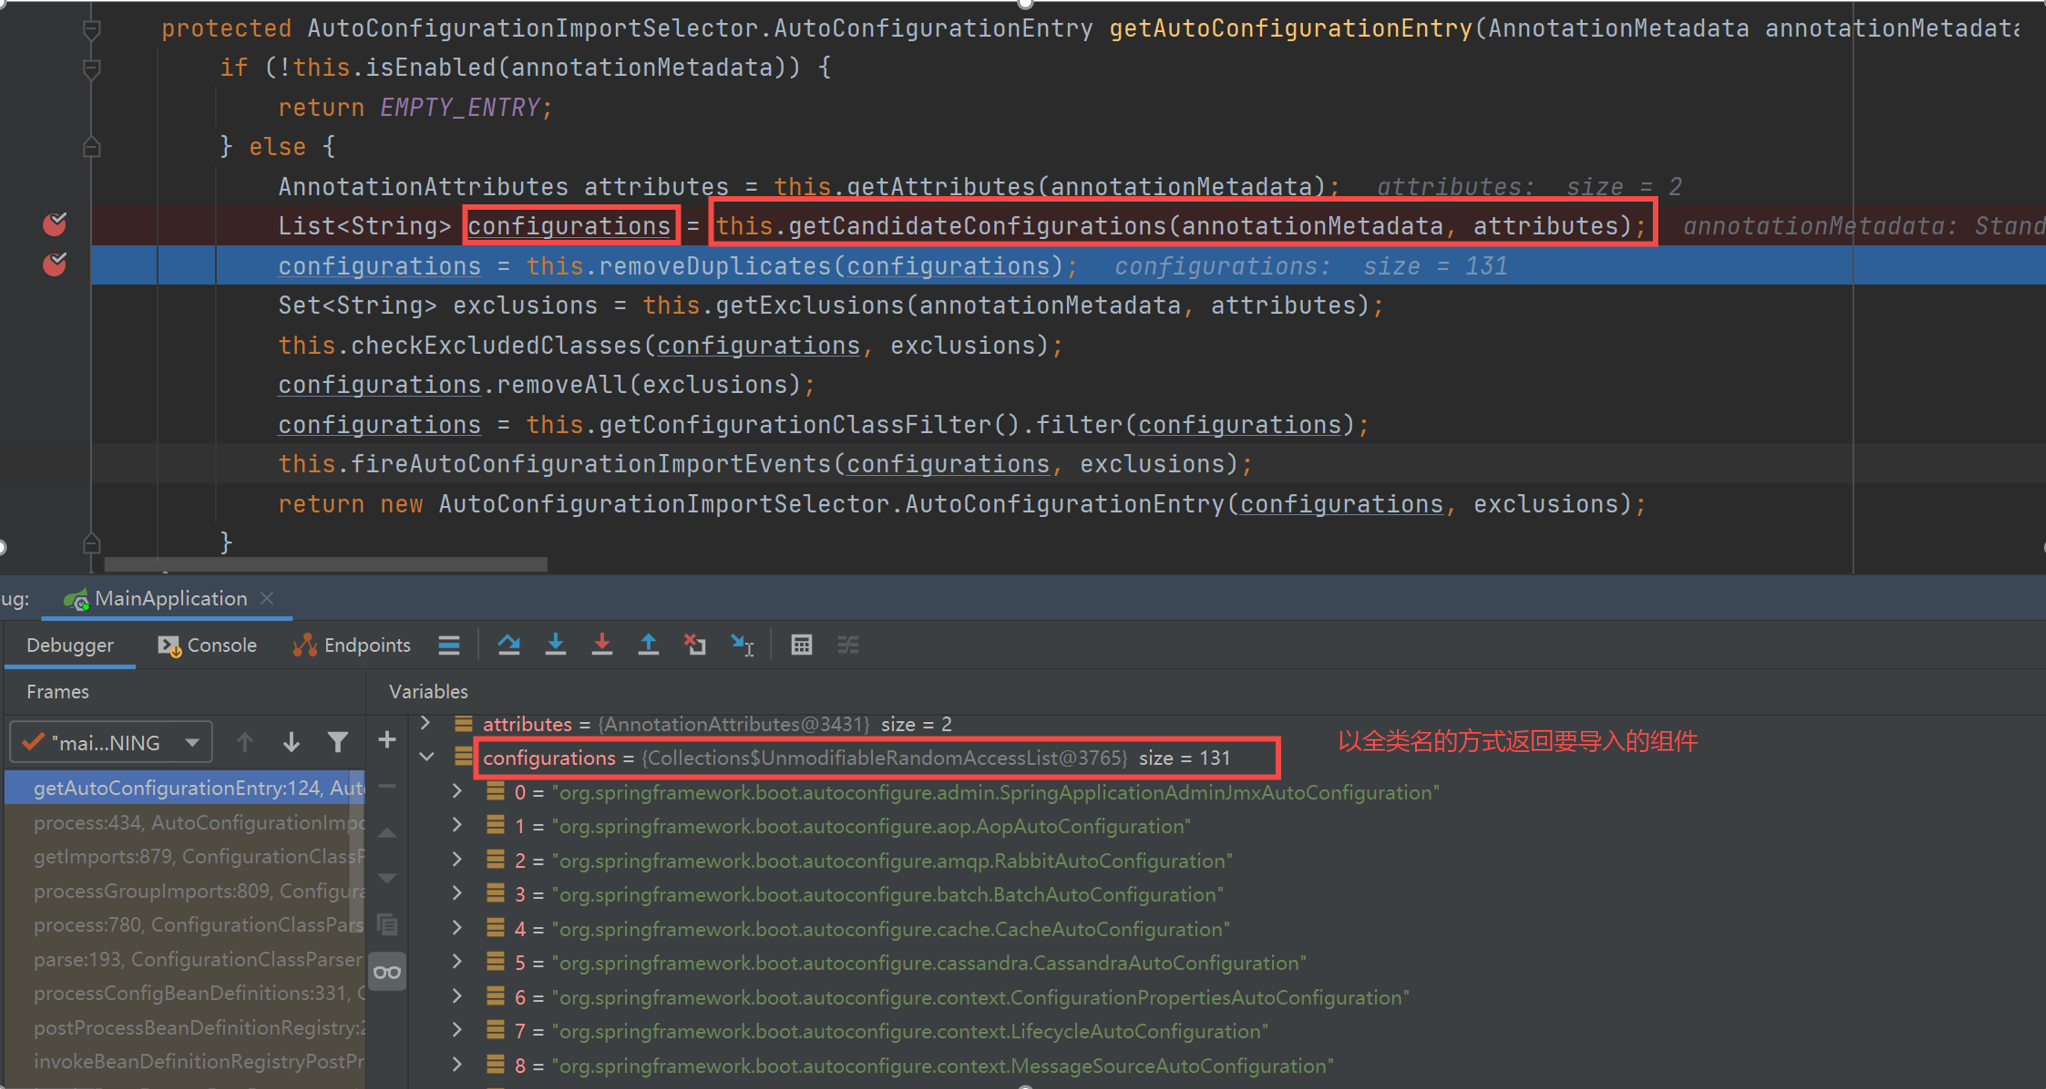
从这里就可以看出, 这个String[] 数组 返回了131个
自动配置类(xxxAutoConfiguration), 将这些以全类名的组件(这些组件就是各个场景所需要的)导入到容器中, 并配置好这些组件。有了自动配置类, 就免去了我们手动编写配置注入功能组件等工作!
而这131个配置类, SpringBoot是从哪得到的呢?
-
getCandidateConfigurations方法
protected List<String> getCandidateConfigurations(AnnotationMetadata metadata, AnnotationAttributes attributes) { List<String> configurations = SpringFactoriesLoader.loadFactoryNames(this.getSpringFactoriesLoaderFactoryClass(), this.getBeanClassLoader()); Assert.notEmpty(configurations, "No auto configuration classes found in META-INF/spring.factories. If you are using a custom packaging, make sure that file is correct."); return configurations; } -
this.getSpringFactoriesLoaderFactoryClass(), 返回
EnableAutoConfiguration字节码, 也就是说, 从properties中获取EnableAutoConfiguration.class类对应的值,然后把他们添加到容器中protected Class<?> getSpringFactoriesLoaderFactoryClass() { return EnableAutoConfiguration.class; } -
loadFactoryNames()方法,该方法又调用了loadSpringFactories()方法。
public static List<String> loadFactoryNames(Class<?> factoryType, @Nullable ClassLoader classLoader) {
    ClassLoader classLoaderToUse = classLoader;
    if (classLoader == null) {
        classLoaderToUse = SpringFactoriesLoader.class.getClassLoader();
    }

    String factoryTypeName = factoryType.getName();
    return (List)loadSpringFactories(classLoaderToUse).getOrDefault(factoryTypeName, Collections.emptyList());
}

private static Map<String, List<String>> loadSpringFactories(ClassLoader classLoader) {
    Map<String, List<String>> result = (Map)cache.get(classLoader);
    if (result != null) {
        return result;
    } else {
        HashMap result = new HashMap();

        try {
            Enumeration urls = classLoader.getResources("META-INF/spring.factories");

            while(urls.hasMoreElements()) {
                URL url = (URL)urls.nextElement();
                UrlResource resource = new UrlResource(url);
                Properties properties = PropertiesLoaderUtils.loadProperties(resource);
                Iterator var6 = properties.entrySet().iterator();

                while(var6.hasNext()) {
                    Entry<?, ?> entry = (Entry)var6.next();
                    String factoryTypeName = ((String)entry.getKey()).trim();
                    String[] factoryImplementationNames = StringUtils.commaDelimitedListToStringArray((String)entry.getValue());
                    String[] var10 = factoryImplementationNames;
                    int var11 = factoryImplementationNames.length;

                    for(int var12 = 0; var12 < var11; ++var12) {
                        String factoryImplementationName = var10[var12];
                        ((List)result.computeIfAbsent(factoryTypeName, (key) -> {
                            return new ArrayList();
                        })).add(factoryImplementationName.trim());
                    }
                }
            }

            result.replaceAll((factoryType, implementations) -> {
                return (List)implementations.stream().distinct().collect(Collectors.collectingAndThen(Collectors.toList(), Collections::unmodifiableList));
            });
            cache.put(classLoader, result);
            return result;
        } catch (IOException var14) {
            throw new IllegalArgumentException("Unable to load factories from location [META-INF/spring.factories]", var14);
        }
    }
}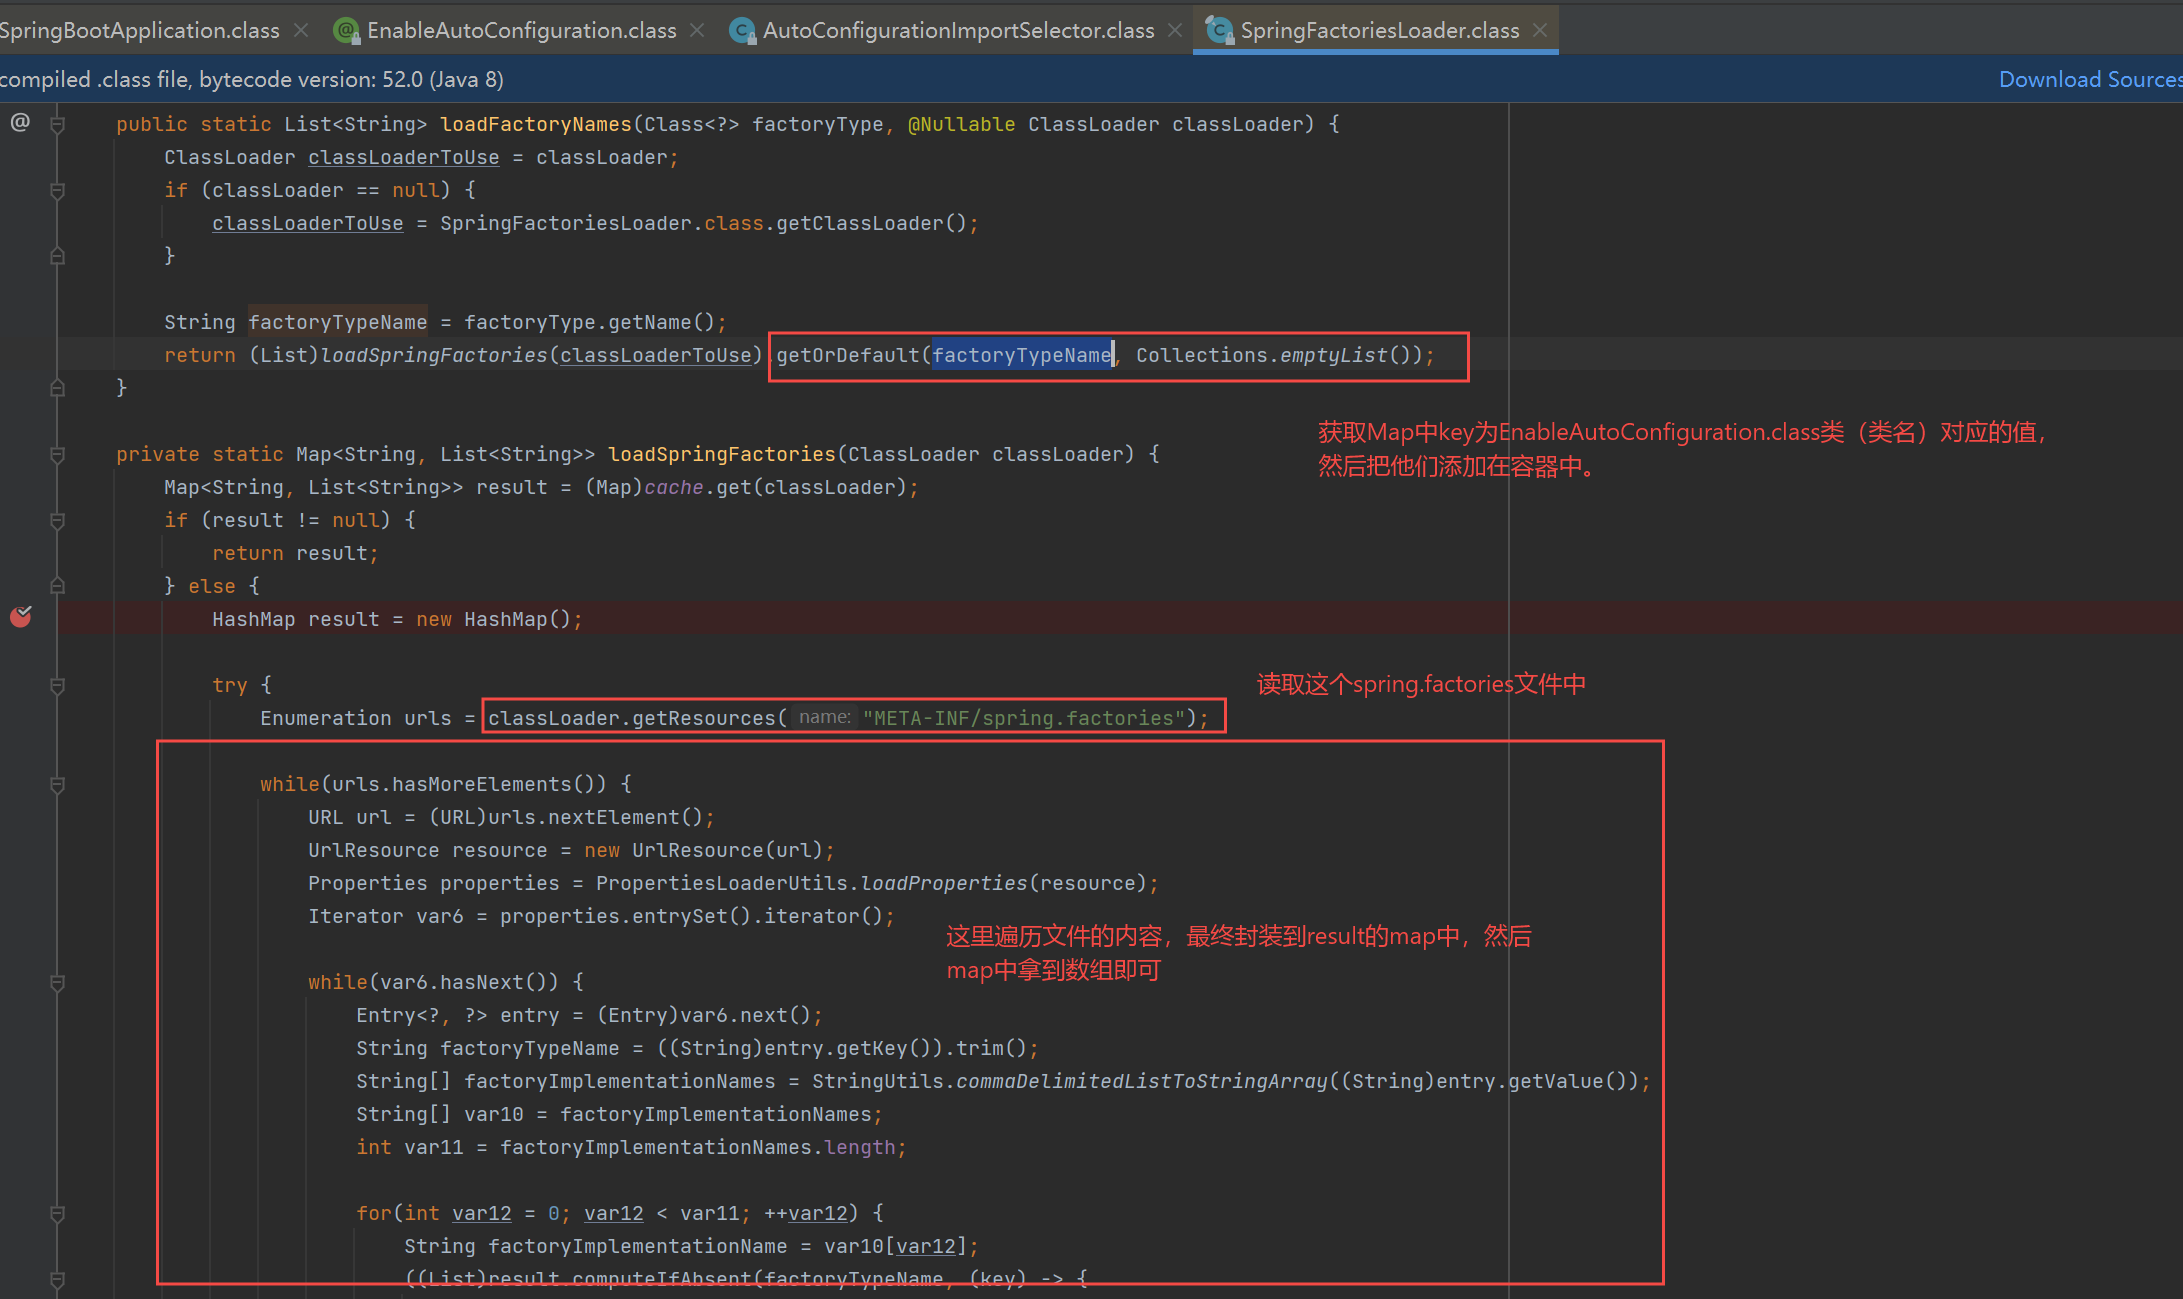
即:SpringFactoriesLoader.loadFactoryNames() 扫描所有jar包类路径下
META-INF/spring.factories。把扫描到的这些文件的内容包装成properties对象; 从properties中获取到EnableAutoConfiguration.class类(类名)对应的值,然后把他们添加在容器中 -
META-INF/spring-factories文件
META-INF/spring-factories文件主要是
spring-boot-autoconfigure-2.3.4.RELEASE.jar包
 将每一个这样的 xxxAutoConfiguration类都是容器中的一个组件,都加入到容器中;用他们来做自动配置;
@Import(AutoConfigurationImportSelector.class)总结:
- 利用
getAutoConfigurationEntry(annotationMetadata);给容器中批量导入一些组件 - 调用
List<String> configurations = getCandidateConfigurations(annotationMetadata, attributes)获取到所有需要导入到容器中的配置类 - 利用工厂加载
Map<String, List<String>> loadSpringFactories(@Nullable ClassLoader classLoader);得到所有的组件 - 从
META-INF/spring.factories位置来加载一个文件。- 默认扫描我们当前系统里面所有
META-INF/spring.factories位置的文件 - 主要是
spring-boot-autoconfigure-2.3.4.RELEASE.jar包里面的META-INF/spring.factories
- 默认扫描我们当前系统里面所有
3.3.2 自动配置类分析
以HttpEncodingAutoConfiguration (Http编码自动配置) 为例解释自动配置原理;

HttpEncodingAutoConfiguration.java文件
HttpEncodingAutoConfiguration中的@Condition注解根据当前不同的条件判断,决定这个配置类是否生效?
@Configuration(proxyBeanMethods = false) //表示这是一个配置类,以前编写的配置文件一样,也可以给容器中添加组件
@EnableConfigurationProperties({ServerProperties.class}) //导入这个已经绑定了属性的ServerProperties对象到spring容器中
@ConditionalOnWebApplication(type = Type.SERVLET) //判断当前应用是否是web应用,如果是,当前配置类生效
@ConditionalOnClass({CharacterEncodingFilter.class}) //当类路径下有指定类的条件下配置类生效
@ConditionalOnProperty(
    prefix = "server.servlet.encoding",
    value = {"enabled"},
    matchIfMissing = true
)//判断配置文件中是否存在某个配置 spring.http.encoding.enabled;如果不存在,判断也是成立的。即使我们配置文件中不配置pring.http.encoding.enabled=true,也是默认生效的;
public class HttpEncodingAutoConfiguration {
    //它已经和SpringBoot的配置文件映射了(因为已经通过@ConditionalOnProperty绑定了)也就是说,通过yml/properties注入进来的
    private final Encoding properties;

    //只有一个有参构造器的情况下,参数的值就会从容器中拿
    public HttpEncodingAutoConfiguration(ServerProperties properties) {
        this.properties = properties.getServlet().getEncoding();
    }

    @Bean //给容器中添加一个组件,这个组件的某些值需要从properties中获取
    @ConditionalOnMissingBean //判断容器有没有CharacterEncodingFilter这个组件,但是如果用户自己配置了以用户的优先
    public CharacterEncodingFilter characterEncodingFilter() {
        CharacterEncodingFilter filter = new OrderedCharacterEncodingFilter();
        filter.setEncoding(this.properties.getCharset().name());
        filter.setForceRequestEncoding(this.properties.shouldForce(org.springframework.boot.web.servlet.server.Encoding.Type.REQUEST));
        filter.setForceResponseEncoding(this.properties.shouldForce(org.springframework.boot.web.servlet.server.Encoding.Type.RESPONSE));
        return filter;
    }

    @Bean
    public HttpEncodingAutoConfiguration.LocaleCharsetMappingsCustomizer localeCharsetMappingsCustomizer() {
        return new HttpEncodingAutoConfiguration.LocaleCharsetMappingsCustomizer(this.properties);
    }

    static class LocaleCharsetMappingsCustomizer implements WebServerFactoryCustomizer<ConfigurableServletWebServerFactory>, Ordered {
       //......
}
ServerProperties.java文件,HttpEncodingAutoConfiguration组件的属性从对应的XxxProperties类中获取。
@ConfigurationProperties(
    prefix = "server",
    ignoreUnknownFields = true
)//将这些类里面的每一个属性和配置文件中以server开头的绑定
public class ServerProperties {
}
总结:
-
自动配置类上面@Condition注解根据当前不同的条件判断,决定这个配置类是否生效?
-
一但这个配置类生效;这个配置类就会给容器中添加各种组件;这些组件的属性是从对应的
XxxProperties类中获取的,因为通过@ConfigurationProperties(prefix = ‘xxx’)将这些类里面的每一个属性又是和配置文件绑定的
我们可以通过启用 debug=true属性;来让控制台打印自动配置报告,这样我们就可以很方便的知道哪些自动配置类生效;
3.3.3 自动配置原理流程总结
- SpringBoot启动的时候通过
@EnableAutoConfiguration内的AutoConfigurationImportSelector选择器中的getAutoConfigurationEntry(annotationMetadata)方法, 找到META-INF/spring.factorie文件中的所有配置类并加载到容器中; - 我们在全局配置文件(yml/properties)中通过
@ConfigurationProperties绑定到相对应的XxxProperties的配置类 - 最后通过
@EnableConfigurationProperties({XxxProperties.class})将XxxProperties的组件添加到Spring容器中; 这样就可以在配置文件中写XxxProperties中对应的属性(有些属性可能定义在了内部类中)了; - 如果需要定制化配置,用户直接自己
@Bean替换底层的组件或者去修改配置文件中的值
xxxxxAutoConfiguration —> 组件 —> xxxxProperties里面拿值 ----> application.properties
最佳实践:
-
查看自动配置了哪些(选做)
- 自己分析,引入场景对应的自动配置一般都生效了
- 配置文件中debug=true开启自动配置报告。Negative(不生效)\Positive(生效)
-
是否需要修改默认组件属性
- 参照文档修改配置项https://docs.spring.io/spring-boot/docs/current/reference/html/appendix-application-properties.html#common-application-properties
- 自己分析。xxxxProperties绑定了配置文件的哪些。
-
自定义加入或者替换组件
- @Bean、@Component。。。
- @Bean、@Component。。。
-
自定义器 XXXXXCustomizer;
-
…
四、配置文件
4.1 配置文件分类
SpringBoot是基于约定的,所以很多配置都有默认值,但如果想使用自己的配置替换默认配置的话,就可以使用 application.properties或者application.yml(application.yaml)进行配置。

⚫ SpringBoot提供了2种配置文件类型:properteis和yml/yaml
⚫ 默认配置文件名称:application
⚫ 在同一级目录下优先级为:properties > yml > yaml
4.2 yaml语法
YAML全称是 YAML Ain’t Markup Language 。YAML是一种直观的能够被电脑识别的的数据数据序列化格式,并且容易被人类阅 读,容易和脚本语言交互的,可以被支持YAML库的不同的编程语言程序导入,比如: C/C++, Ruby, Python, Java, Perl, C#, PHP 等。YML文件是以数据为核心的,比传统的xml方式更加简洁。
YAML文件的扩展名可以使用.yml或者.yaml。
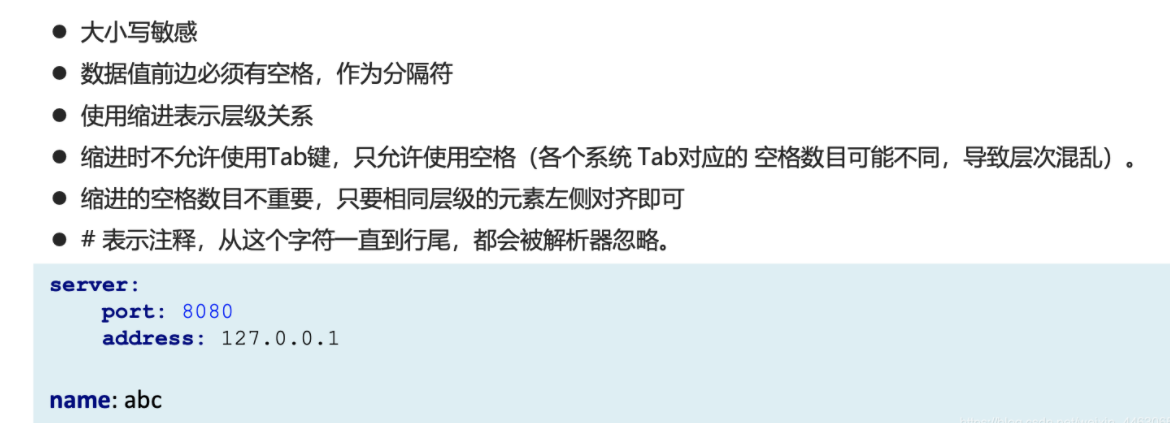
基本语法:
数据类型:
# 对象:键值对的集合。map、hash、object
person:
  name: zhangsan
  age: 20
# 对象行内写法
person2: {name: zhangsan,age: 20}

# 数组:一组按次序排列的值。array、list、queue、set
address:
  - beijing
  - shanghai
# 数组行内写法
address2: [beijing,shanghai]

# 单个的、不可再分的值。date、boolean、string、number、null
k: v
msg1: 'hello \n world' # 单引忽略转义字符
msg2: "hello \n world" # 双引识别转义字符

# 参数引用
name2: lisi
person3:
  name: ${name2} # 引用上边定义的name值
4.3 读取配置文件内容
方法一:使用@ConfigurationProperties,进行对象和配置属性的绑定(重点)
application.yml文件内容:
person:
  username: 'zhang \n san'
  #  单引号会将 \n作为字符串输出   双引号会将\n 作为换行输出
  boss: true
  birth: 1998/7/28
  age: 22
#  interest: [篮球,足球]
  interests:
    - 篮球
    - 足球
  animal: [猫,狗]
#  score:
#    english: 80
#    math: 90
  score: {english: 80,math: 90}
  salarys:
    - 99.7
    - 12
  pet:
    name: 阿狗
    weight: 99.99
  allPets:
    sick:
      - {name: 阿狗,weight: 99.99}
      - name: 阿猫
        weight: 99
      - name: 阿虫
        weight: 77.77
    health: [{name: tom, weight: 23.2}]
定义一个Person类,使用@ConfigurationProperties+@Component注解
@ConfigurationProperties(prefix = "person")//将会读取配置文件中所有以person开头的属性,并和bean中的字段进行匹配
@Component
@Data
public class Person {

    private String userName;
    private Boolean boss;
    private Date birth;
    private Integer age;
    private Pet pet;
    private String[] interests;
    private List<String> animal;
    private Map<String, Object> score;
    private Set<Double> salarys;
    private Map<String, List<Pet>> allPets;
}
测试:
@SpringBootApplication
public class Boot01Helloworld2Application {

    public static void main(String[] args) {
        ConfigurableApplicationContext run = SpringApplication.run(Boot01Helloworld2Application.class, args);
        Person bean = run.getBean(Person.class);
        System.out.println(bean);
        //Person(userName=zhang \n san, boss=true, birth=Tue Jul 28 00:00:00 CST 1998, age=22, pet=Pet(name=阿狗, weight=99.99), interests=[篮球, 足球], animal=[猫, 狗], score={english=80, math=90}, salarys=[99.7, 12.0], allPets={sick=[Pet(name=阿狗, weight=99.99), Pet(name=阿猫, weight=99.0), Pet(name=阿虫, weight=77.77)], health=[Pet(name=tom, weight=23.2)]})
    }

}
方法二:使用@Value注解(了解)
application.yml文件内容:
name: abc

# 对象
person:
  name: zhangsan
  age: 20
  address:
    - zhengzhou
    - kaifeng

# 对象行内写法
person2: {name: zhangsan,age: 20}

# 数组
address:
  - beijing
  - shanghai

# 数组行内写法
address2: [beijing,shanghai]

# 纯量,单个的、不可再分的值
msg1: 'hello \n world' # 单引忽略转义字符
msg2: "hello \n world" # 双引识别转义字符

# 参数引用
name2: lisi

person3:
  name: ${name2} # 引用上边定义的name值
@RestController
public class HelloController {

    //方法二:
    @Value("${name}")//获取application.yml中key为name的值
    private String name;

    @Value("${person.name}")
    private String name2;

    @Value("${person.age}")
    private int age;

    @Value("${address[0]}")
    private String address;

    @Value("${msg1}")
    private String msg1;

    @Value("${msg2}")
    private String msg2;

    @RequestMapping("/hello2")
    public String hello2() {
        System.out.println(name);//abc
        System.out.println(name2);//zhangsan
        System.out.println(age);//20
        System.out.println(address);//beijing
        System.out.println(msg1);//hello \n world
        System.out.println(msg2);
        //hello
        // world
        return "";
    }
}
方法三:使用Environment(了解)
@RestController
public class HelloController {

    //方法三:
    @Autowired
    private Environment env;//通过Environment对象获取值

    @RequestMapping("/hello2")
    public String hello2() {
        System.out.println(env.getProperty("person.name"));//zhangsan
        System.out.println(env.getProperty("address[0]"));//beijing
        return "";
    }
}
4.4 配置提示
自定义的类和配置文件绑定一般没有提示。若要提示,添加如下依赖:
<dependency>
    <groupId>org.springframework.boot</groupId>
    <artifactId>spring-boot-configuration-processor</artifactId>
    <optional>true</optional>
</dependency>

<!-- 下面插件作用是工程打包时,不将spring-boot-configuration-processor打进包内,让其只在编码的时候有用 -->
<build>
    <plugins>
        <plugin>
            <groupId>org.springframework.boot</groupId>
            <artifactId>spring-boot-maven-plugin</artifactId>
            <configuration>
                <excludes>
                    <exclude>
                        <groupId>org.springframework.boot</groupId>
                        <artifactId>spring-boot-configuration-processor</artifactId>
                    </exclude>
                </excludes>
            </configuration>
        </plugin>
    </plugins>
</build>
五、开发小技巧
5.1 Lombok
作用:简化JavaBean开发,用注解的方式代替构造器、getter/setter、toString()的方法的生成
- 引入依赖(spring boot已经管理Lombok的版本)
<dependency> <groupId>org.projectlombok</groupId> <artifactId>lombok</artifactId> </dependency> - idea中搜索安装lombok插件(新版idea集成了lombok插件)
简化JavaBean开发:
@Setter //生成set方法
@Getter //生成get方法
@ToString //toString方法
@NoArgsConstructor //无参构造器
@AllArgsConstructor //全参构造器
@EqualsAndHashCode //重写equals和hashCode方法
@Data //包含了 @ToString、@EqualsAndHashCode、@Getter / @Setter和@RequiredArgsConstructor的功能
public class User {

    private String name;
    private Integer age;

    private Pet pet;

    //两个参数的构造方法
    public User(String name, Integer age) {
        this.name = name;
        this.age = age;
    }
}
缺点:无法支持多种参数构造器的重载。
简化日志开发:
@Slf4j
@RestController
public class HelloController {

    @RequestMapping("/hello")
    public String handle01() {
        log.info("请求进来了...");
        return "Hello,Spring Boot 2!,你好";
    }
}
5.2 dev-tools
作用:DevTools通过提供自动重启
 <dependency>
     <groupId>org.springframework.boot</groupId>
     <artifactId>spring-boot-devtools</artifactId>
     <optional>true</optional>
 </dependency>
项目或者页面修改以后:Ctrl+F9(自动重启)
5.3 Spring Initailizr(项目初始化向导)
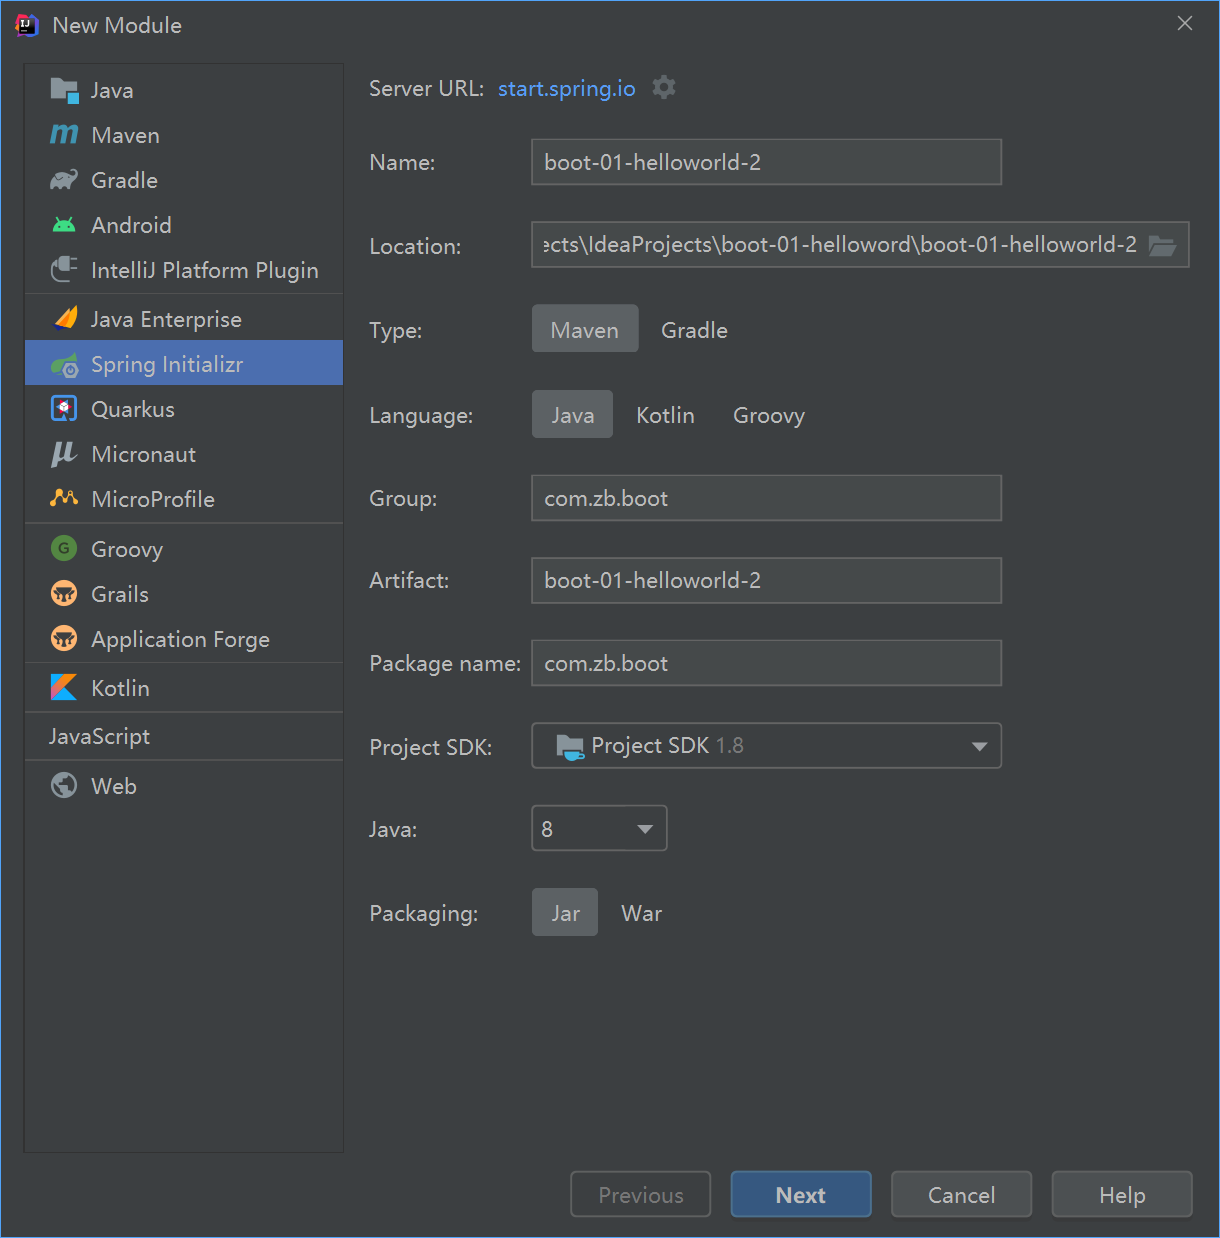
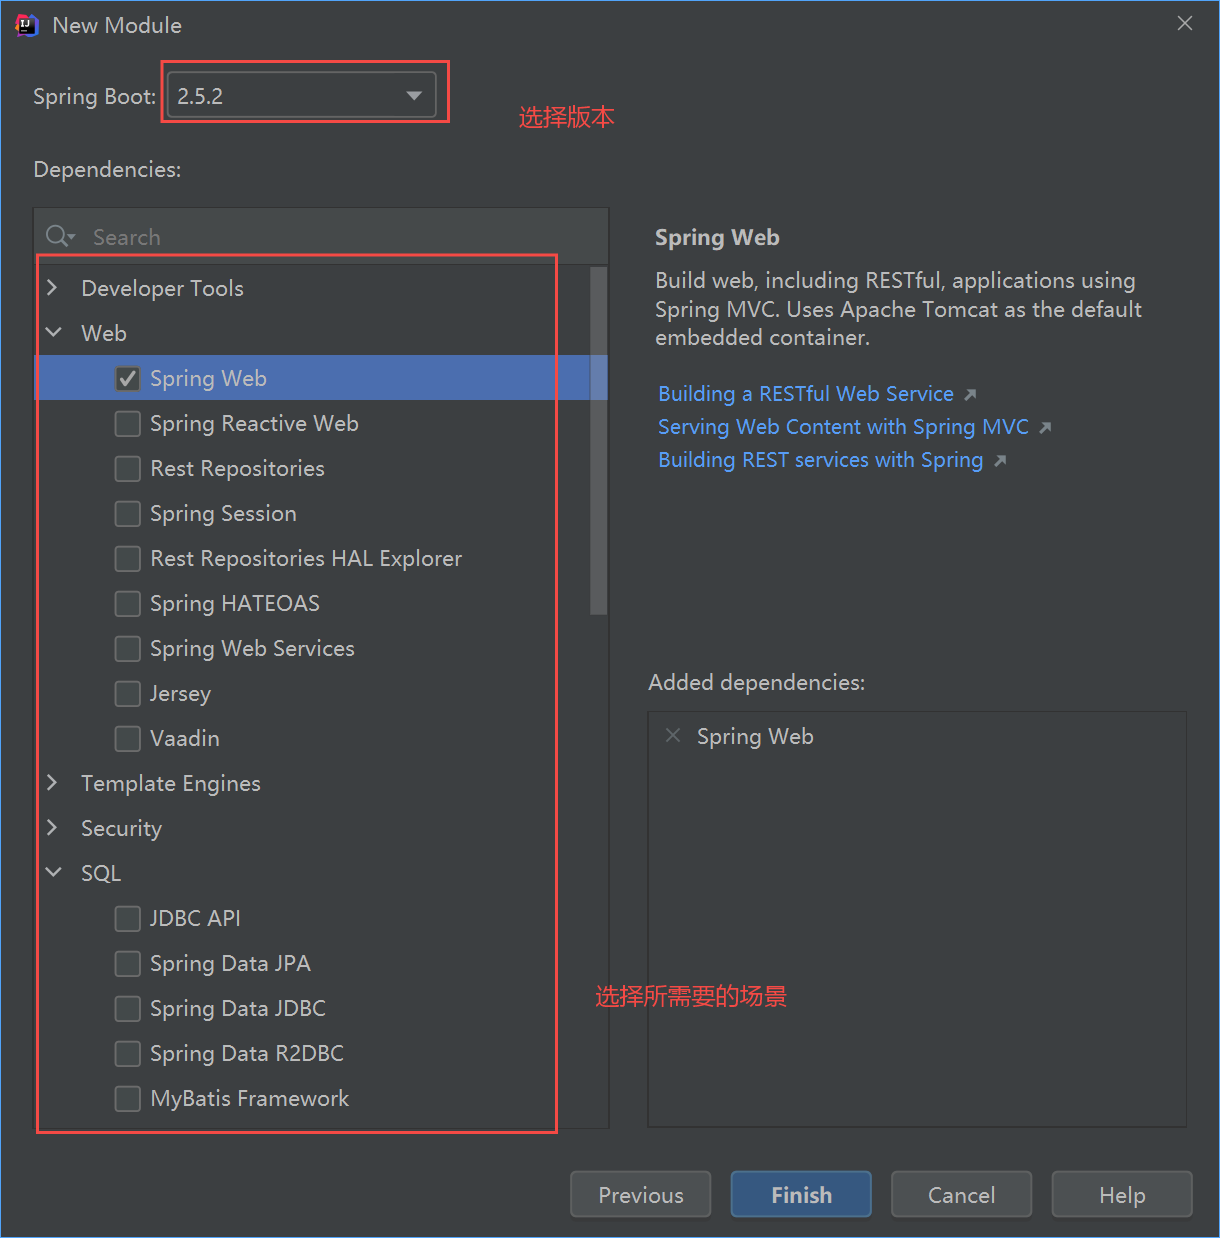
项目结构:
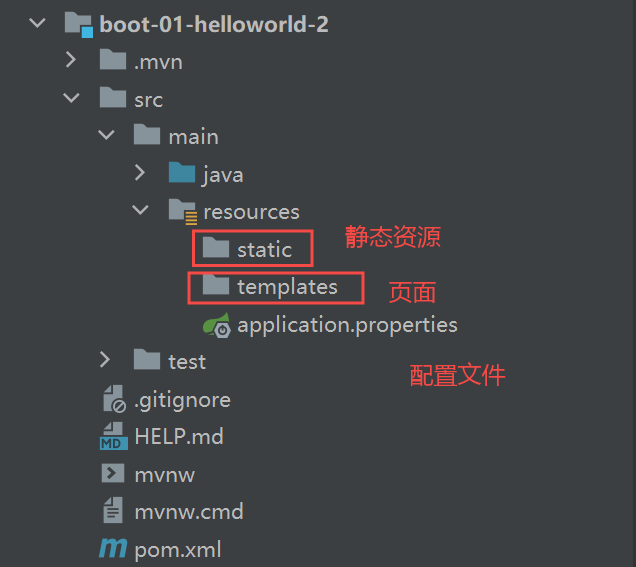
Spring Initailizr的作用:
- 引入了需要的场景依赖、单元测试的场景依赖、spring-boot-maven-plugin打包插件。
- 创建好了全局配置文件,即application.properties。
- 构建了项目的目录结构。
- 帮我们创建好了一个主程序类


 588
588


 被折叠的 条评论
为什么被折叠?


