


一 、搭建步骤
自己实践的步骤:
1.create new project选择maven,直接Next
2.pom
3.创建主程序 (主程序的位置要在最外层包含所有子包,因为spring-boot会自动加载启动类所在包下及其子包下的所有组件.)
4.创建控制器(控制器的文件夹)
5.启动主程序并访问 http://localhost:8080/hello
//2.pom
<parent>
    <groupId>org.springframework.boot</groupId>
    <artifactId>spring-boot-starter-parent</artifactId>
    <version>2.2.4.RELEASE</version>
</parent>
<dependencies>
    <dependency>
        <groupId>org.springframework.boot</groupId>
        <artifactId>spring-boot-starter-web</artifactId>
    </dependency>
</dependencies>

<!-- 这个插件,可以将应用打包成一个可执行的jar包;不然部署提示no main manifest attribute-->
<build>
    <plugins>
        <plugin>
            <groupId>org.springframework.boot</groupId>
            <artifactId>spring-boot-maven-plugin</artifactId>
        </plugin>
    </plugins>
</build>

<build>
    <plugins>
        <plugin>
            <groupId>org.springframework.boot</groupId>
            <artifactId>spring-boot-maven-plugin</artifactId>
            <configuration>
            	<mainClass>com.test.MainApplication</mainClass>
                <skip>true</skip>
            </configuration>
        </plugin>
        <plugin>
            <groupId>org.apache.maven.plugins</groupId>
            <artifactId>maven-compiler-plugin</artifactId>
            <configuration>
                <source>8</source>
                <target>8</target>
            </configuration>
        </plugin>
    </plugins>
</build>
//3.创建主程序 HelloWorldMainApplication
@SpringBootApplication
public class HelloWorldMainApplication {
    public static void main(String[] args) {
        SpringApplication.run(HelloWorldMainApplication.class,args);
    }
}
//4.创建控制层
@Controller
public class HelloController {
    @ResponseBody
    @RequestMapping("/hello")
    public String hello(){
        return "Hello World!";
    }

    @RequestMapping("/toIndex")
    public String toIndex(){
        return "/pages/index.html";
    }

    @RequestMapping("/toIndex2")
    public ModelAndView toIndex2(){
        return new ModelAndView("/pages/index.html");
    }
}
二 、问题汇总
-
无法启动:
启动类应该不应直接放在java/main文件夹下,而应该在java/main再创建个子文件夹 -
无法正常访问控制器
a.将Application类放在最外侧,即包含所有子包
b.控制器加注解 @Controller -
This application has no explicit mapping for /error, so you are seeing this as a fallback
原因1:
Application启动类的位置不对.要将Application类放在最外侧,即包含所有子包
因为:spring-boot会自动加载启动类所在包下及其子包下的所有组件.原因2:
在springboot的配置文件:application.yml或application.properties中关于视图解析器的配置问题:
当pom文件下的spring-boot-starter-paren版本高时使用:pring.mvc.view.prefix/spring.mvc.view.suffix
当pom文件下的spring-boot-starter-paren版本低时使用:pring.view.prefix/spring.view.suffix原因3:
控制器的URL路径书写问题
@RequestMapping(“xxxxxxxxxxxxxx”)
实际访问的路径与”xxx”不符合. -
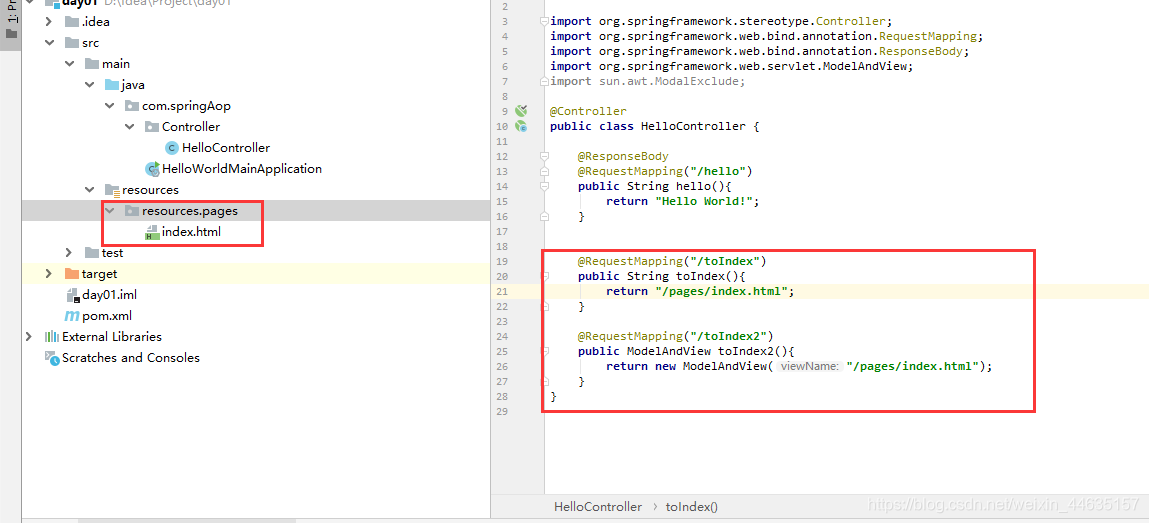
跳转到resources下的页面
注意点(代码在上面的控制器):
1.前置:要在resources文件夹下再添加一个resources文件夹(默认是resources/resources)
2.后置:页面要全称: /index.html ,并且/不要忘记了
5.添加配置文件
在resources文件夹下添加application.yml(文件名固定) 也可以resources加加个config文件夹
server:
  port: 80         #访问端口  server.port=${random.int[8000,9000]}

spring:
  mvc:
    view:
      prefix: /pages     #视图解析器前缀
      suffix: .html      #视图解析器后缀
6、配置全局前置路径
server:
  servlet:
    context-path: /ocpi
7.Spring Boot Application in default package
是因为把main 函数直接放在了java 目录之下,在java目录下新建一个包
三、整合数据库
mysql
1.pom加mysql驱动
	<!--mysql驱动包-->
	<dependency>
	    <groupId>mysql</groupId>
	    <artifactId>mysql-connector-java</artifactId>
	    <version>8.0.19</version>
	</dependency>

2.配置文件配置路径、账号、密码、驱动类
	spring:
	  datasource:
	      url: jdbc:mysql://192.168.0.161:3306/newpn?useUnicode=true&characterEncoding=utf8&zeroDateTimeBehavior=convertToNull&useSSL=true&serverTimezone=GMT%2B8&allowMultiQueries=true
	      username: root
	      password: password
	      driver-class-name: com.mysql.jdbc.Driver
postgresql
1.pom加postgresql驱动包
	   <dependency>
            <groupId>org.postgresql</groupId>
            <artifactId>postgresql</artifactId>
            <scope>runtime</scope>
        </dependency>

2.配置文件配置路径、账号、密码、驱动类
	spring:
		  datasource:
		    url: jdbc:postgresql://10.10.62.7:54321/substation?useSSL=false
		    username: postgres
		    password: 123456
		    driver-class-name: org.postgresql.Driver
druid
1.pom加驱动包
	<!-- druid数据源驱动 -->
	<dependency>
	    <groupId>com.alibaba</groupId>
	    <artifactId>druid-spring-boot-starter</artifactId>
	    <version>1.1.0</version>
	</dependency>

2.配置文件
四、整合redis
1.pom引入依赖
	<dependency>
	    <groupId>org.springframework.boot</groupId>
	    <artifactId>spring-boot-starter-data-redis</artifactId>
	</dependency>

2.yml配置文件
	# redis数据库(默认为0)
	spring:
	  redis:
	      database: 6             #redis哪个库
	      host: localhost         # Redis服务器地址
	      port: 6379              # Redis服务器连接端口
	      password:
	      pool.max-active: 8      #连接池最大连接数
	      pool.max-wait: -1       #连接池最大阻塞等待时间
	      pool.max-idle: 8        #连接池中的最大空闲连接
	      pool.min-idle: 0        #连接池中的最小空闲连接
	      timeout: 5000           #连接超时时间(毫秒)

3.声明
  @Autowired
  private RedisTemplate redisTemplate;
  @Autowired
  private final StringRedisTemplate stringRedisTemplate;

4.使用

添加值:stringRedisTemplate.opsForValue().set(key, validCode, DEFAULT_VALID_CODE_TIME_OUT, TimeUnit.MINUTES);
移除值:template.delete(key);
五、整合jpa和querydsl
jpa
1.pom依赖
       <!--spring-boot-starter-data-jpa  要放在mybatis的上面不然报错-->
        <dependency>
            <groupId>org.springframework.boot</groupId>
            <artifactId>spring-boot-starter-data-jpa</artifactId>
            <version>2.2.4.RELEASE</version>
        </dependency>
          <!--postgresql-->
        <dependency>
            <groupId>org.postgresql</groupId>
            <artifactId>postgresql</artifactId>
            <scope>runtime</scope>
        </dependency>

2.配置文件配置数据源
	spring:
	  datasource:
	    url: jdbc:postgresql://10.10.4.129:54321/substation
	    username: postgres
	    password: 123456

3.实体类
	@Data
	@Entity
	@Table(name="t_user")
	public class UserEntity {
	    @Id
	    @Column(name = "id")
	    private String id;

	    @Column(name = "user_name")
	    private String userName;

	    @Column(name = "user_number")
	    private String userNumber;
	}

4.dao文件
	@Repository
	public interface UserDao extends JpaRepository<UserEntity, String> {

	    List<UserEntity> findByUserNameAndUserNumber(String userName, String userNumber);

	    List<UserEntity> findByUserNameOrUserNumber(String userName, String userNumber);

	    @Query(value = "select * from t_user where user_name=?1 or user_number = ?1", nativeQuery = true)
	    List<UserEntity> findByUserNameOrUserNumber(String userName);
	}


5.控制层和service层引用dao
querydsl
1.pom加入依赖 和生成q文件的插件
        <!--spring-boot-starter-data-jpa-->
        <dependency>
            <groupId>org.springframework.boot</groupId>
            <artifactId>spring-boot-starter-data-jpa</artifactId>
            <version>2.2.4.RELEASE</version>
        </dependency>
        <!--querydsl-jpa-->
        <dependency>
            <groupId>com.querydsl</groupId>
            <artifactId>querydsl-jpa</artifactId>
            <version>4.2.2</version>
        </dependency>
        <!--querydsl-apt-->
        <dependency>
            <groupId>com.querydsl</groupId>
            <artifactId>querydsl-apt</artifactId>
            <version>4.2.2</version>
            <scope>provided</scope>
        </dependency>
        <!--postgresql-->
        <dependency>
            <groupId>org.postgresql</groupId>
            <artifactId>postgresql</artifactId>
            <scope>runtime</scope>
        </dependency>

			 <!--QueryDSL生成Q文件的插件-->
            <plugin>
                <groupId>com.mysema.maven</groupId>
                <artifactId>apt-maven-plugin</artifactId>
                <version>1.1.3</version>
                <executions>
                    <execution>
                        <goals>
                            <goal>process</goal>
                        </goals>
                        <configuration>
                            <outputDirectory>target/generated-sources/java</outputDirectory>
                            <processor>com.querydsl.apt.jpa.JPAAnnotationProcessor</processor>
                        </configuration>
                    </execution>
                </executions>
            </plugin>

2.写实体类Entity文件
	@Data
	@Entity
	@Table(name = "t_user")
	public class UserEntity {
	    @Id
	    @Column(name = "id")
	    private String id;

	    @Column(name = "user_name")
	    private String userName;

	    @Column(name = "user_number")
	    private String userNumber;
	}

3.生成Q文件,生成地址写在pom文件的Q插件里面的outputDirectory

4.把Q文件从target文件夹移动到java文件夹

5.控制层或者Service层使用
   a.类上面声明queryFactory
		private final JPAQueryFactory queryFactory;

	    @Autowired
	    public UserController(EntityManager entityManager) {
	        this.queryFactory = new JPAQueryFactory(entityManager);
	    }

   b.方法中使用
        @GetMapping("get2")
	    public String get2() {
	        QUserEntity qUserEntity = QUserEntity.userEntity;

	        //结果映射
	        Map<String, Expression<?>> resultMap = buildMap();
	        //条件
	        List<Predicate> predicateList = buildPredicateList(new UserEntity());

	        //简单查询
	        List<String> userNames = queryFactory.select(qUserEntity.userName).from(qUserEntity).fetch();
	        //带条件和结果映射的查询
	        List<UserEntity> users = queryFactory
	                .select(Projections.bean(UserEntity.class, buildMap()))
	                .from(qUserEntity)
	                .where(predicateList.toArray(new Predicate[0]))
	                .fetch();

	        return "aa";
	    }

	    //构建结果映射
	    private Map<String, Expression<?>> buildMap() {
	        QUserEntity qUserEntity = QUserEntity.userEntity;
	        Map<String, Expression<?>> resultMap = new HashMap<>();
	        resultMap.put("id", qUserEntity.id);
	        resultMap.put("userName", qUserEntity.userName);
	        return resultMap;
	    }

	    //构建条件查询
	    private List<Predicate> buildPredicateList(UserEntity searchUserDto) {
	        searchUserDto.setUserName("lhc");

	        List<Predicate> predicateList = new ArrayList<>();

	        QUserEntity qUserEntity = QUserEntity.userEntity;
	        if (!StringUtils.isEmpty(searchUserDto.getUserName())) {
	            predicateList.add(qUserEntity.userName.like("%" + searchUserDto.getUserName() + "%"));
	        }
	        if (!StringUtils.isEmpty(searchUserDto.getUserNumber())) {
	            predicateList.add(qUserEntity.userNumber.like("%" + searchUserDto.getUserNumber() + "%"));
	        }
	        return predicateList;
	    }
六、整合Mabatis
1.pom依赖
//1.mybatis和mysql依赖包
<!-- mybatis 要放在jpa的下面不然报错-->
<dependency>
    <groupId>org.mybatis.spring.boot</groupId>
    <artifactId>mybatis-spring-boot-starter</artifactId>
    <version>2.1.1</version>
</dependency>
<!--mysql驱动包-->
<dependency>
    <groupId>mysql</groupId>
    <artifactId>mysql-connector-java</artifactId>
    <version>8.0.19</version>
</dependency>
2.配置文件
//2.配置文件
spring:
  # mysql数据库
  datasource:
      url: jdbc:mysql://192.168.0.161:3306/newpn?useUnicode=true&characterEncoding=utf8&zeroDateTimeBehavior=convertToNull&useSSL=true&serverTimezone=GMT%2B8&allowMultiQueries=true
      username: root
      password: password
      driver-class-name: com.mysql.jdbc.Driver

mybatis:
    mapper-locations: classpath*:mapper/*.xml
3.mapper.xml 写在resource里面
<mapper namespace="com.module.web.mapper.RoleMenuMapper">

   <select id="selectRoleMenuList" resultType="string">
      select * from sys_menu
   </select>
</mapper>
4.mapper.java
@Mapper
@Repository
public interface RoleMenuMapper {

    public String selectRoleMenuList();
}
5.如果提示找不到mapper的方法或者ivalidstatement的
在主启动类加注解@MapperScan("com.jw.mva.repository")
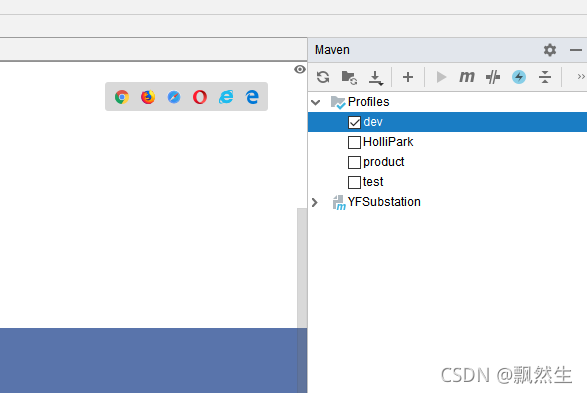
七、有不同的配置文件
方式一
1.application.yml文件添加如下
spring:
  profiles:
    active: #spring.profiles.active#
2.然后多个配置文件

3.启动如下截图或者在主配置文件active写dev

方式二
<profiles>
        <profile>
            <!-- 本地开发环境 -->
            <id>dev</id>
            <properties>
                <profiles.active>dev</profiles.active>
            </properties>
            <activation>
                <!-- 设置默认激活这个配置 -->
                <activeByDefault>true</activeByDefault>
            </activation>
        </profile>
        <profile>
            <!-- 发布环境 -->
            <id>product</id>
            <properties>
                <profiles.active>product</profiles.active>
            </properties>
        </profile>
        <profile>
            <!-- 测试环境 -->
            <id>test</id>
            <properties>
                <profiles.active>test</profiles.active>
            </properties>

        </profile>
    </profiles>
八、maven设置编译包含springboot项目resource下的文件夹下的文件
<build>
        <resources>
            <resource>
                <directory>src/main/resources</directory>
                <filtering>false</filtering>
                <includes>
                <include>*</include>   //要有这个,不然第一层目录的文件都没有嘞
                    <include>certs/*.*</include>
                </includes>
            </resource>
        </resources>
        <plugins>
            <plugin>
                <groupId>org.springframework.boot</groupId>
                <artifactId>spring-boot-maven-plugin</artifactId>
<!--                <configuration>-->
<!--                    <includeSystemScope>true</includeSystemScope>-->
<!--                </configuration>-->
            </plugin>
        </plugins>
    </build>
九、maven设置编译不包含springboot项目resource下的文件夹下的文件
<plugin>
    <groupId>org.apache.maven.plugins</groupId>
    <artifactId>maven-resources-plugin</artifactId>
    <configuration>
        <encoding>UTF-8</encoding>
        <nonFilteredFileExtensions>
            <nonFilteredFileExtension>xls</nonFilteredFileExtension>
            <nonFilteredFileExtension>xlsx</nonFilteredFileExtension>
            <nonFilteredFileExtension>jks</nonFilteredFileExtension>
        </nonFilteredFileExtensions>
    </configuration>
</plugin>


 511
511


 被折叠的 条评论
为什么被折叠?
被折叠的 条评论
为什么被折叠?
 到【灌水乐园】发言


