


Apache配置与应用
Apache HTTP Server之所以受到众多企业的青睐,得益于其代码开源、跨平台、功能模块化、可灵活定制等诸多优点,不仅性能稳定,在安全性方面的表现也十分出色。
Apache连接保持
HTTP是属于应用层的面向对象协议,基于TCP协议之上的可靠传输。每次在进行HTTP连接之前,需要先进行TCP连接,在HTTP连接结束后要对TCP连接进行终止,每个TCP连接都需要进行三次握手与四次断开。HTTP协议不会对之前发生过的请求和响应进行管理,所以建立与关闭连接对于HTTP而言会消耗更多的内存与CPU资源。能不能允许通过同一个TCP连接发出多个请求,从而减少与多个连接相关的延迟,解决办法就是连接保持。
对于HTTP/1.1,就是尽量地保持客户端的连接,通过一个连接传送多个HTTP请求响应,对于客户端可以提高50%以上的响应时间,对于服务器可以降低资源开销。Apache通过设置配置文件httpd.conf中相关的连接保持参数开启与控制连接保持功能。
KeepAlive
决定是否打开连接保持功能,后面接OFF表示关闭,接ON表示打开,可以根据网站的并发请求量决定是否打开,即在高并发时打开连接保持功能,并发量不高时关闭此功能。
KeepAliveTimeout
表示一次连接多次请求之间的最大间隔时间,即两次请求之间超过该时间连接就会自动断开,从而避免客户端占用连接资源。
MaxKeepAliveRequests
用于设置在一次长连接中可以传输的最大请求数量,超过此最大请求数量就会断开连接,最大值的设置决定于网站中网页的内容, 一般设置数量会多于网站中所有的元素。
Apache的访问控制
为了更好地控制对网站资源的访问,可以为特定的网站目录添加访问授权。这里介绍客户机地址限制、用户授权限制,这两种访问控制方式都应用于httpd.conf配置文件中的目录区域<Directory>…</Directory>([dəˈrektəri])范围内。
客户机地址限制
通过Require( [rɪˈkwaɪər] 需要)配置项,可以根据客户端的主机名或IP地址来决定是否允许客户端访问。在httpd服务的主配置文件的<Location>、<Directory>、<Files>、<Limit>配置段中均可以使用Require配置项来控制客户端的访问。使用Require配置项时,需要设置客户端地址以构成完整的限制策略,地址形式可以是IP地址、网络地址、主机名或域名。当Require配置项之后为"all’时,表示匹配任意地址。限制策略的格式如下所示。
- Require all granted: 允许所有主机访问;
- Require all denied( [dɪˈnaɪd] ): 拒绝所有主机访问;
- Require local: 仅允许本地主机访问;
- Require [not] host <主ip机名或域名列表>: 允许或拒绝指定主机或域名访问;
- Require [not] ip <主机名或域名列表>: 允许或拒绝指定ip地址网络访问。
通常情况下,网站服务器是对所有客户机开放的,网页文档目录并未做任何限制,因此使用的是"Require all granted’"的策略, 表示允许从任何客户机访问,策略格式如下所示。
<Directory "/usr/local/httpd/htdocs">
   .....//省略部分内容
   Require all granted
</Directory>
定义限制策略时,多个不带"not”的Require配置语句之间是"或”的关系,即任意一条Require配置语句满足条件均可访问。若既出现了不带”not”的Require 配置语句,又出现了带"not’的Require配置语句,则配置语句之间是"与”的关系,即同时满足所有Require配置语句才能访问。
需要使用“仅允许"的限制策略时,应使用Require配置语句明确设置允许策略,只允许一部分主机访问。例如,若只希望IP地址为173.17.17.2的主机能够访问,目录区域应做如下设置。
<Directory "/usr/local/httpd/htdocs/wwwtest">
   .....//省略部分内容
   Require ip 173.17.17.2
</Directory>
反之,需要使用“仅拒绝”的限制策略时,灵活使用Require与Require not配置语句设置拒绝访问策略,仅禁止一部分主机访问。 在使用not禁止访问时要将其置于容器中,并在容器中设置相应的限制策略。例如,若只希望禁止来自两个内网网段192.168.0.0/24和192.1 68.1.0/24的主机访问,但允许其他任何主机访问,可以使用如下限制策略。
<Directory "/usr/local/httpd/htdocs/wwwroot">
   .....//省略部分内容
   <RequireAll>
      Require all granted
      Require not ip 192.168.0.0/24 192.168.1.0/24
   </RequireAll>
</Directory>
注
<RequireAll></RequireAll>在此元素中包含的规则,拒绝优先执行<RequireAny></RequireAny>在此元素中包含的规则,允许优先执行
总结
# 默认是<RequireAny>
# not的Require指令在<requireny>中不起作用
# 即<requireny>中唯一能够使用的拒绝访问控制是拒绝所有(Require all denied)

# 拒绝优先执行
# 允许所有访问,只拒绝192.168.215.1访问
<RequireAll>
Require all granted
Require not ip 192.168.215.1
</RequireAll>


# 允许优先执行
# 拒绝所有访问,只允许127.0.0.1访问
<RequireAny>
Require all denied
Require ip 127.0.0.1
</RequireAny>
历史版本的设置方法
# Allow( [əˈlaʊ] )和Deny([dɪˈnaɪ] )可以用于apache的conf文件或者.htaccess文件中(配合Directory, Location, Files等),用来控制目录和文件的访问授权。
# 所以,最常用的是:
Order Deny,Allow
Allow from All

# 注意“Deny,Allow”中间只有一个逗号,也只能有一个逗号,有空格都会出错;单词的大小写不限。上面设定的含义是先设定“先检查禁止设定,没有禁止的全部允许”,而第二句没有Deny,也就是没有禁止访问的设定,直接就是允许所有访问了。这个主要是用来确保或者覆盖上级目录的设置,开放所有内容的访问权。

# 按照上面的解释,下面的设定是无条件禁止访问:
Order Allow,Deny
Deny from All

# 如果要禁止部分内容的访问,其他的全部开放:
Order Deny,Allow
Deny from ip1 ip2
或者
Order Allow,Deny
Allow from all
Deny from ip1 ip2

# apache会按照order决定最后使用哪一条规则,比如上面的第二种方式,虽然第二句allow允许了访问,但由于在order中allow不是最后规则,因此还需要看有没有deny规则,于是到了第三句,符合ip1和ip2的访问就被禁止了。注意,order决定的“最后”规则非常重要,下面是两个错误的例子和改正方式:

Order Deny,Allow
Allow from all
Deny from domain.org
# 错误:想禁止来自domain.org的访问,但是deny不是最后规则,apache在处理到第二句allow的时候就已经匹配成功,根本就不会去看第三句。
# 解决方法:Order Allow,Deny,后面两句不动,即可。
Order Allow,Deny
Allow from ip1
Deny from all
# 错误:想只允许来自ip1的访问,但是,虽然第二句中设定了allow规则,由于order中deny在后,所以会以第三句deny为准,而第三句的范围中又明显包含了ip1(all include ip1),所以所有的访问都被禁止了。
# 解决方法一:直接去掉第三句。
# 解决方法二:
Order Deny,Allow
Deny from all
Allow from ip1
用户授权限制
httpd服务器支持使用摘要认证(Digest( [daɪˈdʒest , ˈdaɪdʒest] )) 和基本认证(Basic)两种方式。使用摘要认证需要在编译httpd之前添加"–enable-auth-digest"选项,但并不是所有的浏览器都支持摘要认证;而基本认证是httpd服务的基本功能,不需要预先配置特别的选项。
基于用户的访问控制包含认证(Authentication) 和授权(Authorization) 两个过程。认证是指识别用户身份的过程,授权是指允许特定用户访问特定目录区域的过程。下面将以基本认证方式为例,添加用户授权限制。
1.创建用户认证数据文件
httpd的基本认证通过校验用户名、密码组合来判断是否允许用户访问。授权访问的用户账号需要事先建立,并保存在固定的数据文件中。使用专门的htpasswd工具程序,可以创建授权用户数据文件,并维护其中的用户账号。
使用htpasswd工具时,必须指定用户数据文件的位置,添加”-C"选项表示新建立此文件。例如,执行以下操作可以新建数据文件/usr/local/httpd/conf/ .awspwd,其中包含一个名为webadmin的用户信息。
$ cd /usr/local/httpd/

$ htpasswd -c /usr/local/httpd/conf/.awspwd webadmin
New password:
Re-type new password:
Adding password for user webadmin

$ cat /usr/local/httpd/conf/.awspwd
webadmin:$apr1$ZruUhlsU$c8ipQG0DLC1RwV5EuwwJV.
若省略"-C“选项,则表示指定的用户数据文件已经存在,用于添加新的用户或修改现有用户的密码。例如,需要向.awspwd数据文件中添加一个新用户kcce时,可以执行以下操作。
$ htpasswd /usr/local/httpd/conf/.awspwd kcce
New password:
Re-type new password:
Adding password for user kcce

$ cat /usr/local/httpd/conf/.awspwd
webadmin:$apr1$ZruUhlsU$c8ipQG0DLC1RwV5EuwwJV.
kcce:$apr1$z/CPkNmW$3p5NTSHQ6OhEGVYtNmM5e1
2、添加用户授权配置
有了授权用户账号以后,还需要修改httpd.conf配置文件,在特定的目录区域中添加授权配置,以启用基本认证并设置允许哪些用户访问。例如,若只允许. awspwd数据文件中的任一用户访问系统,可以执行以下操作。
$ vim /usr/local/httpd/conf/httpd.conf
# 忽略部分内容
<Directory "/usr/local/httpd/htdocs">
# 忽略部分内容
# 将Require all granted注释
# 并添加:
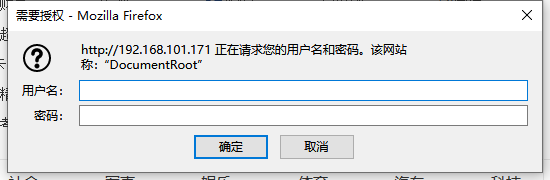
AuthName "DocumentRoot"
AuthType Basic
Authuserfile /usr/local/httpd/conf/.awspwd
Require valid-user
</Directory>
$ systemctl restart httpd //重启服务使配置生效
在上述配置内容中,相关配置项的含义如下。
- AuthName: 定义受保护的领域名称,该内容将在浏览器弹出的认证对话框中显示。
- AuthType: 设置认证的类型,Basic表示基本认证。
- AuthUserFile: 设置用于保存用户账号、密码的认证文件路径。
- require valid-user:要求只有认证文件中的合法用户才能访问。其中,valid-user 表示所有合法用户,若只授权给单个用户,可改为指定的用户名(如webadmin) .
3.验证用户访问授权
当访问系统时,浏览器会首先弹出认证对话框,只有输入正确的用户名和密码后才能查看日志分析报告,否则将拒绝访问。
Apache日志分割
随着网站的访问量越来越大,默认情况下Apache服务器产生的单个日志文件也会越来越大,如果不对日志进行分割,那么如果日志文件占用磁盘空间很大的话势必会将整个日志文件删除,这样也丢失了很多对网站比较宝贵的信息,而这些日志可以用来进行访问分析、网络安全监察、网络运行状况监控等。另外,如果服务器遇到故障时,运维人员要打开日志文件进行分析,打开的过程会消耗很长时间,也势必会增加处理故障的时间。因此管理好这些海量的日志对网站的意义很大,我们会将Apache的日志进行按每天的日期自动分割。下面介绍两种方法均可实现。
1、Apache自带rotatelogs分割工具
(rotate [ˈroʊteɪt] 旋转)首先我们将Apache主配置文件httpd.conf打开,配置网站的日志文件转交给rotatelogs分割处理。
$ vim /usr/local/httpd/conf/httpd.conf
# 添加
ErrorLog "|/usr/local/bin/rotatelogs -l /usr/local/httpd/logs/error_%Y%m%d.log 86400"
# Custom [ˈkʌstəm] 自定义
CustomLog "|/usr/local/bin/rotatelogs -l /usr/local/httpd/logs/access_%Y%m%d.log 86400" common

$ systemctl restart httpd

$ ll /usr/local/httpd/logs/
total 28
-rw-r--r--. 1 root root 11680 Apr 17 04:31 access_log
-rw-r--r--  1 root root   287 Apr 17 04:47 error_20200417.log
-rw-r--r--. 1 root root  6180 Apr 17 04:43 error_log
-rw-r--r--  1 root root     5 Apr 17 04:47 httpd.pid
- 其中ErrorLog行是错误日志,不用太多关注,一般不会记录错误的访问,-l表示使用本地时间代替UTC时间作为时间基准。
- CustomLog行是定义访问日志格式,86400的单位是秒,表示一 天,即每天生成一个新的日志文件。
2、使用第三方工具cronolog分割
cronolog主要和Web服务器配置使用,可以将日志文件按时间分割,易于管理和分析。
安装:
$ wget http://ftp.sjtu.edu.cn/fedora/epel/6/i386/epel-release-6-8.noarch.rpm
$ rpm -ivh epel-release-6-8.noarch.rpm
$ yum install -y cronolog
配置:
$ vim /usr/local/httpd/conf/httpd.conf
Errorlog "|/usr/sbin/cronolog /usr/local/httpd/logs/%Y/%m/%d/error_%Y%m%d.log"
Customlog "|/usr/sbin/cronolog /usr/local/httpd/logs/%Y/%m/%d/access_%Y%m%d.log" common

$ systemctl restart httpd.service

$ tree -c logs/
logs/
├── 2020
│   └── 04
│       └── 17
│           └── error_20200417.log
├── httpd.pid
├── error_20200417.log
├── error_log
└── access_log
AWStats日志分析
在httpd服务器的访问日志文件access_log中,记录了大量的客户机访问信息,通过分析这些信息,可以及时了解Web站点的访问情况,如每天或特定时间段的访问IP数量,点击量最大的页面等。 本节将介绍如何安装AWStats日志分析系统,以完成自动化的日志分析与统计工作。
1、部署AWStats分析系统
AWStats是使用Perl语言开发的一款开源日志分析系统,它不仅可用来分析Apache网站服务器的访问日志,也可以用来分析Samba、Vsftpd、 IIS 等服务的日志信息。结合crond等计划任务服务,可以对不断增长的日志内容定期进行分析。
1.安装AWStats软件包
awstats软件包的安装非常简单,只需将软件包解压到httpd服务器中的/usr/local/目录下即可。
$ wget http://prdownloads.sourceforge.net/awstats/awstats-7.7.tar.gz
# 备用
$ wget http://prdownloads.sourceforge.net/awstats/awstats-7.0.tar.gz
$ tar -zxvf awstats-7.7.tar.gz
$ mv awstats-7.7 /usr/local/awstats
2.为要统计的站点建立配置文件
AWStats系统支持统计多个网站的日志文件,通常以网站名称来区分不同的站点。因此,在执行日志文件分析之前,需要为每个Web站点建立站点统计配置文件,借助于AWStats系统提供的awstats_configure.pI脚本可以简化创建过程。执行脚本之后将会进入一个交互式的配置过程,将会检查awstats的安装目录、httpd服务的配置文件路径、日志记录格式等系统环境,并提示用户指定站点名称、设置配置文件路径。
$ cd /usr/local/awstats/tools
$ ./awstats_configure.pl
----- AWStats awstats_configure 1.0 (build 20140126) (c) Laurent Destailleur -----
This tool will help you to configure AWStats to analyze statistics for
one web server. You can try to use it to let it do all that is possible
in AWStats setup, however following the step by step manual setup
documentation (docs/index.html) is often a better idea. Above all if:
- You are not an administrator user,
- You want to analyze downloaded log files without web server,
- You want to analyze mail or ftp log files instead of web log files,
- You need to analyze load balanced servers log files,
- You want to 'understand' all possible ways to use AWStats...
Read the AWStats documentation (docs/index.html).

-----> Running OS detected: Linux, BSD or Unix

-----> Check for web server install

Enter full config file path of your Web server.
Example: /etc/httpd/httpd.conf
Example: /usr/local/apache2/conf/httpd.conf
Example: c:\Program files\apache group\apache\conf\httpd.conf
Config file path ('none' to skip web server setup):
> /usr/local/httpd/conf/httpd.conf	# 输入Apache主配置文件

-----> Check and complete web server config file '/usr/local/httpd/conf/httpd.conf'
Warning: You Apache config file contains directives to write 'common' log files
This means that some features can't work (os, browsers and keywords detection).
Do you want me to setup Apache to write 'combined' log files [y/N] ? y	# 是否将Apache日志格式设置成combined([kəmˈbaɪnd]合并)(默认是common([ˈkɑːmən] 常见的))
  Add 'Alias /awstatsclasses "/usr/local/awstats/wwwroot/classes/"'
  Add 'Alias /awstatscss "/usr/local/awstats/wwwroot/css/"'
  Add 'Alias /awstatsicons "/usr/local/awstats/wwwroot/icon/"'
  Add 'ScriptAlias /awstats/ "/usr/local/awstats/wwwroot/cgi-bin/"'
  Add '<Directory>' directive
  AWStats directives added to Apache config file.

-----> Update model config file '/usr/local/awstats/wwwroot/cgi-bin/awstats.model.conf'
  File awstats.model.conf updated.

-----> Need to create a new config file ?
Do you want me to build a new AWStats config/profile
file (required if first install) [y/N] ? y	#是否创建一个新的AwStats配置文件

-----> Define config file name to create
What is the name of your web site or profile analysis ?
Example: www.mysite.com
Example: demo
Your web site, virtual server or profile name:
> 192.168.101.171	# Apache网站的域名

-----> Define config file path
In which directory do you plan to store your config file(s) ?
Default: /etc/awstats
Directory path to store config file(s) (Enter for default):
>

-----> Create config file '/etc/awstats/awstats.192.168.101.171.conf'
 Config file /etc/awstats/awstats.192.168.101.171.conf created.

-----> Restart Web server with '/sbin/service httpd restart'
Redirecting to /bin/systemctl restart httpd.service

-----> Add update process inside a scheduler
Sorry, configure.pl does not support automatic add to cron yet.
You can do it manually by adding the following command to your cron:
/usr/local/awstats/wwwroot/cgi-bin/awstats.pl -update -config=192.168.101.171
Or if you have several config files and prefer having only one command:
/usr/local/awstats/tools/awstats_updateall.pl now
Press ENTER to continue...


A SIMPLE config file has been created: /etc/awstats/awstats.192.168.101.171.conf
You should have a look inside to check and change manually main parameters.
You can then manually update your statistics for '192.168.101.171' with command:
> perl awstats.pl -update -config=192.168.101.171
You can also read your statistics for '192.168.101.171' with URL:
> http://localhost/awstats/awstats.pl?config=192.168.101.171

Press ENTER to finish...
3、后续配置工作
Apache2.4以上版本,因为重新定义了访问权限,所以需要将自动生成的awstats访问权限进行相应修改。同时,加载CGI模块。
$ vim /usr/local/httpd/conf/httpd.conf
# 在  下加入或修改
ErrorLog "|/usr/local/bin/rotatelogs -l /usr/local/httpd/logs/error_%Y%m%d.log 86400"
CustomLog "|/usr/sbin/cronolog /usr/local/httpd/logs/%Y/%m/%d/access_%Y%m%d.log" combined


<IfModule !mpm_prefork_module>
    LoadModule cgid_module modules/mod_cgid.so
</IfModule>
<IfModule mpm_prefork_module>
    LoadModule cgi_module modules/mod_cgi.so
</IfModule>

<Directory "/usr/local/awstats/wwwroot">
    Options None
    AllowOverride None
    #Order allow,deny
    #Allow from all
    Require all granted
</Directory>

$ systemctl restart httpd

# 报错修改 搜索"#ServerName",添加ServerName localhost:80
4、修改站点统计配置文件
为站点建立好配置文件以后,还需要对其做进一步的修改。 修改的内容主要包括指定要分析的Web日志文件和指定用来存放统计数据的目录。
$ vim /etc/awstats/awstats.192.168.101.171.conf
LogFile="/usr/local/httpd/logs/%YYYY-0/%MM-0/%DD-0/access_%YYYY-0%MM-0%DD-0.log"
DirData="/var/lib/awstats"

$ mkdir /var/lib/awstats
5.执行日志分析,并设置cron计划任务
使用AWStats提供的awstats_updateall.pl脚本,可以更新所有站点(根据站点配置文件)的日志统计数据。执行该脚本时,系统将会自动分析新增的日志内容,并将分析结果更新到统计数据库中。
$ /usr/local/awstats/tools/awstats_updateall.pl now
Running '"/usr/local/awstats/wwwroot/cgi-bin/awstats.pl" -update -config=192.168.101.171 -configdir="/etc/awstats"' to update config 192.168.101.171
Running '"/usr/local/awstats/wwwroot/cgi-bin/awstats.pl" -update -config=192.168.101.171 -configdir="/etc/awstats"' to update config 192.168.101.171
Create/Update database for config "/etc/awstats/awstats.192.168.101.171.conf" by AWStats version 7.7 (build 20180105)
From data in log file "/usr/local/httpd/logs/2020/04/17/access_20200417.log"...
Phase 1 : First bypass old records, searching new record...
Searching new records from beginning of log file...
Phase 2 : Now process new records (Flush history on disk after 20000 hosts)...
Jumped lines in file: 0
Parsed lines in file: 6
 Found 0 dropped records,
 Found 0 comments,
 Found 0 blank records,
 Found 2 corrupted records,
 Found 0 old records,
 Found 4 new qualified records.

 # 如确认日志格式已修改且出现以下问题,可尝试删除日志文件重新生成。
 AWStats did not find any valid log lines that match your LogFormat parameter, in the 50th first non commented lines read of your log.
Your log file /usr/local/httpd/logs/access_log must have a bad format or LogFormat parameter setup does not match this format.
...
...
Setup ('/etc/awstats/awstats.www.kgc.com.conf' file, web server or permissions) may be wrong.
Check config file, permissions and AWStats documentation (in 'docs' directory).

$ rm /usr/local/httpd/logs/access_log
由于Web日志文件的内容是在不断更新的,为了及时反馈网站访问情况,日志分析工作也需要定期、自动地执行。通过crond服务可设置计划任务,一般建议每五分钟执行一次日志分析任务。
$ crontab -e
*/5 * * * * /usr/local/awstats/tools/awstats_updateall.pl now &> /dev/null
2、访问AWStats分析系统
访问站点http://192.168.101.171/awstats/awstats.pl?config=192.168.101.171后,即可看到AWStats日志分析系统的统计页面,该页面分别按访问时间、用户来源、所用浏览器等类别列出各种详细的网站访问情况,若此处访问出现403 Forbidden错误,关闭selinux即可正常访问。

在该页面中,拖动窗口右侧的滚动条即可查看整个分析报告内容;或者单击左侧导航栏中的链接,可以选择查看其中的部分内容。
在"按参观时间”类别下,可以查看每小时、每天、每周、每月的网站访问次数、网页数、文件数等信息。
在“浏览器统计”类别下,可以查看用户的参观时间、所用的操作系统、浏览器版本.搜索本网站的关键词等相关信息。
在访问AWStats系统时,需要指定awstats目录、脚本位置、统计目标等信息,这样既不便于记忆,输入时也比较麻烦。为了简化操作,可以在Web根目录下建立一个自动跳转的HTML网页。
$ cat /usr/local/httpd/htdocs/awb.html
<html>
<head>
</head>
<body>
<a href='http://192.168.101.171/awstats/awstats.pl?config=192.168.101.171'>awstats</a>
</body>
</htm1>


 184
184


 被折叠的 条评论
为什么被折叠?
被折叠的 条评论
为什么被折叠?
 到【灌水乐园】发言


