


Spring Cloud 实战: 使用 Netflix Ribbon 实现服务发现 & 负载均衡(Service Discovery & Load Balancing)
文章目录
简介
前一篇Spring Cloud 实战: 手把手带你用 Netflix Eureka 实现微服务注册/发现(Service Discovery)我们实现了一个微服务集群,每个服务作为一个 Eureka Client 向 Eureka Server 注册后提供服务。然而前一篇存在一个问题在于我们实际上并没有用上所谓的服务发现(Service Discovery)功能,而仅仅只是注册后直接透过完整路由(host + port)访问调用服务。
本篇就就来使用 Eureka 的依赖中已经包含的 Ribbon 依赖来达成我们的目标。
参考
| ribbon 代码配置 | https://blog.csdn.net/anita9999/article/details/82262000 |
| Spring Cloud Netflix-客户侧负载均衡器:Ribbon | https://www.springcloud.cc/spring-cloud-netflix.html |
| Ribbon之IClientConfig、IClientConfigKey | https://blog.51cto.com/881206524/2141718 |
| Ribbon负载均衡策略配置 | https://blog.csdn.net/rickiyeat/article/details/64918756 |
| Ribbon之IPing | https://blog.csdn.net/weixin_34148340/article/details/93079295 |
| Ribbon之ServerList | https://blog.csdn.net/weixin_33778544/article/details/93079297 |
| Ribbon之ILoadBalancer | https://blog.51cto.com/881206524/2145900 |
| SpringCloud--Ribbon--源码解析--IloadBalancer&ServerListUpdater&ServerListFilter实现 | https://www.cnblogs.com/liconglong/p/13289972.html |
正文
Ribbon 简介
作为 Eureka Client 集成的服务之一,有关 Spring Cloud 核心模块可以参考Spring Cloud 概述: 一文看懂 Spring Cloud 到底在干嘛
在本篇中主要用于实现服务发现(Service Discovery)和客户端负载均衡(Client-Load Balancing)两种核心功能,其他功能有兴趣的可以自己查查,作者不打算深究hh(后面会使用更进一步封装的 Feign 依赖)
Ribbon 配置
在开始使用之前我们先来说明 Ribbon 向外暴露的功能性接口。还记得在 Spring 里面所有对象都能被注册为 Bean,所以 Ribbon 更详细的配置可以透过设置带 @Configuration 注解的配置类,其中根据不同功能注册需要的 Bean 便能够完成我们的配置,实现大概会长这样:
// 配置类
@Configuration
public class RibbonConfig {

    // IRule 配置负载均衡策略
    @Bean
    public IRule rule() {
        return new RandomRule();
    }
}
Ribbon 可配置接口
我们透过注册指定接口的 Bean 来实现配置,下面列出可配置的相关接口
| Bean 接口 | 配置目的 | 默认实现 | 可用实现 |
|---|---|---|---|
| IClientConfig | ribbon 一般配置 | DefaultClientConfigImpl | |
| IRule | 负载均衡策略 | ZoneAvoidanceRule | BestAvailableRule AvailabilityFilteringRule WeightedResponseTimeRule RetryRule RoundRobinRule RandomRule |
| IPing | 服务器健康检测 | NoOpPing | DummyPing PingConstant PingUrl NIWSDiscoveryPing |
| ServerList<Server> | 服务器列表 | ConfigurationBasedServerList | StaticServerList DiscoveryEnabledNIWSServerList |
| ServerListFilter<Server> | 服务器过滤列表 | ZoneReferenceServerListFilter | ServerListSubsetFilter ZoneAffinityServerListFilter DefaultNIWSServerListFilter |
| ILoadBalancer | 负责均衡调度中心 | ZoneAwareLoadBalancer | BaseLoadBalancer DynamicServerListLoadBalancer NoOpLoadBalancer |
| ServerListUpdater | 服务器列表更新 | PollingServerListUpdater | EurekaNotificationServerListUpdater |
看起来还是有些复杂的,我们真正用到的也不会那么多,所以下面捡几个出来说说
IClientConfig 一般客户端配置
这个 Bean 主要用于一些基本的 Ribbon 服务发现的基础配置,如
(String)  appname 服务名
(String)  version 版本
(Integer) port 端口
(Integer) secure-port 安全端口
(String)  vip-address vip地址
(Boolean) force-client-port-configuration 客户端端口限制
(Integer) max-auto-retries 最大重试次数
(Integer) max-auto-retries-next-server 更换服务器前最大重试
(Boolean) ok-to-retry-on-all-operations 允许所有操作重试
(Boolean) request-specific-retry-on 特定请求重试
(Integer) receive-buffer-size 接受返回缓冲区大小
(Boolean) enable-prime-connections 允许存在主连接
这个通常我们可以直接仰赖 Eureka 的服务注册/发现,所以不需要自己额外配置
IRule 负载均衡策略
IRule 是告诉 ribbon 使用什么策略来做负载均衡,有一下选项
| Rule | Description |
|---|---|
| ZoneAvoidanceRule | 根据 zone 的使用性能判定 |
| BestAvailableRule | 选择最小并发请求的服务 |
| AvailabilityFilteringRule | 过滤掉标记为 circuit(可查看断路器相关说明)状态的服务 |
| WeightedResponseTimeRule | 根据响应时间为权重选择服务器 |
| RetryRule | 为负载均衡添加重试机制 |
| RoundRobinRule | 轮循方式 |
| RandomRule | 随机调用 |
IPing 健康检查
第三个配置 IPing 是服务健康检查的情况。在微服务体系中我们不能保证服务一定是存在而健壮的,可能存在单机故障、网络延迟超时、服务异常中断等多种情况,所以我们需要透过健康检查(ping)机制来保证服务的稳定性
| Ping | Description |
|---|---|
| NoOpPing | 啥也不做(就是 true) |
| DummyPing | 假的检查(永远都是 true) |
| PingConstant | 工具类实现,保存服务存活状态(可由其他服务主动修改) |
| PingUrl | 根据 url 请求后返回状态码判定 |
| NIWSDiscoveryPing | 通过 Eureka 实例检查服务可用性 |
项目实践
好了说了这么多该写一个项目来实践一下了(没错,又要开始各种配置了hhh)
基础配置 & 服务接口
版本选用
| 依赖 | 版本号 |
|---|---|
| spring-boot-starter-parent | 2.3.2.RELEASE |
| spring-cloud.version | Hoxton.SR6 |
服务配置接口
| 服务名 | 端口 | 用途 |
|---|---|---|
| eureka-server | 8800 | 微服务注册中心 |
| ribbon-service | 8801 | 服务提供者1 |
| 8802 | 服务提供者2 | |
| ribbon-client | 8803 | 客户端(负载均衡实现) |
服务接口
| appname:port | serivce |
|---|---|
| ribbon-service/info | 查看服务信息(显示实际提供服务的端口号) |
| ribbon-client/found | 发现服务(随机访问 service 服务) |
项目架构
我们启动了两个同名服务 ribbon-service,是客户端调用时有两个服务器能够选择(根据客户端负载均衡实现)
代码目录结构
/spring_cloud_ribbon
├── eureka-server # 注册中心
│   ├── pom.xml
│   └── src
│       ├── main
│       │   ├── java
│       │   │   └── com
│       │   │       └── example
│       │   │           └── server
│       │   │               └── EurekaServerApplication.java
│       │   └── resources
│       │       └── application.yml
│       └── test
├── ribbon-client
│   ├── pom.xml
│   └── src
│       ├── main
│       │   ├── java
│       │   │   └── com
│       │   │       └── example
│       │   │           └── client
│       │   │               ├── ClientController.java
│       │   │               ├── RibbonClientApplication.java
│       │   │               └── RibbonConfig.java
│       │   └── resources
│       │       └── application.yml
│       └── test
└── ribbon-service
    ├── pom.xml
    └── src
        ├── main
        │   ├── java
        │   │   └── com
        │   │       └── example
        │   │           └── service
        │   │               ├── DemoController.java
        │   │               └── RibbonServiceApplication.java
        │   └── resources
        │       ├── application-p1.yml
        │       └── application-p2.yml
        └── test
核心文件内容
eureka-server 注册中心
pom.xml:只列出核心部分
	<parent>
		<groupId>org.springframework.boot</groupId>
		<artifactId>spring-boot-starter-parent</artifactId>
    <!-- Spring Boot 版本 -->
		<version>2.3.2.RELEASE</version>
		<relativePath/> <!-- lookup parent from repository -->
	</parent>
	<groupId>com.example</groupId>
	<artifactId>eureka-server</artifactId>
	<version>0.0.1-SNAPSHOT</version>
	<name>eureka-server</name>
	<description>Demo project for Spring Boot</description>

	<properties>
		<java.version>1.8</java.version>
    <!-- Spring Cloude 版本 -->
		<spring-cloud.version>Hoxton.SR6</spring-cloud.version>
	</properties>

	<dependencies>
		<dependency>
			<groupId>org.springframework.cloud</groupId>
			<artifactId>spring-cloud-starter-netflix-eureka-server</artifactId>
		</dependency>
    <!-- ... -->
application.yml
server:
  port: 8800

eureka:
  client:
    register-with-eureka: false
    fetch-registry: false
    service-url:
      defaultZone: http://localhost:8800/eureka/
  instance:
    secure-port-enabled: false
其他就是记得在 EurekaServerApplication.java 加上 @EnableEurekaServer 就行了,没别的要写
ribbon-service 服务提供者
pom.xml:只列出核心部分
  <!-- spring boot 版本 -->
	<parent>
		<groupId>org.springframework.boot</groupId>
		<artifactId>spring-boot-starter-parent</artifactId>
		<version>2.3.2.RELEASE</version>
		<relativePath/> <!-- lookup parent from repository -->
	</parent>
  <!-- spring cloud 版本 -->
	<properties>
		<java.version>1.8</java.version>
		<spring-cloud.version>Hoxton.SR6</spring-cloud.version>
	</properties>
  <!-- eureka client -->
  <dependency>
  	<groupId>org.springframework.cloud</groupId>
  	<artifactId>spring-cloud-starter-netflix-eureka-client</artifactId>
  </dependency>
  <!-- spring boot web -->
  <dependency>
  	<groupId>org.springframework.boot</groupId>
  	<artifactId>spring-boot-starter-web</artifactId>
  </dependency>
application-p1.yml:透过指定运行参数
--spring.profiles.active=p1
server:
  port: 8801

eureka:
  instance:
    appname: ribbon-service
  client:
    service-url:
      defaultZone: http://localhost:8800/eureka/

spring:
  application:
    name: ribbon-service
application-p2.yml:透过指定运行参数
--spring.profiles.active=p2
server:
  port: 8802

eureka:
  instance:
    appname: ribbon-service
  client:
    service-url:
      defaultZone: http://localhost:8800/eureka/

spring:
  application:
    name: ribbon-service
DemoController.java
package com.example.service;

import org.springframework.beans.factory.annotation.Value;
import org.springframework.web.bind.annotation.GetMapping;
import org.springframework.web.bind.annotation.RestController;

@RestController
public class DemoController {

    @Value("${server.port}")
    private Integer port;

    @GetMapping("/info")
    public String info() {
        return "Service from " + port;
    }
}
最后记得在 RibbonServiceApplication.java 加上 @EnableEurekaClient
ribbon-client 服务使用者
pom.xml:只列出核心部分
<!-- spring boot 版本 -->
<parent>
<groupId>org.springframework.boot</groupId>
<artifactId>spring-boot-starter-parent</artifactId>
<version>2.3.2.RELEASE</version>
<relativePath/> <!-- lookup parent from repository -->
</parent>
<!-- spring cloud 版本 -->
<properties>
<java.version>1.8</java.version>
<spring-cloud.version>Hoxton.SR6</spring-cloud.version>
</properties>
<!-- eureka client -->
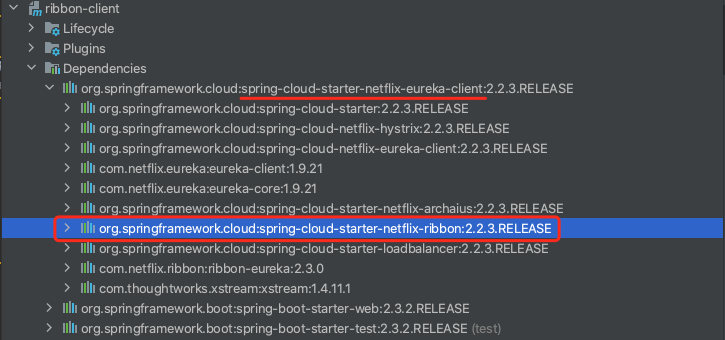
<!-- ribbon 已经包含在 eureka client 依赖里面了 -->
<dependency>
<groupId>org.springframework.cloud</groupId>
<artifactId>spring-cloud-starter-netflix-eureka-client</artifactId>
</dependency>
<!-- spring boot web -->
<dependency>
<groupId>org.springframework.boot</groupId>
<artifactId>spring-boot-starter-web</artifactId>
</dependency>
application.yml
server:
  port: 8803

eureka:
  instance:
    appname: ribbon-client
  client:
    service-url:
      defaultZone: http://localhost:8800/eureka/

spring:
  application:
    name: ribbon-client
RibbonConfig.java:Ribbon 配置类
package com.example.client;

import com.netflix.loadbalancer.IRule;
import com.netflix.loadbalancer.RoundRobinRule;
import org.springframework.context.annotation.Bean;
import org.springframework.context.annotation.Configuration;

@Configuration
public class RibbonConfig {

    @Bean
    public IRule rule() {
        // 使用轮循的负载均衡策略
        return new RoundRobinRule();
    }

}
RibbonClientApplication.java:声明
@RibbonClient为 Ribbon 客户端,透过configuration指定配置类;并注册 RestTemplate 并且加上@LoadBalanced套用 Ribbon 服务
package com.example.client;

import org.springframework.boot.SpringApplication;
import org.springframework.boot.autoconfigure.SpringBootApplication;
import org.springframework.cloud.client.loadbalancer.LoadBalanced;
import org.springframework.cloud.netflix.eureka.EnableEurekaClient;
import org.springframework.cloud.netflix.ribbon.RibbonClient;
import org.springframework.context.annotation.Bean;
import org.springframework.web.client.RestTemplate;

// name 指定 ribbon 客户端名称、configuration 指定配置类
@RibbonClient(name = "ribbon-client", configuration = RibbonConfig.class)
@EnableEurekaClient
@SpringBootApplication
public class RibbonClientApplication {

	public static void main(String[] args) {
		SpringApplication.run(RibbonClientApplication.class, args);
	}

	// 加上 @LoadBalanced 表示使用 ribbon(实现服务发现、负载均衡)
	@LoadBalanced
	@Bean
	public RestTemplate restTemplate() {
		return new RestTemplate();
	}
}
ClientController.java
package com.example.client;

import org.springframework.beans.factory.annotation.Autowired;
import org.springframework.beans.factory.annotation.Value;
import org.springframework.web.bind.annotation.GetMapping;
import org.springframework.web.bind.annotation.RestController;
import org.springframework.web.client.RestTemplate;

@RestController
public class ClientController {

    @Value("${server.port}")
    private Integer port;

    @Autowired
    private RestTemplate restTemplate;

    // 由于套用了 ribbon 服务,可以直接根据服务名 ribbon-service 查找相应微服务
    private String ribbonServiceInfoUrl = "http://ribbon-service/info";
    private int count = 0;

    @GetMapping("/found")
    public String access() {
        count++;
        String res = restTemplate.getForObject(ribbonServiceInfoUrl, String.class);
        return "Ribbon Client(port=" + port + "), " + "result=" + res + '\n' + ", request count=" + count;
    }
}
测试成果
注册中心:第一步先到注册中心查看服务启动和注册是否正确
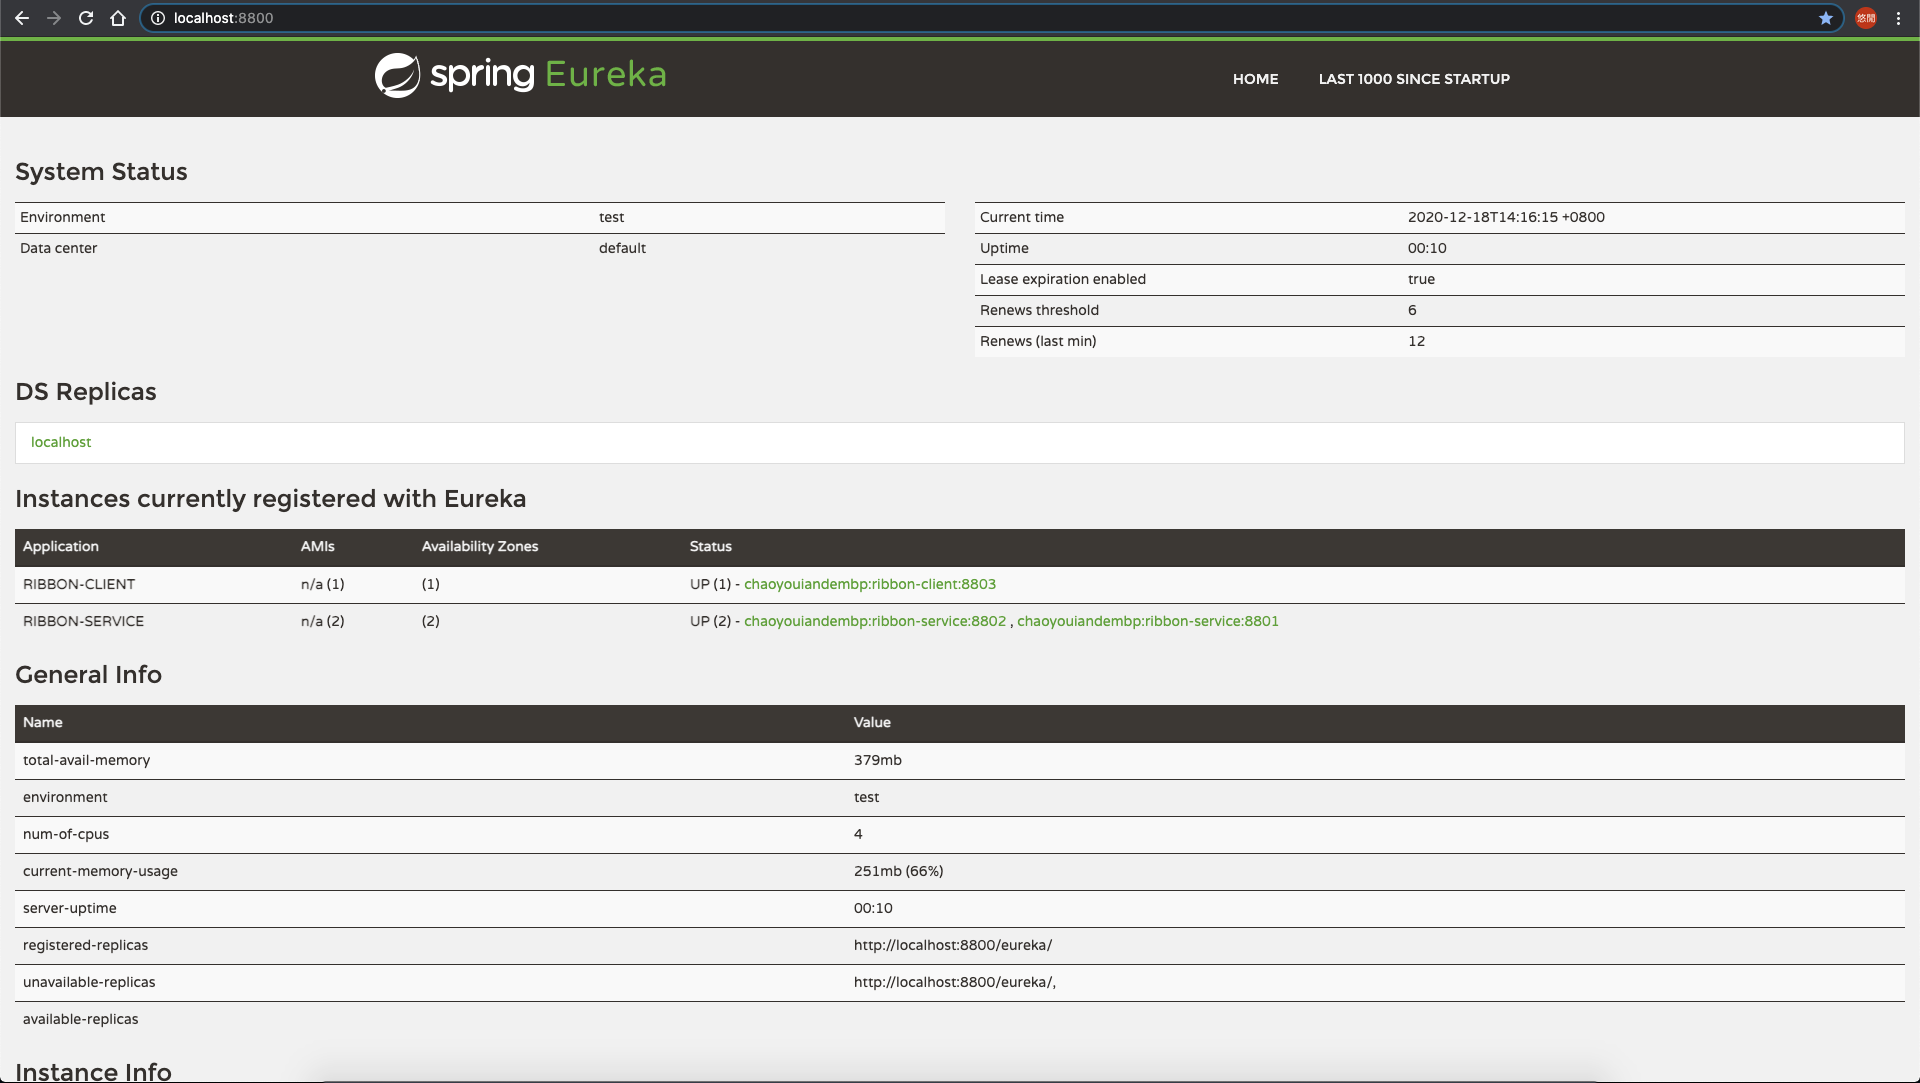
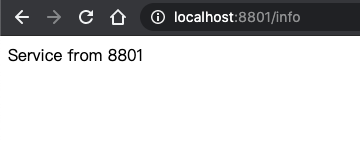
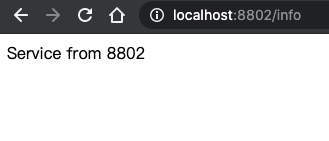
service 服务:接下来分别调用 8801、8802 的服务查看是否正常
client 客户端:最后多次访问 8803/found 查看是否能够正常调用服务,并且实现负载均衡(轮循)
- 重复访问
http://localhost:8803/found得到的结果为
Ribbon Client(port=8803), result=Service from 8802 , request count=1
Ribbon Client(port=8803), result=Service from 8801 , request count=2
Ribbon Client(port=8803), result=Service from 8802 , request count=3
Ribbon Client(port=8803), result=Service from 8801 , request count=4
Ribbon Client(port=8803), result=Service from 8802 , request count=5
Ribbon Client(port=8803), result=Service from 8801 , request count=6
其实还是蛮简单的,总的来说就是配置一个 @RibbonClient 然后加上 @LoadBalanced 就是了hhh
完整实现代码仓库地址
https://github.com/superfreeeee/Blog-code/tree/main/back_end/spring/spring_cloud_ribbon
结语
其实 Ribbon 集成的还是非常完善的,而且各个配置接口都已经有默认配置对象,可谓是将开箱即用发挥到极致。
不过可以看出来 Ribbon 还是有很多缺陷的,例如即便使用 Ribbon 已经能够利用 Eureka 的注册中心实现服务发现(Service Discovery)的功能,但我们还是需要自己拼接调用接口(/info 啥的),一旦接口多了起来也不好管理。
下一期将带来使用 Open Feign 强化版的 Ribbon,在封装 Ribbon 的服务的同时将接口调用对象化,给开发者就好像在使用本地服务一般的接口体验。


 698
698

 被折叠的 条评论
为什么被折叠?
被折叠的 条评论
为什么被折叠?
 到【灌水乐园】发言


