


1、YOLOv5算法简介
YOLOv5是一种单阶段目标检测算法,该算法在YOLOv4的基础上添加了一些新的改进思路,使其速度与精度都得到了极大的性能提升。主要的改进思路如下所示:
输入端:在模型训练阶段,提出了一些改进思路,主要包括Mosaic数据增强、自适应锚框计算、自适应图片缩放;
基准网络:融合其它检测算法中的一些新思路,主要包括:Focus结构与CSP结构;
Neck网络:目标检测网络在BackBone与最后的Head输出层之间往往会插入一些层,Yolov5中添加了FPN+PAN结构;
Head输出层:输出层的锚框机制与YOLOv4相同,主要改进的是训练时的损失函数GIOU_Loss,以及预测框筛选的DIOU_nms。
2、YOLOv5算法详解
2.1 源码下载:GitHub - ultralytics/yolov5: YOLOv5 🚀 in PyTorch > ONNX > CoreML > TFLite
2.2 环境配置
matplotlib>=3.2.2

numpy>=1.18.5

opencv-python>=4.1.2

pillow

PyYAML>=5.3

scipy>=1.4.1

tensorboard>=2.2

torch>=1.6.0

torchvision>=0.7.0

tqdm>=4.41.0
3、数据集下载:约200M已上传,在资源自己下载
4、生成数据集
YoloV5的数据集和以前版本的数据集并不相同,我们先看一下转换后的数据集。
数据结构如下图:
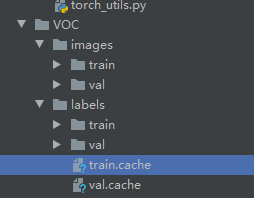
images文件夹存放train和val的图片
labels里面存放train和val的物体数据,里面的每个txt文件和images里面的图片是一一对应的。
txt文件的内容如下:
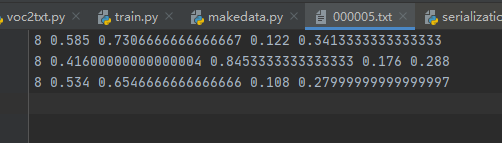
格式:物体类别 x y w h
坐标是不是真实的坐标,是将坐标除以宽高后的计算出来的,是相对于宽和高的比例。
下面我们编写生成数据集的代码,新建LabelmeToYoloV5.py,然后写入下面的代码。
import os

import numpy as np

import json

from glob import glob

import cv2

from sklearn.model_selection import train_test_split

from os import getcwd


classes = ["aircraft", "oiltank"]

# 1.标签路径

labelme_path = "LabelmeData/"

isUseTest = True  # 是否创建test集

# 3.获取待处理文件

files = glob(labelme_path + "*.json")

files = [i.replace("\\", "/").split("/")[-1].split(".json")[0] for i in files]

print(files)

if isUseTest:

    trainval_files, test_files = train_test_split(files, test_size=0.1, random_state=55)

else:

    trainval_files = files

# split

train_files, val_files = train_test_split(trainval_files, test_size=0.1, random_state=55)


def convert(size, box):

    dw = 1. / (size[0])

    dh = 1. / (size[1])

    x = (box[0] + box[1]) / 2.0 - 1

    y = (box[2] + box[3]) / 2.0 - 1

    w = box[1] - box[0]

    h = box[3] - box[2]

    x = x * dw

    w = w * dw

    y = y * dh

    h = h * dh

    return (x, y, w, h)


wd = getcwd()

print(wd)


def ChangeToYolo5(files, txt_Name):

    if not os.path.exists('tmp/'):

        os.makedirs('tmp/')

    list_file = open('tmp/%s.txt' % (txt_Name), 'w')

    for json_file_ in files:

        json_filename = labelme_path + json_file_ + ".json"

        imagePath = labelme_path + json_file_ + ".jpg"

        list_file.write('%s/%s\n' % (wd, imagePath))

        out_file = open('%s/%s.txt' % (labelme_path, json_file_), 'w')

        json_file = json.load(open(json_filename, "r", encoding="utf-8"))

        height, width, channels = cv2.imread(labelme_path + json_file_ + ".jpg").shape

        for multi in json_file["shapes"]:

            points = np.array(multi["points"])

            xmin = min(points[:, 0]) if min(points[:, 0]) > 0 else 0

            xmax = max(points[:, 0]) if max(points[:, 0]) > 0 else 0

            ymin = min(points[:, 1]) if min(points[:, 1]) > 0 else 0

            ymax = max(points[:, 1]) if max(points[:, 1]) > 0 else 0

            label = multi["label"]

            if xmax <= xmin:

                pass

            elif ymax <= ymin:

                pass

            else:

                cls_id = classes.index(label)

                b = (float(xmin), float(xmax), float(ymin), float(ymax))

                bb = convert((width, height), b)

                out_file.write(str(cls_id) + " " + " ".join([str(a) for a in bb]) + '\n')

                print(json_filename, xmin, ymin, xmax, ymax, cls_id)

ChangeToYolo5(train_files, "train")

ChangeToYolo5(val_files, "val")

ChangeToYolo5(test_files, "test")
这段代码执行完成会在LabelmeData生成每个图片的txt标注数据,同时在tmp文件夹下面生成训练集、验证集和测试集的txt,txt记录的是图片的路径,为下一步生成YoloV5训练和测试用的数据集做准备。在tmp文件夹下面新建MakeData.py文件,生成最终的结果,目录结构
打开MakeData.py,写入下面的代码。
import shutil
import os

file_List = ["train", "val", "test"]
for file in file_List:
    if not os.path.exists('../VOC/images/%s' % file):
        os.makedirs('../VOC/images/%s' % file)
    if not os.path.exists('../VOC/labels/%s' % file):
        os.makedirs('../VOC/labels/%s' % file)
    print(os.path.exists('../tmp/%s.txt' % file))
    f = open('../tmp/%s.txt' % file, 'r')
    lines = f.readlines()
    for line in lines:
        print(line)
        line = "/".join(line.split('/')[-5:]).strip()
        shutil.copy(line, "../VOC/images/%s" % file)
        line = line.replace('JPEGImages', 'labels')
        line = line.replace('jpg', 'txt')
        shutil.copy(line, "../VOC/labels/%s/" % file)
5、 修改参数
打开voc.yaml文件,修改里面的配置参数
train: VOC/images/train/ # 训练集图片的路径
val: VOC/images/val/ # 验证集图片的路径
# number of classes
nc: 2 #检测的类别,本次数据集有两个类别所以写2
# class names
names: ["aircraft", "oiltank"]#类别的名称,和转换数据集时的list对应
6. 修改train.py的参数并训练数据,不作要求
7. 待训练完成后,修改test.py参数,并进行测试


 10万+
10万+


 被折叠的 条评论
为什么被折叠?
被折叠的 条评论
为什么被折叠?
 到【灌水乐园】发言


