


文章目录
二、Spring的IOC容器
2.1 IOC底层原理
IOC:全称Inversion of Control,中文范围为控制反转,是面向对象编程的一种设计原则。
作用:把对象的创建和对象之间的调用过程交给Spring进行管理。
好处:降低耦合度
底层原理图解:
1、现在如果我们想要让UserService调用UserDao中的add方法,原始的方法如下,但这种写法耦合度太高了(牵一发而动全身)。

IOC过程如下:(利用xml解析、工厂模式、反射)

解释一下:
1、这里他先通过xml的解析,把“com.hstc.Dao.UserDao”拿出来赋值给UserFactory的classValue属性
2、然后通过Class.forName(classValue)方法通过反射找到他的class字节文件
3、再把这个类返回给clazz
4、最后返回这个类的实例。
2.2 IOC接口(BeanFactory)
IOC思想基于IOC容器完成,IOC容器底层其实就是对象工厂。
Spring提供了IOC容器实现的两种方式:
1、BeanFactory:IOC容器基本实现,是Spring内部使用的接口,不提供开发人员使用
2、ApplicationContext:BeanFactory接口的子接口,提供更多更强大的功能,一般由开发人员使用
区别:
使用BeanFactory的话,在加载配置文件的时候不会创建对象,在获取对象的使用才创建;
使用ApplicationContext的话,在加载配置文件的时候就会创建配置文件中的对象。

2.3 IOC操作Bean管理(基于XML)
Bean管理包括以下两个:
(1)Spring创建对象
(2)Spring注入属性(setter注入和有参构造注入)
2.3.1 无参构造创建对象
前面的例子中,applicationContext.xml文件内的代码就是基于XML的Spring创建对象
<bean id="user" class="com.hstc.spring.User"></bean>
在Bean标签内还有很多的属性,下面给出部分常用属性及其描述:
| 属性 | 描述 |
|---|---|
| id | Bean的唯一标识 |
| class | 类全路径 |
| name | 跟id一样,但是可以加特殊符号(现在不怎么用了) |
注意:创建对象的时候,默认是执行无参构造,所以,如果你写了个有参,没有写无参的话,那么系统可能会报错。
所以,如果要写的话,要么就有参、无参都写,要么就有参、无参都不要写
2.3.2 setter注入属性
那么,Spring怎么注入属性呢?其实很简单,只要给类的每个变量写一个setter方法,然后在xml中实现注入即可,xml注入代码如下:
    <bean id="book" class="com.hstc.spring.Book">
	    <!--name属性名指定的是类的变量名,value属性名指定的是变量的值-->
        <property name="name" value="三国演示"></property>
        <property name="price" value="100.0"></property>
    </bean>
详细代码如下:
先写一个Book.java
package com.hstc.spring;

public class Book {
    private String name;
    private Double price;

    public void setName(String name) {
        this.name = name;
    }

    public void setPrice(Double price) {
        this.price = price;
    }

    public String getName() {
        return name;
    }

    public Double getPrice() {
        return price;
    }
}
然后在applicationContext.xml中进行注册:
    <bean id="book" class="com.hstc.spring.Book">
        <property name="name" value="三国演示"></property>
        <property name="price" value="100.0"></property>
    </bean>
然后随便写个测试类获取这个Bean并输出:
    @Test
    public void bookTest(){
        ApplicationContext context = new ClassPathXmlApplicationContext("applicationContext.xml");
        Book book = context.getBean("book",Book.class);
        System.out.println(book.getName());
        System.out.println(book.getPrice());
    }
运行结果:

很明显,注入成功。
2.3.3 有参构造注入属性
有参构造注入其实也很简单,只要在bean标签中使用子标签constructor-arg即可。
xml中有参构造注入如下:
    <bean id="order" class="com.hstc.spring.Order">
        <constructor-arg name="id" value="a001"></constructor-arg>
        <constructor-arg name="name" value="猪猪开天宝剑"></constructor-arg>
    </bean>
详细代码如下:
Order.java
package com.hstc.spring;

public class Order {
    private String id;
    private String name;

    public Order(String id, String name) {
        this.id = id;
        this.name = name;
    }

    @Override
    public String toString() {
        return "Order{" +
                "id='" + id + '\'' +
                ", name='" + name + '\'' +
                '}';
    }
}
applicationContext.xml如下:
    <bean id="order" class="com.hstc.spring.Order">
        <constructor-arg name="id" value="a001"></constructor-arg>
        <constructor-arg name="name" value="猪猪开天宝剑"></constructor-arg>
    </bean>
测试代码如下:
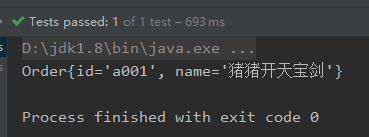
    @Test
    public void orderTest(){
        ApplicationContext context = new ClassPathXmlApplicationContext("applicationContext.xml");
        Order order = context.getBean("order", Order.class);
        System.out.println(order);
    }
运行结果:
2.4 xml注入其他类型属性
2.4.1 设置null值
以下代码给出了非空和null值分别的写法
    <bean id="book" class="com.hstc.spring.Book">
<!--        <property name="name" value="三国演示"></property>-->
        <!--设置null值,不写value属性,然后使用null标签-->
        <property name="name">
            <null/>
        </property>
        <property name="price" value="100.0"></property>
    </bean>
2.4.2 设置特殊符号
只需要使用 <![CDATA[ ]]> 即可。
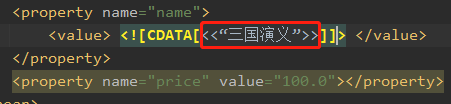
<bean id="book" class="com.hstc.spring.Book">
    <property name="name">
        <value> <![CDATA[<<“三国演义”>>]]> </value>
    </property>
    <property name="price" value="100.0"></property>
</bean>
2.4.3 注入内部bean(典型的service层调用dao层)
先写UserDao:
package com.hstc.dao;

public interface UserDao {
    public void add();
}
然后写UserDaoImple:
package com.hstc.dao;

public class UserDaoImpl implements UserDao{

    public void add() {
        System.out.println("Dao add......");
    }
}
再写UserDaoService
package com.hstc.service;

import com.hstc.dao.UserDao;

public class UserService {
    private UserDao userDao;

    public void setUserDao(UserDao userDao) {
        this.userDao = userDao;
    }

    public void add(){
        System.out.println("Service add......");
        userDao.add();
    }
}
然后在applicationContext.xml中进行注册:
	<!--这里class要指定Dao的实现类-->
    <bean id="userDaoImpl" class="com.hstc.dao.UserDaoImpl"></bean>
    <bean id="userService" class="com.hstc.service.UserService">
        <!--bean的注入,使用ref指定 你想要的bean的id-->
        <property name="userDao" ref="userDaoImpl"></property>
    </bean>
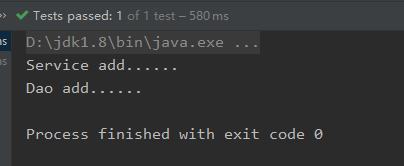
然后我们可以写个测试方法进行验证:
    @Test
    public void userServiceTest(){
        ApplicationContext context = new ClassPathXmlApplicationContext("applicationContext.xml");
        UserService service = context.getBean("userService",UserService.class);
        service.add();
    }
运行结果:
2.4.4 注入外部bean
这里使用外部bean注入的形式,直接用代码进行解释:
先写一个部门类:
package com.hstc.spring;

//部门
public class Deportment {
    private String name;

    public void setName(String name) {
        this.name = name;
    }

    @Override
    public String toString() {
        return "Deportment{" +
                "name='" + name + '\'' +
                '}';
    }
}
然后写一个员工类:
package com.hstc.spring;

//员工
public class Person {
    //这个员工属于哪个部门
    private Deportment deportment;
    private String name;
    private Integer age;

    public void setDeportment(Deportment deportment) {
        this.deportment = deportment;
    }

    public void setName(String name) {
        this.name = name;
    }

    public void setAge(Integer age) {
        this.age = age;
    }

    @Override
    public String toString() {
        return "Person{" +
                "deportment=" + deportment +
                ", name='" + name + '\'' +
                ", age=" + age +
                '}';
    }
}
之后在applicationContext.xml中对bean进行注册:
    <bean id="person" class="com.hstc.spring.Person">
        <property name="deportment">
            <bean id="deportment" class="com.hstc.spring.Deportment">
                <property name="name" value="技术部"></property>
            </bean>
        </property>
        <property name="name" value="张三"></property>
        <property name="age" value="20"></property>
    </bean>
从上面的代码不难看出,内部bean的注入其实就是在property中先指定变量名,然后直接写一个子标签bean引入对应的类即可。
写测试代码演示如下:
    @Test
    public void PersonTest(){
        ApplicationContext context = new ClassPathXmlApplicationContext("applicationContext.xml");
        Person person = context.getBean("person",Person.class);
        System.out.println(person);
    }

2.4.5 级联赋值
关于级联,有三种比较情况:一对一,一对多和多对多。
(一)一对一关系:其中一对一的关系比较简单,一般都是在两个类中分别添加另一个类的唯一标识,这里就不做介绍了。
(二)一对多关系:部门对员工,很明显一个部门肯定会有很多员工。这个时候,这个比较多的就得多写一个部门的属性。来达到多对一的效果。
一对多的级联赋值只需要针对上面的外部bean注入,修改为刚才内部bean注入的形式即可。applicationContext.xml的代码如下(这种写法比较常见,写出来的代码看起来也舒服些):
    <!--级联赋值-->
    <bean id="deportment" class="com.hstc.spring.Deportment">
        <property name="name" value="技术部"></property>
    </bean>
    <bean id="person" class="com.hstc.spring.Person">
        <property name="deportment" ref="deportment"></property>
        <property name="name" value="张三"></property>
        <property name="age" value="20"></property>
    </bean>
(三)多对多的关系:老师对学生,很明显一个老师会教很多学生,但是一个学生也不会只有一个老师,小学生都至少有语数英三个老师,这个时候,我们就需要再多写一个类,然后对老师和学生分别进行注入。这里不做代码的介绍
2.4.6 注入集合类型属性(数组、List、Map、Set)
先写一个Student类(包含四个属性分别是数组、List、Map、Set类型,然后写对应的set和get方法还有toString方法):
package com.hstc.spring;

import java.util.Arrays;
import java.util.List;
import java.util.Map;
import java.util.Set;

public class Student {
    //数组
    private String[] courses;
    //List
    private List<String> list;
    //Map
    private Map<Integer,String> map;
    //Set
    private Set<String> sets;

    public String[] getCourses() {
        return courses;
    }

    public void setCourses(String[] courses) {
        this.courses = courses;
    }

    public List<String> getList() {
        return list;
    }

    public Set<String> getSets() {
        return sets;
    }

    public void setSets(Set<String> sets) {
        this.sets = sets;
    }

    public void setList(List<String> list) {
        this.list = list;
    }

    public Map<Integer, String> getMap() {
        return map;
    }

    public void setMap(Map<Integer, String> map) {
        this.map = map;
    }

    @Override
    public String toString() {
        return "Student{" +
                "courses=" + Arrays.toString(courses) +
                ", list=" + list +
                ", map=" + map +
                ", sets=" + sets +
                '}';
    }
}
然后在applicationContext.xml中实现注入:
    <!--集合类型属性注入-->
    <bean id="student" class="com.hstc.spring.Student">
        <!--数组类型属性注入,使用array或list标签,然后用多个value写值-->
        <property name="courses">
            <array>
                <value>语文</value>
                <value>数学</value>
                <value>英语</value>
            </array>
        </property>
        <!--List类型属性注入,使用array或list标签,然后用多个value写值-->
        <property name="list">
            <list>
                <value>List1</value>
                <value>List2</value>
                <value>List3</value>
            </list>
        </property>
        <!--Map类型属性注入,使用map标签,然后在map标签中写多个entry标签-->
        <property name="map">
            <map>
                <entry key="1" value="value1"></entry>
                <entry key="2" value="value2"></entry>
                <entry key="3" value="value3"></entry>
            </map>
        </property>
        <!--Set类型属性注入,使用set标签,然后用多个value写值-->
        <property name="sets">
            <set>
                <value>Java</value>
                <value>C++</value>
                <value>Python</value>
            </set>
        </property>
    </bean>
小尝试:试了一下,好像set、list还有array三个可以互换,写了都不影响程序运行。所以,你可以试着把所有的Set、List还有数组都只通过set、array或者list的其中一个来用。
上面这种写法其实感觉有点呆呆的,看着有种一个程序把所有代码都写进main中的feel。所以,我其实更习惯把集合这部分抽离出来单独写(类似于写函数),然后再让bean拿去用。这里,我们只需要修改xml文件如下:
先加一个名称空间util(也可以自己取其他名字,然后在 xsi:schemaLocation 中加上下面这两句
http://www.springframework.org/schema/util
http://www.springframework.org/schema/util/spring-util-2.0.xsd
之后就可以使用util:list,util:map,util:set 将这些集合抽取出来了。之后在bean的property中使用属性ref指向这些集合的id。就可以顺利将该集合引入。
<?xml version="1.0" encoding="UTF-8"?>
<beans xmlns="http://www.springframework.org/schema/beans"
       xmlns:xsi="http://www.w3.org/2001/XMLSchema-instance"
       xmlns:util="http://www.springframework.org/schema/util"
       xsi:schemaLocation=
               "http://www.springframework.org/schema/beans
                http://www.springframework.org/schema/beans/spring-beans-2.0.xsd
                http://www.springframework.org/schema/util
                http://www.springframework.org/schema/util/spring-util-2.0.xsd">

    <!--集合类型属性注入-->
    <util:list id="courses">
        <value>语文</value>
        <value>数学</value>
        <value>英语</value>
    </util:list>

    <util:list id="listCollection">
        <value>List1</value>
        <value>List2</value>
        <value>List3</value>
    </util:list>


    <util:map id="mapCollection">
        <entry key="1" value="value1"></entry>
        <entry key="2" value="value2"></entry>
        <entry key="3" value="value3"></entry>
    </util:map>

    <util:set id="setCollection">
        <value>Java</value>
        <value>C++</value>
        <value>Python</value>
    </util:set>

    <bean id="student" class="com.hstc.spring.Student">
        <!--数组类型属性注入,使用array或list标签,然后用多个value写值-->
        <property name="courses" ref="courses"></property>
        <!--List类型属性注入,使用array或list标签,然后用多个value写值-->
        <property name="list" ref="listCollection"></property>
        <!--Map类型属性注入,使用map标签,然后在map标签中写多个entry标签-->
        <property name="map" ref="mapCollection"></property>
        <!--Set类型属性注入,使用set标签,然后用多个value写值-->
        <property name="sets" ref="setCollection"></property>
    </bean>
</beans>
2.5 Bean的作用域和生命周期
2.5.1 Bean的作用域
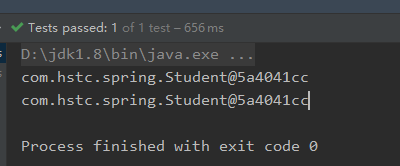
在Spring中,我们可以设置Bean实例是单例(只有一个对象,每次获取到的对象都是同一个)还是多例(每次getBean都是一个新的对象),默认情况下是单例。
以下代码足以证明Bean默认是单例:
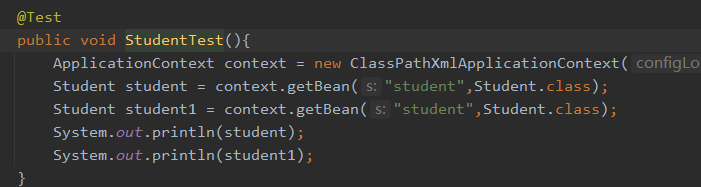
运行结果:
要想让Bean变成多例,需要在Bean中添加属性scope,scope有两个值:
singleton:单例,在加载配置文件的时候创建实例对象
prototype:多例,每次getBean的时候生成一个实例对象
当我们把Bean设置为多例的时候,再次运行刚才的测试代码,如下:

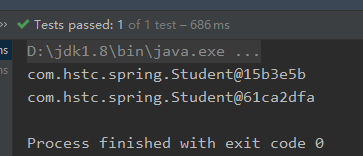
可见,现在两个对象已经不再指向同一个地址空间。
2.5.2 Bean的生命周期
Bean的生命周期如下:
(1)通过构造器创建Bean实例(无参构造)
(2)为bean的属性设置值和对其他bean引用(setter注入)
(3)调用bean的初始化方法(需要进行配置初始化方法)
(4)获取bean对象
(5)容器关闭,调用bean的销毁方法(需要进行配置销毁方法)
bean的初始化方法和销毁方法定义如下:
先随便写两个方法,名字可以任取。
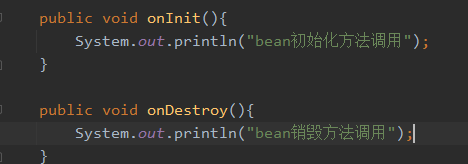
然后我们到xml配置文件中设置bean的属性即可。
init-method指向的是初始化方法
destroy-method指向的是销毁方法

下图没有给出销毁的调用,主要是因为我手动销毁context好像不起作用,不知道是不是bean版本的问题,我用的是最新版,但是,我学的教程不是。

老版本关闭容器的代码如下(调用ClassPathXmlApplicationContext的close方法即可):
//创建容器
ApplicationContext context = new ClassPathXmlApplicationContext("applicationContext.xml");
//销毁容器
((ClassPathXmlApplicationContext) context).close();
如果,为bean设置了后置处理器,那么生命周期有七个部分组成:
(1)通过构造器创建Bean实例(无参构造)
(2)为bean的属性设置值和对其他bean引用(setter注入)
(3)把bean的实例传递给bean后置处理器的方法postProcessBeforeInitialization
(4)调用bean的初始化方法(需要进行配置初始化方法)
(5)把bean的实例传递给bean后置处理器的方法postProcessAfterInitialization
(6)获取bean对象
(7)容器关闭,调用bean的销毁方法(需要进行配置销毁方法)
要想写Bean的后置处理器,我们需要写个类实现
package com.hstc.process;

import org.springframework.beans.BeansException;
import org.springframework.beans.factory.config.BeanPostProcessor;

public class MyProcesser implements BeanPostProcessor {
    @Override
    public Object postProcessBeforeInitialization(Object bean, String beanName) throws BeansException {
        System.out.println("Bean初始化前输出");
        return bean;
    }

    @Override
    public Object postProcessAfterInitialization(Object bean, String beanName) throws BeansException {
        System.out.println("Bean初始化后输出");
        return bean;
    }

}
然后在xml配置文件中完成配置:
<bean id="postProcesser" class="com.hstc.process.MyProcesser"></bean>
注意:他会作为所有bean的后置处理器,而且所有的类似以下的名称空间调用的标签也会一起调用这个后置处理器。

最终显示结果如下:
无参构造后连续四个Bean初始化后输出是property标签调用的。
然后最开始的Bean初始化前输出、Bean初始化后输出是名称空间util写的各个集合调用的。

2.6 xml自动装配
先前我们都是手动装配如下:使用N多个property手动装配

下面演示如果通过属性名称或者属性类型让Spring自动将匹配的属性值进行注入。
要想实现自动装配:
bean标签需要使用属性autowire,autowire属性有两个常用值:
- byName根据属性名称注入,注入值bean的id值和类属性名称一样
- byType根据属性类型注入(如果同一个类注册了两个不同名的bean会报错)
2.7 xml引入外部属性文件
我们在pom.xml中引入druid.jar包
<dependency>
    <groupId>com.alibaba</groupId>
    <artifactId>druid</artifactId>
    <version>1.2.6</version>
</dependency>
我们先写一个要引入的数据库配置文件jdbc.properties(一般不要直接写driverClass、url,否则容易引起名称的冲突):
prop.driverClass=com.mysql.jdbc.Driver
prop.url=jdbc:mysql://localhost:3306/myDb
prop.userName=root
prop.password=root
然后我们在我们的xml配置文件中引入context名称空间:
<?xml version="1.0" encoding="UTF-8"?>
<beans xmlns="http://www.springframework.org/schema/beans"
       xmlns:xsi="http://www.w3.org/2001/XMLSchema-instance"
       xmlns:context="http://www.springframework.org/schema/context"
       xsi:schemaLocation=
               "http://www.springframework.org/schema/beans
                http://www.springframework.org/schema/beans/spring-beans-2.0.xsd
                http://www.springframework.org/schema/context
                http://www.springframework.org/schema/context/spring-context.xsd">
然后我们就可以引入外部属性文件并直接引用该文件的数据。
    <!--引入外部属性文件 jdbc.properties-->
    <context:property-placeholder location="jdbc.properties"/>
    <!--配置连接池-->
    <bean id="dataSource" class="com.alibaba.druid.pool.DruidDataSource">
        <property name="driverClassName" value="${prop.driverClass}"></property>
        <property name="url" value="${prop.url}"></property>
        <property name="username" value="${prop.userName}"></property>
        <property name="password" value="${prop.password}"></property>
    </bean>
2.8 IOC基于注解方式创建对象
注解格式:
@注解名称(属性名称=属性值,属性名称=属性值…)
注解可以作用于类、方法、属性的上边。
Spirng针对Bean管理中创建对象提供了以下几个注解:
- @Component:用于普通的组件
- @Service:业务层或Service层
- @Controller:web层
- @Repository:Dao层或po层
乱用的话,其实也不会报错,但是不建议这么做,因为你的代码可能会被我看到,求放过,谢谢。
下面给出演示代码:
首先,我们需要下载aop这个jar包,maven的依赖代码如下:
<dependency>
    <groupId>org.springframework</groupId>
    <artifactId>spring-aop</artifactId>
    <version>5.3.9</version>
</dependency>
包的结构如下:

然后配置我们的xml文件如下:
<?xml version="1.0" encoding="UTF-8"?>
<beans xmlns="http://www.springframework.org/schema/beans"
       xmlns:xsi="http://www.w3.org/2001/XMLSchema-instance"
       xmlns:context="http://www.springframework.org/schema/context"
       xsi:schemaLocation=
               "http://www.springframework.org/schema/beans
               http://www.springframework.org/schema/beans/spring-beans.xsd
                http://www.springframework.org/schema/context
                http://www.springframework.org/schema/context/spring-context.xsd">

    <!--开启组件扫描-->
    <context:component-scan base-package="com.example"></context:component-scan>
</beans>
扫描直接配置到各个要扫描的包的上级目录,就是扫描所有com.example下的包。
然后我们创建几个类,并写上注解:
下面的value值也可以不写,系统会默认用该类的类名,首字母小写
package com.example.service;

import org.springframework.stereotype.Service;

//value值也可以不写,系统会默认用该类的类名,首字母小写
@Service(value = "userService")//等价于xml中<bean id="userService class="这个类的路径"></bean>
public class UserService {
    public void add(){
        System.out.println("Service add......");
    }
}
然后写个测试类:
package com.example.test;

import com.example.service.UserService;
import org.junit.Test;
import org.springframework.context.ApplicationContext;
import org.springframework.context.support.ClassPathXmlApplicationContext;

public class SpringTest {
    @Test
    public void userServiceTest(){
        ApplicationContext context = new ClassPathXmlApplicationContext("applicationContext.xml");
        UserService userService = context.getBean("userService",UserService.class);
        System.out.println(userService);
        userService.add();
    }
}
运行结果如下:
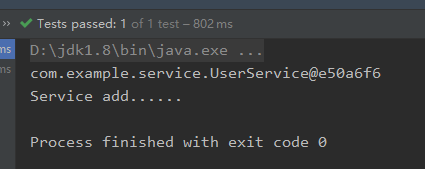
可见,跟之前在xml中注册bean是一样的。但是我们其实duck不必,直接在那个文件写一下舒服多了。
前面提到扫描整个包的注解,有些人可能会想,那如果我们不想扫描整个包的注解,只想扫描部分注解,或者我们这个包有哪个注解不想被扫描又怎么整呢?(又不是女人,问题怎么还倍儿多呢???)行吧,那就给出代码说明一下解决措施把。
如果你只想要扫描Controller和Service注解:
    <!--
        use-default-filters="false":取消默认的过滤器
        context:include-filter:手动配置扫描这些
        expression="org.springframework.stereotype.Controller":扫描Controller
        expression="org.springframework.stereotype.Service":扫描Service
    -->
    <context:component-scan base-package="com.example" use-default-filters="false">
        <context:include-filter type="annotation" expression="org.springframework.stereotype.Controller"/>
        <context:include-filter type="annotation" expression="org.springframework.stereotype.Service"/>
    </context:component-scan>
那如果现在你很叛逆,你突然不想扫描Controller和Service注解了,那么代码也会跟着叛逆变成这样:
    <!--
        这里并没有取消默认的过滤器
        然后使用context:exclude-filter标签表示不扫描这些个注释
    -->
    <context:component-scan base-package="com.example">
        <context:exclude-filter type="annotation" expression="org.springframework.stereotype.Controller"/>
        <context:exclude-filter type="annotation" expression="org.springframework.stereotype.Service"/>
    </context:component-scan>
2.9 IOC基于注解方式注入属性
用于属性注入三个常用的注解如下:
- @AutoWired:根据属性类型自动注入
- @Qualifier:根据属性名称进行注入(需要搭配AutoWired进行使用)
- @Resource:可以根据属性类型也可以根据属性名称注入
还有一个@Value 用于注入普通类型属性
实例:
先写一个UserDao接口如下:
package com.example.dao;

public interface UserDao {
    public void add();
}
然后写个UserDaoImpl实现这个UserDao类:
package com.example.dao.impl;

import com.example.dao.UserDao;
import org.springframework.stereotype.Repository;

@Repository
public class UserDaoImpl implements UserDao {
    @Override
    public void add() {
        System.out.println("UserDaoImpl add......");
    }
}
然后写一个Service将这个UserDao进行注入,为什么叫UserDao可以注入,解释一下,这里他会自己去找他的实现类UserDaoImpl进行注入,如果UserDao接口有两个实现类,那么使用Autowired将会报错:
package com.example.service;

import com.example.dao.UserDao;
import org.springframework.beans.factory.annotation.Autowired;
import org.springframework.stereotype.Service;

@Service
public class UserService {

    @Autowired
    private UserDao userDao;

    public void add(){
        System.out.println("Service add......");
        userDao.add();
    }
}
针对上面的 如果UserDao接口有两个实现类,那么使用Autowired将会报错 这个错误,我们可以使用Qualifier来解决。在@Autowired下再加一个注释@Qualifier(value = “userDaoImpl”)。value的值等于对应要注入的bean的id值,默认是类名首字母小写。
将上述UserService的代码更改为:
package com.example.service;

import com.example.dao.UserDao;
import org.springframework.beans.factory.annotation.Autowired;
import org.springframework.beans.factory.annotation.Qualifier;
import org.springframework.stereotype.Service;

@Service
public class UserService {

    @Autowired
    @Qualifier(value = "userDaoImpl")
    private UserDao userDao;

    public void add(){
        System.out.println("Service add......");
        userDao.add();
    }
}
如果觉得不太好记,也可以使用注解@Resource,变量名使用要注入的bean的id值(默认是类名,首字母小写)。如果没有多个实现类的话,使用userDao也行,他会自己去找对应的类型。不过,如果后续如果突然多了一个实现类,你得去改名字的话,就有点恶心了。
package com.example.service;

import com.example.dao.UserDao;
import org.springframework.stereotype.Service;

import javax.annotation.Resource;

@Service
public class UserService {

    //使用Resource注解,变量名要跟bean的id值一样(默认是类名,首字母小写)
    @Resource
    private UserDao userDaoImpl;

    public void add(){
        System.out.println("Service add......");
        userDaoImpl.add();
    }
}
或者你实在不想把属性名写成bean的id值,你觉得这样子好low呀,你也可以在Resource注解中写个属性name等于你要注入的bean的id值,如下也可以打成同样的效果:
package com.example.service;

import com.example.dao.UserDao;
import org.springframework.stereotype.Service;

import javax.annotation.Resource;

@Service
public class UserService {

    @Resource(name = "userDaoImpl")
    private UserDao userDao;

    public void add(){
        System.out.println("Service add......");
        userDao.add();
    }
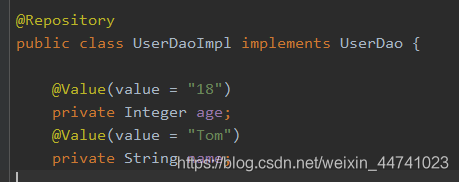
@Value对普通类型的注入代码如下:
2.10 完全注解开发
学了这么多,你用注解也差不多用得该膨胀了。你现在嫌写xml文件麻烦,你想问能不能直接注解跟类,不写xml文件了。答案是:当然可以。请看下面代码:
咱们可以写一个SpirngConfig类来实现,代码如下:
package com.example.config;

import org.springframework.context.annotation.ComponentScan;
import org.springframework.context.annotation.Configuration;

//作为配置类,替代xml配置文件需要加注解Configuration
//ComponentScan注解用来指定扫描我们的
@Configuration
@ComponentScan(basePackages = {"com.example"})com.example包
public class SpringConfig {

}
然后我们删除我们原先的xml配置文件,并写一个新的测试方法如下:
    @Test
    public void userServiceTest(){
		//ApplicationContext context = new ClassPathXmlApplicationContext("applicationContext.xml");
		//使用AnnotationConfigApplicationContext对象加载我们的配置类
        ApplicationContext context = new AnnotationConfigApplicationContext(SpringConfig.class);
        UserService userService = context.getBean("userService",UserService.class);
        System.out.println(userService);
        userService.add();
        userService.showMsg();
    }


 670
670


 被折叠的 条评论
为什么被折叠?
被折叠的 条评论
为什么被折叠?
 到【灌水乐园】发言


