


文章目录
六、RESTFUL风格
6.1 RESTFul简介
REST:Representational State Transfer,表现层资源状态转移。
这里介绍几个专业术语:
-
资源:资源是一种看待服务器的方式,即,将服务器看作是由很多离散的资源组成。每个资源是服务器上一个可命名的抽象概念。因为资源是一个抽象的概念,所以它不仅仅能代表服务器文件系统中的一个文件、数据库中的一张表等等具体的东西,可以将资源设计得非常抽象,只要想象力允许而且客户端应用开发者能够理解。与面向对象设计类似,资源是以名词为核心来组织的,首先关注的是名词。一个资源可以由一个或多个 URl 来标识。 URI 既是资源的名称,也是资源在 Web 上的地址。对某个资源感兴趣的客户端应用,可以贡酬寸资源的 URI 与其进行交互。
-
资源的表述:资源的表述是一段对于资源在某个特定时刻的状态的描述。可以在客户端一服务器端之间转移(交换)。资源的表述可以有多种格式,例如HTML/XML/JSON/纯文本/图片/视频/音频等等。资源的表述格式可以通过协商机制来确定。请求一响应方向的表述通常使用不同的格式。
-
状态转移:在客户端和服务器端之间转移( transfer )代表资源状态的表述。通过转移和操作资源的表述,来间接实现操作资源的目的。
6.2 RESTFul的实现
前面写了那么多东西,相信很多人应该反而被绕晕了吧。没关系,我们要开始讲人话,贴代码了。
先简单提一下之前说过的一个点吧,HTTP协议中,有四个表示操作方式的动词:GET、POST、PUT、DELETE。
这四个动词分别对应四种基本操作:GET用来获取资源,POST用来新建资源,PUT用来更新资源,DELETE用来删除资源。
REST风格提倡URL地址使用统一的风格设计,从前到后各个单词使用斜杠分开,不适用问号键值对方式携带请求参数,而是将要发送给服务器的数据作为URL地址的一部分,以保证整体风格的一致性。
给个表格吧,看一眼你就懂了。
| 操作 | 传统方式 | REST风格 |
|---|---|---|
| 增 | addUser | user ——> post请求方式 |
| 删 | deleteUser?id=1 | user/1 ——> delete请求方式 |
| 改 | updateUser | user ——> put请求方式 |
| 查 | getUserById?id=1 | user/1 ——> get请求方式 |
下面,就让我们使用RESTFul模拟下用户资源的增加和查找吧。先写一个
UserController.java类:
package com.example.controller;

import org.springframework.stereotype.Controller;
import org.springframework.web.bind.annotation.GetMapping;
import org.springframework.web.bind.annotation.PostMapping;
import org.springframework.web.bind.annotation.RequestMapping;

@Controller
public class UserController {

    @RequestMapping("/restful")
    public String toResuful(){
        return "restful";
    }

    /*
    *   使用RESTFul模拟用户资源的增删改查
    *   /user       GET请求       查询所有用户信息
    *   /user/1     GET请求       根据用户id查询用户信息
    *   /user       POST请求      添加用户信息
    *   /user/1     DELETE请求    删除用户信息
    *   /user       PUT请求       修改用户信息
    */

    @GetMapping("/user")
    public String getAllUser(){
        System.out.println("查询所有用户信息");
        return "success";
    }

    @GetMapping("/user/{id}")
    public String getUserById(){
        System.out.println("根据用户id查询用户信息");
        return "success";
    }

    @PostMapping("/user")
    public String addUser(String username, String password){
        System.out.println("添加用户信息:"+username+", "+password);
        return "success";
    }
}
然后写一下存放我们各种超链接的网页:
restful.html
<!DOCTYPE html>
<html lang="en" xmlns:th="http://www.thymeleaf.org">
<head>
<meta charset="UTF-8">
<title>REST风格</title>
</head>
<body>
<a th:href="@{/user}">查询所有用户信息</a><br>
<a th:href="@{/user/1}">根据id查询用户信息</a><br>
<form th:action="@{/user}" method="post">
用户名:<input type="text" name="username">
密 码:<input type="password" name="password">
<input type="submit" value="添加用户信息">
</form>
</body>
</html>
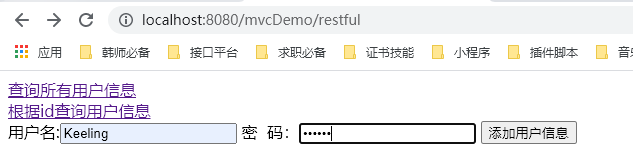
重启服务器后:
来到我们的restful.html页面,分别点击上面两个超链接并输入用户名和密码后点击添加用户信息。
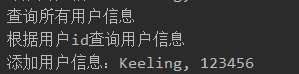
此时控制台显示如下:
6.3 HiddenHttpMethodFilter
由于浏览器只支持发送get和post方式的请求,SpringMVC便给我们提供了一个HiddenHttpMethodFilter帮助我们将POST请求转换为DELETE或PUT请求。
HiddenHttpMethodFilter处理put和delete请求的条件有以下:
1、当前请求的请求方式必须为post
2、当前请求必须传输请求参数 _method
演示代码如下:
先在web.xml中配置我们的HiddenHttpMethodFilter。(最好配置在CharacterEncodingFilter后边,否则会有中文乱码的问题)
    <!--配置HiddenHttpMethodFilter-->
    <filter>
        <filter-name>HiddenHttpMethodFilter</filter-name>
        <filter-class>org.springframework.web.filter.HiddenHttpMethodFilter</filter-class>
    </filter>
    <filter-mapping>
        <filter-name>HiddenHttpMethodFilter</filter-name>
        <url-pattern>/*</url-pattern>
    </filter-mapping>
然后在Controller下添加方法:
    @PutMapping("/user")
    public String updateUser(String username, String password){
        System.out.println("修改用户信息:"+username+", "+password);
        return "success";
    }

    @DeleteMapping("/user/{id}")
    public String deleteUserById(){
        System.out.println("删除用户信息");
        return "success";
    }
最后在restful.html中添加超链接:
<form th:action="@{/user}" method="post">
<!--
要想使用put和delete必须要有_method请求参数
因为这个是用户不需要知道的,所以我们将它隐藏即可
-->
<input type="hidden" name="_method" value="put">
用户名:<input type="text" name="username">
密 码:<input type="password" name="password">
<input type="submit" value="修改用户信息">
</form>
<br>
<!--一般删除不会这么写哈,这里只是为了演示-->
<form th:action="@{/user/1}" method="post">
<input type="hidden" name="_method" value="delete">
<input type="submit" value="删除用户信息">
</form>
<br>
6.4 完整的代码案例
首先,我们肯定先配置我们的依赖,也就是修改我们的pom.xml文件(这里只是学习RESTFul,因此并没有引入数据库的依赖)
pom.xml
<?xml version="1.0" encoding="UTF-8"?>
<project xmlns="http://maven.apache.org/POM/4.0.0"
         xmlns:xsi="http://www.w3.org/2001/XMLSchema-instance"
         xsi:schemaLocation="http://maven.apache.org/POM/4.0.0 http://maven.apache.org/xsd/maven-4.0.0.xsd">
    <modelVersion>4.0.0</modelVersion>

    <groupId>org.example</groupId>
    <artifactId>mvc_demo1</artifactId>
    <version>1.0-SNAPSHOT</version>
    <packaging>war</packaging>

    <properties>
        <maven.compiler.source>8</maven.compiler.source>
        <maven.compiler.target>8</maven.compiler.target>
    </properties>

    <dependencies>
        <!--SpringMVC-->
        <dependency>
            <groupId>org.springframework</groupId>
            <artifactId>spring-webmvc</artifactId>
            <version>5.3.9</version>
        </dependency>

        <!--日志-->
        <dependency>
            <groupId>ch.qos.logback</groupId>
            <artifactId>logback-classic</artifactId>
            <version>1.2.3</version>
            <scope>test</scope>
        </dependency>

        <!--ServletAPI-->
        <dependency>
            <groupId>javax.servlet</groupId>
            <artifactId>javax.servlet-api</artifactId>
            <version>4.0.1</version>
            <scope>provided</scope>
        </dependency>

        <!--Spring5和Thymeleaf整合包-->
        <dependency>
            <groupId>org.thymeleaf</groupId>
            <artifactId>thymeleaf-spring5</artifactId>
            <version>3.0.12.RELEASE</version>
        </dependency>
    </dependencies>
</project>
然后就写我们整个项目的配置文件web.xml:
<?xml version="1.0" encoding="UTF-8"?>
<web-app xmlns="http://xmlns.jcp.org/xml/ns/javaee"
         xmlns:xsi="http://www.w3.org/2001/XMLSchema-instance"
         xsi:schemaLocation="http://xmlns.jcp.org/xml/ns/javaee http://xmlns.jcp.org/xml/ns/javaee/web-app_4_0.xsd"
         version="4.0">

    <!--配置编码过滤器,解决中文乱码问题-->
    <filter>
        <filter-name>CharacterEncodingFilter</filter-name>
        <filter-class>org.springframework.web.filter.CharacterEncodingFilter</filter-class>
        <init-param>
            <param-name>encoding</param-name>
            <param-value>UTF-8</param-value>
        </init-param>
        <init-param>
            <param-name>forceResponseEncoding</param-name>
            <param-value>true</param-value>
        </init-param>
    </filter>
    <filter-mapping>
        <filter-name>CharacterEncodingFilter</filter-name>
        <url-pattern>/*</url-pattern>
    </filter-mapping>

    <!--配置HiddenHttpMethodFilter-->
    <filter>
        <filter-name>HiddenHttpMethodFilter</filter-name>
        <filter-class>org.springframework.web.filter.HiddenHttpMethodFilter</filter-class>
    </filter>
    <filter-mapping>
        <filter-name>HiddenHttpMethodFilter</filter-name>
        <url-pattern>/*</url-pattern>
    </filter-mapping>

    <!--配置SpringMVC的前端控制器,对浏览器发送的请求进行统一处理-->
    <servlet>
        <servlet-name>SpringMVC</servlet-name>
        <servlet-class>org.springframework.web.servlet.DispatcherServlet</servlet-class>
        <!--配置SpringMVC配置文件的位置和名称-->
        <init-param>
            <param-name>contextConfigLocation</param-name>
            <param-value>classpath:springMVC.xml</param-value>
        </init-param>
        <!--将前端控制器DispatcherServlet的初始化时间提前到服务器启动时-->
        <load-on-startup>1</load-on-startup>
    </servlet>
    <servlet-mapping>
        <servlet-name>SpringMVC</servlet-name>
        <!--
            使用/可以拦截 /login、 .html、 .js 、.css方式的请求
            但是不能拦截 .jsp的请求,如果要把.jsp文件也拦下来,那么就得用/*
        -->
        <url-pattern>/</url-pattern>
    </servlet-mapping>
</web-app>
然后因为我们使用的是SpringMVC的框架,所以我们还得创建SpringMVC的配置文件:
<?xml version="1.0" encoding="UTF-8"?>
<beans xmlns="http://www.springframework.org/schema/beans"
       xmlns:xsi="http://www.w3.org/2001/XMLSchema-instance"
       xmlns:context="http://www.springframework.org/schema/context"
       xmlns:mvc="http://www.springframework.org/schema/mvc"
       xsi:schemaLocation="http://www.springframework.org/schema/beans
       http://www.springframework.org/schema/beans/spring-beans.xsd
       http://www.springframework.org/schema/context
       https://www.springframework.org/schema/context/spring-context.xsd
       http://www.springframework.org/schema/mvc
       https://www.springframework.org/schema/mvc/spring-mvc.xsd">

    <!--扫描组件-->
    <context:component-scan base-package="com.example"/>

    <!--配置Thymeleaf视图解析器(针对h5文件,抄就完了)-->
    <bean id="viewResolver" class="org.thymeleaf.spring5.view.ThymeleafViewResolver">
        <property name="order" value="1"/>
        <property name="characterEncoding" value="UTF-8"/>
        <property name="templateEngine">
            <bean class="org.thymeleaf.spring5.SpringTemplateEngine">
                <property name="templateResolver">
                    <bean class="org.thymeleaf.spring5.templateresolver.SpringResourceTemplateResolver">
                        <!--视图前缀-->
                        <property name="prefix" value="/WEB-INF/templates/"/>
                        <!--视图后缀-->
                        <property name="suffix" value=".html"/>
                        <property name="templateMode" value="HTML5"/>
                        <property name="characterEncoding" value="UTF-8"/>
                    </bean>
                </property>
            </bean>
        </property>
    </bean>

    <!--
        处理静态资源,如html、js、css、jpg
        若只设置该标签,则只访问静态资源,其他请求无法访问
        此时必须设置<mvc:annotation-driven/>解决问题
    -->
    <mvc:default-servlet-handler/>

    <!--开启mvc注解驱动-->
    <mvc:annotation-driven>
        <mvc:message-converters>
            <!--处理响应中文乱码问题-->
            <bean class="org.springframework.http.converter.StringHttpMessageConverter">
                <property name="defaultCharset" value="UTF-8"/>
                <property name="supportedMediaTypes">
                    <list>
                        <value>text/html</value>
                        <value>application/json</value>
                    </list>
                </property>
            </bean>
        </mvc:message-converters>
    </mvc:annotation-driven>
</beans>
之后呢,我们就开始写我们的po层的代码,比如创建一个员工类
Employee.java:(一般是写一个有参构造加一个无参构造加所有的get和set方法再重写一个toString方法)
package com.example.po;

public class Employee {
    private Integer id;     //唯一标识
    private String name;    //姓名
    private String email;   //邮箱
    private Integer gender; //性别

    public Employee() {
    }

    public Employee(Integer id, String name, String email, Integer gender) {
        this.id = id;
        this.name = name;
        this.email = email;
        this.gender = gender;
    }

    public Integer getId() {
        return id;
    }

    public void setId(Integer id) {
        this.id = id;
    }

    public String getName() {
        return name;
    }

    public void setName(String name) {
        this.name = name;
    }

    public String getEmail() {
        return email;
    }

    public void setEmail(String email) {
        this.email = email;
    }

    public Integer getGender() {
        return gender;
    }

    public void setGender(Integer gender) {
        this.gender = gender;
    }

    @Override
    public String toString() {
        return "Employee{" +
                "id=" + id +
                ", name='" + name + '\'' +
                ", email='" + email + '\'' +
                ", gender=" + gender +
                '}';
    }
}
然后就写我们的dao层:(一般的写法其实是写一个Dao接口,再写一个DaoImpl实现类,再写一个service类来调用),但是这里相当于把这三个合并成一个直接拿来用。
EmployeeDao.java
package com.example.dao;

import com.example.po.Employee;

import java.util.Collection;
import java.util.HashMap;
import java.util.Map;

public class EmployeeDao {
    /*模拟数据库*/
    private static Map<Integer, Employee> employees = null;

    static {
        employees = new HashMap<Integer, Employee>();

        /*假设数据库中现有以下六条数据*/
        employees.put(1001,new Employee(1001, "林一", "123@qq.com", 0));
        employees.put(1002,new Employee(1002, "黄二", "456@qq.com", 1));
        employees.put(1003,new Employee(1003, "张三", "789@qq.com", 0));
        employees.put(1004,new Employee(1004, "李四", "321@qq.com", 1));
        employees.put(1005,new Employee(1005, "王五", "654@qq.com", 0));
        employees.put(1006,new Employee(1006, "刘六", "987@qq.com", 1));
    }

    /*模拟数据库的自增id*/
    private static Integer initId = 1007;

    /*增加一个Employee对象*/
    public void save(Employee employee){
        if (employee.getId() == null){
            employee.setId(initId++);
        }
        employees.put(employee.getId(),employee);
    }

    /*返回所有的Employees对象*/
    public Collection<Employee> getAll(){
        return employees.values();
    }

    /*通过id返回Employee对象*/
    public Employee get(Integer id){
        return employees.get(id);
    }

    /*通过id删除Employee对象*/
    public void delete(Integer id){
        employees.remove(id);
    }
}
然后我们根据下面的功能清单,写我们的控制器方法和超链接。

6.4.1 查询功能
先演示一个查询的功能。
EmployeeController.java代码如下:
package com.example.controller;

import com.example.dao.EmployeeDao;
import com.example.po.Employee;
import org.springframework.stereotype.Controller;
import org.springframework.web.bind.annotation.GetMapping;
import org.springframework.web.bind.annotation.PathVariable;
import org.springframework.web.servlet.ModelAndView;

import javax.annotation.Resource;
import java.util.Collection;

@Controller
public class EmployeeController {
    @Resource
    private EmployeeDao employeeDao;

    @GetMapping("/")
    public String toIndex(){
        return "index";
    }

    @GetMapping("/employee")
    public ModelAndView getAllEmployee(ModelAndView modelAndView){
        Collection<Employee> employees = employeeDao.getAll();
        //保存数据到request域对象
        modelAndView.addObject("employees", employees);
        //设置跳转的视图为employees.html
        modelAndView.setViewName("employees");
        return modelAndView;
    }

    @GetMapping("/employee/{id}")
    public ModelAndView getEmployeeById(ModelAndView modelAndView, @PathVariable Integer id){
        Employee employee = employeeDao.get(id);
        /*保存数据到request对象*/
        modelAndView.addObject("employees", employee);
        /*设置跳转的视图为employees.html*/
        modelAndView.setViewName("employees");
        return modelAndView;
    }
}
然后写我们的首页:
index.html
<!DOCTYPE html>
<html lang="en" xmlns:th="http://www.thymeleaf.org">
<head>
    <meta charset="UTF-8">
    <title>首页</title>
</head>
<body>
    <h1>首页</h1>
    <a th:href="@{/employee}">查询所有员工信息</a><br>
    <a th:href="@{/employee/1001}">查询id为1001的员工信息</a><br>
</body>
</html>
最后我们陈列(显示数据)的页面:
employees.html
<!DOCTYPE html>
<html lang="en" xmlns:th="http://www.thymeleaf.org">
<head>
    <meta charset="UTF-8">
    <title>员工信息列表</title>
    <style type="text/css">
      table{
        border: 1px solid black;
        width: 50%;
        /*表格对于整体居中*/
        margin: 0 auto;
        /*表格中的文字居中*/
        text-align: center;
      }

      td,th{
        border: 1px solid black;
      }
    </style>
</head>
<body>
    <table>
      <tr>
        <!--设置让他独占五列-->
        <th colspan="5">员工信息列表</th>
      </tr>
      <tr>
        <th>工号</th>
        <th>姓名</th>
        <th>邮箱</th>
        <th>性别</th>
        <th>选项</th>
      </tr>
      <!--
          这里的用法类似于for(Employee item : employees)
          th:each表示的是取到的集合中的每一个对象
          : ${employees} 表示遍历request域中的employees
      -->
      <tr th:each="item : ${employees}">
        <td th:text="${item.id}"></td>
        <td th:text="${item.name}"></td>
        <td th:text="${item.email}"></td>
        <td th:text="${item.gender}"></td>
        <td>
          <a href="">删除</a>
          <a href="">修改</a>
        </td>
      </tr>
    </table>
</body>
</html>
启动服务器:

点击查询所有员工信息显示:

点击查询id为1001的用户信息显示:

6.4.2 删除功能
然后我们说一下删除功能(直接贴代码):
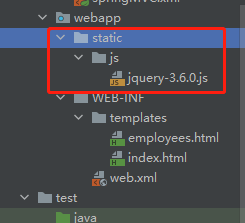
首先我们要引入我们的jQuery
然后,我们在控制器中添加方法:
    @DeleteMapping("/employee/{id}")
    public ModelAndView removeById(ModelAndView modelAndView, @PathVariable("id") Integer id){
        /*删除*/
        employeeDao.delete(id);
        modelAndView.setViewName("redirect:/employee");
        return modelAndView;
    }
再修改我们的employee.html页面如下:
<!DOCTYPE html>
<html lang="en" xmlns:th="http://www.thymeleaf.org">
<head>
    <meta charset="UTF-8">
    <title>员工信息列表</title>
    <style type="text/css">
      table{
        border: 1px solid black;
        width: 50%;
        /*表格对于整体居中*/
        margin: 0 auto;
        /*表格中的文字居中*/
        text-align: center;
      }

      td,th{
        border: 1px solid black;
      }
    </style>
</head>
<body>
    <table>
      <tr>
        <!--设置让他独占五列-->
        <th colspan="5">员工信息列表</th>
      </tr>
      <tr>
        <th>工号</th>
        <th>姓名</th>
        <th>邮箱</th>
        <th>性别</th>
        <th>选项</th>
      </tr>
      <!--
          这里的用法类似于for(Employee item : employees)
          th:each表示的是取到的集合中的每一个对象
          : ${employees} 表示遍历request域中的employees
      -->
      <tr th:each="item : ${employees}">
        <td th:text="${item.id}"></td>
        <td th:text="${item.name}"></td>
        <td th:text="${item.email}"></td>
        <td th:text="${item.gender}"></td>
        <td>
          <a class="deleteOption" th:href="@{'/employee/'+${item.id}}">删除</a>
          <a id="updateOption" th:href="@{/employee}">修改</a>
        </td>
      </tr>
    </table>

    <!--删除表单-->
    <form id="deleteForm" method="post">
      <input type="hidden" name="_method" value="delete">
    </form>

    <script type="text/javascript" th:src="@{/}+'/static/js/jquery-3.6.0.js'"></script>
    <script type="text/javascript">
        $(function (){
            $(".deleteOption").click(function (event){
                /*获取a标签的href*/
                $("#deleteForm").attr("action",$(this).attr("href"));
                /*提交form表单*/
                $("#deleteForm").submit();
                //取消超链接的默认行为
                event.preventDefault();
            })
        });
    </script>
</body>
</html>
6.4.3 添加功能
接着说一下添加功能,代码如下:
现在index中添加一个超链接跳转到页面添加员工信息。
index.html
<!DOCTYPE html>
<html lang="en" xmlns:th="http://www.thymeleaf.org">
<head>
    <meta charset="UTF-8">
    <title>首页</title>
</head>
<body>
    <h1>首页</h1>
    <a th:href="@{/employee}">查询所有员工信息</a><br>
    <a th:href="@{/employee/1001}">查询id为1001的员工信息</a><br>
    <a th:href="@{/toAdd}">添加员工信息</a>
</body>
</html>
然后写我么你的添加员工信息的页面:
employee_add.html
<!DOCTYPE html>
<html lang="en" xmlns:th="http://www.thymeleaf.org">
<head>
    <meta charset="UTF-8">
    <title>添加员工信息</title>
</head>
<body>
    <form th:action="@{/employee}" method="post">
        姓名:<input type="text" name="name"><br>
        邮箱:<input type="text" name="email"><br>
        性别:<input type="radio" name="gender" value="0">女
        <input type="radio" name="gender" value="1">男 <br>
        <input type="submit" value="提交"><br>
    </form>
</body>
</html>
再在Controller中补两个方法:
    @GetMapping("/toAdd")
    public String toAdd(){
        return "employee_add";
    }

    @PostMapping("/employee")
    public ModelAndView addEmployee(Employee employee,ModelAndView modelAndView){
        employeeDao.save(employee);
        modelAndView.setViewName("redirect:/employee");
        return modelAndView;
    }
重启服务器:

输入信息后点击提交
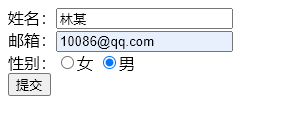
结果:

6.4.4 修改功能
先修改我们之前的index页面(去掉查询个人的功能):
index.html
<!DOCTYPE html>
<html lang="en" xmlns:th="http://www.thymeleaf.org">
<head>
    <meta charset="UTF-8">
    <title>首页</title>
</head>
<body>
    <h1>首页</h1>
    <a th:href="@{/employee}">查询所有员工信息</a><br>
    <a th:href="@{/toAdd}">添加员工信息</a>
</body>
</html>
然后写一个修改的页面:
<!DOCTYPE html>
<html lang="en" xmlns:th="http://www.thymeleaf.org">
<head>
  <meta charset="UTF-8">
  <title>修改员工信息</title>
</head>
<body>
<form th:action="@{/employee}" method="post">
  <input type="hidden" name="_method" value="put">
  <input type="hidden" name="id" th:value="${employee.id}">
  姓名:<input type="text" name="name" th:value="${employee.name}"><br>
  邮箱:<input type="text" name="email" th:value="${employee.email}"><br>
  性别:<input type="radio" name="gender" value="0" th:field="${employee.gender}">女
  <input type="radio" name="gender" value="1" th:field="${employee.gender}">男 <br>
  <input type="submit" value="修改"><br>
</form>
</body>
</html>
最后写两个控制器方法:(第一个getEmployeeById之前写过,需要更改)
    @GetMapping("/employee/{id}")
    public ModelAndView getEmployeeById(ModelAndView modelAndView, @PathVariable("id") Integer id){
        Employee employee = employeeDao.get(id);
        /*保存数据到request对象*/
        modelAndView.addObject("employee", employee);
        /*设置跳转的视图为employees.html*/
        modelAndView.setViewName("employee_update");
        return modelAndView;
    }

    @PutMapping("/employee")
    public ModelAndView updateEmployee(ModelAndView modelAndView, Employee employee){
        employeeDao.save(employee);
        modelAndView.setViewName("redirect:/employee");
        return modelAndView;
    }
然后重启服务器:
演示就不演示了,直接看结果把。这里把王五改成了哈哈。


 118
118


 被折叠的 条评论
为什么被折叠?
被折叠的 条评论
为什么被折叠?
 到【灌水乐园】发言


