


五、SpringBoot——Web开发
点击查看5.1 简单功能介绍(上篇)——Web开发之简单功能介绍
5.1 简单功能介绍(下篇)
5.1.4 源码剖析——静态资源原理
SpringBoot中,我们大部分的web的自动配置都放在WebMvcAutoConfiguration类中。我们可以去里面看看。(可以按两个Shift,输入类名,也可以自己去依赖里面找)
我们看看他都配了啥:
这个应该挺熟悉的,这个是用来配置让我们表单可以提交put和delete请求方式的。之前SpringMVC讲RESTFul风格的时候讲过。

回归正题哈,看这个:
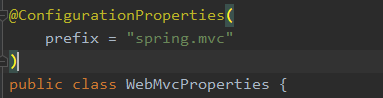
他同时绑定了这三个类WebMvcProperties.class, ResourceProperties.class, WebProperties.class。

其中WebMvcProperties和spring.mvc进行绑定
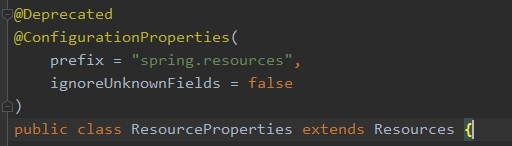
ResourceProperties和spring.resources进行绑定
WebProperties和spring.web进行了绑定

我们往下再看他的构造器,可以看到,他只有一个有参构造器,这种写法相当于有参构造器的所有参数的值会从容器中确定。
其中
| 参数 | 描述 |
|---|---|
| ResourceProperties resourceProperties | 获取和spring.resources绑定的所有的值的对象 |
| WebProperties webProperties | 获取和spring.web绑定的所有的值的对象 |
| WebMvcProperties mvcProperties | 获取和spring.mvc绑定的所有的值的对象 |
| ListableBeanFactory beanFactory | 获取Spring的beanFactory |
| ObjectProvider<HttpMessageConverters> messageConvertersProvider | 获取所有的HttpMessageConverters |
| ObjectProvider<WebMvcAutoConfiguration. ResourceHandlerRegistrationCustomizer> resourceHandlerRegistrationCustomizerProvider | 找到资源处理器的定义器 |
| ObjectProvider dispatcherServletPath | 前端控制器路径 |
| ObjectProvider<ServletRegistrationBean<?>> servletRegistrations | 给应用注册Servlet、Filter … |
public WebMvcAutoConfigurationAdapter(ResourceProperties resourceProperties, WebProperties webProperties, WebMvcProperties mvcProperties, ListableBeanFactory beanFactory, ObjectProvider<HttpMessageConverters> messageConvertersProvider, ObjectProvider<WebMvcAutoConfiguration.ResourceHandlerRegistrationCustomizer> resourceHandlerRegistrationCustomizerProvider, ObjectProvider<DispatcherServletPath> dispatcherServletPath, ObjectProvider<ServletRegistrationBean<?>> servletRegistrations) {
    this.resourceProperties = (Resources)(resourceProperties.hasBeenCustomized() ? resourceProperties : webProperties.getResources());
    this.mvcProperties = mvcProperties;
    this.beanFactory = beanFactory;
    this.messageConvertersProvider = messageConvertersProvider;
    this.resourceHandlerRegistrationCustomizer = (WebMvcAutoConfiguration.ResourceHandlerRegistrationCustomizer)resourceHandlerRegistrationCustomizerProvider.getIfAvailable();
    this.dispatcherServletPath = dispatcherServletPath;
    this.servletRegistrations = servletRegistrations;
    this.mvcProperties.checkConfiguration();
}
继续往下拉:
这个代码写的就是我们的资源的默认处理规则啦!!!
public void addResourceHandlers(ResourceHandlerRegistry registry) {
    if (!this.resourceProperties.isAddMappings()) {
        logger.debug("Default resource handling disabled");
    } else {
        this.addResourceHandler(registry, "/webjars/**", "classpath:/META-INF/resources/webjars/");
        this.addResourceHandler(registry, this.mvcProperties.getStaticPathPattern(), (registration) -> {
            registration.addResourceLocations(this.resourceProperties.getStaticLocations());
            if (this.servletContext != null) {
                ServletContextResource resource = new ServletContextResource(this.servletContext, "/");
                registration.addResourceLocations(new Resource[]{resource});
            }
        });
    }
}
从上面的代码,我们可以看出来哈,如果我们要禁用 用户对我们静态资源的访问很简单,只需要让第一个if条件!this.resourceProperties.isAddMappings()=true,也就是this.resourceProperties.isAddMappings()=false就可以了。(可以自己往内部看,最后addMapping的默认值是true。)上面那个CLASSPATH_RESOURCE_LOCATIONS就是我们默认的静态资源的路径。
以下代码WebProperties.class类的部分代码截取。
@ConfigurationProperties("spring.web")
public class WebProperties {
private Locale locale;
private WebProperties.LocaleResolver localeResolver;
private final WebProperties.Resources resources;
public WebProperties() {
this.localeResolver = WebProperties.LocaleResolver.ACCEPT_HEADER;
this.resources = new WebProperties.Resources();
}
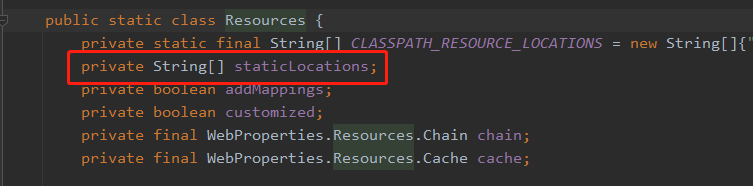
public static class Resources {
private static final String[] CLASSPATH_RESOURCE_LOCATIONS = new String[]{"classpath:/META-INF/resources/", "classpath:/resources/", "classpath:/static/", "classpath:/public/"};
private String[] staticLocations;
private boolean addMappings;
private boolean customized;
private final WebProperties.Resources.Chain chain;
private final WebProperties.Resources.Cache cache;
public Resources() {
this.staticLocations = CLASSPATH_RESOURCE_LOCATIONS;
this.addMappings = true;
this.customized = false;
this.chain = new WebProperties.Resources.Chain();
this.cache = new WebProperties.Resources.Cache();
}
}
}
从上面代码,我们可以看到Resources是WebProperties的内部类,而且WebProperties类中还包含一个Resources的对象,他的无参构造方法更是直接new了Resources的无参构造方法,这就让addMappings的默认值为true。
而根据yaml的语法,我们要修改这个addMappings的值,就需要通过他的属性resources来控制addMappings。

所以我们使用以下语句,就可以修改我们addMappings的默认值啦。(为什么这里是-mapping而不是Mapping,这个是因为配了一个从杠-到驼峰的东东。)
回归正题,修改这个值,我们就可以让我们的用户无法访问我们的静态资源哦。
spring:
  web:
    resources:
      add-mappings: false
如果这个值我们不改的话,我们往下看:
else {
  this.addResourceHandler(registry, "/webjars/**", "classpath:/META-INF/resources/webjars/");
  this.addResourceHandler(registry, this.mvcProperties.getStaticPathPattern(), (registration) -> {
      registration.addResourceLocations(this.resourceProperties.getStaticLocations());
      if (this.servletContext != null) {
          ServletContextResource resource = new ServletContextResource(this.servletContext, "/");
          registration.addResourceLocations(new Resource[]{resource});
      }
  });
一句一句解析把:
这一句是处理我们的webjars的。(这是啥?其实就是一个不知道算组织还是什么,我给忘了,他帮我们把一个比如jquery啊啥的封装成jar包了。然后默认放的路径把,就是他下面的/META-INF/resources/webjars/)。
this.addResourceHandler(registry, "/webjars/**", "classpath:/META-INF/resources/webjars/");
然后是这一段:
this.addResourceHandler(registry, this.mvcProperties.getStaticPathPattern(), (registration) -> {
    registration.addResourceLocations(this.resourceProperties.getStaticLocations());
    if (this.servletContext != null) {
        ServletContextResource resource = new ServletContextResource(this.servletContext, "/");
        registration.addResourceLocations(new Resource[]{resource});
    }
this.mvcProperties.getStaticPathPattern()这个,我们可以进去看一下,最后发现他的默认值是/**。
(registration)这个嘛,其实就是他默认写好的{“classpath:/META-INF/resources/”, “classpath:/resources/”, “classpath:/static/”, “classpath:/public/”}啦
所以呢,如果我们要修改this.mvcProperties.getStaticPathPattern()的默认值,我们就修改这个spring.mvc.staticPathPattern即可。第二张图可以看到,它的默认值是/**。


配置文件写作:
spring:
  mvc:
    static-path-pattern: /**
如果要修改(registration)这个值,我们可以看到他调用了addResourceLocations(this.resourceProperties.getStaticLocations());也就是说,我们只需要修改this.resourceProperties.getStaticLocations()这个,就可以了。
我们到this.resourceProperties里面,再定位到他的类,可以看到他是别人的一个内部类,那他上级是谁嘞,往上拉。
好家伙,是这个棱,他的前缀是spring.web
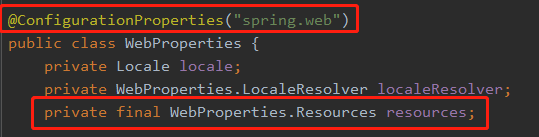
所以我们要修改那个值就是spring.web.resources.static-locations=[]
spring:
  web:
    resources:
      static-locations:
我们再看看欢迎页的底层代码:
看这个方法,然后到WelcomePageHandlerMapping这个类下看一下他的构造器方法吧。
@Bean
public WelcomePageHandlerMapping welcomePageHandlerMapping(ApplicationContext applicationContext, FormattingConversionService mvcConversionService, ResourceUrlProvider mvcResourceUrlProvider) {
    WelcomePageHandlerMapping welcomePageHandlerMapping = new WelcomePageHandlerMapping(new TemplateAvailabilityProviders(applicationContext), applicationContext, this.getWelcomePage(), this.mvcProperties.getStaticPathPattern());
    welcomePageHandlerMapping.setInterceptors(this.getInterceptors(mvcConversionService, mvcResourceUrlProvider));
    welcomePageHandlerMapping.setCorsConfigurations(this.getCorsConfigurations());
    return welcomePageHandlerMapping;
}
看下面的if条件if (welcomePage != null && "/**".equals(staticPathPattern)),他写死了staticPathPattern必须是/**,也就是静态资源的访问路径前缀必须是这个,否则就没法setRootViewName(“forward:index.html”);
取而代之的是,他会去Controller看哪个控制器方法能调用我们的index请求。
    WelcomePageHandlerMapping(TemplateAvailabilityProviders templateAvailabilityProviders, ApplicationContext applicationContext, Resource welcomePage, String staticPathPattern) {
        if (welcomePage != null && "/**".equals(staticPathPattern)) {
            logger.info("Adding welcome page: " + welcomePage);
            this.setRootViewName("forward:index.html");
        } else if (this.welcomeTemplateExists(templateAvailabilityProviders, applicationContext)) {
            logger.info("Adding welcome page template: index");
            this.setRootViewName("index");
        }
    }
5.1.5 源码剖析——Rest映射
之前在将SpringMVC的时候学过Restful,然后现在呢,我们如果要用SpringBoot写Rest风格的代码,怎么搞嘞?看源码:
要让SpringBoot开启他帮我们配好的HiddenHttpMethodFilter,首先,我们还不能自己去注册这个HiddenHttpMethodFilter组件,然后。我们还在在配置文件中配置spring.mvc.hiddenmethod.filter下的enabled。
    @Bean
    @ConditionalOnMissingBean({HiddenHttpMethodFilter.class})
    @ConditionalOnProperty(
        prefix = "spring.mvc.hiddenmethod.filter",
        name = {"enabled"}
    )
    public OrderedHiddenHttpMethodFilter hiddenHttpMethodFilter() {
        return new OrderedHiddenHttpMethodFilter();
    }
OK,那我们就乖乖地去配。
spring:
  mvc:
    hiddenmethod:
      filter:
        enabled: true
然后写个控制器方法:
package com.example.boot.controller;

import org.springframework.web.bind.annotation.*;

@RestController
public class UserController {

    @GetMapping("/user")
    public String getUser(){
        return "GET-User";
    }

    @PostMapping("/user")
    public String postUser(){
        return "POST-User";
    }

    @PutMapping("/user")
    public String putUser(){
        return "Put-User";
    }

    @DeleteMapping("/user")
    public String deleteUser(){
        return "Delete-User";
    }

}
再在index中加四个form表单,来测试我们的REST:
<!DOCTYPE html>
<html lang="en" xmlns:th="http://www.thymeleaf.org">
<head>
    <meta charset="UTF-8">
    <title>首页</title>
</head>
<body>
    <h1>欢迎光临!!!</h1>
    <h2>测试REST风格:</h2><br>
    测试Get请求:
    <form action="/user" method="get">
        <input value="提交" type="submit">
    </form>
    <br>
    测试Post请求:
    <form action="/user" method="post">
        <input value="提交" type="submit">
    </form>
    <br>
    测试Put请求:
    <form action="/user" method="post">
        <input type="hidden" name="_method" value="put">
        <input value="提交" type="submit">
    </form>
    <br>
    测试Delete请求:
    <form action="/user" method="post">
        <input type="hidden" name="_method" value="delete">
        <input value="提交" type="submit">
    </form>
    <br>
</body>
</html>
看到下图这两个应该就足够证明配置成功了吧。


至于这个HiddenHttpMethodFilter为什么可以让我们发送put和delete请求,请看:
HiddenHttpMethodFilter这个类的下面这个方法:(来自源码)
为了能读懂这段源码,下面还给出了这个类的其他几个方法。
public class HiddenHttpMethodFilter extends OncePerRequestFilter {
    private static final List<String> ALLOWED_METHODS;
    private String methodParam = "_method";

    static {
        ALLOWED_METHODS = Collections.unmodifiableList(Arrays.asList(HttpMethod.PUT.name(), HttpMethod.DELETE.name(), HttpMethod.PATCH.name()));
    }

    protected void doFilterInternal(HttpServletRequest request, HttpServletResponse response, FilterChain filterChain) throws ServletException, IOException {
        HttpServletRequest requestToUse = request;
        if ("POST".equals(request.getMethod()) && request.getAttribute("javax.servlet.error.exception") == null) {
            String paramValue = request.getParameter(this.methodParam);
            if (StringUtils.hasLength(paramValue)) {
                String method = paramValue.toUpperCase(Locale.ENGLISH);
                if (ALLOWED_METHODS.contains(method)) {
                    requestToUse = new HiddenHttpMethodFilter.HttpMethodRequestWrapper(request, method);
                }
            }
        }

        filterChain.doFilter((ServletRequest)requestToUse, response);
    }
}
简单解读一下吧,就是首先ALLOWED_METHODS = Collections.unmodifiableList(Arrays.asList(HttpMethod.PUT.name(), HttpMethod.DELETE.name(), HttpMethod.PATCH.name()));告诉我们ALLOWED_METHODS包含PUT、DELETE、PATCH。然后,匹配我们的请求的方式是不是POST,而且访问的这个Servlet是否也没有异常,如果这两个条件满足的话,获取请求的_method的参数,然后把这个参数转化为纯大写字母去跟ALLOWED_METHODS中的字符做对比。如果匹配成功,那么对其的提交的方式进行封装,将post封装成对应的put、delete或patch方式转发到对应的服务器的控制器方法。
扩展:我们如果不想用_method,也可以自己定义。如下:
自己写一个配置类,然后配Bean。通过HiddenHttpMethodFilter的setMethodParam方法来设置我们要的name。
package com.example.boot.config;

import org.springframework.context.annotation.Bean;
import org.springframework.context.annotation.Configuration;
import org.springframework.web.filter.HiddenHttpMethodFilter;

@Configuration(proxyBeanMethods = false)
public class MyConfig {

    @Bean
    HiddenHttpMethodFilter hiddenHttpMethodFilter(){
        HiddenHttpMethodFilter methodFilter = new HiddenHttpMethodFilter();
        methodFilter.setMethodParam("function");
        return methodFilter;
    }
}
完后,记得把index里面的值改了,如下:

编译一下,然后我们可以测试一下,依旧成功访问。
5.1.6 源码剖析——请求映射原理
以前学JavaWeb的时候,我们有学习过Servlet,然后后来对每个请求,我们都要写一个直自己的Servlet方法继承HttpServlet。而这个HttpServlet呢,又通过doGet和doPost两个方法来处理我们接收到的get和post请求。
而现在,我们知道,我们导入web场景的时候,他会自动帮我们配置我们的前端控制器。而且所有的请求都会被他所接收。来,我们看一下他们之间有啥关系。下图可以看到哈,这个HttpServlet是DispatcherServlet的祖先。
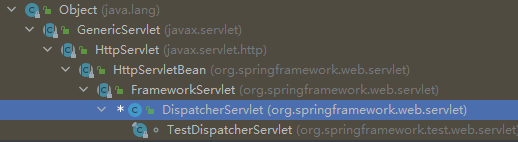
而这个DispatherServlet以及HttpServletBean都没有直接的重写HttpServlet的doGet和doPost方法。所以我们来看一下有重写doGet和doPost的FrameworkServlet。
他重写的doGet和doPost如下,都只是简单的执行一句 this.processRequest(request, response);。
    protected final void doGet(HttpServletRequest request, HttpServletResponse response) throws ServletException, IOException {
        this.processRequest(request, response);
    }

    protected final void doPost(HttpServletRequest request, HttpServletResponse response) throws ServletException, IOException {
        this.processRequest(request, response);
    }
行吧,既然如此,那就再看看这个processRequest写的是啥。
    protected final void processRequest(HttpServletRequest request, HttpServletResponse response) throws ServletException, IOException {
        long startTime = System.currentTimeMillis();
        Throwable failureCause = null;
        LocaleContext previousLocaleContext = LocaleContextHolder.getLocaleContext();
        LocaleContext localeContext = this.buildLocaleContext(request);
        RequestAttributes previousAttributes = RequestContextHolder.getRequestAttributes();
        ServletRequestAttributes requestAttributes = this.buildRequestAttributes(request, response, previousAttributes);
        WebAsyncManager asyncManager = WebAsyncUtils.getAsyncManager(request);
        asyncManager.registerCallableInterceptor(FrameworkServlet.class.getName(), new FrameworkServlet.RequestBindingInterceptor());
        this.initContextHolders(request, localeContext, requestAttributes);

        try {
            this.doService(request, response);
        } catch (IOException | ServletException var16) {
            failureCause = var16;
            throw var16;
        } catch (Throwable var17) {
            failureCause = var17;
            throw new NestedServletException("Request processing failed", var17);
        } finally {
            this.resetContextHolders(request, previousLocaleContext, previousAttributes);
            if (requestAttributes != null) {
                requestAttributes.requestCompleted();
            }

            this.logResult(request, response, (Throwable)failureCause, asyncManager);
            this.publishRequestHandledEvent(request, response, startTime, (Throwable)failureCause);
        }
    }
前面那一块初始化参数的我们就不看了。直接看他最核心的部分:
 try {
            this.doService(request, response);
        } catch (IOException | ServletException var16) {
            failureCause = var16;
            throw var16;
        } catch (Throwable var17) {
            failureCause = var17;
            throw new NestedServletException("Request processing failed", var17);
        } finally {
            this.resetContextHolders(request, previousLocaleContext, previousAttributes);
            if (requestAttributes != null) {
                requestAttributes.requestCompleted();
            }
            this.logResult(request, response, (Throwable)failureCause, asyncManager);
            this.publishRequestHandledEvent(request, response, startTime, (Throwable)failureCause);
        }
    }
首先,我们先执行 this.doService(request, response); 所以,我们再看看他的doService都做了啥。
protected abstract void doService(HttpServletRequest var1, HttpServletResponse var2) throws Exception;
好家伙,他直接作为抽象方法,交给别人写去了。行吧,委屈一下,我们再去看他的子类怎么写doService的。(他的子类是DispatcherServlet)
    protected void doService(HttpServletRequest request, HttpServletResponse response) throws Exception {
        this.logRequest(request);
        Map<String, Object> attributesSnapshot = null;
        if (WebUtils.isIncludeRequest(request)) {
            attributesSnapshot = new HashMap();
            Enumeration attrNames = request.getAttributeNames();

            label116:
            while(true) {
                String attrName;
                do {
                    if (!attrNames.hasMoreElements()) {
                        break label116;
                    }

                    attrName = (String)attrNames.nextElement();
                } while(!this.cleanupAfterInclude && !attrName.startsWith("org.springframework.web.servlet"));

                attributesSnapshot.put(attrName, request.getAttribute(attrName));
            }
        }

        request.setAttribute(WEB_APPLICATION_CONTEXT_ATTRIBUTE, this.getWebApplicationContext());
        request.setAttribute(LOCALE_RESOLVER_ATTRIBUTE, this.localeResolver);
        request.setAttribute(THEME_RESOLVER_ATTRIBUTE, this.themeResolver);
        request.setAttribute(THEME_SOURCE_ATTRIBUTE, this.getThemeSource());
        if (this.flashMapManager != null) {
            FlashMap inputFlashMap = this.flashMapManager.retrieveAndUpdate(request, response);
            if (inputFlashMap != null) {
                request.setAttribute(INPUT_FLASH_MAP_ATTRIBUTE, Collections.unmodifiableMap(inputFlashMap));
            }

            request.setAttribute(OUTPUT_FLASH_MAP_ATTRIBUTE, new FlashMap());
            request.setAttribute(FLASH_MAP_MANAGER_ATTRIBUTE, this.flashMapManager);
        }

        RequestPath previousRequestPath = null;
        if (this.parseRequestPath) {
            previousRequestPath = (RequestPath)request.getAttribute(ServletRequestPathUtils.PATH_ATTRIBUTE);
            ServletRequestPathUtils.parseAndCache(request);
        }

        try {
            this.doDispatch(request, response);
        } finally {
            if (!WebAsyncUtils.getAsyncManager(request).isConcurrentHandlingStarted() && attributesSnapshot != null) {
                this.restoreAttributesAfterInclude(request, attributesSnapshot);
            }

            if (this.parseRequestPath) {
                ServletRequestPathUtils.setParsedRequestPath(previousRequestPath, request);
            }
        }
    }
这里吧,一样的前面都是在配置这个那个东西,我们不管,直接看他最关键的try里面的内容this.doDispatch(request, response);
**这个就是最关键的了!!!!**我们的每个请求,最终其实都需要经过这里。虽然她历经波折,
    protected void doDispatch(HttpServletRequest request, HttpServletResponse response) throws Exception {
        HttpServletRequest processedRequest = request;
        HandlerExecutionChain mappedHandler = null;
        boolean multipartRequestParsed = false;
        WebAsyncManager asyncManager = WebAsyncUtils.getAsyncManager(request);

        try {
            try {
                ModelAndView mv = null;
                Object dispatchException = null;

                try {
                    processedRequest = this.checkMultipart(request);
                    multipartRequestParsed = processedRequest != request;
                    mappedHandler = this.getHandler(processedRequest);
                    if (mappedHandler == null) {
                        this.noHandlerFound(processedRequest, response);
                        return;
                    }

                    HandlerAdapter ha = this.getHandlerAdapter(mappedHandler.getHandler());
                    String method = request.getMethod();
                    boolean isGet = HttpMethod.GET.matches(method);
                    if (isGet || HttpMethod.HEAD.matches(method)) {
                        long lastModified = ha.getLastModified(request, mappedHandler.getHandler());
                        if ((new ServletWebRequest(request, response)).checkNotModified(lastModified) && isGet) {
                            return;
                        }
                    }

                    if (!mappedHandler.applyPreHandle(processedRequest, response)) {
                        return;
                    }

                    mv = ha.handle(processedRequest, response, mappedHandler.getHandler());
                    if (asyncManager.isConcurrentHandlingStarted()) {
                        return;
                    }

                    this.applyDefaultViewName(processedRequest, mv);
                    mappedHandler.applyPostHandle(processedRequest, response, mv);
                } catch (Exception var20) {
                    dispatchException = var20;
                } catch (Throwable var21) {
                    dispatchException = new NestedServletException("Handler dispatch failed", var21);
                }

                this.processDispatchResult(processedRequest, response, mappedHandler, mv, (Exception)dispatchException);
            } catch (Exception var22) {
                this.triggerAfterCompletion(processedRequest, response, mappedHandler, var22);
            } catch (Throwable var23) {
                this.triggerAfterCompletion(processedRequest, response, mappedHandler, new NestedServletException("Handler processing failed", var23));
            }

        } finally {
            if (asyncManager.isConcurrentHandlingStarted()) {
                if (mappedHandler != null) {
                    mappedHandler.applyAfterConcurrentHandlingStarted(processedRequest, response);
                }
            } else if (multipartRequestParsed) {
                this.cleanupMultipart(processedRequest);
            }

        }
    }
他这里具体做了啥嘞?我们把主要的代码说一下:
首先processedRequest = this.checkMultipart(request);这一段是用来检查该请求是否是上传文件的请求。咱们先不管,本次要讲的是请求映射,所以主要是这个方法mappedHandler = this.getHandler(processedRequest);获取我们请求的处理方法(要用哪个Controller进行响应)。
我们给个断点,调试来看一下:
首先,肯定是进入我们的getHandler内部

然后看看这个handlerMappings是啥,里面都有啥:
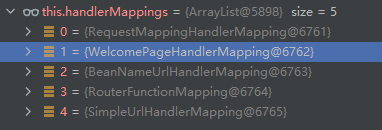
我们可以看到前两个,一个是WelcomePageHandlerMapping,一个是RequestMappingHandlerMapping。其中这个WelcomePageHandlerMapping就是用来处理帮我们自动跳转到index页面的。打开来看看:
可以看到他写了一个view,用来跳转到index.html页面

还有这个pathMatcher下的pathSeparator,用来拦截 / 这个请求。

然后再看看这个RequestMappingHandlerMapping,RequestMapping看着应该很眼熟吧。就是我们在控制器方法中常用的用来处理请求的注解。这个RequestMappingHandlerMapping类,其实他保存了所有的@RequestMapping和所有的映射规则。来,我们来看一下,我们让他继续往后执行,到这一句HandlerMapping mapping = (HandlerMapping)var2.next();此时,RequestmappingHandlerMapping里面的mappingRegistry里面有数据了。(而且里面的数据,正是我们所有的请求映射)

如果找不到怎么办呢?找不到他的循环语句就遍历下一个HandlerMapping,也就是我们的WelcomePageHandlerMapping,还没有就继续再下一个HandlerMapping反复下去,直到真的一个也找不到了。那就只能报错404了:
 while(var2.hasNext()) {
     HandlerMapping mapping = (HandlerMapping)var2.next();
     HandlerExecutionChain handler = mapping.getHandler(request);
     if (handler != null) {
         return handler;
     }
 }
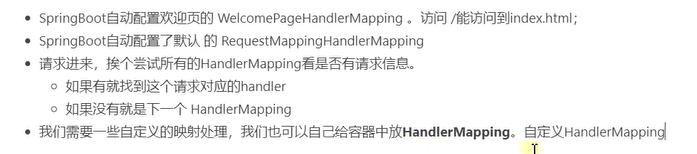
总结一下:
- SpringBoot自动配置欢迎页的WelcomePageHandlerMapping,访问 / 就能访问到我们的index.html
- SpringBoot自动配置了默认的RequestMappingHandlerMapping
- 请求进来,逐个尝试所有的HandlerMapping,看是否有对应的请求映射
1. 如果有就找到这个请求对应的handler
2. 如果没有就去找下一个HandlerMapping
3. 实在没有了,报404错误 - 我们也可以通过给自己的容器放HandlerMapping,以此来定义我们的HandlerMapping


 779
779


 被折叠的 条评论
为什么被折叠?
被折叠的 条评论
为什么被折叠?
 到【灌水乐园】发言


