


MyBatis 的工作原理
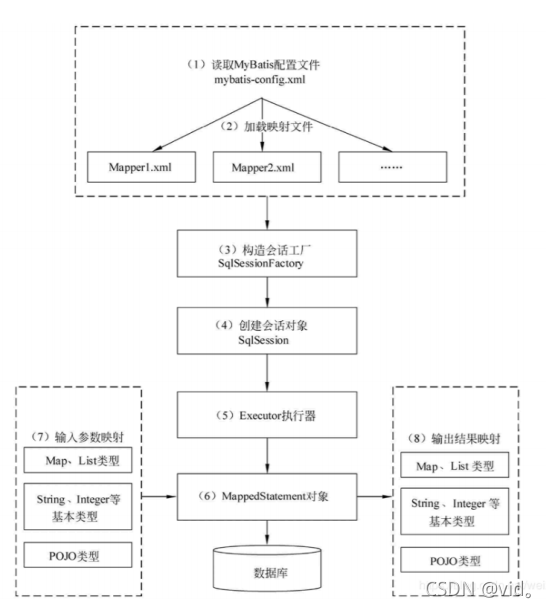
SqlSessionFactory的创建
这是我们常见的SqlSessionFactory创建的代码,我们下面来对源码剖析
    @Before
    public void testBefore() throws IOException {

        InputStream rs = Resources.getResourceAsStream("mybatis-config.xml");

        SqlSessionFactory sqlSessionFactory = new SqlSessionFactoryBuilder().build(rs);

        SqlSession sqlSession = sqlSessionFactory.openSession();
点进build,我们只传了一个InputStream 的参数

可以发现如下代码
  public SqlSessionFactory build(InputStream inputStream, String environment, Properties properties) {
    try {
      XMLConfigBuilder parser = new XMLConfigBuilder(inputStream, environment, properties);
      return build(parser.parse());
    } catch (Exception e) {
      throw ExceptionFactory.wrapException("Error building SqlSession.", e);
    } finally {
      ErrorContext.instance().reset();
      try {
        inputStream.close();
      } catch (IOException e) {
        // Intentionally ignore. Prefer previous error.
      }
    }
  }
首先我们去看XMLConfigBuilder
由于 environment, props这两个参数都是null,我们就主要去看XPathParser parser这个参数。
  public XMLConfigBuilder(InputStream inputStream, String environment, Properties props) {
    this(new XPathParser(inputStream, true, props, new XMLMapperEntityResolver()), environment, props);
  }
XPathParser parser参数指向的就是new XPathParser(inputStream, true, props, new XMLMapperEntityResolver()),inputStream, true, props这三个参数没什么好说的,我们主要是去看一下 new XMLMapperEntityResolver()点进去可以看到主要是对约束文件进行解析
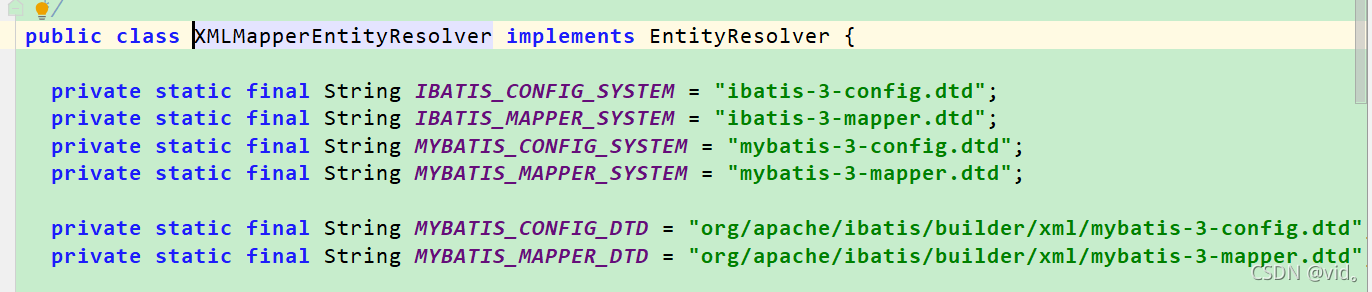
就是配置文件的头部分进行解析
<?xml version="1.0" encoding="UTF-8" ?>
<!DOCTYPE mapper
        PUBLIC "-//mybatis.org//DTD Mapper 3.0//EN"
        "http://mybatis.org/dtd/mybatis-3-mapper.dtd">
我们把new XPathParser(inputStream, true, props, new XMLMapperEntityResolver())扩号里面每个参数都分析完了,我们再看XPathParser想干什么,我们在对XPathParser进行分析
  public XPathParser(InputStream inputStream, boolean validation, Properties variables, EntityResolver entityResolver) {
    commonConstructor(validation, variables, entityResolver);
    this.document = createDocument(new InputSource(inputStream));
  }
可以发现 它将我们传入inputStream对象直接使其生成出了一个document 对象。
  public XMLConfigBuilder(InputStream inputStream, String environment, Properties props) {
    this(new XPathParser(inputStream, true, props, new XMLMapperEntityResolver()), environment, props);
  }
我们点击this 去看他用的什么构造器和构造器里面有什么步骤
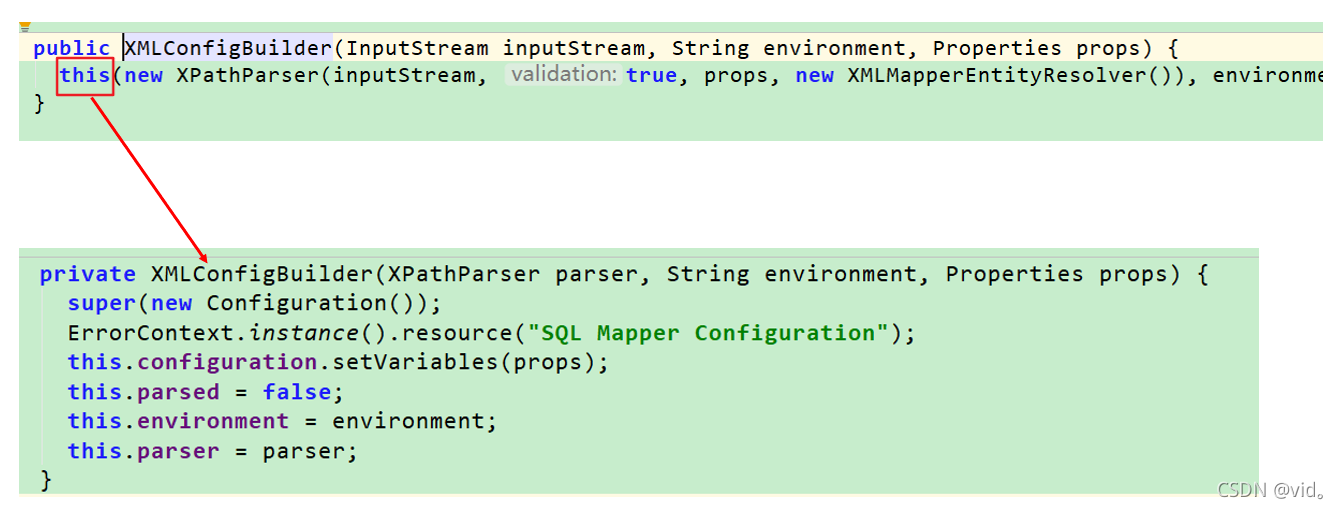
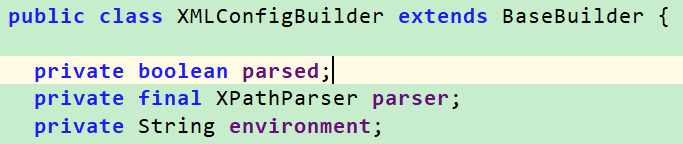
注意下parsed这个参数,此时为false
就是将(XPathParser parser, String environment, Properties props)这三个我们传进去的参数赋值给XMLConfigBuilder类的全局变量
自此我们就回到这一步,此时XMLConfigBuilder就创建完成了。

这个parser里面是包含了我们的我们配置文件解析出来的document 对象的我们注意这一点。
此时我们对红框的这句话进行解析,点进parse
  public Configuration parse() {
    if (parsed) {
      throw new BuilderException("Each XMLConfigBuilder can only be used once.");
    }
    parsed = true;
    parseConfiguration(parser.evalNode("/configuration"));
    return configuration;
  }
我们在刚刚说了parsed为false,我们着重关注parseConfiguration(parser.evalNode("/configuration"));这个方法,我们的可以点进去看一下
  private void parseConfiguration(XNode root) {
    try {
      //issue #117 read properties first
      /**解析配置文件中的各种属性*/
      propertiesElement(root.evalNode("properties"));
      /**解析mybatis的全局设置信息*/
      Properties settings = settingsAsProperties(root.evalNode("settings"));
      loadCustomVfs(settings);
      /**解析别名配置*/
      typeAliasesElement(root.evalNode("typeAliases"));
      /**解析插件配置*/
      pluginElement(root.evalNode("plugins"));
      /**解析对象工厂元素*/
      objectFactoryElement(root.evalNode("objectFactory"));
      objectWrapperFactoryElement(root.evalNode("objectWrapperFactory"));
      reflectorFactoryElement(root.evalNode("reflectorFactory"));
      settingsElement(settings);
      /**解析mybatis的环境配置*/
      environmentsElement(root.evalNode("environments"));
      databaseIdProviderElement(root.evalNode("databaseIdProvider"));
      /**解析类型处理器配置信息*/
      typeHandlerElement(root.evalNode("typeHandlers"));
      /**解析mapper配置信息*/
      mapperElement(root.evalNode("mappers"));
    } catch (Exception e) {
      throw new BuilderException("Error parsing SQL Mapper Configuration. Cause: " + e, e);
    }
  }
可以发现parseConfiguration它就对核心配置文件中的每个节点进行解析的。
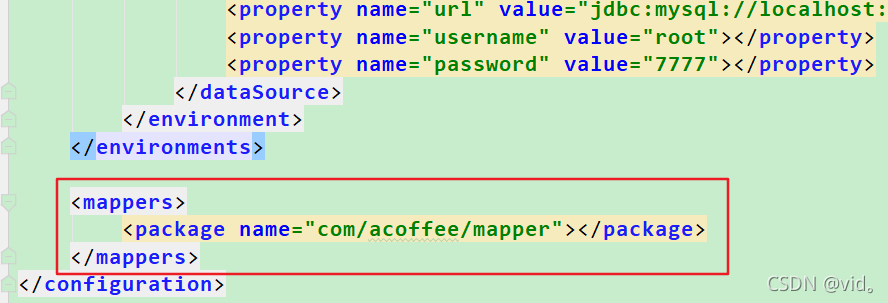
我们在这里着重关注mapperElement(root.evalNode("mappers"));这句话这是对mappers节点进行解析。
我们点进mapperElement(root.evalNode("mappers"));进行分析,我们发现如下代码
 private void mapperElement(XNode parent) throws Exception {
    if (parent != null) {
      for (XNode child : parent.getChildren()) {
      	//如果mappers下面的子节点是package,我们直接进行包扫描,上图我们就是用的package节点
        if ("package".equals(child.getName())) {
          String mapperPackage = child.getStringAttribute("name");
          configuration.addMappers(mapperPackage);
        } else {
          String resource = child.getStringAttribute("resource");
          String url = child.getStringAttribute("url");
          String mapperClass = child.getStringAttribute("class");
          //如果子节点是resource、url 、mapperClass 结汇走下面的流程,我们最常见的是resource
          if (resource != null && url == null && mapperClass == null) {
            ErrorContext.instance().resource(resource);
            InputStream inputStream = Resources.getResourceAsStream(resource);
            XMLMapperBuilder mapperParser = new XMLMapperBuilder(inputStream, configuration, resource, configuration.getSqlFragments());
            mapperParser.parse();
          } else if (resource == null && url != null && mapperClass == null) {
            ErrorContext.instance().resource(url);
            InputStream inputStream = Resources.getUrlAsStream(url);
            XMLMapperBuilder mapperParser = new XMLMapperBuilder(inputStream, configuration, url, configuration.getSqlFragments());
            mapperParser.parse();
          } else if (resource == null && url == null && mapperClass != null) {
            Class<?> mapperInterface = Resources.classForName(mapperClass);
            configuration.addMapper(mapperInterface);
          } else {
            throw new BuilderException("A mapper element may only specify a url, resource or class, but not more than one.");
          }
        }
      }
    }
  }
我们以resource 进行分析
		if (resource != null && url == null && mapperClass == null) {
          ErrorContext.instance().resource(resource);
          InputStream inputStream = Resources.getResourceAsStream(resource);
          //这里实在解析我们的resource 引入xml文件(接口对应的映射文件)
          XMLMapperBuilder mapperParser = new XMLMapperBuilder(inputStream, configuration, resource, configuration.getSqlFragments());
          mapperParser.parse();
        }
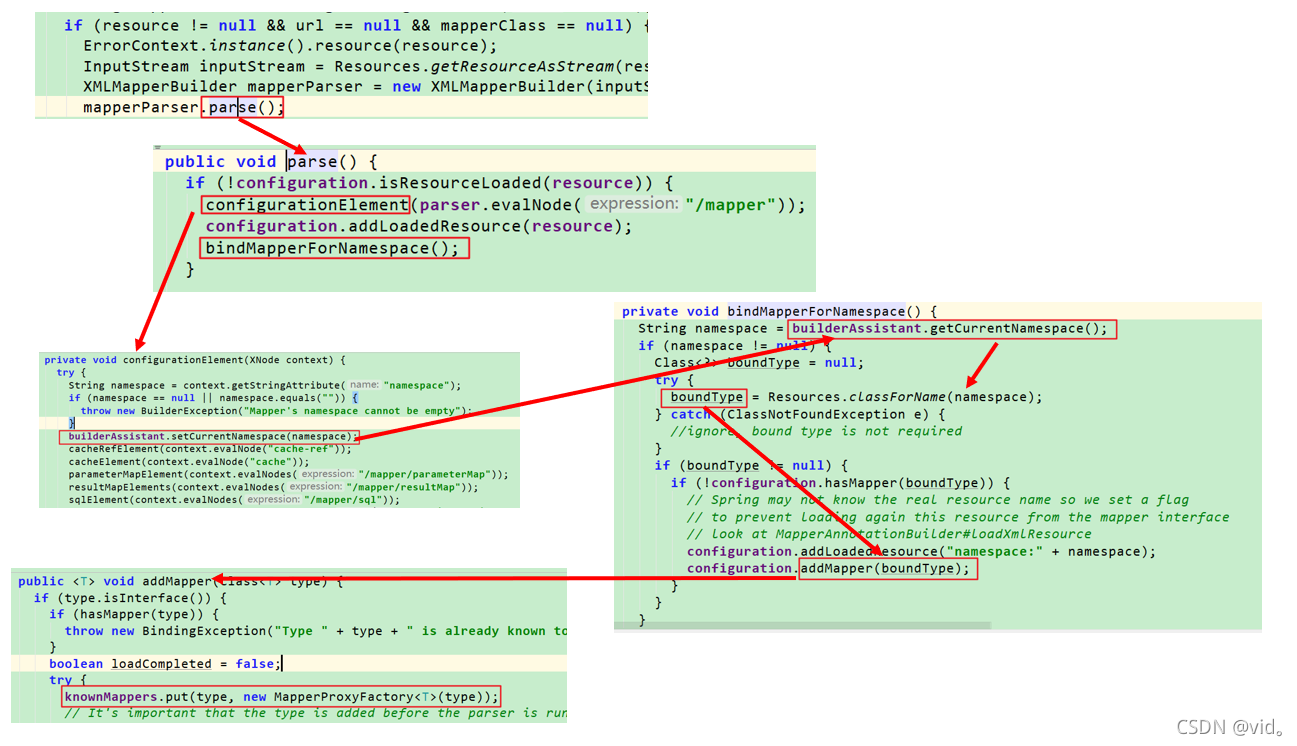
其实对resource 标签里面的xml文件解析的流程跟最开始解析核心配置文件的流程差不多,解析完成后也是mapperParser里面包含一个document对象,我们点进对mapperParser的parse()方法来看。
  public void parse() {
    if (!configuration.isResourceLoaded(resource)) {
      configurationElement(parser.evalNode("/mapper"));
      configuration.addLoadedResource(resource);
      bindMapperForNamespace();
    }

    parsePendingResultMaps();
    parsePendingCacheRefs();
    parsePendingStatements();
  }
我们点进configurationElement进行分析,点进去我们可以发现这里面也是对映射文件的节点进行解析
 private void configurationElement(XNode context) {
    try {
      String namespace = context.getStringAttribute("namespace");
      if (namespace == null || namespace.equals("")) {
        throw new BuilderException("Mapper's namespace cannot be empty");
      }
      builderAssistant.setCurrentNamespace(namespace);
      cacheRefElement(context.evalNode("cache-ref"));
      cacheElement(context.evalNode("cache"));
      parameterMapElement(context.evalNodes("/mapper/parameterMap"));
      resultMapElements(context.evalNodes("/mapper/resultMap"));
      sqlElement(context.evalNodes("/mapper/sql"));
      buildStatementFromContext(context.evalNodes("select|insert|update|delete"));
    } catch (Exception e) {
      throw new BuilderException("Error parsing Mapper XML. The XML location is '" + resource + "'. Cause: " + e, e);
    }
  }
我们来看一下 buildStatementFromContext(context.evalNodes("select|insert|update|delete"));很明显这是sql的标签,我们点进去看
  private void buildStatementFromContext(List<XNode> list) {
    if (configuration.getDatabaseId() != null) {
      buildStatementFromContext(list, configuration.getDatabaseId());
    }
    buildStatementFromContext(list, null);
  }
一路点击,直至parseStatementNode这个方法
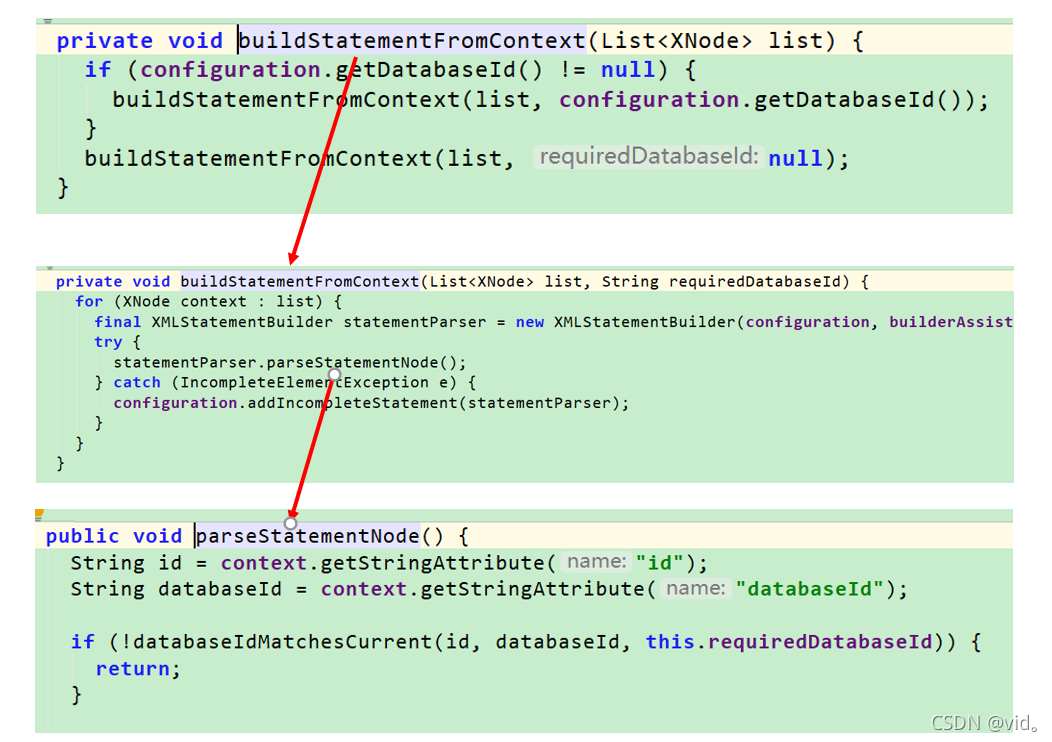
我们来看parseStatementNode的源码
  public void parseStatementNode() {
    String id = context.getStringAttribute("id");
    String databaseId = context.getStringAttribute("databaseId");

    if (!databaseIdMatchesCurrent(id, databaseId, this.requiredDatabaseId)) {
      return;
    }

    Integer fetchSize = context.getIntAttribute("fetchSize");
    Integer timeout = context.getIntAttribute("timeout");
    String parameterMap = context.getStringAttribute("parameterMap");
    String parameterType = context.getStringAttribute("parameterType");
    Class<?> parameterTypeClass = resolveClass(parameterType);
    String resultMap = context.getStringAttribute("resultMap");
    String resultType = context.getStringAttribute("resultType");
    String lang = context.getStringAttribute("lang");
    LanguageDriver langDriver = getLanguageDriver(lang);

    Class<?> resultTypeClass = resolveClass(resultType);
    String resultSetType = context.getStringAttribute("resultSetType");
    StatementType statementType = StatementType.valueOf(context.getStringAttribute("statementType", StatementType.PREPARED.toString()));
    ResultSetType resultSetTypeEnum = resolveResultSetType(resultSetType);

    String nodeName = context.getNode().getNodeName();
    SqlCommandType sqlCommandType = SqlCommandType.valueOf(nodeName.toUpperCase(Locale.ENGLISH));
    boolean isSelect = sqlCommandType == SqlCommandType.SELECT;
    boolean flushCache = context.getBooleanAttribute("flushCache", !isSelect);
    boolean useCache = context.getBooleanAttribute("useCache", isSelect);
    boolean resultOrdered = context.getBooleanAttribute("resultOrdered", false);

    // Include Fragments before parsing
    XMLIncludeTransformer includeParser = new XMLIncludeTransformer(configuration, builderAssistant);
    includeParser.applyIncludes(context.getNode());

    // Parse selectKey after includes and remove them.
    processSelectKeyNodes(id, parameterTypeClass, langDriver);

    // Parse the SQL (pre: <selectKey> and <include> were parsed and removed)
    //sqlSource
    SqlSource sqlSource = langDriver.createSqlSource(configuration, context, parameterTypeClass);
    String resultSets = context.getStringAttribute("resultSets");
    String keyProperty = context.getStringAttribute("keyProperty");
    String keyColumn = context.getStringAttribute("keyColumn");
    KeyGenerator keyGenerator;
    String keyStatementId = id + SelectKeyGenerator.SELECT_KEY_SUFFIX;
    keyStatementId = builderAssistant.applyCurrentNamespace(keyStatementId, true);
    if (configuration.hasKeyGenerator(keyStatementId)) {
      keyGenerator = configuration.getKeyGenerator(keyStatementId);
    } else {
      keyGenerator = context.getBooleanAttribute("useGeneratedKeys",
          configuration.isUseGeneratedKeys() && SqlCommandType.INSERT.equals(sqlCommandType))
          ? Jdbc3KeyGenerator.INSTANCE : NoKeyGenerator.INSTANCE;
    }

    builderAssistant.addMappedStatement(id, sqlSource, statementType, sqlCommandType,
        fetchSize, timeout, parameterMap, parameterTypeClass, resultMap, resultTypeClass,
        resultSetTypeEnum, flushCache, useCache, resultOrdered,
        keyGenerator, keyProperty, keyColumn, databaseId, langDriver, resultSets);
  }
  public MappedStatement addMappedStatement(
      String id,
      SqlSource sqlSource,
      StatementType statementType,
      SqlCommandType sqlCommandType,
      Integer fetchSize,
      Integer timeout,
      String parameterMap,
      Class<?> parameterType,
      String resultMap,
      Class<?> resultType,
      ResultSetType resultSetType,
      boolean flushCache,
      boolean useCache,
      boolean resultOrdered,
      KeyGenerator keyGenerator,
      String keyProperty,
      String keyColumn,
      String databaseId,
      LanguageDriver lang,
      String resultSets) {

    if (unresolvedCacheRef) {
      throw new IncompleteElementException("Cache-ref not yet resolved");
    }

    id = applyCurrentNamespace(id, false);
    boolean isSelect = sqlCommandType == SqlCommandType.SELECT;

    MappedStatement.Builder statementBuilder = new MappedStatement.Builder(configuration, id, sqlSource, sqlCommandType)
        .resource(resource)
        .fetchSize(fetchSize)
        .timeout(timeout)
        .statementType(statementType)
        .keyGenerator(keyGenerator)
        .keyProperty(keyProperty)
        .keyColumn(keyColumn)
        .databaseId(databaseId)
        .lang(lang)
        .resultOrdered(resultOrdered)
        .resultSets(resultSets)
        .resultMaps(getStatementResultMaps(resultMap, resultType, id))
        .resultSetType(resultSetType)
        .flushCacheRequired(valueOrDefault(flushCache, !isSelect))
        .useCache(valueOrDefault(useCache, isSelect))
        .cache(currentCache);

    ParameterMap statementParameterMap = getStatementParameterMap(parameterMap, parameterType, id);
    if (statementParameterMap != null) {
      statementBuilder.parameterMap(statementParameterMap);
    }

    MappedStatement statement = statementBuilder.build();
    configuration.addMappedStatement(statement);
    return statement;
  }
通过解析一个个的标签,最终将sql语句的所有信息封装成MappedStatement对象,然后存储在configuration对象中。(这个MappedStatement对象我们下面也要用)
configurationElement分析完了,我们回到parse()方法
  public void parse() {
    if (!configuration.isResourceLoaded(resource)) {
      configurationElement(parser.evalNode("/mapper"));
      configuration.addLoadedResource(resource);
      bindMapperForNamespace();
    }

    parsePendingResultMaps();
    parsePendingCacheRefs();
    parsePendingStatements();
  }
我们在来看bindMapperForNamespace();这个方法,点进去
  private void bindMapperForNamespace() {
    String namespace = builderAssistant.getCurrentNamespace();
    if (namespace != null) {
      Class<?> boundType = null;
      try {
        boundType = Resources.classForName(namespace);
      } catch (ClassNotFoundException e) {
        //ignore, bound type is not required
      }
      if (boundType != null) {
        if (!configuration.hasMapper(boundType)) {
          // Spring may not know the real resource name so we set a flag
          // to prevent loading again this resource from the mapper interface
          // look at MapperAnnotationBuilder#loadXmlResource
          configuration.addLoadedResource("namespace:" + namespace);
          configuration.addMapper(boundType);
        }
      }
    }
  }
点进 configuration.addMapper(boundType);
  public <T> void addMapper(Class<T> type) {
    mapperRegistry.addMapper(type);
  }
点进 addMapper() 方法中,为mapperRegistry类中的全局变量knownMappers赋值,我们可以着重的去看这句话 knownMappers.put(type, new MapperProxyFactory<T>(type)); 里面有两个参数第一个是type,第二个生成这个type的代理类。
  public <T> void addMapper(Class<T> type) {
    if (type.isInterface()) {
      if (hasMapper(type)) {
        throw new BindingException("Type " + type + " is already known to the MapperRegistry.");
      }
      boolean loadCompleted = false;
      try {
      	//这里就将
        knownMappers.put(type, new MapperProxyFactory<T>(type));
        // It's important that the type is added before the parser is run
        // otherwise the binding may automatically be attempted by the
        // mapper parser. If the type is already known, it won't try.
        MapperAnnotationBuilder parser = new MapperAnnotationBuilder(config, type);
        parser.parse();
        loadCompleted = true;
      } finally {
        if (!loadCompleted) {
          knownMappers.remove(type);
        }
      }
    }
  }
我们来分析这个type到底是从哪里来的,从这张图上我们可以清楚的看到type 的类型就是我们去解析接口对应的映射配置文件中mapper标签中的namespace这个属性里面的接口进行解析的,所以往这个knownMappers这个变量里面放的就是这个接口,和这个接口的代理类,这里仅仅只是将这个代理创建了出来,还没有进行使用,会在后面的sqlSession.getMapper(StudentMapper.class);这段代码进行使用。
实际上就是解析该sql对应的class,并把该class放到configuration中的mapperRegistry中。实际上mybatis的所有配置信息以及运行时的配置参数全部都保存在configuration对象中。
自此我们就对parser(包含对核心配置文件解析出来的document对象)解析完毕
返回build,我们点击build
  public SqlSessionFactory build(Configuration config) {
    return new DefaultSqlSessionFactory(config);
  }
发现以下代码,实际上就是返回了一个DefaultSqlSessionFactory对象,而DefaultSqlSessionFactory是SqlSessionFactory的实现类。

到这里我们的SqlSessionFactory就创建完毕了。
SqlSession的创建
我们创建的SqlSessionFactory的时候实际返回的是DefaultSqlSessionFactory
  @Override
  public SqlSession openSession() {
    return openSessionFromDataSource(configuration.getDefaultExecutorType(), null, false);
  }
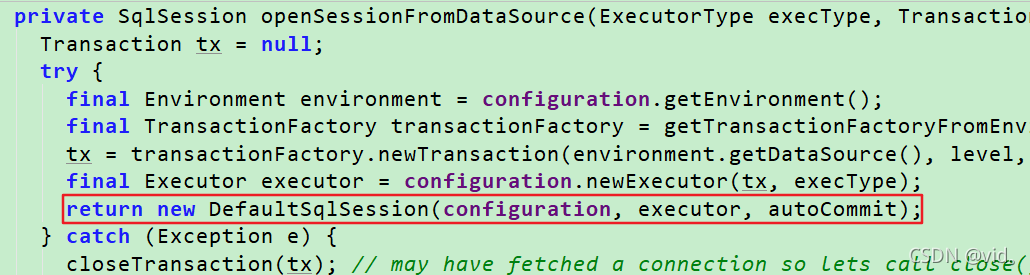
我们点进openSessionFromDataSource看一下
 private SqlSession openSessionFromDataSource(ExecutorType execType, TransactionIsolationLevel level, boolean autoCommit) {
    Transaction tx = null;
    try {
      final Environment environment = configuration.getEnvironment();
      final TransactionFactory transactionFactory = getTransactionFactoryFromEnvironment(environment);
      tx = transactionFactory.newTransaction(environment.getDataSource(), level, autoCommit);
      //这句话是重点:根据execType创建Executor对象
      final Executor executor = configuration.newExecutor(tx, execType);
      return new DefaultSqlSession(configuration, executor, autoCommit);
    } catch (Exception e) {
      closeTransaction(tx); // may have fetched a connection so lets call close()
      throw ExceptionFactory.wrapException("Error opening session.  Cause: " + e, e);
    } finally {
      ErrorContext.instance().reset();
    }
  }
openSessionFromDataSource方法先是获取了一些信息,然后创建了一个Executor
我们点进newExecutor看一下
  public Executor newExecutor(Transaction transaction, ExecutorType executorType) {
    executorType = executorType == null ? defaultExecutorType : executorType;
    executorType = executorType == null ? ExecutorType.SIMPLE : executorType;
    Executor executor;
   	//根据Executor在全局的配置类型创建相应的executor
    if (ExecutorType.BATCH == executorType) {
      executor = new BatchExecutor(this, transaction);
    } else if (ExecutorType.REUSE == executorType) {
      executor = new ReuseExecutor(this, transaction);
    } else {
      executor = new SimpleExecutor(this, transaction);
    }
    //如果有二级缓存则包装executor,但实际增删改查用的是包装前的executor
    if (cacheEnabled) {
      executor = new CachingExecutor(executor);
    }
    //用每一个拦截器重新包装executor
    executor = (Executor) interceptorChain.pluginAll(executor);
    return executor;
  }
Executor 是一个执行器用来做增删改查的,在文章在上方的那张原理图我们也可以找到它。
public interface Executor {

  ResultHandler NO_RESULT_HANDLER = null;

  int update(MappedStatement ms, Object parameter) throws SQLException;

  <E> List<E> query(MappedStatement ms, Object parameter, RowBounds rowBounds, ResultHandler resultHandler, CacheKey cacheKey, BoundSql boundSql) throws SQLException;

  <E> List<E> query(MappedStatement ms, Object parameter, RowBounds rowBounds, ResultHandler resultHandler) throws SQLException;

  <E> Cursor<E> queryCursor(MappedStatement ms, Object parameter, RowBounds rowBounds) throws SQLException;

  List<BatchResult> flushStatements() throws SQLException;

  void commit(boolean required) throws SQLException;

  void rollback(boolean required) throws SQLException;

  CacheKey createCacheKey(MappedStatement ms, Object parameterObject, RowBounds rowBounds, BoundSql boundSql);

  boolean isCached(MappedStatement ms, CacheKey key);

  void clearLocalCache();

  void deferLoad(MappedStatement ms, MetaObject resultObject, String property, CacheKey key, Class<?> targetType);

  Transaction getTransaction();

  void close(boolean forceRollback);

  boolean isClosed();

  void setExecutorWrapper(Executor executor);

}
得到 executor对象后我们可以发现它的下一句话
返回了一个创建的DefaultSqlSession,点进去看看
public class DefaultSqlSession implements SqlSession {

  private final Configuration configuration;
  private final Executor executor;

  private final boolean autoCommit;
  private boolean dirty;
  private List<Cursor<?>> cursorList;
包含了executor以及配置信息,我们也可以清楚的看到DefaultSqlSession 是SqlSession 实现类,所以自此就完成了SqlSession 的创建。
Mapper代理的生成
我们获取Mapper对象的方式,我们对它进行分析
studentMapper = sqlSession.getMapper(StudentMapper.class);
在DefaultSqlSession这个类中找到getMapper方法
  @Override
  public <T> T getMapper(Class<T> type) {
    return configuration.<T>getMapper(type, this);
  }
继续点进getMapper(type, this)方法
  public <T> T getMapper(Class<T> type, SqlSession sqlSession) {
    return mapperRegistry.getMapper(type, sqlSession);
  }
继续点getMapper()方法
  @SuppressWarnings("unchecked")
  public <T> T getMapper(Class<T> type, SqlSession sqlSession) {
  	//着重关注这一句话
    final MapperProxyFactory<T> mapperProxyFactory = (MapperProxyFactory<T>) knownMappers.get(type);
    if (mapperProxyFactory == null) {
      throw new BindingException("Type " + type + " is not known to the MapperRegistry.");
    }
    try {
      return mapperProxyFactory.newInstance(sqlSession);
    } catch (Exception e) {
      throw new BindingException("Error getting mapper instance. Cause: " + e, e);
    }
  }
我们就可以发现final MapperProxyFactory<T> mapperProxyFactory = (MapperProxyFactory<T>) knownMappers.get(type);从这句话就可以很清楚的看出实际上是从configuration当中的MapperRegistry当中获取Mapper的代理对象,而这个knownMappers属性里面的值是我们在解析mappers的值通过addMapper方法put进去的
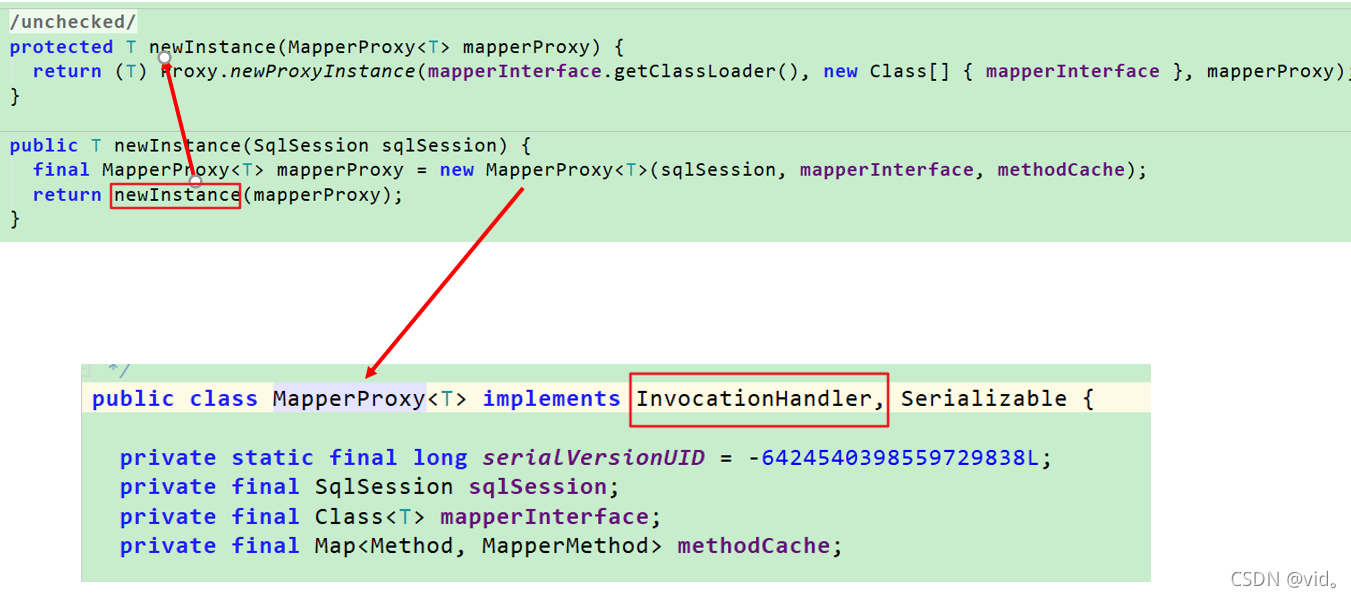
MapperProxy实现了InvocationHandler接口,从以上代码可以看出,实际上使用的就是jdk的动态代理,给UserMapper接口生成一个代理对象。实际上就是MapperProxy的一个对象,如下图调试信息所示:
从上面的代码可以看出,MapperProxy实现了InvocationHandler接口,这就说明这里用来动态代理,给我们Mapper接口生成了一个代理对象。
我们通过对studentMapper进行dubug研究


我们可以看到studentMapper是一个MapperProxy类
简单的分析查询功能
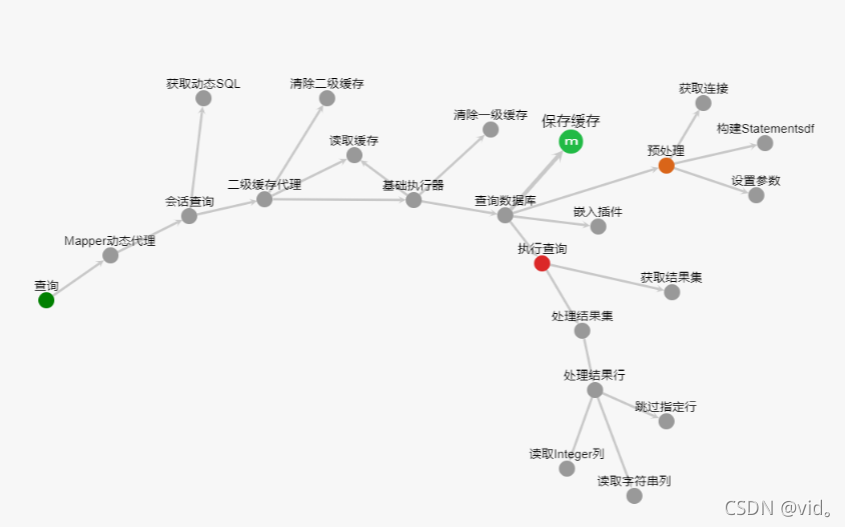
这是我从源码阅读网上面截的图,使我们可以清晰的了解这个流程,但是我们只是缝隙其中的一些主干
我们上面得知studentMapper是一个MapperProxy类,所以是通过MapperProxy类中的invoke方法来执行sql 语句的,
  @Override
  public Object invoke(Object proxy, Method method, Object[] args) throws Throwable {
    try {
      //如果调用的是Object类中方法就直接放行
      if (Object.class.equals(method.getDeclaringClass())) {
        return method.invoke(this, args);
      //如果方法是default方法就放行
      } else if (isDefaultMethod(method)) {
        return invokeDefaultMethod(proxy, method, args);
      }
    } catch (Throwable t) {
      throw ExceptionUtil.unwrapThrowable(t);
    }
    final MapperMethod mapperMethod = cachedMapperMethod(method);
    return mapperMethod.execute(sqlSession, args);
  }
Object.class.equals(method.getDeclaringClass():如果调用的是Object类中方法就直接放行,因为如果我们调用的方法比如hashcode()、equals等这些事继承于Object类的方法,那么mybatis就不需要进行动态代理了。
我们来分析这段代码,特别是这个isDefaultMethod(method)这句话的作用,我们都知道在JDK1.8之后,在接口中也是可以定义default方法,这是为了解耦,因为在1.8之前实现接口的方法需要重写接口里面的所有方法,所以引入了default是修改接口变得简单,所以这里就是判断方法是不是一个default方法,如果是就只会去为其提供正常代理,而不是去拿sql语句。
上述的if条件如果都不满足就来到了这一句话 final MapperMethod mapperMethod = cachedMapperMethod(method);我们对cachedMapperMethod进行研究。
  private MapperMethod cachedMapperMethod(Method method) {
    MapperMethod mapperMethod = methodCache.get(method);
    if (mapperMethod == null) {
      mapperMethod = new MapperMethod(mapperInterface, method, sqlSession.getConfiguration());
      methodCache.put(method, mapperMethod);
    }
    return mapperMethod;
  }
根据方法名从缓存中去获取,如果没有就去创建一个mapperMethod 对象,并且将创建好的mapperMethod 对象放入缓存,然后返回。
退到上一步.

得到的mapperMethod 对象执行了execute方法,点进execute.
  public Object execute(SqlSession sqlSession, Object[] args) {
    Object result;
    switch (command.getType()) {
      case INSERT: {
      Object param = method.convertArgsToSqlCommandParam(args);
        result = rowCountResult(sqlSession.insert(command.getName(), param));
        break;
      }
      case UPDATE: {
        Object param = method.convertArgsToSqlCommandParam(args);
        result = rowCountResult(sqlSession.update(command.getName(), param));
        break;
      }
      case DELETE: {
        Object param = method.convertArgsToSqlCommandParam(args);
        result = rowCountResult(sqlSession.delete(command.getName(), param));
        break;
      }
      case SELECT:
        if (method.returnsVoid() && method.hasResultHandler()) {
          executeWithResultHandler(sqlSession, args);
          result = null;
        } else if (method.returnsMany()) {
          result = executeForMany(sqlSession, args);
        } else if (method.returnsMap()) {
          result = executeForMap(sqlSession, args);
        } else if (method.returnsCursor()) {
          result = executeForCursor(sqlSession, args);
        } else {
          Object param = method.convertArgsToSqlCommandParam(args);
          result = sqlSession.selectOne(command.getName(), param);
        }
        break;
      case FLUSH:
        result = sqlSession.flushStatements();
        break;
      default:
        throw new BindingException("Unknown execution method for: " + command.getName());
    }
    if (result == null && method.getReturnType().isPrimitive() && !method.returnsVoid()) {
      throw new BindingException("Mapper method '" + command.getName()
          + " attempted to return null from a method with a primitive return type (" + method.getReturnType() + ").");
    }
    return result;
  }
我们可以发现这就是执行sql语句的方法
而我们查询的是queryAll(),返回的是一个 List<Student>所以就走的是这一句话result = executeForMany(sqlSession, args);
List<Student> students = studentMapper.queryAll();
  private <E> Object executeForMany(SqlSession sqlSession, Object[] args) {
    List<E> result;
    //获取方法参数的签名
    Object param = method.convertArgsToSqlCommandParam(args);
    if (method.hasRowBounds()) {
      //判断是否需要通过mybatis提供的方式做分页查询,一般不会用,因为mybatis是查出数据后然后在内存中做了分页操作
      RowBounds rowBounds = method.extractRowBounds(args);
      result = sqlSession.<E>selectList(command.getName(), param, rowBounds);
    } else {
      result = sqlSession.<E>selectList(command.getName(), param);
    }
    // issue #510 Collections & arrays support
    if (!method.getReturnType().isAssignableFrom(result.getClass())) {
      if (method.getReturnType().isArray()) {
        return convertToArray(result);
      } else {
        return convertToDeclaredCollection(sqlSession.getConfiguration(), result);
      }
    }
    return result;
  }
我们对获取方法参数的签名这方法进行分析点进convertArgsToSqlCommandParam
    public Object convertArgsToSqlCommandParam(Object[] args) {
      return paramNameResolver.getNamedParams(args);
    }
继续点进getNamedParams
  public Object getNamedParams(Object[] args) {
    final int paramCount = names.size();
    //我们都知道使用@Param可以自定义参数名,这里这个if 就是说如果我们没有使用Param的时候,在多参数的情况下JDK获取到的参数名就是arg0,arg1...或者是param1,param2... ,否则mybatis为sql语句赋值就会报错
    if (args == null || paramCount == 0) {
      return null;
    //并且没有标注@Param注解,且方法只有一个参数就不做改动,直接返回这个参数的值
    } else if (!hasParamAnnotation && paramCount == 1) {
      return args[names.firstKey()];
    } else {
      final Map<String, Object> param = new Pa ramMap<Object>();
      int i = 0;
      for (Map.Entry<Integer, String> entry : names.entrySet()) {
        param.put(entry.getValue(), args[entry.getKey()]);
        // add generic param names (param1, param2, ...)
        final String genericParamName = GENERIC_NAME_PREFIX + String.valueOf(i + 1);
        // ensure not to overwrite parameter named with @Param
        if (!names.containsValue(genericParamName)) {
          param.put(genericParamName, args[entry.getKey()]);
        }
        i++;
      }
      return param;
    }
  }
我们传进去的参数args,如果我们传进去了这么一个参数,在映射文件中写sql语句的时候我们会写#{ }进行参数的匹配,只有一个参数的情况下,这里面不管我们写什么我们都可以正常使用,这个大家都应该不陌生,这里就是这个现象的原理,如果只传入一个参数且方法只有一个参数就不做改动,直接返回这个参数的值。
但是如果传入的参数有多个,在这种情况下在我们没有@Param注解的时候,占位符中只能填 arg0、arg1、arg2…或者param1、param2、param3…否则会报错,这是因为我们通过反射获取方法的参数名的时候在1.8之前是无法获取真实参数的,在1.8之后也需要增加一些配置才可以获取到,所以如果想要在占位符中占位符中使用我们自定义参数名那么就要加@Param注解。
我们回到这里
...
    if (method.hasRowBounds()) {
      //判断是否需要通过mybatis提供的方式做分页查询,一般不会用,因为mybatis是查出数据后然后在内存中做了分页操作
      RowBounds rowBounds = method.extractRowBounds(args);
      result = sqlSession.<E>selectList(command.getName(), param, rowBounds);
    } else {
      result = sqlSession.<E>selectList(command.getName(), param);
    }
...
我们看这句method.hasRowBounds(),我们原来说了这个是mybatis内置的分页方式我们一般不会用这个。
所以程序就会跳到了result = sqlSession.<E>selectList(command.getName(), param);,我们进入进行研究。
  @Override
  public <E> List<E> selectList(String statement, Object parameter) {
    return this.selectList(statement, parameter, RowBounds.DEFAULT);
  }
这里有一个RowBounds.DEFAULT,这个才是真正的分页我们可以看到NO_ROW_OFFSET = 0,NO_ROW_LIMIT = Integer.MAX_VALUE,这两个参数
public class RowBounds {

  public static final int NO_ROW_OFFSET = 0;
  public static final int NO_ROW_LIMIT = Integer.MAX_VALUE;
  public static final RowBounds DEFAULT = new RowBounds();

  private final int offset;
  private final int limit;

  public RowBounds() {
    this.offset = NO_ROW_OFFSET;
    this.limit = NO_ROW_LIMIT;
  }
继续进
  @Override
  public <E> List<E> selectList(String statement, Object parameter, RowBounds rowBounds) {
    try {
      MappedStatement ms = configuration.getMappedStatement(statement);
      return executor.query(ms, wrapCollection(parameter), rowBounds, Executor.NO_RESULT_HANDLER);
    } catch (Exception e) {
      throw ExceptionFactory.wrapException("Error querying database.  Cause: " + e, e);
    } finally {
      ErrorContext.instance().reset();
    }
  }
我们上面提到过MappedStatement是在SqlSessionFactory的创建解析resource的时候,通过解析一个个的标签,最终将sql语句的所有信息封装成MappedStatement对象,然后存储在configuration全局配置对象中。
然后就会执行这一句话
return executor.query(ms, wrapCollection(parameter), rowBounds, Executor.NO_RESULT_HANDLER);
在这里调用的executor是SimpleExecutor,然后就会执行这个query方法
  @Override
  public <E> List<E> query(MappedStatement ms, Object parameterObject, RowBounds rowBounds, ResultHandler resultHandler) throws SQLException {
    BoundSql boundSql = ms.getBoundSql(parameterObject);
    //这里创建的是一个session级别的缓存
    CacheKey key = createCacheKey(ms, parameterObject, rowBounds, boundSql);
    return query(ms, parameterObject, rowBounds, resultHandler, key, boundSql);
  }
  @Override
  public BoundSql getBoundSql(Object parameterObject) {
    return sqlSource.getBoundSql(parameterObject);
  }
sqlSource在我们addMappedStatement的时候放进去的
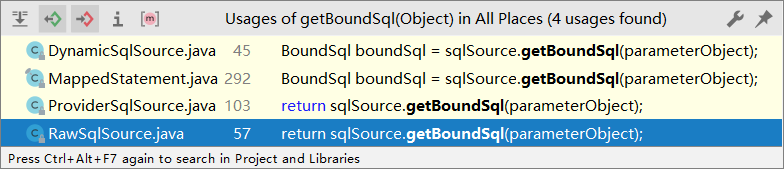
如果是RawSqlSource的话就不需要做处理了直接传入参数通过StaticSqlSource中的getBoundSql
构建BoundSql对象返回即可。如果是其他的SqlSource还会做其他的处理。
  @Override
  public BoundSql getBoundSql(Object parameterObject) {
    return new BoundSql(configuration, sql, parameterMappings, parameterObject);
  }
生成的BoundSql 对象

这里就是先通过MappedStatement 的getBoundSql这个方法去解析sql语句,这里就是如果我们写的是${}这个我们在解析mapper的是不会进行解析sql的。如果我们写的是#{},sql在会在解析mapper的时候就解析了,但也仅仅只是解析sql,还没有填值,所以在这里对于 ${ } 情况。进行解析sql,并且设置值,但是对于 #{},这里只会用?进行替换占位符,也还没有设置值。
我们可以看到解析完sql就创建了一个缓存,这是一个session级别的缓存。然后就可以进入我们的query方法。
 @Override
  public <E> List<E> query(MappedStatement ms, Object parameterObject, RowBounds rowBounds, ResultHandler resultHandler, CacheKey key, BoundSql boundSql)
      throws SQLException {
    //先判断是否有缓存的存在,这里是mybatis二级缓存
    Cache cache = ms.getCache();
    if (cache != null) {
      flushCacheIfRequired(ms);
      if (ms.isUseCache() && resultHandler == null) {
        ensureNoOutParams(ms, boundSql);
        @SuppressWarnings("unchecked")
        List<E> list = (List<E>) tcm.getObject(cache, key);
        if (list == null) {
          //没有缓存就会通过query方法
          list = delegate.<E> query(ms, parameterObject, rowBounds, resultHandler, key, boundSql);
          tcm.putObject(cache, key, list); // issue #578 and #116
        }
        return list;
      }
    }
    return delegate.<E> query(ms, parameterObject, rowBounds, resultHandler, key, boundSql);
  }
进入query方法
  public <E> List<E> query(MappedStatement ms, Object parameter, RowBounds rowBounds, ResultHandler resultHandler, CacheKey key, BoundSql boundSql) throws SQLException {
    ErrorContext.instance().resource(ms.getResource()).activity("executing a query").object(ms.getId());
    if (closed) {
      throw new ExecutorException("Executor was closed.");
    }
    if (queryStack == 0 && ms.isFlushCacheRequired()) {
      clearLocalCache();
    }
    List<E> list;
    try {
      //一级缓存
      queryStack++;
      list = resultHandler == null ? (List<E>) localCache.getObject(key) : null;
      if (list != null) {//缓存中没有数据就会通过数据库去查询数据
        handleLocallyCachedOutputParameters(ms, key, parameter, boundSql);
      } else {
        list = queryFromDatabase(ms, parameter, rowBounds, resultHandler, key, boundSql);
      }
    } finally {
      queryStack--;
    }
    if (queryStack == 0) {
      for (DeferredLoad deferredLoad : deferredLoads) {
        deferredLoad.load();
      }
      // issue #601
      deferredLoads.clear();
      if (configuration.getLocalCacheScope() == LocalCacheScope.STATEMENT) {
        // issue #482
        clearLocalCache();
      }
    }
    return list;
  }
ms.isFlushCacheRequired() 这段代码的判断是基于了一个MappedStatement 类中的flushCacheRequired 的属性做判断的,mybatis判断了 ms.isFlushCacheRequired() 的返回数据,如果为 true 会执行 clearLocalCache 方法,清空缓存信息。如果缓存中获取不到的话,才会继续去查询数据库。
没有缓存我们就会去执行queryFromDatabase方法
  private <E> List<E> queryFromDatabase(MappedStatement ms, Object parameter, RowBounds rowBounds, ResultHandler resultHandler, CacheKey key, BoundSql boundSql) throws SQLException {
    List<E> list;
    将一级缓存保存在当前的session中,现在还没有执行查询结果,所以放一个空的类似于占位符
    localCache.putObject(key, EXECUTION_PLACEHOLDER);
    try {
      //SimpleExecutor里面的方法,因为我们这里调用的SimpleExecutor
      list = doQuery(ms, parameter, rowBounds, resultHandler, boundSql);
    } finally {
      localCache.removeObject(key);
    }
    localCache.putObject(key, list);
    if (ms.getStatementType() == StatementType.CALLABLE) {
      localOutputParameterCache.putObject(key, parameter);
    }
    return list;
  }
然后执行doQuery方法
  @Override
  public <E> List<E> doQuery(MappedStatement ms, Object parameter, RowBounds rowBounds, ResultHandler resultHandler, BoundSql boundSql) throws SQLException {
    Statement stmt = null;
    try {
      Configuration configuration = ms.getConfiguration();
      //里出现了Mybatis四大对象中的StatementHandler
      StatementHandler handler = configuration.newStatementHandler(wrapper, ms, parameter, rowBounds, resultHandler, boundSql);
      //初始化(获取链接对象,获取jdbc中的Statement对象) 给参数赋值
      stmt = prepareStatement(handler, ms.getStatementLog());
      return handler.<E>query(stmt, resultHandler);
    } finally {
      closeStatement(stmt);
    }
  }
我们进入prepareStatement方法看看
  private Statement prepareStatement(StatementHandler handler, Log statementLog) throws SQLException {
    Statement stmt;
    //获取连接
    Connection connection = getConnection(statementLog);
    //获取Statement对象
    stmt = handler.prepare(connection, transaction.getTimeout());
    //完成赋值
    handler.parameterize(stmt);
    return stmt;
  }
我们可以看到这就是我们熟悉jdbc的格式,就是建立Connection,获取Statement对象等等,然后我们可以通过parameterize方法看看是怎么赋值的。
  @Override
  public void parameterize(Statement statement) throws SQLException {
    delegate.parameterize(statement);
  }
  @Override
  public void parameterize(Statement statement) throws SQLException {
    parameterHandler.setParameters((PreparedStatement) statement);
  }
  @Override
  public void setParameters(PreparedStatement ps) {
    ErrorContext.instance().activity("setting parameters").object(mappedStatement.getParameterMap().getId());
    获取所有的参数
    List<ParameterMapping> parameterMappings = boundSql.getParameterMappings();
    if (parameterMappings != null) {
      for (int i = 0; i < parameterMappings.size(); i++) {
        ParameterMapping parameterMapping = parameterMappings.get(i);
        if (parameterMapping.getMode() != ParameterMode.OUT) {
          Object value;
          String propertyName = parameterMapping.getProperty();
          if (boundSql.hasAdditionalParameter(propertyName)) { // issue #448 ask first for additional params
            value = boundSql.getAdditionalParameter(propertyName);
          } else if (parameterObject == null) {
            value = null;
          } else if (typeHandlerRegistry.hasTypeHandler(parameterObject.getClass())) {
            value = parameterObject;
          } else {
            MetaObject metaObject = configuration.newMetaObject(parameterObject);
            value = metaObject.getValue(propertyName);
          }
          TypeHandler typeHandler = parameterMapping.getTypeHandler();
          JdbcType jdbcType = parameterMapping.getJdbcType();
          String对应varchar,mybatis会有默认的一些类型对应关系,一般很少用
          if (value == null && jdbcType == null) {
            jdbcType = configuration.getJdbcTypeForNull();
          }
          try {
          	//这句话就是调用我们jdbc中的方法完成赋值
            typeHandler.setParameter(ps, i + 1, value, jdbcType);
          } catch (TypeException e) {
            throw new TypeException("Could not set parameters for mapping: " + parameterMapping + ". Cause: " + e, e);
          } catch (SQLException e) {
            throw new TypeException("Could not set parameters for mapping: " + parameterMapping + ". Cause: " + e, e);
          }
        }
      }
    }
  }
  @Override
  public void setParameter(PreparedStatement ps, int i, T parameter, JdbcType jdbcType) throws SQLException {
    if (parameter == null) {
      if (jdbcType == null) {
        throw new TypeException("JDBC requires that the JdbcType must be specified for all nullable parameters.");
      }
      try {
        ps.setNull(i, jdbcType.TYPE_CODE);
      } catch (SQLException e) {
        throw new TypeException("Error setting null for parameter #" + i + " with JdbcType " + jdbcType + " . " +
                "Try setting a different JdbcType for this parameter or a different jdbcTypeForNull configuration property. " +
                "Cause: " + e, e);
      }
    } else {
      try {
        setNonNullParameter(ps, i, parameter, jdbcType);
      } catch (Exception e) {
        throw new TypeException("Error setting non null for parameter #" + i + " with JdbcType " + jdbcType + " . " +
                "Try setting a different JdbcType for this parameter or a different configuration property. " +
                "Cause: " + e, e);
      }
    }
  }

这里我们没有用#{},我们只是用的简单的select * from student,但是可以说一下底层处理#{},就是通过PreparedStatement的set方法来实现,查询出结果后就返回查询结果的数据,然后会移除之前保存在session中的当前查询语句的缓存结果,更近记录以后再put到缓存数据的集合中。其实到这里就基本完成了查询操作,将查询结果一层一层往上反即可。
自此就基本完成了一些重要功能的分析,当然mybatis是一个庞大的体系,里面还有很多东西我们没有分析到。
本文部分借鉴了Mybatis运行原理及源码解析


 8547
8547


 被折叠的 条评论
为什么被折叠?
被折叠的 条评论
为什么被折叠?
 到【灌水乐园】发言


