


一.连接池
1.介绍
mybatis使用的是自己的连接池技术,可以在mybatis-config.xml中进行配置
如图:

2.mybaits连接池的分类
- UNPOOLED 不使用连接池的数据源
- POOLED 使用连接池的数据源
- JNDI 使用JNDI实现的数据库连接池
3.UNPOOLED分析
UNPOOLED 不使用连接池的数据源,当 dateSource 的type属性被配置成了UNPOOLED,MyBatis 首先会实例化一个UnpooledDataSourceFactory工厂实例,然后通过.getDataSource() 方法返回一个UnpooledDataSource 实例对象引用,我们假定为dataSource。
使用 UnpooledDataSource 的 getConnection() ,每调用一次就会产生一个新的 Connection 实例对象。UnPooledDataSource 的 getConnection() 方法实现如下:
public class UnpooledDataSource implements DataSource {
    private ClassLoader driverClassLoader;
    private Properties driverProperties;
    private static Map<String, Driver> registeredDrivers = new ConcurrentHashMap();
    private String driver;
    private String url;
    private String username;
    private String password;
    private Boolean autoCommit;
    private Integer defaultTransactionIsolationLevel;

    public UnpooledDataSource() {
    }

    public UnpooledDataSource(String driver, String url, String username, String password){
        this.driver = driver;
        this.url = url;
        this.username = username;
        this.password = password;
    }

    public Connection getConnection() throws SQLException {
        return this.doGetConnection(this.username, this.password);
    }

    private Connection doGetConnection(String username, String password) throws SQLException {
        Properties props = new Properties();
        if(this.driverProperties != null) {
            props.putAll(this.driverProperties);
        }

        if(username != null) {
            props.setProperty("user", username);
        }

        if(password != null) {
            props.setProperty("password", password);
        }

        return this.doGetConnection(props);
    }

    private Connection doGetConnection(Properties properties) throws SQLException {
        this.initializeDriver();
        Connection connection = DriverManager.getConnection(this.url, properties);
        this.configureConnection(connection);
        return connection;
    }
}
如上代码所示,UnpooledDataSource会做以下事情:
- 初始化驱动: 判断driver驱动是否已经加载到内存中,如果还没有加载,则会动态地加载driver类,并实例化一个Driver对象,使用DriverManager.registerDriver()方法将其注册到内存中,以供后续使用。
- 创建Connection对象: 使用DriverManager.getConnection()方法创建连接。
- 配置Connection对象: 设置是否自动提交autoCommit和隔离级别isolationLevel。
- 返回Connection对象
从上述的代码中可以看到,我们每调用一次getConnection()方法,都会通过DriverManager.getConnection()返回新的java.sql.Connection实例,所以没有连接池。
4.POOLED分析
PooledDataSource: 将java.sql.Connection对象包裹成PooledConnection对象放到了PoolState类型的容器中维护。 MyBatis将连接池中的PooledConnection分为两种状态: 空闲状态(idle)和活动状态(active),这两种状态的PooledConnection对象分别被存储到PoolState容器内的idleConnections和activeConnections两个List集合中:
idleConnections:
空闲(idle)状态PooledConnection对象被放置到此集合中,表示当前闲置的没有被使用的PooledConnection集合,调用PooledDataSource的getConnection()方法时,会优先从此集合中PooledConnection对象。当用完一个java.sql.Connection对象时,MyBatis会将其包裹成PooledConnection对象放到此集合中。
**activeConnections: **
活动(active)状态的PooledConnection对象被放置到名为activeConnections的ArrayList中,表示当前正在被使用的PooledConnection集合,调用PooledDataSource的getConnection()方法时,会优先从idleConnections集合中取PooledConnection对象,如果没有,则看此集合是否已满,如果未满,PooledDataSource会创建出一个PooledConnection,添加到此集合中,并返回
现在让我们看一下popConnection()方法到底做了什么:
- 先看是否有空闲(idle)状态下的PooledConnection对象,如果有,就直接返回一个可用的PooledConnection对象;否则进行第2步。
- 查看活动状态的PooledConnection池activeConnections是否已满;如果没有满,则创建一个新的PooledConnection对象,然后放到activeConnections池中,然后返回此PooledConnection对象;否则进行第三步;
- 看最先进入activeConnections池中的PooledConnection对象是否已经过期:如果已经过期,从activeConnections池中移除此对象,然后创建一个新的PooledConnection对象,添加到activeConnections中,然后将此对象返回;否则进行第4步。
- 线程等待,循环2步
/*
 * 传递一个用户名和密码,从连接池中返回可用的PooledConnection
 */
private PooledConnection popConnection(String username, String password) throws SQLException
{
    boolean countedWait = false;
    PooledConnection conn = null;
    long t = System.currentTimeMillis();
    int localBadConnectionCount = 0;

    while (conn == null)
    {
        synchronized (state)
        {
            if (state.idleConnections.size() > 0)
            {
                // 连接池中有空闲连接,取出第一个
                conn = state.idleConnections.remove(0);
                if (log.isDebugEnabled())
                {
                    log.debug("Checked out connection " + conn.getRealHashCode() + " from pool.");
                }
            }
            else
            {
                // 连接池中没有空闲连接,则取当前正在使用的连接数小于最大限定值,
                if (state.activeConnections.size() < poolMaximumActiveConnections)
                {
                    // 创建一个新的connection对象
                    conn = new PooledConnection(dataSource.getConnection(), this);
                    @SuppressWarnings("unused")
                    //used in logging, if enabled
                    Connection realConn = conn.getRealConnection();
                    if (log.isDebugEnabled())
                    {
                        log.debug("Created connection " + conn.getRealHashCode() + ".");
                    }
                }
                else
                {
                    // Cannot create new connection 当活动连接池已满,不能创建时,取出活动连接池的第一个,即最先进入连接池的PooledConnection对象
                    // 计算它的校验时间,如果校验时间大于连接池规定的最大校验时间,则认为它已经过期了,利用这个PoolConnection内部的realConnection重新生成一个PooledConnection
                    //
                    PooledConnection oldestActiveConnection = state.activeConnections.get(0);
                    long longestCheckoutTime = oldestActiveConnection.getCheckoutTime();
                    if (longestCheckoutTime > poolMaximumCheckoutTime)
                    {
                        // Can claim overdue connection
                        state.claimedOverdueConnectionCount++;
                        state.accumulatedCheckoutTimeOfOverdueConnections += longestCheckoutTime;
                        state.accumulatedCheckoutTime += longestCheckoutTime;
                        state.activeConnections.remove(oldestActiveConnection);
                        if (!oldestActiveConnection.getRealConnection().getAutoCommit())
                        {
                            oldestActiveConnection.getRealConnection().rollback();
                        }
                        conn = new PooledConnection(oldestActiveConnection.getRealConnection(), this);
                        oldestActiveConnection.invalidate();
                        if (log.isDebugEnabled())
                        {
                            log.debug("Claimed overdue connection " + conn.getRealHashCode() + ".");
                        }
                    }
                    else
                    {

                        //如果不能释放,则必须等待有
                        // Must wait
                        try
                        {
                            if (!countedWait)
                            {
                                state.hadToWaitCount++;
                                countedWait = true;
                            }
                            if (log.isDebugEnabled())
                            {
                                log.debug("Waiting as long as " + poolTimeToWait + " milliseconds for connection.");
                            }
                            long wt = System.currentTimeMillis();
                            state.wait(poolTimeToWait);
                            state.accumulatedWaitTime += System.currentTimeMillis() - wt;
                        }
                        catch (InterruptedException e)
                        {
                            break;
                        }
                    }
                }
            }

            //如果获取PooledConnection成功,则更新其信息

            if (conn != null)
            {
                if (conn.isValid())
                {
                    if (!conn.getRealConnection().getAutoCommit())
                    {
                        conn.getRealConnection().rollback();
                    }
                    conn.setConnectionTypeCode(assembleConnectionTypeCode(dataSource.getUrl(), username, password));
                    conn.setCheckoutTimestamp(System.currentTimeMillis());
                    conn.setLastUsedTimestamp(System.currentTimeMillis());
                    state.activeConnections.add(conn);
                    state.requestCount++;
                    state.accumulatedRequestTime += System.currentTimeMillis() - t;
                }
                else
                {
                    if (log.isDebugEnabled())
                    {
                        log.debug("A bad connection (" + conn.getRealHashCode() + ") was returned from the pool, getting another connection.");
                    }
                    state.badConnectionCount++;
                    localBadConnectionCount++;
                    conn = null;
                    if (localBadConnectionCount > (poolMaximumIdleConnections + 3))
                    {
                        if (log.isDebugEnabled())
                        {
                            log.debug("PooledDataSource: Could not get a good connection to the database.");
                        }
                        throw new SQLException("PooledDataSource: Could not get a good connection to the database.");
                    }
                }
            }
        }

    }

    if (conn == null)
    {
        if (log.isDebugEnabled())
        {
            log.debug("PooledDataSource: Unknown severe error condition.  The connection pool returned a null connection.");
        }
        throw new SQLException("PooledDataSource: Unknown severe error condition.  The connection pool returned a null connection.");
    }

    return conn;
}
当我们的程序中使用完Connection对象时,如果不使用数据库连接池,我们一般会调用 connection.close() 方法,关闭connection连接,释放资源
调用过close()方法的Connection对象所持有的资源会被全部释放掉,Connection对象也就不能再使用。那么,如果我们使用了连接池,我们在用完了Connection对象时,需要将它放在连接池中,该怎样做呢?
可能大家第一个在脑海里闪现出来的想法就是:我在应该调用con.close()方法的时候,不调用close()方法,将其换成将Connection对象放到连接池容器中的代码!
怎样实现Connection对象调用了close()方法,而实际是将其添加到连接池中
这是要使用代理模式,为真正的Connection对象创建一个代理对象,代理对象所有的方法都是调用相应的真正Connection对象的方法实现。当代理对象执行close()方法时,要特殊处理,不调用真正Connection对象的close()方法,而是将Connection对象添加到连接池中。
MyBatis的PooledDataSource的PoolState内部维护的对象是PooledConnection类型的对象,而PooledConnection则是对真正的数据库连接java.sql.Connection实例对象的包裹器。
PooledConnection对象内持有一个真正的数据库连接java.sql.Connection实例对象和一个java.sql.Connection的代理:
class PooledConnection implements InvocationHandler {
    private static final String CLOSE = "close";
    private static final Class<?>[] IFACES = new Class[]{Connection.class};
    private int hashCode = 0;
    private PooledDataSource dataSource;
    private Connection realConnection;
    private Connection proxyConnection;
    private long checkoutTimestamp;
    private long createdTimestamp;
    private long lastUsedTimestamp;
    private int connectionTypeCode;
    private boolean valid;

    public PooledConnection(Connection connection, PooledDataSource dataSource) {
        this.hashCode = connection.hashCode();
        this.realConnection = connection;
        this.dataSource = dataSource;
        this.createdTimestamp = System.currentTimeMillis();
        this.lastUsedTimestamp = System.currentTimeMillis();
        this.valid = true;
        this.proxyConnection = (Connection)Proxy.newProxyInstance(Connection.class.getClassLoader(), IFACES, this);
    }

    public Object invoke(Object proxy, Method method, Object[] args) throws Throwable {
        String methodName = method.getName();
        //当close时候,会回收 connection , 不会真正的close
        if("close".hashCode() == methodName.hashCode() && "close".equals(methodName)) {
            this.dataSource.pushConnection(this);
            return null;
        } else {
            try {
                if(!Object.class.equals(method.getDeclaringClass())) {
                    this.checkConnection();
                }

                return method.invoke(this.realConnection, args);
            } catch (Throwable var6) {
                throw ExceptionUtil.unwrapThrowable(var6);
            }
        }
    }
}
过程图:

二.事务与隔离级别
1.事务的提交方式
在jdbc中,事务的提交方式是通过setAutoCommit()接口来进行设置的,在mybatis中对jdbc中的事务提交方式进行了封装,它的提交方式如下
// 设置为自动提交
sqlSession = MybatisUtils.openSession(true);
//默认不写参数的话是手动提交
//手动提交
sqlSession.commit();
2.事务回滚
在执行一个多条sql语句的时候,如果中间发生异常,那么就需要回滚,mybatis中回滚的方式
sqlSession.rollback();
    //测试报错后事务的回滚
    @Test
    public void TestRollBack(){
        try {
            //插入用户
            User user = new User();
            user.setNickname("张三");
            userMapper.insertUser(user);
            //模拟中途报错
            int a = 10/0;
            //模拟插入对应的用户地址
            Address address = new Address();
            address.setAddress("方大科技园");
            address.setUserId(user.getId());
            addressMapper.insertAddress(address);
        } catch (Exception e) {
            e.printStackTrace();
            session.rollback();//报错回滚
        }
    }
3.事务的隔离级别
1.脏读,不可重复读,幻读
脏读:读取未提交的数据,这个很好理解,如果读取到了未提交的数据,若该数据被回滚了,那么便读到了脏数据(不应该存在的数据)
不可重复读:两次读到的数据不一致,在一次事务的过程中,第一次读到了数据A,在执行该事务的过程中,该数据被修改了,等再次需要读这个数据的时候,数据已经发生了变化,就会发生一些错误
幻读:开始没有这条数据,但是后面再读就有了,这个一般设计到插入操作,开始读的时候为空,但是在事务的进行过程中,该条目被插入了,再次读的时候,该数据就有了,这也会发生一些错误
用最简答的几个字总结一下:
脏读:读未提交
不可重复读:读的前后不一致(修改操作)
幻读:数据无中生有(插入操作)
2.事务的隔离级别
事务的隔离级别就是解决以上问题的方法:
√: 可能出现 ×: 不会出现
| 脏读 | 不可重复读 | 幻读 | 说明 | |
|---|---|---|---|---|
| Read uncommitted | √ | √ | √ | 直译就是"读未提交",意思就是即使一个更新语句没有提交,但是别 的事务可以读到这个改变.这是很不安全的。允许任务读取数据库中未提交的数据更改,也称为脏读。 |
| Read committed | × | √ | √ | 直译就是"读提交",可防止脏读,意思就是语句提交以后即执行了COMMIT以后,别的事务才能读到这个改变. 只能读取到已经提交的数据。Oracle等多数数据库默认都是该级别 |
| Repeatable read | × | × | √ | 直译就是"可以重复读",这是说在同一个事务里面先后执行同一个查询语句的时候,得到的结果是一样的.在同一个事务内的查询都是事务开始时刻一致的,InnoDB默认级别。在SQL标准中,该隔离级别消除了不可重复读,但是还存在幻象读。 |
| Serializable | × | × | × | 直译就是"序列化",意思是说这个事务执行的时候不允许别的事务并发执行. 完全串行化的读,每次读都需要获得表级共享锁,读写相互都会阻塞 |
3.mybatis中设置隔离级别
//读提交,解决脏读(只读提交的数据)
session = sqlSessionFactory.openSession(TransactionIsolationLevel.READ_COMMITTED);
//可重复读,解决不可重复读(对数据进行加锁)
session = sqlSessionFactory.openSession(TransactionIsolationLevel.REPEATABLE_READ);
//序列化,解决幻读,完全串行化的读,效率较低
session = sqlSessionFactory.openSession(TransactionIsolationLevel.SERIALIZABLE);
package org.apache.ibatis.session;

public enum TransactionIsolationLevel {
    NONE(0),
    READ_COMMITTED(2),
    READ_UNCOMMITTED(1),
    REPEATABLE_READ(4),
    SERIALIZABLE(8);

    private final int level;

    private TransactionIsolationLevel(int level) {
        this.level = level;
    }

    public int getLevel() {
        return this.level;
    }
}
三.延迟加载策略
在使用到关联查询的时候,需要数据的时候才会进行加载,那么这就需要进行懒加载
1.全局配置
  <settings>
        <setting name="lazyLoadingEnabled" value="true"/>
        <setting name="aggressiveLazyLoading" value="false"/>
    </settings>
属性开启之后,我们获取到变量的任意属性,就会触发懒加载,而关闭之后,我们只有触发到关联属性时,才会触发懒加载
2.局部配置
在关联字段上也可以通过设置fetchType来指定加载方式。对于当个关联属性指定fetchType优先级是高于全局配置
    <resultMap id="lazyLoadTestMap" type="Address" autoMapping="true">
        <result column="user_id" property="userId"></result>
        <association property="user" column="user_id" javaType="User" fetchType="lazy" select="com.tl.mybatis03.mapper.UserMapper.findById">
        </association>
    </resultMap>
    <select id="lazyLoadTest" parameterType="int" resultMap="lazyLoadTestMap">
        select * from address where id = #{id}
    </select>
四.使用注解进行开发
1.mybatis常用注解说明
@Insert:实现新增
@Update:实现更新
@Delete:实现删除
@Select:实现查询
@Result:实现结果集封装
@Results:可以与@Result 一起使用,封装多个结果集
@ResultMap:实现引用@Results 定义的封装
@One:实现一对一结果集封装
@Many:实现一对多结果集封装
2.实现基本的CRUD
public interface IAddressDao {
    @Insert("insert into t_address (addr, phone, postcode, user_id) VALUES (#{addr},#{phone},#{postcode},#{userId})")
    int insert(Address address);

    @Delete("delete from t_address where id = #{id}")
    int delete(int id);

    @Update("update t_address set addr = #{addr} where id = #{id}")
    int update(Address address);

    @Select("select * from t_address where id = #{id}")
    Address selectById(int id);
}
3.使用Result进行映射
如何我们需要映射结果集的时候可以通过@Results注解进行映射
    @Select("select * from t_address where id = #{id}")
    @Results(id = "addressRes", value = {
            //id = true 标志这个字段是主键
            @Result(id = true, column = "id", property = "id"),
            @Result(column = "addr", property = "addr"),
            @Result(column = "phone", property = "mobile"),
    })
    Address selectById(int id);
4.注解进行关联查询
1 1对1
    @Select("select * from t_address where id = #{id}")
    @Results(id = "addressRes", value = {
            //id = true 标志这个字段是主键
            @Result(id = true, column = "id", property = "id"),
            @Result(column = "addr", property = "addr"),
            @Result(column = "phone", property = "mobile"),
            @Result(column = "user_id", property = "user",
                    one = @One(select = "com.tledu.erp.mapper.IUserMapper.selectById", fetchType = FetchType.EAGER))
    })
    Address selectById(int id);
2 1对多
    @Select("select * from t_user where id = #{id}")
    @Results(id = "addressRes", value = {
            //id = true 标志这个字段是主键
            @Result(id = true, column = "id", property = "id"),
            @Result(column = "id", property = "addressList",
                    many = @Many(select = "com.tledu.erp.mapper.IAddressMapper.listByUserId", fetchType = FetchType.EAGER))
    })
    User selectById(int id);
五.缓存
1.介绍
像大多数的持久化框架一样,Mybatis 也提供了缓存策略,通过缓存策略来减少数据库的查询次数,从而提高性能。
Mybatis 中缓存分为一级缓存,二级缓存
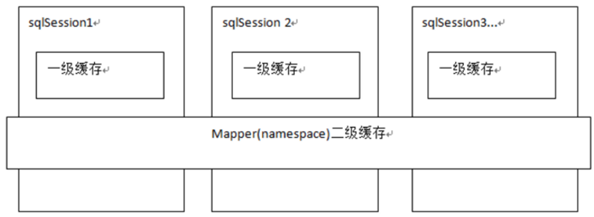
2.一级缓存
一级缓存是 SqlSession 级别的缓存,只要 SqlSession 没有 flush 或 close,它就存在。
测试:

清除一级缓存的方式:
session.clearCache();
3.二级缓存
二级缓存保存在mapper中,可以在过个sqlSession中共享,需要进行配置
配置
开启二级缓存
<setting name="cacheEnabled" value="true"/>
配置mapper支持缓存
<mapper namespace="com.tledu.erp.mapper.IAddressMapper">
  <!-- 开启缓存支持-->
    <cache />
</mapper>
查询语句中需要指定useCache=“true”
<select id="selectOne" resultMap="addressResultMap" useCache="true">
        select *
        from t_address
        where id = #{id}
</select>
注意:当我们在使用二级缓存时,所缓存的类一定要实现 java.io.Serializable 接口,这种就可以使用序列化方式来保存对象。
4.总结
- 在使用二级缓存的时候,需要注意配置mybatis-config.xml中 开启二级缓存
- 然后再mapper映射文件中使用catch标签标注开启,并对需要换成的语句添加useCache=”true”
- 在mapper的映射文件中使用,代表当前mapper是开启二级缓存的
- 在需要二级缓存的查询上增加useCache = true,代表当前查询是需要缓存的
- 并且对应封装数据的实体类需要实现Serializable 接口
- 对待缓存的数据,实现Serialization接口,代表这个数据是可序列化
- 只有当sqlSession close之后,二级缓存才能生效
- 当执行增删改操作的时候,必须执行commit()才能持久化到数据库中,同时二级缓存清空
- session.clearCache()无法清除二级缓存,如果需要清除二级缓存,可以通过sqlSessionFactory.getConfiguration().getCache(“缓存id”).clear();
- 但是当我们查询语句中,执行commit() 或者是close()关闭session,都不会清空二级缓存
六.分页
一、为什么要分页
数据特别多的时候,单次请求返回大量的数据接口会非常慢。
对于数据量特别大的查询,我们都会采用分页查询
二、怎么设计分页
- 每页有多少个
- 当前是在第几页
- 数据的总数
- 数据列表
基于这些属性设计分页的实体类
@Data
public class PageInfo<T> {
    /**
     * 每页有多少个
     */
    private int pageSize;
    /**
     * 当前是在第几页
     */
    private int currentPage;
    /**
     * 数据的总数
     */
    private int total;
    /**
     * 数据列表
     */
    private List<T> list;

    // 获取偏移量
    public int getOffset() {
        return (this.currentPage - 1) * this.pageSize;
    }
}
三、实现分页功能
创建分页查询的方法
	/**
     * 分页查询
     *
     * @param user     查询条件
     * @param offset   起始位置
     * @param pageSize 每页容量
     * @return 用户列表
     */
    List<User> page(@Param("user") User user, @Param("offset") int offset, @Param("pageSize") int pageSize);

    /**
     * 统计总数
     *
     * @param user 查询条件
     * @return 总数
     */
    int count(@Param("user") User user);
    <select id="page" resultType="User">
        select *
        from t_user
        <where>
            <if test="user.nickname != null and user.nickname != ''">
                and nickname like concat('%',#{user.nickname},'%')
            </if>
            <if test="user.username != null and user.username != ''">
                and username = #{user.username}
            </if>
        </where>
        limit #{offset},#{pageSize};
    </select>
    <select id="count" resultType="int">
        select count(*)
        from t_user
        <where>
            <if test="user.nickname != null and user.nickname != ''">
                and nickname like concat('%',#{user.nickname},'%')
            </if>
            <if test="user.username != null and user.username != ''">
                and username = #{user.username}
            </if>
        </where>
    </select>
测试
    @Test
    public void page(){
        PageInfo<User> pageInfo = new PageInfo<User>();
        pageInfo.setCurrentPage(1);
        pageInfo.setPageSize(10);
        User user = new User();
        user.setNickname("尚云");
        // 加上筛选条件,根据nickname 或 username进行筛选
        List<User> list = userMapper.page(user,pageInfo.getOffset(),pageInfo.getPageSize());
        pageInfo.setList(list);
        pageInfo.setTotal(userMapper.count(user));
        System.out.println(pageInfo);
    }
四、分页插件
1. 引入依赖
 <dependency>
            <groupId>com.github.pagehelper</groupId>
            <artifactId>pagehelper</artifactId>
            <version>5.2.0</version>
        </dependency>
2. 配置拦截器
在mybatis的配置文件中增加插件
<!--
    plugins在配置文件中的位置必须符合要求,否则会报错,顺序如下:
    properties?, settings?,
    typeAliases?, typeHandlers?,
    objectFactory?,objectWrapperFactory?,
    plugins?,
    environments?, databaseIdProvider?, mappers?
-->
<plugins>
    <!-- com.github.pagehelper为PageHelper类所在包名 -->
    <plugin interceptor="com.github.pagehelper.PageInterceptor">
        <!-- 使用下面的方式配置参数,后面会有所有的参数介绍 -->
        <property name="param1" value="value1"/>
	</plugin>
</plugins>
3. 配置插件
4. 使用插件
    @Test
    public void testList() throws IOException {
        SqlSession session = MybatisUtils.openSession();
        User condition = new User();
        // 插件里提供的分页工具,在要查询之前,执行一下PageHelper.startPage(当前页数,每页的容量), 当使用工具时候,会导致懒加载失败
        // 加了这个操作,插件就会在sql语句中拼接limit限制,并且还会统计总个数
        PageHelper.startPage(1,5);
        List<User> users = session.getMapper(IUserMapper.class).list(condition);
        // 拿到结果之后通过PageInfo.of() 的方法,获得pageInfo
        com.github.pagehelper.PageInfo<User> list = com.github.pagehelper.PageInfo.of(users);
        System.out.println(users);
    }


 300
300


 被折叠的 条评论
为什么被折叠?
被折叠的 条评论
为什么被折叠?
 到【灌水乐园】发言


