


人人都笑金角,人人都是金角
推荐文章:
1、https://playwright.dev/python/docs/api/class-playwright  //官方文档
2、https://cuiqingcai.com/36045.html  //崔庆才教程
3、https://github.com/qqq732004709/  //实战参考
4、https://www.cnblogs.com/carl-/p/15761861.html //实战参考
5、https://www.cnblogs.com/james-wangx/p/16106304.html //实战参考
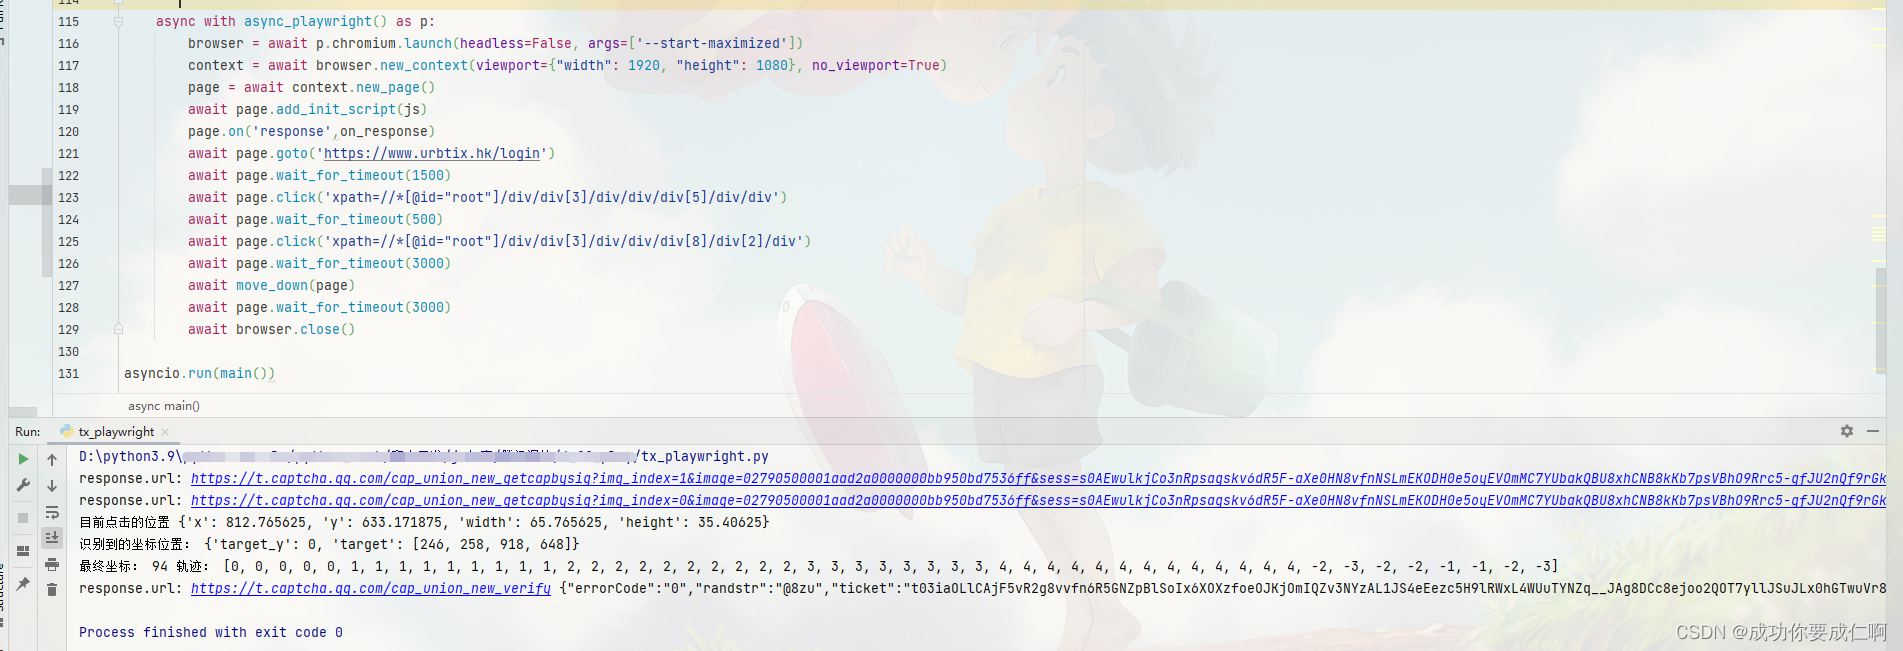
案例一:tx滑块(playwright)
目标网站:aHR0cHM6Ly93d3cudXJidGl4LmhrL2xvZ2lu
1、创建Chromium实例(如果不设置为 False,默认是无头模式启动浏览器)
async with async_playwright() as p:
    browser = await p.chromium.launch(headless=False, args=['--start-maximized'])
2、最大化窗口
context = await browser.new_context(viewport={"width": 1920, "height": 1080}, no_viewport=True)
3、新建标签页
page = await context.new_page()
4、加载过检测js
await page.add_init_script(js) #stealth.min.js
5、监听response事件
async def on_response(response):
    if '/cap_union_new_getcapbysig' in response.url and response.status == 200:
        #对背景图以及滑块图进行拦截然后保存
        if 'img_index=1' in response.url:
            with open("bg_picture.jpg", "wb") as f:
                f.write(requests.get(response.url).content)
        elif 'img_index=0' in response.url:
            with open("cut_picture.png", "wb") as f:
                f.write(requests.get(response.url).content)
        print("response.url:", response.url)
    if 'cap_union_new_verify' in response.url and response.status == 200:
        #滑块通过后获取参数
        result = await response.text()
        print("response.url:", response.url,result)

page.on('response',on_response)
6、打开网页、触发滑块
await page.goto('aHR0cHM6Ly93d3cudXJidGl4LmhrL2xvZ2lu')
await page.wait_for_timeout(1500)
await page.click('xpath=//*[@id="root"]/div/div[3]/div/div/div[5]/div/div')
await page.wait_for_timeout(500)
await page.click('xpath=//*[@id="root"]/div/div[3]/div/div/div[8]/div[2]/div')
7、识别坐标
def get_gap_offset():
    """
    识别坐标,滑块的图片需要切割
    """
    det = ddddocr.DdddOcr(det=False, ocr=False, show_ad=False)
    img = Image.open('cut_picture.png')
    region = img.crop((160, 508, 243, 595))  #
    region.save(f'cut_picture.png')
    with open('bg_picture.jpg', 'rb') as f:
        target_bytes = f.read()
    with open('cut_picture.png', 'rb') as f:
        background_bytes = f.read()
    res = det.slide_match(target_bytes, background_bytes, simple_target=True)
    print("识别到的坐标位置:", res)
    distance = int(res['target'][0])
    return distance
8、找到滑动起始点,并滑动
async def move_down(page):
    #定位iframe
    new_frame = page.frame_locator('iframe[id="tcaptcha_iframe_dy"]')
    #定位起始点
    move_tag = new_frame.locator('xpath=//*[@id="tcOperation"]/div[6]')
    #找到这个元素在当前页面的坐标
    box = await move_tag.bounding_box()
    print("目前点击的位置",box)
    # 讲鼠标移动到到其实元素的中心
    await page.mouse.move(box["x"] + box["width"] / 2, box["y"] + box["height"] / 2)
    # 按下鼠标
    await page.mouse.down()
    #延时1.2s
    await page.wait_for_timeout(1200)
    # 这里获取到x坐标中心点位置
    x = box["x"] + box["width"] / 2
    #识别到坐标后与网页上的比例
    distance = int(get_gap_offset()/1.97)-30
    #轨迹
    move_distance = get_track_list(distance)
    print("最终坐标:",distance,"轨迹:",move_distance)
    for i in move_distance:
        x += i
        await page.mouse.move(x, box["y"])
    await page.mouse.up()
9、关闭窗口
await browser.close()
至此tx滑块的分析就结束了
然后我还写了一版selenium的,相比于playwright就会麻烦一些
案例一:tx滑块(selenium)
对于我们日常使用而言两者主要区别在于:
1、selenium只支持同步,playwright可以支持异步的
2、操作iframe,selenium来回切换iframe非常麻烦,而playwright只需要定位元素即可
2、在监听请求这一点上,playwright的page.on非常好用,而selenium一般是借助browsermobproxy通过代理的方式进行拦截
   使用方式:(1)https://github.com/lightbody/browsermob-proxy/releases,下载并解压
            (2)安装证书,参考链接https://www.bilibili.com/read/cv21263644/
            (3)调用方式
		        server = Server('browsermob-proxy-2.1.4/bin/browsermob-proxy')
		        server.start()
		        proxy = server.create_proxy(params={'trustAllServers':'true'})
		        option = ChromeOptions()
		        option.add_argument('--proxy-server={0}'.format(self.proxy.proxy))
		        driver = webdriver.Chrome(options=option)
这里就不细致讲解了,主要代码如下
class Tencent():
    def __init__(self):
        server = Server('browsermob-proxy-2.1.4/bin/browsermob-proxy')
        server.start()
        self.proxy = server.create_proxy(params={'trustAllServers':'true'})
        self.url = 'aHR0cHM6Ly93d3cudXJidGl4LmhrL2xvZ2lu'
        option = ChromeOptions()
        option.add_experimental_option('excludeSwitches', ['enable-automation'])
        option.add_experimental_option('useAutomationExtension', False)
        option.add_argument('--proxy-server={0}'.format(self.proxy.proxy))
        self.proxy.new_har(options={'captureContent': True,'captureHeaders': True})
        self.driver = webdriver.Chrome(options=option)
        self.driver.execute_cdp_cmd('Page.addScriptToEvaluateOnNewDocument', {
            'source': 'Object.defineProperty(navigator,"webdriver",{get: () => undefined})'
        })
        with open('stealth.min.js') as f:
            js = f.read()
        self.driver.execute_cdp_cmd("Page.addScriptToEvaluateOnNewDocument", {"source": js})
        self.driver.maximize_window()
        self.det = ddddocr.DdddOcr(det=False, ocr=False, show_ad=False)
        self.headers = {'user-agent': 'Mozilla/5.0 (Windows NT 10.0; Win64; x64) AppleWebKit/537.36 (KHTML, like Gecko) Chrome/108.0.0.0 Safari/537.36'}

    def index(self):
        """
        主流程
        """
        self.driver.get(self.url)
        time.sleep(5)
        print("正在打开网页~~~")
        self.driver.find_element(by=By.XPATH, value=f'//*[@id="root"]/div/div[3]/div/div/div[5]/div/div').click()
        time.sleep(1)
        self.driver.find_element(by=By.XPATH, value=f'//*[@id="root"]/div/div[3]/div/div/div[8]/div[2]/div').click()
        time.sleep(5)
        self.driver.switch_to.frame('tcaptcha_iframe_dy')
        bg_style = self.driver.find_element('id','slideBg').get_attribute("style")
        cut_style = self.driver.find_element(by=By.XPATH, value=f'//*[@id="tcOperation"]/div[8]').get_attribute("style")
        bg_url = re.findall('url\("(.*?)"\)',str(bg_style))[0]
        cut_url = re.findall('url\("(.*?)"\)', str(cut_style))[0]
        print("获取到背景图片url:",bg_url)
        print("获取到滑块图片url:",cut_url)
        with open("bg_picture.jpg", "wb") as f:
            f.write(requests.get(bg_url).content)
        with open("cut_picture.png", "wb") as f:
            f.write(requests.get(cut_url).content)

    def get_gap_offset(self):
        """
        识别坐标
        """
        img = Image.open('cut_picture.png')
        region = img.crop((160, 508, 243, 595))  #
        region.save(f'cut_picture.png')

        with open('bg_picture.jpg', 'rb') as f:
            target_bytes = f.read()
        with open('cut_picture.png', 'rb') as f:
            background_bytes = f.read()
        res = self.det.slide_match(target_bytes, background_bytes, simple_target=True)
        print("识别到的坐标位置:",res)
        distance = int(res['target'][0])
        return distance

    def get_track(self, offset):
        '''
        计算滑块的移动轨迹
        '''
        offset -= 30  # 滑块并不是从0开始移动,有一个初始值
        a = offset / 4
        track = [a, a, a, a]
        return track

    def shake_mouse(self):
        """
        模拟人手释放鼠标抖动
        """
        ActionChains(self.driver).move_by_offset(xoffset=-2, yoffset=0).perform()
        ActionChains(self.driver).move_by_offset(xoffset=2, yoffset=0).perform()

    def operate_slider(self, track):
        """
        拖动滑块
        :param track: 运动轨迹
        """
        #  定位到拖动按钮
        slider_bt = self.driver.find_element(by=By.XPATH,value ='//*[@id="tcOperation"]/div[6]')
        # 点击拖动按钮不放
        ActionChains(self.driver).click_and_hold(slider_bt).perform()
        # 按正向轨迹移动
        for i in track:
            ActionChains(self.driver).move_by_offset(xoffset=i, yoffset=0).perform()
            time.sleep(random.random() / 100)  # 每移动一次随机停顿0-1/100秒之间骗过了极验,通过率很高
        time.sleep(random.random())
        # 按逆向轨迹移动
        back_tracks = [-1, -0.5, -1]
        for i in back_tracks:
            time.sleep(random.random() / 100)
            ActionChains(self.driver).move_by_offset(xoffset=i, yoffset=0).perform()
        # 模拟人手抖动
        self.shake_mouse()
        time.sleep(random.random())
        # 松开滑块按钮
        ActionChains(self.driver).release().perform()
        time.sleep(2)

    def login(self):
        '''
        实现主要的登陆逻辑
        '''
        self.index()
        distance = self.get_gap_offset()
        distance = int(distance/1.97)
        track = self.get_track(distance)
        self.operate_slider(track)

        result = self.proxy.har
        for entry in result['log']['entries']:
            if entry['request']['url'] == 'https://t.captcha.qq.com/cap_union_new_verify':
                print(entry['request']['url'],entry['response']['content'])
                print(entry['response']['content']['text'])
案例二:阿里225(playwright)
目标网站:aHR0cHM6Ly9wYXNzcG9ydC5kYW1haS5jbi9sb2dpbg==
1、前面的初始化流程
async with async_playwright() as p:
        browser = await p.chromium.launch(headless=False, args=['--start-maximized'])
	    context = await browser.new_context(viewport={"width": 1920, "height": 1080}, no_viewport=True)
	    context.set_default_timeout(8000)
	    page = await context.new_page()
	    await page.add_init_script(js)
	    print("打开网页~~~")
	    await page.goto('aHR0cHM6Ly9wYXNzcG9ydC5kYW1haS5jbi9sb2dpbg==')
	    await page.wait_for_timeout(1000)
	    page.on('response', on_response)
2、输入账号密码
 #这里需要注意这个iframe,前面的iframe和后面出滑块之后的iframe属于包含关系
 new_frame = page.frame_locator('iframe[id="alibaba-login-box"]')
 await page.wait_for_timeout(1000)
 await new_frame.locator('#fm-login-id').fill("正确的手机号码")
 await page.wait_for_timeout(1000)
 await new_frame.locator('#fm-login-password').fill("错误的密码")
 await page.wait_for_timeout(1000)
 await new_frame.get_by_role("button", name="登录").click()
 await page.wait_for_timeout(1000)
3、强制弹出滑块,并判断
 #这里为了让它出滑块要先输出错误的密码,然后一直click,直到出滑块为止
while True:
   try:
       new_frame2 = new_frame.frame_locator('iframe[id="baxia-dialog-content"]')
       move_tag = new_frame2.locator('xpath=//*[@id="nc_1_n1z"]')
       number = await move_tag.count()
       if number>=1:
           box = await move_tag.bounding_box()
           print("目前点击的位置", box)
           break
       else:
           print(f"没出滑块,重新点击")
           await page.wait_for_timeout(1000)
           await new_frame.get_by_role("button", name="登录").click()
   except:
       await new_frame.get_by_role("button", name="登录").click()
4、定位以及滑动
async def move_down(page,box):
    await page.mouse.move(box["x"] + box["width"] / 2, box["y"] + box["height"] / 2)
    await page.mouse.down()  # 按下鼠标
    await page.wait_for_timeout(1200)
    x = box["x"] + box["width"] / 2  # 这里获取到x坐标中心点位置
    move_distance = get_track_list(265)
    print("轨迹:",move_distance)
    for i in move_distance:
        x += i
        await page.mouse.move(x, box["y"])
    await page.mouse.up()
    await page.wait_for_timeout(500)
至此ali滑块的分析就结束了

当脚下的路走起来比以前轻松了,是不是该问自己是否在走下坡路了,我也不知道呢


 4849
4849


 被折叠的 条评论
为什么被折叠?
被折叠的 条评论
为什么被折叠?
 到【灌水乐园】发言


