


tp6使用rabbitmq
1.composer 安装amqplib扩展包
composer require php-amqplib/php-amqplib
2.config下面新建rabbitmq.php
<?php
return [
    'host'=>'127.0.0.1',
    'port'=>'5672',
    'user'=>'guest',
    'password'=>'guest',
    'vhost'=>'/',
    'exchange_name' => 'email_exchange',
    'queue_name' => 'email_queue',
    'route_key' => 'email_route',
    'consumer_tag' => 'consumer',
];
?>
3.创建生产者Producer.php
<?php

namespace app\controller;

use PhpAmqpLib\Connection\AMQPStreamConnection;
use PhpAmqpLib\Exchange\AMQPExchangeType;
use PhpAmqpLib\Message\AMQPMessage;

/**
 * RabbitMQ生产者类
 */
class Producer
{
    protected $connection;
    protected $channel;
    protected $mq_config;

    public function __construct()
    {
        //创建连接
        $this->mq_config = config('rabbitmq');

        $res = $this->connection = new AMQPStreamConnection(
            $this->mq_config['host'],
            $this->mq_config['port'],
            $this->mq_config['user'],
            $this->mq_config['password']
        );


        //创建通道
        $this->channel = $this->connection->channel();
    }

    /**
     * 向队列里发送消息
     * @param $data object 消息
     */
    public function send($data)
    {

        /**
         * 创建队列(Queue)
         * name: hello         // 队列名称
         * passive: false      // 如果设置true存在则返回OK,否则就报错。设置false存在返回OK,不存在则自动创建。
         * durable: true       // 是否持久化,设置false是存放到内存中的,RabbitMQ重启后会丢失;
         *                        设置true,则代表是一个持久化的队列,服务重启后也会存在,
         *                        因为服务会把持久化的queue存放到磁盘上当服务重启的时候,会重新加载之前被持久化的queue
         * exclusive: false    // 是否排他,指定该选项为true则队列只对当前连接有效,连接断开后自动删除。
         * auto_delete: false  // 是否自动删除,当最后一个消费者断开连接之后队列是否自动被删除。
         */
        $this->channel->queue_declare($this->mq_config['queue_name'], false, true, false, false);

        /**
         * 创建交换机(Exchange)
         * name: vckai_exchange// 交换机名称
         * type: direct        // 交换机类型,分别为direct/fanout/topic,参考另外文章的Exchange Type说明。
         * passive: false      // 如果设置true存在则返回OK,否则就报错。设置false存在返回OK,不存在则自动创建
         * durable: false      // 是否持久化,设置false是存放到内存中的,RabbitMQ重启后会丢失
         * auto_delete: false  // 是否自动删除,当最后一个消费者断开连接之后队列是否自动被删除
         */
        $this->channel->exchange_declare($this->mq_config['exchange_name'], AMQPExchangeType::DIRECT, false, true, false);
        //AMQPExchangeType如果没有的话 里面的其实是下面这4个 自己封装一下就行
        //const DIRECT = 'direct'; 精确匹配类型
        //const FANOUT = 'fanout'; 路由广播的形式
        //const TOPIC = 'topic';模式匹配
        //const HEADERS = 'headers';键值对匹配
        //绑定消息交换机和队列
        $this->channel->queue_bind($this->mq_config['queue_name'], $this->mq_config['exchange_name'], $this->mq_config['route_key']);

        //将要发送的数据转为JSON字符串
        $messageBody = json_encode($data,JSON_UNESCAPED_UNICODE);

        /**
         * 创建AMQP消息
         * delivery_mode 消息是否持久化
         * AMQPMessage::DELIVERY_MODE_NON_PERSISTENT  不持久化
         * AMQPMessage::DELIVERY_MODE_PERSISTENT      持久化
         */
        $message = new AMQPMessage($messageBody, [
            'content_type' => 'text/plain',
            'delivery_mode' => AMQPMessage::DELIVERY_MODE_PERSISTENT
        ]);

        /**
         * 发送消息
         * msg: $message            // AMQP消息内容
         * exchange: vckai_exchange // 交换机名称
         * routing_key: hello       // 路由key
         */
        $this->channel->basic_publish($message, $this->mq_config['exchange_name'], $this->mq_config['route_key']);

        //关闭连接
//        $this->stop();
    }

    /**
     * 关闭进程
     */
    public function stop()
    {
        $this->channel->close();
        $this->connection->close();
    }

    /**
     * 关闭进程
     */
    public function __destruct()
    {
        $this->channel->close();
        $this->connection->close();
    }

}
4.创建消费者Consumer.php
<?php
namespace app\controller;

use PhpAmqpLib\Connection\AMQPStreamConnection;
use PhpAmqpLib\Exchange\AMQPExchangeType;
use think\facade\Log;

/**
 * RabbitMQ消费者类
 */
class Consumer
{
    protected $connection;
    protected $channel;
    protected $mq_config;

    public function __construct()
    {
        //创建连接
        $this->mq_config = config('rabbitmq');
        $this->connection = new AMQPStreamConnection(
            $this->mq_config['host'],
            $this->mq_config['port'],
            $this->mq_config['user'],
            $this->mq_config['password']
        );

        //创建通道
        $this->channel = $this->connection->channel();
    }

    /**
     * 启动
     * nohup php index.php index/Message_Consume/start &
     */
    public function start(){

        // 设置消费者(Consumer)客户端同时只处理一条队列
        // 这样是告诉RabbitMQ,再同一时刻,不要发送超过1条消息给一个消费者(Consumer),直到它已经处理了上一条消息并且作出了响应。
        // 这样的设置,RabbitMQ就会把消息分发给下一个空闲的消费者(Consumer)。
        // 消费者端要把自动确认autoAck设置为false,basic_qos才有效。
        // $this->channel->basic_qos(0, 1, false);

        // 同样是创建队列和路由,以及绑定路由队列,注意要跟producer(生产者)的一致
        // 这里其实可以不用设置,但是为了防止队列没有被创建所以做的容错处理
        $this->channel->queue_declare($this->mq_config['queue_name'], false, true, false, false);
        $this->channel->exchange_declare($this->mq_config['exchange_name'],AMQPExchangeType::DIRECT, false, true, false);
        $this->channel->queue_bind($this->mq_config['queue_name'], $this->mq_config['exchange_name'], $this->mq_config['route_key']);

        /**
         * 启动队列消费者
         *
         * queue: queue_name            // 被消费的队列名称
         * consumer_tag: consumer_tag   // 消费者客户端身份标识,用于区分多个客户端
         * no_local: false              // 这个功能属于AMQP的标准,但是RabbitMQ并没有做实现
         * no_ack: true                 // 收到消息后,是否不需要回复确认即被认为被消费
         * exclusive: false             // 是否排他,即这个队列只能由一个消费者消费。适用于任务不允许进行并发处理的情况下
         * nowait: false                // 不返回执行结果,但是如果排他开启的话,则必须需要等待结果的,如果两个一起开就会报错
         * callback: $callback          // 回调逻辑处理函数
         */
        $this->channel->basic_consume(
            $this->mq_config['queue_name'],
            $this->mq_config['consumer_tag'],
            false,
            false,
            false,
            false,
            [$this, 'process_message']
        );

        register_shutdown_function([$this, 'shutdown'], $this->channel, $this->connection);

        while (count($this->channel->callbacks)){
            $this->channel->wait();
        }

    }

    /**
     * 消息处理(消费)的回调函数
     * @param $message
     */
    public function process_message($message){

        //消息处理逻辑
        echo $message->body . "\n";
        if($message->body !== 'quit'){

            $obj = json_decode($message->body);
            if(!isset($obj->id)){
                Log::write('错误数据:' . $message->body, 2);
            }else{

                try{

                    Log::write('数据:' . json_encode($message));

                }catch (\think\Exception $e){

                    Log::write($e->getMessage(), 2);
                    Log::write(json_encode($message, 2));

                }catch(\PDOException $pe){

                    Log::write($pe->getMessage(), 2);
                    Log::write(json_encode($message), 2);

                }
            }
        }

        //手动确认ack,确保消息已经处理
        $message->delivery_info['channel']->basic_ack($message->delivery_info['delivery_tag']);

        //发送带有字符串“quit”的消息以取消消费者
        if ($message->body === 'quit') {
            $message->delivery_info['channel']->basic_cancel($message->delivery_info['consumer_tag']);
        }

    }

    /**
     * 关闭进程
     * @param $channel object 通道进程
     * @param $connection object 连接进程
     */
    public function shutdown($channel, $connection){
        $channel->close();
        $connection->close();
    }

}
5.在command 下创建脚本文件Consumer.php
<?php
declare (strict_types = 1);
namespace app\command;
use think\console\Command;
use think\console\Input;
use think\console\input\Argument;
use think\console\input\Option;
use think\console\Output;
use \app\controller\Consumer as con; //引用消费者类
class Consumer extends Command
{
    protected function configure()
    {
        // 指令配置
        $this->setName('consumer')
            ->setDescription('the consumer command');
    }

    protected function execute(Input $input, Output $output)
    {
        $consumer=new con();
        $consumer->start();
        // 指令输出
        $output->writeln('consumer');
    }
}
6.console.php 文件添加指令
<?php
// +----------------------------------------------------------------------
// | 控制台配置
// +----------------------------------------------------------------------
return [
    // 指令定义
    'commands' => [
        'consumer' => 'app\command\Consumer',
    ],
];
7.在控制器里面模拟生产者生产消息RabbitMq.php
<?php


namespace app\controller;
use app\BaseController;
class RabbitMq extends BaseController
{
    private $rabbit_mq;
    /**
     * 生产消息
     */
    public function add()
    {
        $this->rabbit_mq = new Producer();
        //$params = $this->request->param();
        $params = 'time:'.date('Y-m-d H:i:s',time()). '我生产了一条消息';
        $this->rabbit_mq->send($params);
        echo 'success';
    }
}
?>
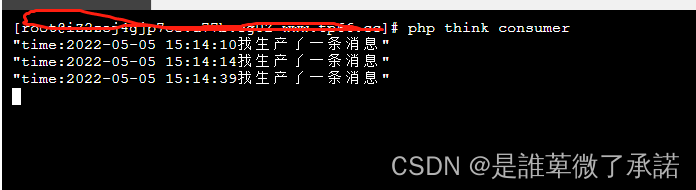
8.调用模拟 /RabbitMq/add 请求访问这个方法;没请求一次就会收到一条消息;我们接到消息就可以处理自己的业务了;


 522
522


 被折叠的 条评论
为什么被折叠?
被折叠的 条评论
为什么被折叠?
 到【灌水乐园】发言


