


Spring
文章目录
1.Spring简介
Spring官网:https://spring.io/
Spring下载:https://spring.io/projects/spring-framework#learn
Spring官网下载地址:https://repo.spring.io/release/org/springframework/spring/
官网的介绍:https://docs.spring.io/spring/docs/4.3.9.RELEASE/spring-framework-reference/htmlsingle/
【一句话描述:】
Spring是一个轻量级的控制反转【IOC】/ 依赖注入[DI]和面向切面【AOP】的(容器)框架。
◆目的:解决企业应用开发的复杂性
◆功能:使用基本的JavaBean代替EJB,并提供了更多的企业应用功能
◆范围:任何Java应用
◆益处:Spring处理基础架构,因此你可以专注于你的应用程序
- 使Java方法在数据库事务中执行,而不必处理事务API。
- 使本地Java方法成为HTTP端点,而无需处理Servlet API。
- 使本地Java方法成为消息处理程序,而无需处理JMS API。
- 使本地Java方法成为管理操作,而无需处理JMX API。
【spring组成:】

2.IOC/DI
【个人理解】
IOC–控制反转 (inversion of Control):它实质上是一种思想。而DI(依赖注入)则是实现这种思想的一种方式。
我们知道单独的一个对象是没办法完成复杂的业务的,实际上每一个完整的项目都需要至少成百上千的对象去互相合作。假设我们现在在写一个JavaWeb项目,X对象需要调用Y对象的方法,那就需要将Y对象new出来,这是传统的方法,而我们使用了spring之后,创建对象这个工作就由spring去做了,我们不需要管spring是怎么创建以及什么时候创建Y对象的,我们只需要告诉spring,我们需要一个Y对象,然后拿着是spring容器给我们的对象去用就行了。
控制反转----Ioc容器来控制对象的创建而不是程序主动的去创建Y,也就是说由容器来帮忙创建和 (将依赖对象需要的外部资源)注入依赖对象,即X被动的接受依赖对象Y。
传统应用程序是由我们在类内部主动创建依赖对象,IOC思想则让我们把创建和查找依赖对象的控制权交给容器
【一个简单例子】
我们随便写一个实体类,然后用IOC思想来创建这个实体类的对象
<1.导入jar包
<!-- https://mvnrepository.com/artifact/org.springframework/spring-webmvc -->
<dependency>
    <groupId>org.springframework</groupId>
    <artifactId>spring-webmvc</artifactId>
    <version>4.3.9.RELEASE</version>
</dependency>
<2.写一个实体类
注意:一定要有默认无参构造方法(后面会说明原因)
package priv.sehun.pojo;

public class Bxg {
    private String info;

    public Bxg() {
    }

    public Bxg(String info) {
        this.info = info;
    }

    public String getInfo() {
        return info;
    }

    public void setInfo(String info) {
        this.info = info;
    }

    @Override
    public String toString() {
        return "Bxg{" +
                "info='" + info + '\'' +
                '}';
    }
}
< 3.写spring的配置文件
按理你可以随便给它起名字,但是最好不要
大家默认起名applicationContext.xml或者beans.xml也行,见名知意
- bean就是一个java对象,由Spring管理和创建
- id就是给这个bean起一个名字
- class就是要实例化的类
<?xml version="1.0" encoding="UTF-8"?>
<beans xmlns="http://www.springframework.org/schema/beans"
       xmlns:xsi="http://www.w3.org/2001/XMLSchema-instance"
       xsi:schemaLocation="http://www.springframework.org/schema/beans
        http://www.springframework.org/schema/beans/spring-beans.xsd">

    <bean id="beanID" class="priv.sehun.pojo.Bxg">
        <property name="info" value="博君一笑"/>
    </bean>
    <bean id="beanBxg2" class="priv.sehun.pojo.Bxg">
        <property name="info" value="开心就好"/>
    </bean>

</beans>
<4.测试类
package priv.sehun.pojo;

import org.junit.Test;
import org.springframework.context.ApplicationContext;
import org.springframework.context.support.ClassPathXmlApplicationContext;

public class BxgText {
    @Test
    public  void OneTest(){
        //解析beans.xml配置文件
        ApplicationContext context = new ClassPathXmlApplicationContext("beans.xml");
        //通过bean得到所需对象对象
        Bxg bean1 = (Bxg) context.getBean("beanBxg1");
        System.out.println(bean1.toString());
        Bxg bean2 = (Bxg)context.getBean("beanBxg2");
        System.out.println(bean2.toString());


    }
}
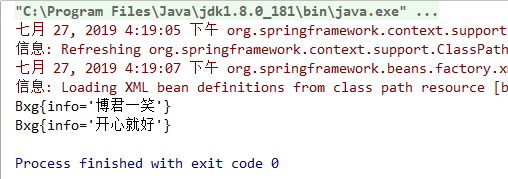
<5.运行结果
【IOC创建对象的方式】
我们一般通过无参或者有参构造来创建对象
那么spring是怎么创建对象的呢?
还是通过例子来说:
<1.实体类
package priv.sehun.pojo;

public class User {
    private String name;
    private int age;
    private String sex;

    public User() {
    }

    public User(String name) {
        this.name = name;
    }

    public User(String name, int age) {
        this.name = name;
        this.age = age;
    }

    public User(String name, int age, String sex) {
        this.name = name;
        this.age = age;
        this.sex = sex;
    }

    public String getName() {
        return name;
    }

    public void setName(String name) {
        this.name = name;
    }

    public int getAge() {
        return age;
    }

    public void setAge(int age) {
        this.age = age;
    }

    public String getSex() {
        return sex;
    }

    public void setSex(String sex) {
        this.sex = sex;
    }

    @Override
    public String toString() {
        return "User{" +
                "name='" + name + '\'' +
                ", age=" + age +
                ", sex='" + sex + '\'' +
                '}';
    }
}
<2.写spring配置文件
<?xml version="1.0" encoding="UTF-8"?>
<beans xmlns="http://www.springframework.org/schema/beans"
       xmlns:xsi="http://www.w3.org/2001/XMLSchema-instance"
       xsi:schemaLocation="http://www.springframework.org/schema/beans
        http://www.springframework.org/schema/beans/spring-beans.xsd">

    <!--调用有参构造用成员变量名赋值-->
    <bean id="userbean1" class="priv.sehun.pojo.User">
        <constructor-arg name="name" value="爱丽丝"/>
    </bean>
    <bean id="userbean2" class="priv.sehun.pojo.User">
        <constructor-arg name="name" value="甜甜"/>
        <constructor-arg name="age" value="22"/>
        <constructor-arg name="sex" value="酷盖儿"/>
    </bean>

    <!--使用构造器的参数下标进行赋值-->
    <bean id="userbean3" class="priv.sehun.pojo.User">
        <constructor-arg index="0" value="kuangshen"/>
        <constructor-arg index="1" value="18"/>
    </bean>

    <!--
    通过set方法赋值,set+【name值】(name值首字母大写)***即setAge(),
    如果你将实体类里的setAge()方法换个名字,就会因为找不到而报错
    -->
    <bean id="userbean4" class="priv.sehun.pojo.User">
        <property name="age" value="28"/>
    </bean>


    <!--通过构造器参数类型进行赋值-->

    <bean id="userbean5" class="priv.sehun.pojo.User">

        <constructor-arg type="java.lang.String" value="赞赞"/>
        <constructor-arg type="int" value="28"/>
        <constructor-arg type="java.lang.String" value="男"/>

    </bean>

</beans>
< 3.测试类
package priv.sehun.pojo;

import org.junit.Test;
import org.springframework.context.support.ClassPathXmlApplicationContext;

public class UserTest {
    @Test
    public void test1(){
        ClassPathXmlApplicationContext context = new ClassPathXmlApplicationContext("beans.xml");
        Object userbean = context.getBean("userbean1");
        System.out.println(userbean);
    }

    @Test
    public void test2(){
        ClassPathXmlApplicationContext context = new ClassPathXmlApplicationContext("beans.xml");
        Object userbean = context.getBean("userbean2");
        System.out.println(userbean);
    }
    @Test
    public void test3(){
        ClassPathXmlApplicationContext context = new ClassPathXmlApplicationContext("beans.xml");
        Object userbean = context.getBean("userbean3");
        System.out.println(userbean);
    }
    @Test
    public void test4(){
        ClassPathXmlApplicationContext context = new ClassPathXmlApplicationContext("beans.xml");
        Object userbean = context.getBean("userbean4");
        System.out.println(userbean);
    }
    @Test
    public void test5(){
        ClassPathXmlApplicationContext context = new ClassPathXmlApplicationContext("beans.xml");
        Object userbean = context.getBean("userbean5");
        System.out.println(userbean);
    }
}
<5.运行结果
test1:
User{name='爱丽丝', age=0, sex='null'}
test2:
User{name='甜甜', age=22, sex='酷盖儿'}
test3:
User{name='果果', age=18, sex='null'}
test4:
User{name='null', age=28, sex='null'}
test5:
User{name='赞赞', age=28, sex='男'}
小结:
-
IOC默认会走无参构造,所以实体类必须要有无参构造
-
IOC通过有参构造创建对象有三种方式:
- 通过下标
- 通过参数名 【推荐】
- 通过参数类型
-
在测试类解析配置文件时,即使你只调用userbean5,也会走之前的userbean1~4
【DI依赖注入】
<1. 常量注入
<!--普通字段-->
<property name="userbean" value="小小"/>
<2. Bean注入
<!--引用其他bean使用ref-->
<property name="beanid" ref="userbean"/>
< 3. 数组注入
<!--数组的注入-->
<property name="books">
    <array>
        <value>西游记</value>
        <value>水浒传</value>
        <value>红楼梦</value>
        <value>三国演义</value>
    </array>
</property>
<4. List注入
<!--List注入-->
<property name="hobbys">
    <list>
        <value>画画</value>
        <value>游戏</value>
        <value>电影</value>
    </list>
</property>
<5.Map注入
<!--Map的注入-->
<property name="name">
    <map>
        <entry key="a" value="01111001"/>
        <entry key="b" value="01111007"/>
        <entry key="c" value="01111014"/>
    </map>
</property>
<6.Set注入
<!--Set注入-->
<property name="dress">
    <set>
        <value>洛丽塔</value>
        <value>汉服</value>
        <value>唐山装</value>
        <value>现代装</value>
    </set>
</property>
<7. 空值注入
<!--Null空值注入-->
<property name="none">
    <null/>
</property>
<8. Properties注入
props标签
键使用key
值,在标签中间;
<!--Properties注入-->
<property name="info">
    <props>
        <prop key="学号">12</prop>
        <prop key="性别">女</prop>
        <prop key="姓名">爱丽丝</prop>
        <prop key="年级">大二</prop>
    </props>
</property>
拓展1:p命名空间注入
【注意点:需要导入对应的约束文件】
属性的注入
<!--p:property属性,命名空间注入-->
<bean id="user1" class="com.kuang.pojo.User" p:name="a" p:age="18"/>
拓展2:c命名空间注入
构造器的注入
<!--c:constructor构造器:命名空间注入-->
<bean id="user2" class="com.kuang.pojo.User" c:name="b" c:age="18"/>


 7633
7633


 被折叠的 条评论
为什么被折叠?
被折叠的 条评论
为什么被折叠?
 到【灌水乐园】发言


