


以前开发 Linux 服务器的程序,会有通过 samba 进行文件保存,或者先在 windows 上编译测试,然后传到 Linux 服务器重新编译测试。这些都不太直接,而且调试起来比较困难。现在很多 IDE 都支持直接编写 LINUX 上的程序了,本文介绍 VSCode 如何完成这个工作。
使用 Visual Studio Code 开发 LINUX 上 C++ 应用 - 腾讯云开发者社区-腾讯云 (tencent.com)
- 在 Win10 办公 PC 上下载安装 Visual Studio Code,我使用的版本是:1.45.1

- 安装插件 Remote - SSH,完成后左边工具栏就会有一个“远程资源管理器”的按钮
- 配置连接到 LINUX 服务器上,点击“远程资源管理器”,然后选 SSH TARGERTS 的“+”号,输入一行 ssh 命令,就会打开一个登录配置文件,你可以自己编辑多个需要登录的主机
- 选择已经配置好的服务器右边的“打开”按钮,会连接到远程服务器上,并且自动在LINUX服务器上安装一些 VS CODE 所需要的软件,这需要你的远程服务器可以连接到公网上
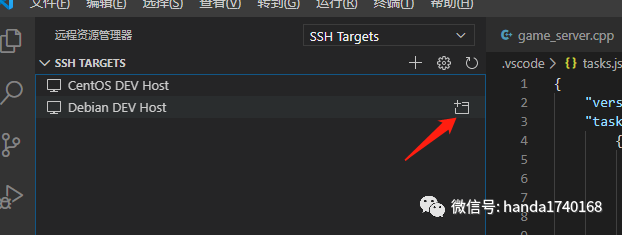
- 安装完成后你就可以打开一个远程的服务器目录了,这个目录就是你的工程主目录

- 有时候因为你的服务器限制了文件通知数量,vscode 会提示了使用 LINUX 命令修改这个参数,以便 IDE 能更好的工作,只需要参考官方说明即可:https://code.visualstudio.com/docs/setup/linux#_visual-studio-code-is-unable-to-watch-for-file-changes-in-this-large-workspace-error-enospc
- 在远程服务器上安装 C++ 相关插件:
- C/C++
- C++Intellisense
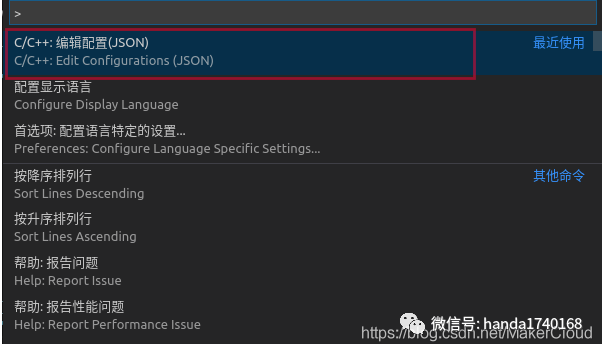
- 在 vscode 中配置或添加头文件路径
在vscode中按Ctrl+Shift+P 输入configuration 在c_cpp_properties.json中includePath字段中添加待添加的SDK或者库的头文件路径 例:"/usr/local/xxx/include/"
{

"configurations": [

{

"name": "Linux",

"includePath": [

"${workspaceFolder}/thirdparty/**",

"${workspaceFolder}/src/**"

],

"defines": [],

"compilerPath": "/usr/bin/g++",

"cStandard": "gnu11",

"cppStandard": "gnu++14",

"intelliSenseMode": "gcc-x64"

}

],

"version": 4

}
复制
{

"version": "2.0.0",

"tasks": [

{

"type": "shell",

"label": "make demo game_server",

"command": "/usr/bin/make",

"args": [],

"options": {

"cwd": "${workspaceFolder}/demos/demo/server"

},

"problemMatcher":{

"base": "$gcc",

"fileLocation":  [

"relative",

"${fileDirname}"

]


},

"group": {

"kind": "build",

"isDefault": true

}

},

{

"type": "shell",

"label": "clean demo game_server",

"command": "/usr/bin/make",

"args": ["clean"],

"options": {

"cwd": "${workspaceFolder}/demos/demo/server"

},

"problemMatcher":{

"base": "$gcc",

"fileLocation":  [

"relative",

"${fileDirname}"

]


},

"group": {

"kind": "build",

"isDefault": true

}

}

]

}
复制
{

// 使用 IntelliSense 了解相关属性。

// 悬停以查看现有属性的描述。

// 欲了解更多信息,请访问: https://go.microsoft.com/fwlink/?linkid=830387

"version": "0.2.0",

"configurations": [

{

"name": "调试 demo game_server",

"type": "cppdbg",

"request": "launch",

"program": "
"args": [],

"stopAtEntry": false,

"cwd": "${workspaceFolder}/demos/demo/server/bin",

"environment": [],

"externalConsole": false,

"MIMode": "gdb",

"setupCommands": [

{

"description": "为 gdb 启用整齐打印",

"text": "-enable-pretty-printing",

"ignoreFailures": true

}

],

"preLaunchTask": "make demo game_server",

"miDebuggerPath": "/usr/bin/gdb"

}

]

}
复制
- 安装代码自动格式化器 clang-format。其实 VSCODE 自带了代码格式化器,但是只有一种风格,如果想用 Google 风格,就要自己安装了
- 在服务器上安装 clang-format: sudo apt install clang-format
- 在 VS Code 上安装插件:Clang-Format
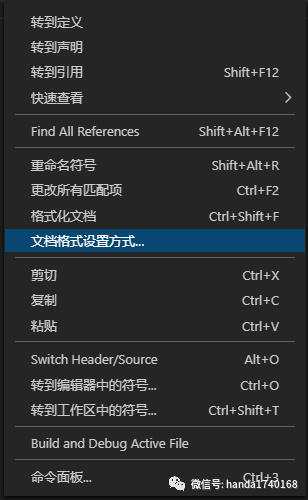
- 在打开的代码页面,按鼠标右键,选择“文档格式化设置方式”,然后选择 CLang-Format
- 按 Ctrl+Shift+F 就可以格式化文档了
- 如果要设置格式化的风格,在 Clang-Format 插件菜单点“齿轮”,选择“扩展设置”,然后在 Clang-format: FallbackStyle 格子里面输入 Google 或者其他:LLVM/Chromium/Mozilla/WebKit
- 如果之前使用 Eclipse 的话,为了使用旧的快捷方式,可以下载插件:
- Eclipse Keymap: 常用的 Ctrl+o Ctrl+Shift+r 都可以用
- Header source switch:默认的 Ctrl+tab 是切换内部编辑器窗口,安装了这个插件后可以修改默认快捷键,让 Ctrl+Tab 和这个插件的快捷键 Alt+o 互换
- 如果希望使用漂亮的 JetBrains 字体,记得要设置一下“连体字”设置,这样!=、==和→都会变得很好看。
- 下载字体 https://www.jetbrains.com/lp/mono/
- Open the VSCode Settings (Code -> Preferences -> Settings), then add to the end of the User Settings JSON file:
"editor.fontFamily": "JetBrains Mono",

"editor.fontSize": 13,

"editor.fontLigatures": true


 3717
3717


 被折叠的 条评论
为什么被折叠?
被折叠的 条评论
为什么被折叠?
 到【灌水乐园】发言


